Advertisement
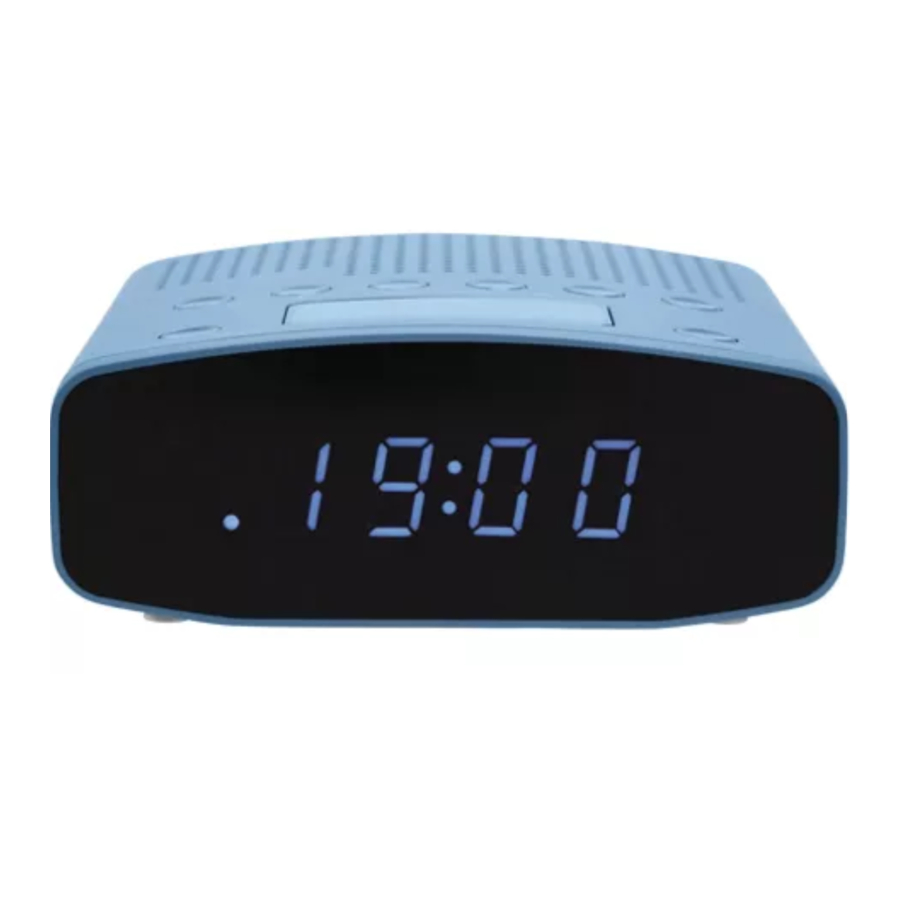
CONTROLS AND CONNECTIONS

- Standby/Mode button
- Scan down button
- Scan up button
- Sleep button
- Snooze/Display dimmer button
- Preset button
- Volume down button
- Alarm button
- Volume up button
- Buzzer alarm mode indicator
- Radio alarm mode indicator
- Time/Frequency display
- Sleep indicator

- FM aerial
- DC IN jack
INTRODUCTION
The CR1401 is a digital alarm clock with FM radio. The clock/radio includes features such as snooze, sleep and a display dimmer to set the display brightness.
Backup batteries may be fitted to retain time and alarm settings through a power cut.
PRELIMINARIES
UNPACKING
Carefully unpack the unit. If it is damaged, please return it to your nearest Tesco store for replacement. Remember to take your purchase receipt with you.
Retain the User Handbook. If you pass the unit on to a third party, make sure you pass on the handbook.
We suggest you retain the packaging. If you dispose of it, do so having regard to any recycling regulations in your area.
CONTENTS
The carton should contain:
- The CR1401 clock radio
- AC adapter
- Operating Manual
If any items are missing or damaged, contact your nearest TESCO store for a replacement. Have your receipt ready when you call. Retain the packaging. If you dispose of it, do so having regard to any recycling regulations in your area.
LOCATION
Place the unit on dry stable surface away from heat and damp and where it is unlikely to fall or be knocked over.
BACKUP BATTERIES
You can fit batteries (not supplied) to your clock/radio to retain clock and alarm settings in the event of a power cut. If the radio loses the time setting during a power cut, the battery may need to be replaced.
Fitting/replacing a battery
- Press the catch on the battery cover.
![]()
- While holding the catch, lift the cover off the battery compartment.
- Fit or replace two AAA batteries, observing polarity as shown.
![]()
- Re-fit the cover.


Battery disposal
Dispose of used batteries with regard to the recycling regulations in your area. Do NOT short circuit batteries or throw them into water, the general rubbish or in a fire.
Weak batteries can leak and damage the unit. Replace them in good time!
GETTING STARTED
UNPACKING
Carefully unpack the unit. If it is damaged, please return it to your nearest Tesco store for replacement. Remember to take your purchase receipt with you.
Retain the User Handbook. If you pass the unit on to a third party make sure you pass on the handbook.
We suggest you retain the packaging. If you dispose of it, do so having regard to any recycling regulations in your area.
CONTENTS
The carton should contain:
- The CR1401 clock radio
- AC adapter
- Operating Manual
If any items are missing or damaged, contact your nearest TESCO store for a replacement. Have your receipt ready when you call.
LOCATION
Place the unit on dry stable surface away from heat and damp and where it is unlikely to fall or be knocked over.
CONNECTING POWER
Before connecting the power, check that the mains voltage on the rating plate on the AC adapter is the same as the voltage in your area.
- Connect the cable from the AC adapter to the DC IN jack on the back panel.
- Plug the AC adapter into a mains outlet and switch it on.
The unit is now ready for use.
SETTING THE CLOCK
The clock is set manually when set to Standby.
The clock displays the time in 24 hour format (for example, 2 a.m. is displayed as 2:00, 2 p.m. is displayed as 14:00.
When setting the time or alarm, ensure that you are setting times in this format.
Setting the time
- Press and hold the PRESET button until the
- Release the PRESET button.
- Press the SCAN - button repeatedly to set the hour digits to the correct time.
- Press the SCAN + button repeatedly to set the minutes digits to the correct time.
- Press the PRESET button to save the settings and exit clock setting.
The clock is now set.
NOTE: If you prefer, you can hold down the SCAN- or SCAN+ button when setting the time. The hour or minute setting will automatically change.
OPERATION
USING THE RADIO
If a backup battery is fitted, the clock and alarm settings will be retained in the event of a power cut.
FM aerial
Before using your clock radio for FM reception, unwrap and fully extend the aerial wire. You may need to adjust the position of the aerial wire for maximum signal strength.
To switch the radio on
- Press the STANDBY/MODE button.
The radio will switch on and the tuning frequency will be displayed.
Changing display mode
- While the radio is playing, press the STANDBY/MODE button.
The radio will switch to display the time.
- Press the STANDBY/MODE button again to return to frequency display.
To switch the radio off
- Press and hold the STANDBY/MODE button.
The radio will switch off and the time will be displayed.
Display brightness
• Press the SNOOZE/DIMMER button repeatedly to change the display brightness between dim and bright.
Auto-tuning to a station
- Press and hold the SCAN+ or SCAN- button to search up or down the band for a station.
Tuning will stop when the next station is reached and the station will play. Adjust the aerial wire for the clearest reception.
Manually tuning to a station
• Press the SCAN+ or SCAN- button briefly to step up or down the band in 0.05MHz steps.
Storing radio presets
You can store up to 20 of your favourite stations for quick recall.
- Tune to the station you want to store.
- Press and hold the PRESET button.
The display will flash 'P01' (Preset 01).
- Press the SCAN+ or SCAN- button to choose the preset number you want to save.
- Press the PRESET button to store this preset.
Recalling radio presets
- Press the PRESET button repeatedly to step through the presets.
To set the volume
- Turn the VOLUME+ or VOLUME- button to increase or decrease the volume setting.
The volume setting will be displayed on a scale of 0 to 15.
USING THE ALARM
Setting the alarm time
- Press and hold the ALARM button.
The time display will flash.
- Release the ALARM button.
- Press the SCAN - button repeatedly to set the hour digits to the correct time.
- Press the SCAN + button repeatedly to set the minutes digits to the correct time.
- Press the ALARM button to save the time setting.
'bb' will flash on the display (buzzer alarm mode).
- Press the SCAN + or SCAN - button repeatedly to switch between buzzer alarm mode (bb is displayed) and radio alarm mode (the frequency is displayed).
- If you chose radio mode, the alarm will sound with radio at the frequency displayed. You can also press the PRESET button repeatedly to choose a preset station for the radio alarm.
- Press the ALARM button to save the alarm settings and exit.
Setting the alarm to wake you
- Press the ALARM button repeatedly to switch the alarm on or off.
The alarm indicator will light when the alarm is set on.
If you have set the alarm to wake you by radio or buzzer, switch on the radio and check that the volume is set to a level that will wake you.
When the alarm sounds
The radio will play or the buzzer will sound and the alarm indicator will flash. The alarm will sound for 60 minutes.
- Press the ALARM button to switch the alarm off or press the SNOOZE button to set snooze mode.
If Snooze mode is set, the alarm indicator will continue to flash and the alarm will sound again after a 9 minute period.
SLEEP MODE
When listening to the radio, you can select Sleep mode to play for a set period of time while you are going to sleep.
Setting sleep mode
- Press the Sleep button repeatedly to choose your preferred sleep time in the range 15-90 minutes.
The radio will switch off automatically after playing for the sleep time you set.
To cancel sleep mode
- Press the Sleep button repeatedly until the sleep time is set to off.
CARE AND MAINTENANCE
All care and cleaning operations should be carried out with the unit unplugged from the mains power.
The surface of the unit can be cleaned with a soft, dry cloth. Never use abrasives, abrasive cloths or chemical solvents.
SPECIFICATIONS
| Power supply: | 100-240 V~, 50/60 Hz |
| Power consumption | 1.4 W |
| Backup battery | 3V  (2 x AAA) (2 x AAA) |
| Frequency range (FM): | 87.5-108 MHz |
| Weight: | 210 g |
Class II construction double insulated.
This product must not be connected to earth.

Tesco Stores Ltd, Delamare Road, Cheshunt, Herts, EN8 9SL

Documents / ResourcesDownload manual
Here you can download full pdf version of manual, it may contain additional safety instructions, warranty information, FCC rules, etc.
Advertisement


Need help?
Do you have a question about the CR1401 and is the answer not in the manual?
Questions and answers