Advertisement
Quick Links
Setting Up the Pi Zero Wireless Pan-Tilt
Camera
Introduction
This tutorial will show you how to assemble, program, and access the
Raspberry Pi Zero Wireless Pan-Tilt Camera.
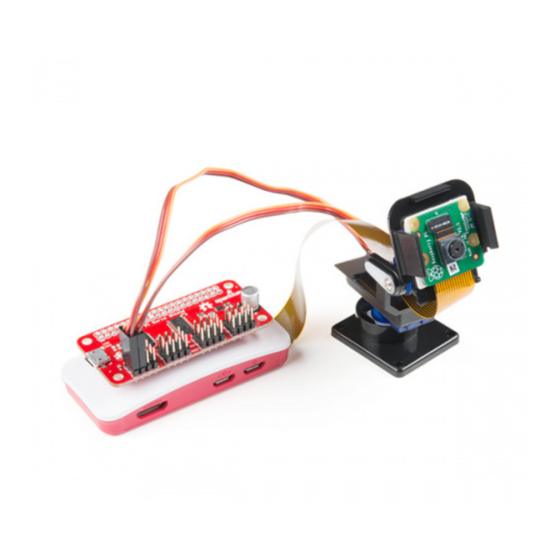
SparkFun Raspberry Pi Zero W Camera Kit
KIT-1432 9
Required Materials
You'll need a microSD card, a sufficient power supply, and a micro-B USB
Cable. We do not recommend the pre-installed NOOBS card, as it may not
include a recent enough version of the Pi operating system to support the
Pi Zero W.
microSD Card with Adapter -
16GB (Class 10)
COM- 13833
USB micro-B Cable - 6 Foot
CAB-10215
Page 1 of 21
Advertisement

Subscribe to Our Youtube Channel
Related Manuals for sparkfun KIT-1432

Summary of Contents for sparkfun KIT-1432
- Page 1 Introduction This tutorial will show you how to assemble, program, and access the Raspberry Pi Zero Wireless Pan-Tilt Camera. SparkFun Raspberry Pi Zero W Camera Kit KIT-1432 9 Required Materials You’ll need a microSD card, a sufficient power supply, and a micro-B USB Cable.
-
Page 2: Required Tools
Page 2 of 21 Wall Adapter Power Supply - 5.1V DC 2.5A (USB Micro-B) TOL- 13831 Required Tools You’ll need a few tools to assemble this kit: just a standard soldering iron, solder, a small screwdriver, and a pair of side cutters. Soldering Iron - 30W (US, Flush Cutters - Hakko 110V) - Page 3 Page 3 of 21 How to Solder: Through- Hobby Servo Tutorial Hole Soldering Servos are motors that allow you to This tutorial covers everything you accurately control the rotation of the need to know about through-hole output shaft, opening up all kinds of soldering.
- Page 4 Page 4 of 21 This is another long-ish process, requiring several minutes to complete. Once complete, the window will display a “Flash Complete!” message. By default, Etcher “ejects” the card after it has created the image, so you’ll need to pull it out and reinsert it to get your computer to reload the disk. Edit the “config.txt”...
-
Page 5: Hardware Assembly
Page 5 of 21 The contents of the file can be quite simple. Most likely, you can get away with something that looks like this: network={ ssid="YOUR_SSID" psk="YOUR_PASSWORD" key_mgmt=WPA-PSK Once added, modify the network ID and password for your WiFi network. Then save the file as “wpa_supplicant.conf”... - Page 6 Page 6 of 21 Here’s the family portrait of the stuff that comes in the kit. You won’t be needing the servo horns that come packaged with the servo motors, just the ones that come packaged separately. Start by identifying the servo horn with two long arms and two short arms. You’ll need to clip off the long arms, as shown below.
- Page 7 Page 7 of 21 Find the two pieces pictured below that will sandwich the first servo. Note the orientation of the servo in these pieces. Here’s the sandwiched servo. Again, note the orientation for proper assembly. Here, you can see where the screws identified a couple of steps ago fit into our servo sandwich.
- Page 8 Page 8 of 21 Find the two longer screws that came with the horn kit in the set. There will likely be only two of these, and you need both, so don’t lose one! You’ll now need the single arm servo horn, as shown in the image below on the left.
- Page 9 Page 9 of 21 Here’s a picture of the two pieces assembled to one another. Now, find the longest machine screws in the baggie, as shown below. Once again, you’ll find that there are more of these than you need. Thread these screws through the stand off wings on the servo motor and into the last piece of the mechanism.
- Page 10 Page 10 of 21 You may need to assemble and disassemble these two parts a couple of times to find the right rotational position of the servo motor so that the tilting portion has its full range of motion. Here’s an image of the two bits put together.
- Page 11 Page 11 of 21 My favorite trick for this type of situation is to solder down one pin, then melt the solder on that pin with the iron held in my right hand and use my left hand to adjust the header until it sits flat as shown below. Make sure that you are soldering with the header’s shorter side and the longer pins are on the component side.
- Page 12 Page 12 of 21 Next, attach the flex cable to the camera module. Take note of the copper “fingers” on the end of the cable. The side with the fingers on it should be facing the camera module circuit board. See the image below. Thread the flex cable through the pan-tilt mechanism as shown below, then press the back of the camera board against the double stick tape to adhere it to the pan-tilt mechanism.
- Page 13 Page 13 of 21 Connect the Servo Motors to the Pi Servo Hat The servo motors need to be connected to channels 0 and 1 on the Pi Servo Hat. Connect the “pan” servo (the one on the bottom) to channel 0 and the “tilt”...
- Page 14 Page 14 of 21 Using a sufficient 5V wall adapter, we can power the Pi Zero W. Plug the wall adapter into a wall outlet for power. Then connecting the micro-b from the power supply to the Pi Zero W’s micro-b connector labeled as “PWR IN.”...
- Page 15 Page 15 of 21 Using a Mac OS, you’ll need to open a terminal window. To figure out which port the Pi has connected to, type this command: ls /dev/cu.usbserial* This will return a list of USB-Serial converter ports on the system. Take note of the devices on the list, then unplug the Pi and see which port on the list disappears.
- Page 16 Page 16 of 21 sudo raspiconfig If you’re curious, the “sudo” portion of the command tells the OS to run the command as a superuser – basically, a user with full system permissions. This is the menu that you’ll then be presented with: From here you can make several changes.
- Page 17 Page 17 of 21 Hit enter to leave this screen. You’ll be back at the main menu. Return to the “Interfacing Options” menu again and repeat the process two more times, once for the “I2C” option and once for the “SSH” option. This concludes the work you need to do with the raspi-config utility.
- Page 18 Page 18 of 21 git clone https://github.com/silvanmelchior/RPi_Cam_Web_Interf ace.git cd RPi_Cam_Web_Interface chmod u+x *.sh ./install.sh The first command fetches the software from GitHub. You don’t need a GitHub account for this to work. However, if you enter the command or URL wrong, may ask for a username.
- Page 19 Page 19 of 21 There’s lots of information here but we’re only concerned with one small chunk: the “inet addr” entry in the “wlan0” section. In the example image above, that value is 10.8.252.217. This is the IP address of your camera. Open up a web browser and type in that number plus “/html”, for the web address.
- Page 20 Page 20 of 21 Next, we need to create a system pipe in order to send commands to the interface software that controls the pan-tilt functionality. A pipe is like a file, only it has no static contents. Only contents defined at run time by the program will control the motors.
- Page 21 • SparkFun Pan/Tilt Example Code GitHub Repository - Demo code used in the Setting Up the Pi Zero Wireless Pan-Tilt Camera tutorial. • SparkFun Product Showcase: Pi Zero W Pan-Tilt Camera Kit Demo • Shawn’s Pan/Tilt Time Lapse Demo Code - Python demo code that was used for SparkFun’s product showcase...
Need help?
Do you have a question about the KIT-1432 and is the answer not in the manual?
Questions and answers