
Related Manuals for Whirlpool AWO/D 6528 WP


Summary of Contents for Whirlpool AWO/D 6528 WP
-
Page 1: Table Of Contents
CONTENTS DEFINITION OF USE BEFORE USING THE WASHING MACHINE PRECAUTIONS AND GENERAL RECOMMENDATIONS DESCRIPTION OF THE WASHING MACHINE DOOR CHILD SAFETY BEFORE THE FIRST WASH CYCLE PREPARATION OF THE WASHING DETERGENTS AND ADDITIVES REMOVING THE FILTER/DRAINING RESIDUAL WATER CARE AND MAINTENANCE TROUBLESHOOTING GUIDE AFTER-SALES SERVICE ACCESSORIES... -
Page 2: Electrical Connection
DEFINITION OF USE This washing machine is exclusively destined to wash machine washable laundry in quantities which are usual for private households. • Observe the instructions given in these Instructions for Use and the Programme Chart when using the washing machine. BEFORE USING THE WASHING MACHINE 1.Removing the packaging and inspection •... -
Page 3: Safety Instructions
PRECAUTIONS AND GENERAL RECOMMENDATIONS 1.Safety instructions • The washing machine is appropriate for indoor use only. • Do not store flammable fluids near the appliance. • If you want to place a dryer on top of your washing machine, first contact our After-Sales Service or your specialist dealer to verify if this is possible. -
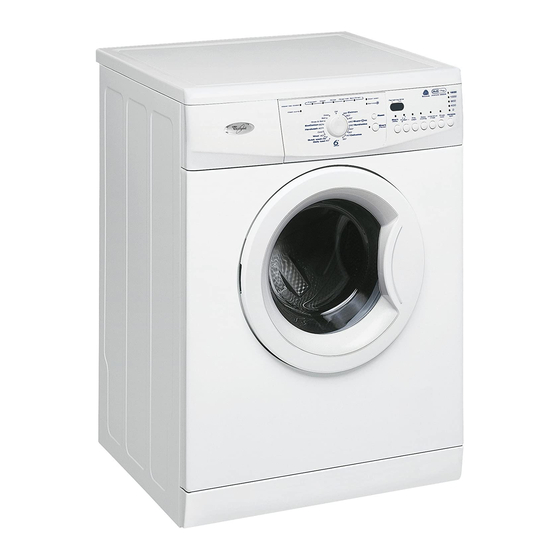
Page 4: Description Of The Washing Machine
DESCRIPTION OF THE WASHING MACHINE 1. Worktop 2. Control panel 3. Detergent dispenser 4. Service plate (inside the door) 5. Door 6. Child safety device (if provided, inside the door) 7. Pump access behind plinth or cover (depending on the model) 8. -
Page 5: Preparation Of The Washing
PREPARATION OF THE WASHING 1.Sort the laundry according to... • Type of fabric / care label symbol Cottons, mixed fibres, easy care/synthetics, wool, handwash items. • Colour Separate coloured and white items. Wash new coloured articles separately. • Loading Wash items of different sizes in the same load to improve washing efficiency and distribution in the drum. -
Page 6: Where To Put Detergent And Additives
Where to put detergent and additives The detergent drawer has three chambers (fig. “A”). Prewash Chamber • Detergent for the prewash Main Wash Chamber • Detergent for the main wash • Stain remover • Water softener Softener Chamber • Fabric softener •... -
Page 7: Removing The Filter/Draining Residual Water
REMOVING THE FILTER/DRAINING RESIDUAL WATER We recommend that you check and clean the filter regularly, at least two or three times a year. Especially: • If the appliance is not draining properly or if it fails to perform spin cycles. •... -
Page 8: Care And Maintenance
CARE AND MAINTENANCE Appliance exterior and control panel • Can be washed down with a soft, damp cloth. • A little neutral detergent (non abrasive) can also be used. • Dry with a soft cloth. Appliance interior • After each washing, leave the door open for some time to allow the inside of the appliance to dry. - Page 9 Water supply hose(s) If a supply hose shows a damage, replace it by a new hose of the same type, available through our After-Sales Service or your specialist dealer. If your supply hose has a transparent hose coating (fig. “C”), periodically check the colour of the transparent coating.
-
Page 10: Troubleshooting Guide
TROUBLESHOOTING GUIDE Your washing machine is equipped with various automatic safety functions. These enable faults to be detected in good time and the safety system can react appropriately. These faults are frequently so minor that they can be removed within a few minutes. Problem Appliance does not start, •... -
Page 11: Description Of Red Indications
Description of red indications Red indication Red indication lights up (if fitted on your (if fitted on your machine) “Water tap closed” “Clean pump” on display machine) Appliance has no or insufficient water supply. The “Start/Pause” light flashes. Check whether: •... - Page 12 Red indication Indication on lights up time display (if fitted on your (if fitted on your machine) machine) from “F02” to “F35” (except “F09”) from “F40” to “F43” “F09” “FA” “Service” “Fod” Description Causes Solutions “Electrical module fault” Select and start the “Drain” programme or push the “Reset”...
-
Page 13: After-Sales Service
AFTER-SALES SERVICE Before contacting After-Sales Service: 1. Try to remedy the problem yourself (see “Troubleshooting Guide”). 2. Restart the programme to check whether the problem has solved itself. 3. If the washing machine continues to function incorrectly, call our After-Sales Service. ACCESSORIES For some models, you can obtain via our After- Sales Service or your specialist dealer:... -
Page 14: Electrical Connection
ELECTRICAL CONNECTION For Great Britain only Warning - this appliance must be earthed Fuse replacement If the mains lead of this appliance is fitted with a BS 1363A 13amp fused plug, to change a fuse in this type of plug use an A.S.T.A. approved fuse to BS 1362 type and proceed as follows: 1.
Need help?
Do you have a question about the AWO/D 6528 WP and is the answer not in the manual?
Questions and answers