Table of Contents
Advertisement
Quick Links
Advertisement
Table of Contents

Related Manuals for Royal Range of California RON-36

Summary of Contents for Royal Range of California RON-36
- Page 1 OWNERS MANUAL For Outdoor Use Only Installation, Operation, Maintenance Instructions And Parts List Models: RON-36, RON-27, RON-24 Royal Range of California, Inc. 3245 Corridor Drive, Eastvale, CA 91752 Phone: (951) 360-1600 Fax: (951) 360-7500...
-
Page 2: Table Of Contents
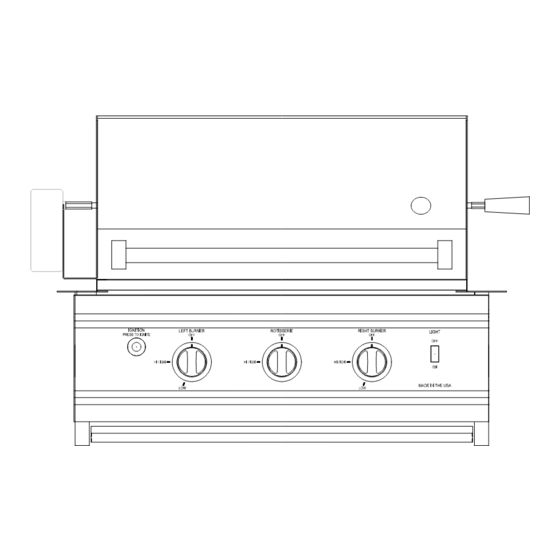
Contents Page For Your Safety Safety Rules Gas Connection LP Tank Requirement Installation Location Clearances Electrical Burner Adjustment Low Flame Setting Lighting Instructions Operation Cleaning and Maintenance Parts Removal and Replacement Trouble Shooting Exploded View – Parts Identification 19, 20 Message to the Proud Owner Congratulations on owning the high quality, high performance grill. -
Page 3: For Your Safety
For Your Safety If you smell gas : 1. Shut off gas to the appliance. 2. Extinguish any open flames. 3. Open lid. 4. If odor continues, immediately call your gas supplier. WARNING Read the “Lighting Instructions” in this manual, before lighting this appliance. For Your Safety 1. -
Page 4: Safety Rules
CALIFORNIA PROPOSITION 65- WARNING The Burning of gas cooking fuel generates some by-products which are on the list of substances which are known by the State of California to cause cancer or reproductive harm. California law requires businesses to warn customers of potential exposure to such substances. -
Page 5: Gas Connection
7. Children should be carefully supervised when they are in the vicinity of the grill. Do not allow them to get close while in use. Items of interest to children should not be stored in or around the grill in the cabinet or in the masonry enclosure. Portions of the grill can be extremely hot while in use and can cause severe burns. - Page 6 The outdoor cooking gas appliance and its individual shut-off valve must be disconnected from the gas supply piping system during any pressure testing of the system at test pressures in excess of ½ Psi (3.5 kPa). The outdoor cooking gas appliance must be isolated from the gas supply piping system by closing its individual manual shut-off valve during any pressure testing of the gas supply piping system at test pressures equal to or less than ½...
- Page 7 LP Gas Connection Appliance pressure 10.5” W.C. Inlet pressure 11” – 14” W.C. Purchase a standard 20 lbs. LP tank with QCC – 1 fitting. Assemble pipe/hose assembly as shown. After completion of assembly, turn the tank valve on and turn the control valves on the grill to the ‘HI/IGN’...
-
Page 8: Lp Tank Requirement
To connect, insert the regulator inlet into the tank valve and turn the black coupler clockwise until the coupler tightens up. DO NOT OVERTIGHTEN THE COUPLER. To disconnect, turn the tank valve off. Hold the coupler sleeve and turn counter clockwise. The inlet line will be disengaged. If the appliance is not in use, the gas must be turned off at the supply cylinder. -
Page 9: Installation Location
Do not store a spare LP gas cylinder under or near this appliance. Never fill the cylinder beyond 80 percent full. If the information in “(a)” and “(b)” is not followed exactly, a fire causing death or serious injury may occur. Installation Location Choose a location where the flow of air in the front of the grill is not obstructed. - Page 10 Non-Combustible Construction Sides of the grill can be 0” from non-combustible wall, below the cooking surface. Built in Installation For non-combustible Masonry enclosure installation, follow the cutout dimension as shown. Model “A” dim RON-24 26-1/4 RON-27 29-1/4 RON-36 38-1/4...
-
Page 11: Electrical
The bottom of the grill must be supported on both sides and back or full width with opening as shown for gas connection. Electrical Electrical outlet for Rotisserie motor must be installed to the left side of the grill. The outdoor cooking gas appliance, when installed, must be electrically grounded in accordance with local codes or, in the absence of local codes, with the National Electrical Code, ANSI/NFPA 70, or the Canadian Electrical Code, CSA C22.1. -
Page 12: Burner Adjustment
NEVER USE AN OPEN FLAME TO CHECK FOR LEAKS. Burner Adjustments Every grill is thoroughly checked for proper lighting and burner flame pattern. Conditions at the location may necessitate minor adjustment of the burner air intake, if the flames are not steady/stable as shown in the figure. ADJUSTMENT SCREW 1"... -
Page 13: Low Flame Setting
The flame should be full length of the burner, blue and stable. The air intake should be adjusted ONLY if the flame is lifting off of the ports or has yellow tipping. If flame is lifting, turn the air shutter clockwise reducing this intake. The screw should be loosened before turning the air shutter. -
Page 14: Lighting Instructions
Lighting Instructions Before Lighting: Check gas line/hose for signs of wear, abrasion or cuts. If evidence of deterioration is visible, replace the part prior to use. If you smell gas, check for leaks. If odor continues, immediately call for service. Keep your face and body away from grill top when lighting. -
Page 15: Cleaning And Maintenance
Grill: Grill burners are controlled individually with a control knob. After lighting, turn the knob to HI, LO or in between as desired. Turn on as many burners as required. The top cover may be closed during grilling. Keep the top cover in the closed position during the pre heat period. - Page 16 Shield: Burner shields (Briquette holder) are made out of stainless steel. After every use, allow the shields to cool down. Remove and soak in water with a mild soap or detergent. Replace when dry along with the briquettes. Crumb Tray / Grease Pan: Empty grease pan as required to prevent overflowing.
-
Page 17: Parts Removal And Replacement
that will adversely affect the functioning of the grill. Check burner inlets, orifice hood (gas inlet to burner), igniter, sparkers, etc. thoroughly and clean before use. Front panel removal - Pull knobs out. - Remove screws (4). - Pull panel out slightly. - Disconnect wires from module and switch. -
Page 18: Trouble Shooting
Electronic Module: Unscrew the module cap from front. Unscrew the holding nut from front. Remove the module from the rear after disconnecting the wires from the module. Replace in reverse order. Battery: Unscrew the module cap from front. Remove battery. Replace new battery and screw cap on. -
Page 19: Exploded View - Parts Identification
Contact us for Genuine Royal BBQ Grill Parts. 1-877-386-7766 (877-DVORSON)
Need help?
Do you have a question about the RON-36 and is the answer not in the manual?
Questions and answers