Cortelco 2730 Owner's Instruction Manual
Caller id type ii multi-feature telephone
Hide thumbs
Also See for 2730:
- User manual (4 pages) ,
- Features (2 pages) ,
- Owner's instruction manual (11 pages)

Related Manuals for Cortelco 2730


Summary of Contents for Cortelco 2730
- Page 1 WNER’S NSTRUCTION ANUAL ID T ALLER ULTI- EATURE ELEPHONE MODEL 2730...
- Page 2 ALLER ULTI- EATURE We want you to know all about your new Telephone, how to install it, the features it provides, and the services you can expect from its use. We have included this information in your Owner’s Instruction Manual.
-
Page 3: Table Of Contents
Table Of Contents IMPORTANT SAFETY INSTRUCTIONS ... 5 TELEPHONE PART IDENTIFICATION ... 7 INSTALLATION ... 8 DESK MOUNT ... 8 WALL MOUNT ... 8 ANSWERING MACHINE ... 8 MESSAGE WAITING LAMP ... 8 Message Waiting Switch Location ... 8 UNIT SETUP ... 9 FACTORY PRESETS ... - Page 4 DIALING DIRECTORY NUMBERS ... 19 DELETING ITEMS ... 19 Deleting Individual Entries ... 19 Deleting All Entries ... 19 TELEPHONE SERVICE PROBLEMS ... 20 MAINTENANCE INFORMATION ... 21 TELEPHONE REPAIR ... 22 FCC INFORMATION ... 23 LIMITED WARRANTY ... 24...
-
Page 5: Important Safety Instructions
Unplug this product from the wall outlet before cleaning. Use a damp cloth for cleaning. Do not use liquid or aerosol cleaners. Do not use the telephone near water. For example, do not use near a bathtub, wash bowl, kitchen sink, laundry tub, swimming pool, or in a wet basement. - Page 6 13. Do not use a telephone to report a gas leak in the vicinity of the leak. 14. Unplug the telephone from the wall outlet and refer servicing to qualified service personnel under the following conditions: • When the line cord is frayed or plugs damaged.
-
Page 7: Telephone Part Identification
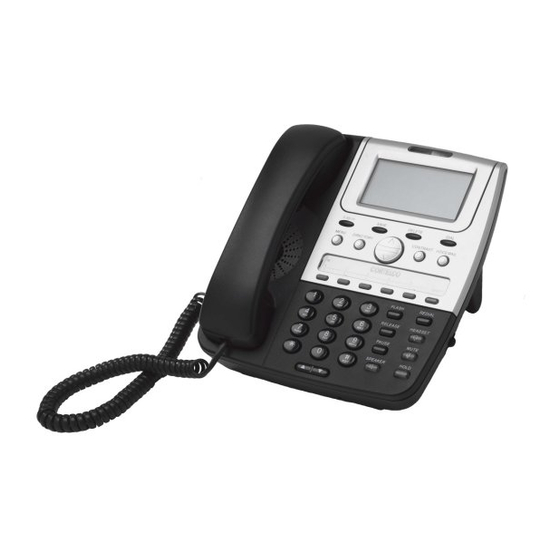
TELEPHONE PART IDENTIFICATION 1 Menu Button 2 5-7-10-11 Button 3 Directory Button 4 Save Button 5 Message Lamp 6 Multi-Angle LCD 7 Delete Button 8 Contrast Button 9 Dial Button 10 Voice Mail Button 11 Review Up/Down Button 12 Directory/Logo Strip... -
Page 8: Installation
ANSWERING MACHINE Connect the LINE jack of the answering machine to the wall telephone jack. Connect the LINE jack of the model 2730 phone unit to the PHONE jack of the answering machine. Set the answering machine to answer after 2 or more rings. -
Page 9: Unit Setup
UNIT SETUP FACTORY PRESETS The following table shows the default factory settings: LANGUAGE ... ENGLISH STUTTER TONE ... YES AREA CODE ... No Setting LDS CODE ... 1 ACCESS CODE ... No Setting TIME & DATE ... No Setting FLASH TIMER ... 600 ms RINGER CADENCE ... - Page 10 When [FLASH TIMER (MS)] appears, press REVIEW UP to toggle between 600ms, 100 ms, and 300ms. Press MENU to confirm selection. When [RINGER CADENCE] appears, the default setting is 3. To alter this setting, press REVIEW UP. There are 10 ringer cadences and each one will be played as you scroll through them.
-
Page 11: Telephone Features
TELEPHONE FEATURES DIALING The 2730 is only capable of DTMF dialing. It is not capable of pulse dialing. RECEIVING A PHONE CALL When the phone rings, lift the handset or press SPEAKER to begin your conversa- tion. To change the Ringer Volume, refer to the “Factory Presets” section. -
Page 12: Mute Button
MUTE BUTTON Press MUTE to speak without the person on the phone hearing your conversation. The MUTE Indicator will light up and remain lighted until you resume your conversation. Also, “MIC MUTED” will show in the display. To resume the conversation, press MUTE. -
Page 13: Hold Button
Note that HOLD will not light in this mode. FLASH BUTTON This telephone provides a line break signal for accessing PABX service or for use of Call Waiting from your local telephone company. If you have Call Waiting service, you can use the Call Waiting function per the following instructions. -
Page 14: Release Button
This unit may not be activated or deactivated under certain conditions. For example, when you retrieve messages from an outside phone (not your own telephone number), the MESSAGE indicator may not be canceled when you return home. If you experience this... -
Page 15: Ringer
RINGER RINGER CADENCE The 2730 has 10 different ringer cadences. This makes it easy to distinguish a particular ringing phone from a group of phones. It can also be used to identify specific callers when used in conjunction with Caller ID. -
Page 16: Caller Id Features
In addition to this, the CALL WAITING symbol (CW) will flash. RECEIVING CALLS When the telephone is not in use and a new call is received, the display will show the NEW symbol, the phone number, the caller’s name, and the call time for about 4 minutes. -
Page 17: 5-7-10-11 Button
Press 5-7-10-11 a fourth time to add the LDS code to the number (1+ 3-digit area code + 7-digit telephone number) and display 11 digits. When the desired format of the telephone number is reached, press DIAL to dial the displayed number. -
Page 18: Storing A Number From Caller Id
When the telephone company is unable to provide the caller’s name, [UNKNOWN NAME] and his telephone number will be displayed on the screen. • When the telephone company is unable to provide the caller’s name and number, [UNKNOWN CALLER] will be displayed on the screen. STORING A NUMBER FROM CALLER ID To store a number from Caller ID to a memory dial location follow these steps: Press REVIEW UP or REVIEW DOWN until the desired number is displayed. -
Page 19: Using The Directory
To search for a directory entry, press DIRECTORY. Then, using the keypad, type the desired name. DIALING DIRECTORY NUMBERS Find the number you want to dial in the Directory List. (Telephone can be on or off hook) When the number shows on the display, press DIAL to start dialing. DELETING ITEMS Deleting Individual Entries Enter the directory and select the individual entry. -
Page 20: Telephone Service Problems
SPEAKERPHONE indicator is on. Turn off speakerphone. NO DIAL TONE Wire is disconnected at telephone or at wall jack. Test the telephone in a different wall jack. If it works, the first jack may be defective. REDIAL BUTTON DOES NOT FUNCTION The telephone may have been momentarily disconnected from the telephone jack. -
Page 21: Maintenance Information
Avoid putting near heating appliances and devices that generate electrical noise (for example, motors and florescent lamps). Clean your telephone equipment with a damp cloth. Stains may be removed with a mild soap. Do not use liquid or aerosol detergents or cleaning agents. -
Page 22: Telephone Repair
DO NOT ATTEMPT TO REPAIR THIS PRODUCT YOURSELF. Telephones manufactured by CORTELCO must be returned to us for repair. You can return your telephone to CORTELCO for repair or replacement in accor- dance with our LIMITED WARRANTY. CORTELCO warrants THIS PRODUCT against defects in material and workmanship in accordance with our LIMITED WARRANTY. -
Page 23: Fcc Information
RENs, and be sure that the total is not more than five. Your telephones may not ring if the total is more than five. Also, in some rural locations, your telephone may not ring if the REN total is more than three. -
Page 24: Limited Warranty
LIMITED WARRANTY If you purchased this product new in the U.S. or Puerto Rico, CORTELCO warrants it against defects in material and workmanship for a period of two (2) years from the date of original purchase. This warranty is in lieu of all other express warranties.
Need help?
Do you have a question about the 2730 and is the answer not in the manual?
Questions and answers