Table of Contents
Advertisement
Available languages
Available languages
Quick Links
Operator's Manual
4-Cycle
Electric Start Capable
WEEDWACKER
Model No. 316.73193*
*The last digit of the model number varies.
CAUTION: Before using this product,
read this manual and follow all its Safety
Rules and Operating Instructions.
Sears Brands Management Corporation, Hoffman Estates, IL 60179 U.S.A.
769-11313 / 00
GAS TRIMMER
®
Visit our website: www.craftsman.com
• SAFETY
• ASSEMBLY
• OPERATION
• MAINTENANCE
• ESPAÑOL, P. 23
12/15
Advertisement
Chapters
Table of Contents

Subscribe to Our Youtube Channel
Related Manuals for Craftsman WEEDWACKER 316.73193


Summary of Contents for Craftsman WEEDWACKER 316.73193
- Page 1 CAUTION: Before using this product, • OPERATION read this manual and follow all its Safety • MAINTENANCE Rules and Operating Instructions. • ESPAÑOL, P. 23 Sears Brands Management Corporation, Hoffman Estates, IL 60179 U.S.A. Visit our website: www.craftsman.com 769-11313 / 00 12/15...
-
Page 2: Table Of Contents
TABLE OF CONTENTS All information, illustrations and specifications in this manual are based on the latest product information available at the time of printing. We Safety ..........2 reserve the right to make changes at any time without notice. - Page 3 • IMPORTANT SAFETY INSTRUCTIONS • READ ALL INSTRUCTIONS BEFORE OPERATING SAFETY WARNINGS FOR GAS UNITS WARNING: WARNING: When using the unit, all safety Gasoline is highly flammable and instructions must be followed. Please read these its vapors can explode if ignited. Take the following instructions before operating the unit in order to ensure the precautions: safety of the operator and any bystanders.
- Page 4 OTHER SAFETY WARNINGS • Always stop the unit when operation is delayed or when walking from one location to another. • Maintain the unit with care. • Before setting the unit down, always make sure the engine is off • All service, other than the maintenance procedures described in and all moving parts have stopped.
- Page 5 • SAFETY & INTERNATIONAL SYMBOLS • This operator's manual describes safety and international symbols and pictographs that may appear on this product. Read the operator's manual for complete safety, assembly, operating and maintenance and repair information. SYMBOL MEANING SYMBOL MEANING •...
-
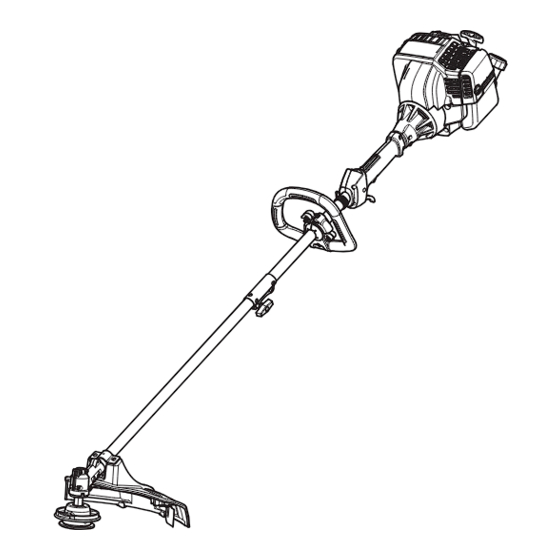
Page 6: Know Your Unit
KNOW YOUR UNIT APPLICATIONS Spark Plug Muffler As a trimmer: Primer Bulb • Cutting grass and light weeds • Edging Throttle Lockout • Decorative trimming around trees, fences, etc. Other optional attachments may be used with this unit. On/Off Switch Shoulder Strap / Harness Loop ASSEMBLY TOOLS REQUIRED... -
Page 7: Assembly
ASSEMBLY INSTALLING THE CUTTING HEAD SHIELD Mount Bracket WARNING: To prevent serious personal injury, never operate the unit without the cutting head shield in place. Screw (x2) Cutting Head Shield 1. Place the cutting head shield under the mount bracket (Fig. 1). Align the holes in the cutting head shield with the holes in the Hole (x2) mount bracket (Fig. - Page 8 5. Insert a nut into one of the hexagonal recesses in the back of the Nut (x4) rear handle bracket (Fig. 5). Make sure the round side of the nut faces outward. Hold the nut in place with a finger. Insert a bolt into the corresponding hole in the front handle bracket (Fig.
- Page 9 INSTALLING AND REMOVING THE ATTACHMENT The coupler enables the use of various optional attachments. WARNING: Before using any attachment, read and understand the manual that came with the attachment. Follow all safety information contained within. Loosen WARNING: To avoid serious personal injury and damage to the unit, shut the unit off before removing or installing an attachment.
- Page 10 INSTALLING THE SHOULDER STRAP (OPTIONAL) 1. Push the strap up through the center slot in the buckle (Fig. 11). 2. Bend the strap over and push it down through the lower slot in Buckle the buckle (Fig. 11). Center 3. Put the shoulder strap over the operator’s head and onto the left Slot shoulder.
-
Page 11: Oil And Fuel
OIL AND FUEL USING THE RIGHT OIL Use a high-quality SAE 30 weight oil. DO NOT use dirty oil. Failure to use clean oil of the correct type can cause premature engine wear and failure. ADDING OIL: INITIAL USE Oil Fill Plug WARNING: OVERFILLING THE CRANKCASE MAY CAUSE SERIOUS PERSONAL INJURY. - Page 12 FUELING THE UNIT WARNING: Gasoline is extremely flammable. Ignited vapors may explode. Always stop the engine and allow it to cool before filling the fuel tank. Do not smoke while filling the tank. Keep sparks and open flames at a distance from the area.
-
Page 13: Starting And Stopping
STARTING AND STOPPING WARNING: On/Off Switch Operate this unit only in a well-ventilated outdoor area. Carbon monoxide exhaust fumes can be (I = On / O = Off) lethal in a confined area. WARNING: Avoid accidentally starting the unit. To avoid serious injury, the operator and the unit must be in a stable Throttle position when pulling the starter rope (Fig. - Page 14 Description Please contact your local Craftsman retailer, call 1-888-331-4569 or 316.85951 ......Plug-In Power Start visit www.craftsman.com for more information.
-
Page 15: Operation
OPERATION HOLDING THE UNIT WARNING: Always wear eye, hearing, hand, foot and body protection to reduce the risk of injury when operating this unit. WARNING: To prevent serious personal injury, avoid arm contact with the engine while operating the unit. The engine may be extremely hot. - Page 16 EDGING The trimmer attachment can be used for edging (Fig. 21). Alternatively, bladed lawn edger attachments can also be purchased for use with this unit. Rotating the Trimmer Attachment WARNING: To avoid serious personal injury and damage to the unit, shut the unit off before rotating the attachment.
-
Page 17: Maintenance
Never use metal-reinforced line, wire, chain or rope. These can break off and become dangerous projectiles. NOTE: When using Craftsman® Hassle Free™ XTRA QUIET Spiral Line, use the line best suited for the job at hand. Medium-sized (red) line is designed for cutting grass and small weeds. Large-sized Holes (black) line is designed for cutting larger weeds and light brush. - Page 18 Loop Line Fig. 25 CHECKING THE OIL LEVEL WARNING: Check the oil level before each use. The importance of maintaining the proper oil level cannot be overemphasized. Inspecting the Oil Level Window 1. Stop the engine and allow it to cool. 2.
- Page 19 CHANGING THE OIL Change the oil while the engine is still warm. The oil will flow freely and carry away more impurities. 1. Clean the area around the oil fill plug (Fig. 27) to prevent debris from entering the oil fill hole. 2.
- Page 20 ADJUSTING THE IDLE SPEED WARNING: The cutting head may spin during idle speed adjustments. Wear protective clothing and observe all safety instructions to prevent serious personal injury. If the engine will not idle properly: 1. Start the engine. Refer to Starting and Stopping. Idle Speed Screw 2.
-
Page 21: Cleaning And Storage
CLEANING AND STORAGE CLEANING STORAGE • Never store a fueled unit where fumes may reach an open flame WARNING: To avoid serious personal injury, always stop or spark. the engine and allow it to cool before cleaning or maintaining • Allow the engine to cool before storing. -
Page 22: Troubleshooting
TROUBLESHOOTING PROBLEM SOLUTION THE ENGINE WILL NOT START The fuel tank is empty Fill the fuel tank with fresh fuel The primer bulb was not pressed enough Press the primer bulb 10 times The fuel is old (over 30 days) Drain the fuel tank and add fresh fuel The spark plug is fouled Replace the spark plug... - Page 23 PRECAUCIÓN: Antes de utilizar, este • ENSAMBLAJE producto lea este manual y siga todas • OPERACIÓN las reglas de seguridad e instrucciones de operación. • MANTENIMIENTO Sears Brands Management Corporation, Hoffman Estates, IL 60179 U.S.A. Visite nuestro sitio web: www.craftsman.com 769-11313 / 00 12/15...
-
Page 24: Seguridad
TABLA DE CONTENIDO Toda la información, las ilustraciones y especificaciones que contiene este manual se basan en la información más reciente del producto, Seguridad ......... . .24 existente en el momento de la impresión. - Page 25 • INSTRUCCIONES DE SEGURIDAD IMPORTANTES • LEA TODAS LAS INSTRUCCIONES ANTES DE USAR LA ADVERTENCIAS DE SEGURIDAD PARA LAS UNIDADES UNIDAD A GASOLINA ADVERTENCIA: ADVERTENCIA: Se deben respetar La gasolina es todas las instrucciones de seguridad al usar la unidad. Por sumamente inflamable y sus vapores pueden explotar si se favor, lea estas instrucciones antes de utilizar la unidad para encienden.
- Page 26 OTRAS ADVERTENCIAS DE SEGURIDAD • No se extienda demasiado. Siempre debe estar bien afirmado y mantener el equilibrio adecuado. Tenga cuidado al trabajar • El mantenimiento de la unidad debe ser minucioso. sobre escalinatas, cuestas empinadas o pendientes. Para evitar •...
- Page 27 • SÍMBOLOS INTERNACIONALES Y DE SEGURIDAD • Este manual del operador describe símbolos de seguridad e internacionales, así como pictogramas, que pueden aparecer en este producto. Lea el manual del operador para obtener información completa sobre seguridad, montaje, funcionamiento, mantenimiento y reparaciones. SÍMBOLOS SIGNIFICADO SÍMBOLOS SIGNIFICADO •...
-
Page 28: Conozca Su Unidad
CONOZCA SU UNIDAD APLICACIONES Bujía de encendido Silenciador Como recortadora: Bulbo del cebador • Corta hierbas y malezas ligeras Bloqueo del • Bordeado acelerador • Recorte decorativo alrededor de árboles, vallas, etc. Interruptor Con esta unidad se pueden usar otros dispositivos de sujeción encendido / apagado opcionales. -
Page 29: Ensamblaje
ENSAMBLAJE INSTALACIÓN DEL PROTECTOR DEL CABEZAL DE CORTE Soporte de montaje ADVERTENCIA: Para evitar lesiones personales Protector del graves, no opere nunca la unidad sin el protector del Tornillo (x2) cabezal de corte cabezal de corte colocado. 1. Ubique el protector del cabezal de corte bajo el soporte de Orificio (x2) montaje (Fig. - Page 30 5. Inserte una tuerca en una de las entrantes hexagonales de la Tuerca (x4) parte posterior del soporte de la manija trasera (Fig. 5). Verifique que el lado redondo de la tuerca mira hacia afuera. Fije la tuerca en su lugar con un dedo. Inserte un perno en el correspondiente orificio del soporte de la manija delantera (Fig.
- Page 31 INSTALACIÓN Y EXTRACCIÓN DEL ACCESORIO El acoplador permite el uso de varios accesorios opcionales. ADVERTENCIA: Antes de comenzar a utilizar cualquiera de los accesorios, lea y comprenda el manual que viene con dicho accesorio. Tenga en cuenta toda la Afloje información de seguridad que incluye.
- Page 32 INSTALACIÓN DE LA CORREA DE HOMBRO (OPCIONAL) 1. Haga pasar la correa hacia arriba por el ojal central de la hebilla (Fig. 11). Hebilla Ojal 2. Doble la correa sobre sí misma y hágala pasar por el ojal inferior central de la hebilla (Fig.
-
Page 33: Aceite Y Combustible
ACEITE Y COMBUSTIBLE USO DEL ACEITE CORRECTO Use un aceite pesado de alta calidad SAE 30. NO utilice aceite sucio. Si no se utiliza aceite limpio del tipo adecuado se puede producir un desgaste y una falla prematura del motor. INCORPORACIÓN DE ACEITE: USO INICIAL Tapón para llenado de aceite... - Page 34 ADVERTENCIA: NO UTILICE COMBUSTIBLE E85 EN ESTA UNIDAD. Se ha demostrado que el combustible que contiene más de un 10% de etanol es probable que dañe este motor y anule la garantía. Uso de aditivos para el combustible Utilice un aditivo para el combustible, como el estabilizador de combustible STA-BIL u otro equivalente, para inhibir la corrosión y minimizar los depósitos de goma.
-
Page 35: Arranque Y Parada
ARRANQUE Y PARADA ADVERTENCIA: Interruptor Opere esta unidad solamente en un encendido / apagado área exterior bien ventilada. El monóxido de carbono de (I = Encendido / los gases de escape puede ser letal en un área confinada. O = Apagado) ADVERTENCIA: Evite arrancar la unidad por accidente. - Page 36 316.85952 ....Arrancador de potencia para taladro Craftsman llamando al 1-888-331-4569 o visite 316.85953 ....Arrancador Eléctrico Inalámbrico www.craftsman.com.
-
Page 37: Operación
OPERACIÓN CÓMO SOSTENER LA UNIDAD ADVERTENCIA: Utilice siempre protección ocular, auditiva, de manos, pies y corporal para reducir el riesgo de sufrir lesiones durante la operación de esta unidad. ADVERTENCIA: A fin de evitar lesiones personales graves, evite el contacto del brazo con el motor mientras opere la unidad. - Page 38 BORDEADO El accesorio de la recortadora puede ser utilizado para el bordeado (Fig. 21). De manera alternativa, también se pueden comprar accesorios de bordeadora de césped con cuchillas para utilizar con esta unidad. Rotación del accesorio de la recortadora ADVERTENCIA: A fin de evitar lesiones personales graves y daños a la unidad, apague la unidad antes de rotar el accesorio.
-
Page 39: Mantenimiento
No use nunca la línea reforzada con metal, alambre, cadena o soga. Los mismos pueden desprenderse y convertirse en un proyectil peligroso. NOTA: Cuando use la Línea Espiral Craftsman® Hassle Free™ XTRA Orificios QUIET, use la línea que mejor se ajuste al trabajo en cuestión. La línea de tamaño mediano (de color rojo) está... - Page 40 5. Presione el lazo expuesto del hilo de recorte hasta que esté Lazo ajustado contra el cabezal de corte (Fig. 25). Línea Fig. 25 CONTROL DEL NIVEL DE ACEITE ADVERTENCIA: Controle el nivel de aceite antes de cada uso. No está de más insistir en la importancia de mantener el nivel de aceite adecuado.
- Page 41 CAMBIO DE ACEITE Cambie el aceite mientras el motor aún está caliente. El aceite fluirá libremente y arrastrará más impurezas. 1. Limpie la zona que rodea el tapón de llenado de aceite (Fig. 27) a fin de evitar que ingresen residuos en el orificio de carga de aceite. 2.
- Page 42 AJUSTE DE LA VELOCIDAD DE RALENTÍ ADVERTENCIA: El cabezal de corte puede girar durante los ajustes de la velocidad de ralentí. Utilice vestimenta de protección y respete todas las instrucciones de seguridad para evitar que se produzcan lesiones personales graves. Si el motor no funciona al ralentí...
-
Page 43: Limpieza Y Almacenamiento
LIMPIEZA Y ALMACENAMIENTO LIMPIEZA ALMACENAMIENTO • Nunca almacene la unidad con combustible en lugares donde ADVERTENCIA: A fin de evitar lesiones personales las emanaciones pueden alcanzar llamas abiertas o chispas. graves, siempre pare el motor y deje que se enfríe antes de •... -
Page 44: Localización Y Solución De Problemas
SOLUCIÓN DE PROBLEMAS PROBLEMA SOLUCIÓN EL MOTOR NO ARRANCA El depósito de combustible está vacío Llene el depósito de combustible con combustible nuevo El bulbo del cebador no se presionó lo suficiente Oprima el bulbo del cebador 10 veces El combustible está viejo (más de 30 días) Drene el depósito de combustible y agregue combustible nuevo La bujía está... - Page 45 NOTAS...
- Page 46 NOTAS...
- Page 47 NOTAS...
Need help?
Do you have a question about the WEEDWACKER 316.73193 and is the answer not in the manual?
Questions and answers