Advertisement
IMPORTANT SAFEGUARDS
When using electrical appliances, basic safety precautions should always be followed, including the following:
- Read and save all instructions.
- To protect against risk of electrical shock, do not immerse base, motor, cord, or plug in water or other liquid.
- Close supervision is necessary when any appliance is used by or near children.
- This appliance should not be used bychildren.
- Unplug cord from outlet when not in use, before putting on or taking off parts, and before cleaning.
- Avoid contacting moving parts.
- Do not operate any appliance with a damaged cord or plug or after the appliance malfunctions or is dropped or damaged in any manner. Call our toll-free customer service number for information on examination, repair or electrical or mechanical adjustment.
- The use of attachments not recommended or sold by the appliance manufacturer, may cause fire, electric shock, or injury.
- Do not use your food processor if any part is broken.
- Do not use appliance outdoors.
- Do not let cord hang over edge of table or counter, or touch hot surfaces.
- Keep hands and utensils away from moving blade and disc while processing food to reduce the risk of severe personal injury and/or damage to the food processor. A rubber scraper may be used but ONLY when the food processor is not running.
- The blade and disc are sharp. Handle carefully. Store out of reach of children.
- To reduce the risk of injury, never place cutting blade or disc on base without first putting bowl properly in place.
- Be certain lid is securely locked in place before operating appliance..
- Never feed food into food chute by hand. Always use food pusher.
- Do not attempt to defeat the lid interlock mechanism.
- Make sure the blade or disc has come to a full stop before removing lid.
- To reduce the risk of injury, be sure to insert or remove blade and disc using hubs provided for this purpose. Use caution when removing blade and disc from the bowl, when emptying the bowl, and when cleaning.
- Be sure to turn switch to OFF ( O ) position after each use. Always use the pusher to clear the food chute. When this method is not possible, turn the motor off and disassemble unit to remove the remaining food.
- The appliance is not intended for commercial, professional or industrial use. It is designed and built exclusively for household use only.
- Never use appliance for a longer period or with a larger amount of ingredients other than that recommended by appliance manufacturer.
- The maximum rating of this unit is based on using the Chopping/Mixing Blade. Using the Slicing/Shredding Disc may draw significantly less power.
- Do not place on or near a hot gas or electric burner or in a heated oven.
- Do not use appliance for other than intended use.
- This appliance is not intended for use by persons(including children)with resensory or mental capabilities, or lack of experience and knowledge, unless given supervision or instruction concerning use of the appliance by a person their safety.
Children should be supervised to ensure that they do not play with the appliance. - This marking indicates that this product should not be disposed with other household wastes throughout the EU. To prevent possible harm to the environment or human health from uncontrolled waste disposal, recycle it responsibly to promote the sustainable reuse of material resources. To return your used device, please use the return and collection systems or contactthe retailer where the product was purchased. They can take this product for environmental safe recycling.
![]()

SAVE THESE INSTRUCTIONS!
This appliance is intended for householduse only.

Shock Hazard: This appliance has a polarized plug (one blade is wider than the other).
To reduce the risk of electric shock, this plug is intended to fit into a polarized outlet only one way.
If the plug does not fit fully into the outlet, reverse the plug. If it still does not fit, contact a qualified electrician.
Do not attempt to modify the plug in any way.
To avoid an electrical circuit overload, do not use another high wattage appliance on the same circuit with your food processor.
The length of the cord used on this appliance was selected to reduce the hazards of becoming tangled in, or tripping over a longer cord. If a longer cord is necessary, an approved extension cord may be used.
The electrical rating of the extension cord must be equal to or greater than the rating of the appliance.
Care must be taken to arrange the extension cord so that it will not drape over the countertop or tabletop where it can be pulled on by children or accidentally tripped over.
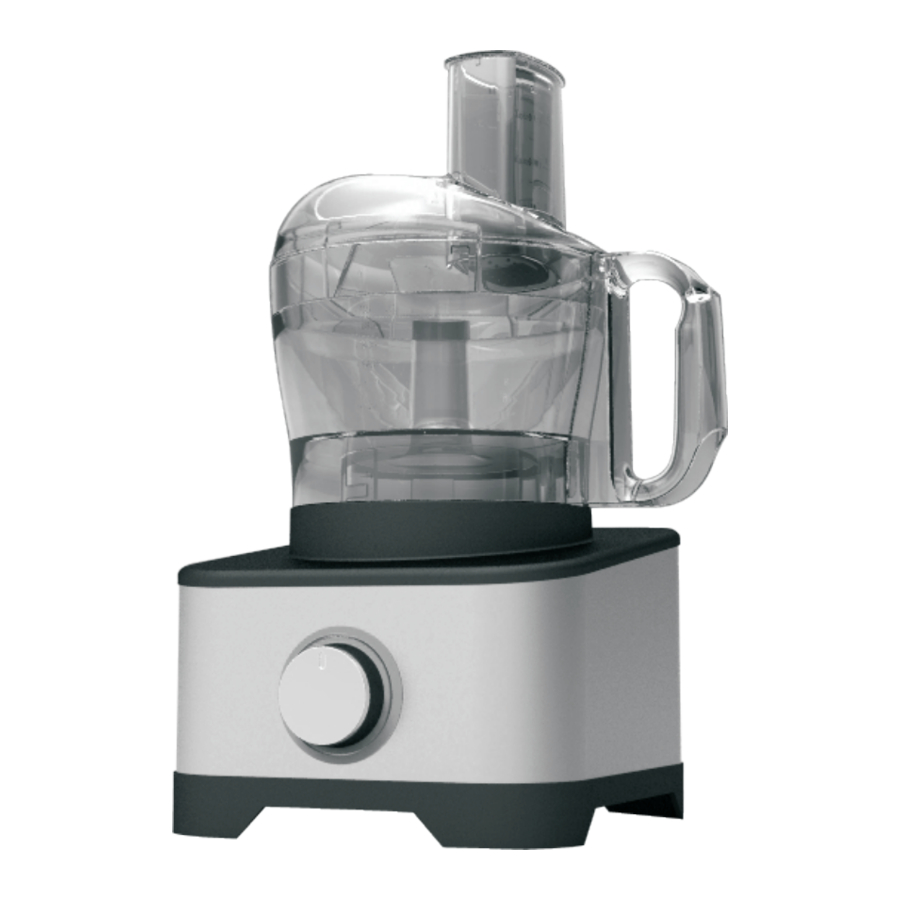
PARTS AND FEATURES

- Pushers
- Lid
- Maxi-blend canopy
- Removable drive Sleeve
- Bowl
- Motor shaft
- Rotor
- Main machine
- Dough tool
- Knife blade
- Thin slicing/fine shredding disc
USING YOUR FOOD PROCESSOR
How to Lock the Bowl
Align base and bowl as illustrated. Turn bowl clockwise until it locks into place. The bowl will lock onto the base in 3 different positions for user convenience.

NOTE: The food processor will not work unless the bowl is locked into position.
How to Assemble and Lock the Lid
Align lid as illustrated by placing thumbon lid tab and twisting lid clockwise. Four visual alignment markers are provided (see illustration), one on bowl, one onhandle and two on bowl lid.

NOTE: The food processor will not work unless the lid is locked into position.
How to Operate the Controls
The control dial is conveniently located on the front of the base. Rotate the knob clockwise to speed up. Rotate counterclockwise to slow down. For instant on and off control, use the PULSE(P) button by rotating knob counterclockwise. To turn off the machine, rotate the switch to OFF(O).

Processing Tips and Techniques
- *This food processor is excellent to chop, mix, slice, or shred most foods. However, to maintain peak performance, do not use your food processor for the following: grinding grain, coffee beans or spices; slicing frozen meat; or crushing ice.
- *To achieve maximum capacity, use Chopping/Mixing blade of Big Mouth and add food no higher than the maximum fill line on food chute. See Food Processing Charts for more information.
- *Operating time will depend on quantity of food being processed. Most foods can be sliced, chopped, or shredded in seconds. If unit is operated for 30 senconds continuously, let the processor rest about 3 minutes before continuing.
Processing Using Chopping/Mixing Blade
- *For a more uniform consistency, start with pieces of food that are similar in size. Carrots, for example, should all be cut in 1-inch (2.5 cm) chunks. Do not process 4-inch (10cm) pieces with 1⁄2 inch (1 cm) pieces.
- *The Chopping/Mixing Blade can be used to coarsely chop, finely mince, mix, or puree food to a smooth consistency.
- Make sure the Control Switch is turned to OFF (O) and the unit is unplugged.
- Lock the bowl onto base.(See "How to Lock the Bowl")
- Place the Chopping/Mixing Blade onto motor shaft of food processor in center of bowl. Turn slowly until blade drops into place.

Handle carefully; the blade is sharp. - Lock lid onto bowl. Insert food pusher into food chute.
*Do not puree or mash starchy vegetables like potatoes. They will be over-processed in a second and turn gummy. - Plug in unit and process food. The processing speed and time will determine the finished consistency of the food. The Pulse button can help you avoid overprocessing. Reference the food processing chart for recommended processing times and speeds.
- When finished processing, select OFF (O) or release from PULSE position.
Wait until blade has stopped rotating before removing lid.
Unplug the unit.

Processing Using Slicer/Shredder
- *To slice or shred cheese, select firmcheese like Cheddar, Monterey Jack, or Swiss. Place cheese in freezer for 30 minutes before processing.
- *The Reversible Slicer/Shredder Disc has a slicing blade on one side and shredding teeth on the other. The name engraved on the blade, facing up, is the function selected. Place on motor shaft with desired cutting edge facing up.
- Make sure the Control Switch is turned to OFF(O)and the unit is unplugged.
- Lock the bowl onto base.(See "How to Lock the Bowl" )
- Place Removable Drive Sleeve on Motor Shaft. Put Slicer/ Shredder Disc on Removable Drive Sleeve with the desired side facing up for either slicing or shredding. Lock lid onto bowl.(See "How to Assemble and Lock the Lid")
![]()
- To slice/shred large foods(such as chunk of cabbage, green pepper, whole tomato) open food chute lid by lifting latch. Depress food holder to the right. Insert food and lock lid.
*To julienne vegetables, slice then remove from bowl and restack the vegetables. Pack into food chute with slices vertical. Slice again to make match-stick cut vegetables.
To slice/shred long,thin foods (such as potato, pepperoni, carrots, celery). Lock lid. Long foods can be inserted into the chute opening and processed as long as the food chute lid is closed. - Insert food pusher in chute. Always use the food pusher to feed food into the chute.
NEVER PUSH FOOD THROUGH CHUTE WITH HANDS.
![]()
- Plug in unit.
- Select speed. While pressing on food pusher, rotate the switch for optimum slicing and shredding performance or PULSE to process food. Reference the food processing chart for recommended processing times and speeds.
NOTE:The food chute lid is designed to pivot towards the right when processing food that fills the whole food chute capacity. - When food chute is empty, select OFF(O) or release from PULSE position.
Wait until blade has stopped rotating before removing lid.Unplug the unit.


TROUBLESHOOTING GUIDE
Before calling the Customer Service Number, carefully check the list below for a possible solution to your question.
| POTENTIAL PROBLEM | PROBABLE CAUSE/SOLUTION |
| Unit does not operate on any speed or Pulse. |
|
| Food is not chopped, sliced or shredded uniformly. |
|
| Unit stops and will not come back on. |
|
| Unit has a burning smell. |
|
| Motor seems weak. |
|
CLEANING, STORAGE AND MAIMTENANCE
- Wash bowl, lids, blade, discs, removable drive sleeve and food pusher in hot, soapy water.
Rinse and dry thoroughly. See page 4 for information on how to remove food chute lid for cleaning.
To clean food thoroughly from the bowl and bowl lid/food chute,immerse in hot,soapy water.
NOTE: Do not store unit with lid in locked position; this may put strain on interlock tab. - Wipe base, control panel, and cord with a damp cloth or sponge. To remove stubborn soil, use a mild non-abrasive cleanser.
- To store, place bowl on base. Then place Chopping/Mixing Blade on motor shaft and Slicer/ Shredder Disc on Chopping/Mixing Blade. The Removable Drive Sleeve may be stored in the bowl.
Place lid on bowl but do not lock. - Monthly place a drop of vegetable oil on each screw in the food chute.
HOW TO RELEASE SUCTION CUP FEET AFTER USE
The suction cup feet on the bottom of your Food Processor are designed to keep the unit stationary during use. To maximize the life of your Food Processor please review the following directions:
- Food Processor fully assembled: lift it from counter by placing hands under unit as shown and lifting to one side.
![]()
OR - With Food Processor fully assembled: lift it from counter by grabbing the handle as shown and lifting from same side as handle.

OR - With bowl and lid removed from Food Processor: lift it from counter by placing hands under unit as shown and lifting to one side


Documents / ResourcesDownload manual
Here you can download full pdf version of manual, it may contain additional safety instructions, warranty information, FCC rules, etc.
Advertisement


Need help?
Do you have a question about the GS-509 and is the answer not in the manual?
Questions and answers