Advertisement
Quick Links
manual
strada av
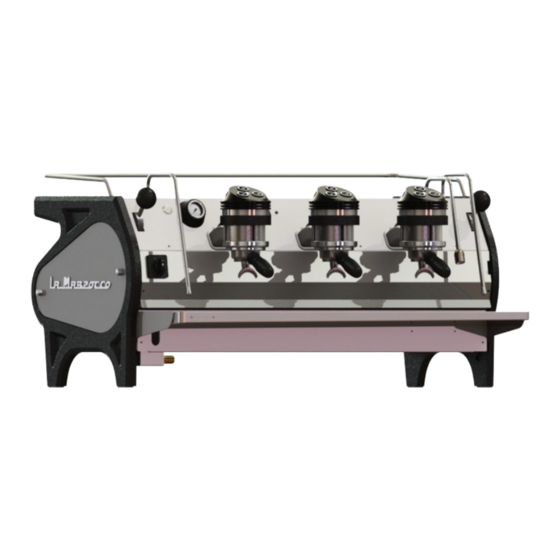
The Strada AV is characterized by its underlying mechanical features
and design of the Strada. The initials "AV" refer to a feature whereby
brewing is activated by a three button keypad where the doses
are counted by a flowmeter for each group. This model includes
proportional steam valves, both featuring anti-resuction valves.
Advertisement

Related Manuals for La Marzocco strada av


Summary of Contents for La Marzocco strada av
- Page 1 The Strada AV is characterized by its underlying mechanical features and design of the Strada. The initials “AV” refer to a feature whereby brewing is activated by a three button keypad where the doses are counted by a flowmeter for each group. This model includes...
- Page 2 Operating Manual V3.0 - 09/2020 MAN.16.1.03 Chapters La Marzocco S.r.l. page 3 1. General Warnings and Safety Specifications Via La Torre 14/H Località La Torre page 8 2. Definition of Available Models 50038 Scarperia e San Piero (Firenze) - ITALIA page 11 3.
- Page 3 * H Q H UDO: D UQ L Q J V DQ G 6DIHW\ 6SHFLÐ F DWLR Q V more than 8 years of age) CAUTION This machine is for professional As already mentioned in with reduced physical, use only and should be installed the preceding notes, the sensory mental...
- Page 4 This operating manual removed the packaging. codes. installation is an integral and essential Note: In case of doubt, do not go on also must comply to the part of the product and any further and contact your dealer manufacturer’s instructions, must be supplied to users.
- Page 5 represents fundamental This device must be used • do not unplug the device safety requirement. Ensure exclusively for the functions it from the power outlet qualified personnel check has been designed and built by pulling on the power such connection. for.
- Page 6 circuit breaker. make use of an omnipolar relative circuit breaker and cleaning operation, follow connector during installation, close off the water supply; exclusively the instructions as required by local, national, to replace the power supply contained in this manual. and international electrical cord, contact qualified...
- Page 7 2-dose portafilters Water pressure supply or persons if the equipment orresponding to the number must be between 0,4 and undergoes technical of groups; 0,8 MPa. aesthetic changes, • replacement 1-dose and The maximum inlet water changes performance 2-dose filters (one of each); pressure shall be at least and characteristics, and in •...
- Page 8 ' H Ð Q L WLR Q R I $ Y D LODEOH0R G H OV 7KLVR S HUDWLQ J P D Q X D OUHIHUVH[ F OX V LY H O\ WR WKHIR O OR Z L Q J P R G H OVR I R X U R Z Q P D Q X I DFWX U H STRADA, model AV 3 groups Main Switch Pressure Gauge (steam boiler)
- Page 9 * H Q H UDO' H VFULSWLR Q by temperature probe and PID controller. is a list of effective volume and power The machine is built in 2 and 3 coffee The steam boiler has various fittings used ratings according to the number of groups group versions and is essentially composed for safety devices, for supplying hot water installed:...
- Page 10 É % U HZ L Q J J U R X S V • Water pump • Machine CE plate: They consist of a precision casting made The rotary vane pump, is installed on the of stainless steel. The brewing group water supply tubing and is set up to operate accepts the portafilter used to hold the anytime the coffee groups are activated,...
- Page 11 3. ,Q V WDOODWLR Q WAR N ING R A TED COFFEE STEAM R A TED P O WER COR D TOTAL MO DE L/SER I E S G R O UP V /Hz P O WER INP U T BOILER BOILER SIZ E ( mm²...
- Page 12 WAR N ING WAR N ING WAR N ING : D WHUSUHVVX U HVX S SO\ P X V W + D ] D UG R X V Y R O WDJ H G L VFR Q Q H FW 7KLVDSSOLDQ F HLVQ R W LQ W HQ G H G EHEHWZ H HQ DQ G 03D IUR P SR Z H UVX S SO\ EHIR U H...
- Page 13 ,Q V WDOODWLR Q R Q WKHFR X Q W HU WAR N ING The image below shows the recommended method to drill the hole on the counter. ,Q R U G H UWR SUHY H Q W FUDFNV R U OHDNDJ H G R Q R W VWR U HR U LQ V WDOOWKH&...
- Page 14 ,Q V WDOODWLR Q J X L G H For best results, STRADA needs a If the pressure and flow are not adequate, If the incoming water of the espresso minimum flow of water in input of 100 l/h air bubbles may develop within the gears. machine falls outside the recommended and a pressure of 2.5 bar.
- Page 15 3UHVVX U HKLJ K HUWKDQ EDU )OR Z UDWHOR Z H UWKDQ OK Installation pressure reducer immediately after the water treatment system, upstream of the rotary pump. Installation of the rotary pump (set to 9 bar) immediately after the pressure reducer, upstream of the tee.
- Page 16 $ F FHVV R U LHV 5) Flowmeter safety removal In order to proceed with installation, it is Before switch on, remove the clamp from necessary that the following are available: the flowmeter located inside the machine, as • Pipes carrying drinking water with a indicated by the adhesive label applied on 3/8”G (BSP) end connection;...
- Page 17 To guarantee a correct and safe functioning designed to be used exclusively with cold to espresso machine via a strain relief of the machine and to maintain an water. Make sure that water is always connector. adequate performance level and a high present while the pump is operating, quality of the beverages being brewed it otherwise air can be introduced into the...
- Page 18 - Cable tightening; suitable waste water collection system. In case such a system is not available, drained liquids may be collected in a suitable bucket and any necessary drain pipe extensions shall be made using steel-lined PVC tubing and suitable hose clamps.
- Page 19 Machine Operation and Coffee Preparation CAUTION IMPORTANT Never remove the filter holder To improve the flavor of the espresso, the temperature of the water in the coffee boiler when water is being delivered. and therefore of the groups may eventually This operation can be extremely be raised or lowered via the digital display (please consult the Software Programming...
- Page 20 1R W H Air inside the steam boiler may build 4) Installing the portafilters up pressure (which may be detected Install the portafilter(s) by inserting them through the pressure gauge). into the group and rotate the handle from Once the pump stops, check the display, left to right.
- Page 21 % U HZ L Q J FR I IHH from exceeding 11-12 bar. too slowly (drop by drop) nor too quickly Now you can brew an espresso. Disengage In case the pressure exceeds 12 bar, (quick light brown flow). A general rule one of the portafilters, fill the filter with you must adjust the expansion valve by is that a double dose should dispense...
- Page 22 Dispensing Steam and Hot Water 6WHDP L Q J P L ONR U R W KHUOLTX L G V This condition is undesireable and can 2) Preparing hot water and other hot drinks. In order to allow for any condensed water cause contamination in the steam boiler.
- Page 23 6. 0DLQ W HQ D Q F HDQ G 3HULR G L F& O HDQ L Q J 2SHUDWLR Q V WAR N ING WAR N ING WAR N ING ,IWKHDER Y H P H Q W LR Q H G 7KHP D FKLQ H P X V WEHLQ V WDOOHG VR 7KLVP D FKLQ H LVIR U SUR I HVVLR Q D O LQ V WUX F WLR Q V DUHQ R W DG K HUHG...
- Page 24 & O HDQ L Q J Ð O WHUV and run hot water through each group & O HDQ L Q J WKHKR W Z D WHUDQ G VWHDP Q R ] ] O HV - Put 2 or 3 teaspoons of detergent powder several times with the screen installed.
- Page 25 of water to be brewed: Disconnect the machine from the Steam wand (just after use) At least 1 liter for a 1/2 group machine electrical mains. Drain grille At least 2 liters for a 3 group machine & O HDQ L Q J IUHTX H Q F \ : H HNO\ If the machine is not going to be used •...
- Page 26 0DQ G D WR U \ 0DLQ W HQ D Q F HDQ G & K HFNX S 2SHUDWLR Q V These operations are in addition to the Maintenance and Periodic Cleaning Operations as specified in Chapter 6. The following maintenance and check-up operations sould be carried out by a qualified technician. The time required for the periodic maintenance is determinated by the quantity of daily work and/or coffee consumption.
- Page 27 3UHFLVLR Q 6FDOH WAR N ING + D Q G O HZ L WKFDUHP D [ L P X P OR D G Scale crosspiece .J G R Q R W OLIW Drain grille Scale individual grid WAR N ING Removable drain tray 7KHLQ G L Y L G X D OJ U LG R I WKHVFDOH LVDIUDJ L OHFR P S R Q H Q W KDQ G O H...
- Page 28 - To avoid contact with dirt before placing the filter holder, clean and dry the grid; - Use only original La Marzocco filters and - Please be careful during the cleaning filter holders, identified by the following...
- Page 29 5HP R Y L Q J WKHHOHFWUR Q L FER [ To remove the electronic box you need to remove the lower front panel, unscrew and remove the lower screws , loosen the upper screws without removing them and move the scale crosspiece up. Now you can access the electronic box or remove it.
- Page 30 6R I WZ D UH3UR J U DP P L Q J * X L G H Ä % D ULVWDÅ 3UR J U DP P L Q J 94.4 00: 0 0 95.5 95.1 SB page 34 Press and hold the T3 button for 5 seconds. Menu P r ess B3 to Exit G r oup Dose...
- Page 31 Ä % D ULVWDÅ 3UR J U DP P L Q J P r e-Inf Cup Warmer Menu Settings DISABLED P r ess B3 to Exit page 65 page 66 page 67 G r oup 1 P r e-Inf P r e-Inf Settings 0s Wet 0s Hold Exit page 65...
- Page 32 Ä 7 HFKQ L FDOÅ 3UR J U DP P L Q J 94.4 00: 0 0 95.5 95.1 SB page 34 Press and hold the T3 button for 5 seconds. Enter P a ssword page 38 Technician Menu P r ess B3 to Exit Language Temp Units Name...
- Page 33 Ä 7 HFKQ L FDOÅ 3UR J U DP P L Q J Scale Water Dose Coffee Boiler Steam Boiler Configuration Settings Settings Settings page 90 page 93 page 96 page 99 Cup Warmer Clock Time Display Chrono P r e-Inf Settings 00: 0 0 SUNDAY TIME...
- Page 34 3UR J U DP P L Q J ,Q W UR G X F WLR Q Description • This espresso machine has a CPU and many configurable settings. • Additionally, there are many feedback controls employed in this espresso machine to troubleshoot problems should they occur. •...
- Page 35 Programming Keypad The keypad has two functions. The first is for control of the espresso. The second is for programming individual software parameters. The programming of the individual parameters is possible only using the buttons in the group 1 (group starting from the left). Button Description This button is used to control the brewing of the single espresso.
- Page 36 Start Up Procedures Turning the Espresso Machine On The following is the procedure for turning • Proceed checking for water connection on the power to the espresso machine. to the espresso machine. • Please follow the procedures carefully • Proceed making sure you have filled the to avoid any damage to the espresso boilers.
- Page 37 6KX W ' R Z Q 3UR F HG X U HV 7X U Q L Q J WKH(VSUHVVR 0DFKLQ H 2II The following is the procedure for turning • This machine has two off settings. One off power to the espresso machine. setting turns off all of the components •...
- Page 38 $ F FHVVLQ J 3UR J U DP P L Q J 0R G H quality of the espresso. Programming Mode No password is required for access. • Technical Programming - The parameters • To change the values of any parameter contained within this level are ones the operator must first enter into the the operator can change to affect the...
- Page 39 Cleaning Cycles Cleaning Cycles • This parameter allows the operator • The rinsing procedure is provided to give to carry out the washing of the coffee the operator more flexibility and freedom groups, in an automatic way, by running with regard to this operation. multiple cleaning cycles.
- Page 40 (only on ABR espresso machine models) Brewratio The procedure for weighing the filter • To brew in brew ratio mode, set this holder either empty or filled with coffee mode by entering the software settings. powder is shown below. • This parameter records the values for •...
- Page 41 Program Dose • This parameter allows the operator to • It is possible to set the dose for both a program the amount of coffee (brewing short and a long shot on the same key. amount) each button • The setting of the first group is keyboard.
- Page 42 Program Dose • This parameter allows the operator to • It is possible to set the dose for both a program the amount of coffee (brewing short and a long shot on the same key. amount) each button • The setting of the first group is keyboard.
- Page 43 (only on ABR espresso machine models) Program Dose • This parameter allows the operator to • It is possible to set the dose for both a program the amount of coffee (brewing short and a long shot on the same key. weight) for each button on the keyboard.
- Page 44 (only on ABR espresso machine models) Program Dose • This parameter allows the operator to • It is possible to set the dose for both a program the amount of coffee (brewing short and a long shot on the same key. weight) for each button on the keyboard.
- Page 45 (only on ABR espresso machine models) Program Dose • This parameter allows the operator to select the coffee brewing mode among those available: pulse, mass and brew ratio. • PULSE mode: control of doses in volume • MASS mode: control of doses in mass •...
- Page 46 (only on ABR espresso machine models) Program Dose • This parameter allows the operator to select the coffee brewing mode among those available: pulse, mass and brew ratio. • PULSE mode: control of doses in volume • MASS mode: control of doses in mass •...
- Page 47 Program Dose • This parameter allows the operator to • The dose can be set by pulses or by view and manually change each dose for mass (weight). each key. • For greater accuracy and consistency of the doses, it is recommended that you set each key.
- Page 48 3UR J U DP ' R V H • This parameter allows the operator to • The dose can be set by pulses or by view and manually change each dose for mass (weight). each key. • For greater accuracy and consistency of G 1 Dose the doses, it is recommended that you Settings...
- Page 49 (only on ABR espresso machine models) Program Dose • This parameter allows the operator to • For greater accuracy and consistency of view and manually change each dose for the doses, it is recommended that you each key. set each key. When the espresso machine is turned on, press and hold the T3 button to access the “Barista”...
- Page 50 (only on ABR espresso machine models) Program Dose • This parameter allows the operator to • For greater accuracy and consistency of view and manually change each dose for the doses, it is recommended that you each key. set each key. Press the button T3 to exit the submenu.
- Page 51 (only on ABR espresso machine models) Program Dose • This parameter allows the operator to • For greater accuracy and consistency of view and manually change each dose for the doses, it is recommended that you each key. set each key. When the espresso machine is turned on, press and hold the T3 to access the “Barista”...
- Page 52 (only on ABR espresso machine models) Program Dose • This parameter allows the operator to • For greater accuracy and consistency of view and manually change each dose for the doses, it is recommended that you each key. set each key. Press the button T1 or T2 to view the coffee mass of each group.
- Page 53 (only on ABR espresso machine models) Program Dose • This parameter allows the operator to • The dose can be set by pulses or by view and manually change each dose for mass (weight). each key. • For greater accuracy and consistency of the doses, it is recommended that you set each key.
- Page 54 Program Dose • This parameter allows the operator to copy the doses present of each key to the others. When the espresso machine is turned on, press and hold the T3 button to access the “Barista” programming. After about 5 seconds the following screen is displayed. Press the T3 button to enter the doses programming procedure.
- Page 55 Program Dose • This parameter allows the operator to copy the doses present of each key to the others. Press T1 or T2 to continue with the programming of the other parameters. Press T2 and T3 at the same time to exit the programming mode and return to the normal use of the espresso machine.
- Page 56 Program Dose • This parameter allows the operator to cancel all the doses set. When the espresso machine is turned on, press and hold the T3 button to access the “Barista” programming. After about 5 seconds the following screen is displayed. Press the T3 button to enter the doses programming procedure.
- Page 57 Program Dose • This parameter allows the operator to cancel all the doses set. Press T1 or T2 to continue with the programming of the other parameters. Press T2 and T3 at the same time to exit the programming mode and return to the normal use of the espresso machine.
- Page 58 (only on ABR espresso machine models) Program Scales • This parameter enables the technician to set some scale parameters like: Enabling/disabling offset parameter; - Setting the weight reading time; - Calibrating the scales. When the espresso machine is turned on, press and hold the T3 button to access the “Barista”...
- Page 59 (only on ABR espresso machine models) Program Scales • This parameter enables the technician to set some scale parameters like: Enabling/disabling offset parameter; - Setting the weight reading time; - Calibrating the scales. Press the T3 button to return to the “Barista” programming. Press T1 or T2 to continue with the programming of the other parameters.
- Page 60 Water Dose • This parameter allows the operator to • This feature can be enabled or disabled. program the amount of water (brewing amount) for the hot water button. When the espresso machine is turned on, press and hold the T3 button to access the “Barista”...
- Page 61 Water Dose • This parameter allows the operator to • This feature can be enabled or disabled. program the amount of water (brewing amount) for the hot water button. To program the brewing time, press the water button to start and then press it again to stop when the desired dose is achieved.
- Page 62 Water Dose • This parameter allows the operator to • This feature can be enabled or disabled. program the amount of water (brewing amount) for the water button. Press the T3 button to return to the “Barista” programming. Press T1 or T2 to continue with the programming of the other parameters.
- Page 63 Coffee Boiler • This parameter allows the operator to • This parameter allows the operator to enable/disable the coffee boiler. program the coffee boiler temperature. Each group can have a different programming. When the espresso machine is turned on, press and hold the T3 button to access the “Barista”...
- Page 64 Coffee Boiler • This parameter allows the operator to • This parameter allows the operator to enable/disable the coffee boiler. program the coffee boiler temperature. Each group can have a different programming. CB Settings To exit the menu move between the parameters using the buttons T1 and T2 until the exit menu is Exit...
- Page 65 3UH,Q I X V LR Q R U 3UH% U HZ L Q J • This parameter allows the operator to pre-brewing cycle; during this time the program the time of pre-brewing of pump is active. Once the pre-brewing water with the coffee. Each group can cycle is over, the normal brewing cycle have a different programming.
- Page 66 & X S : D UP H U • This parameter allows the operator to • This function is displayed only on the enable or disable the cups heating models of espresso machine equipped function. with this accessory. Cup Warmer DISABLED When the espresso machine is turned on, press and hold the T3 button .
- Page 67 ([ L W0HQ X • This parameter allows the operator to exit the “Barista” programming and return to the normal use of the espresso machine. Menu P r ess B3 to Exit Menu Press the T3 button to exit the “Barista” programming and return to the normal use of the espresso P r ess B3 to Exit machine.
- Page 68 /DQ J X D J H • This parameter allows the technician to change the language of the display. Language ENG L ISH LaMarzocco 09:30 When the espresso machine is turned on, press and hold the T3 button . After about 10 seconds the 94.5 94.6 94.5 SB following screen is displayed.
- Page 69 Temperature Measurement Units • This parameter allows the technician to change the temperature display from degrees Celsius to degrees Fahrenheit and vice versa. Temp Units CELSIUS Enter P a ssword After accessing the “Technical” programming menu and entering the password, use the buttons T1 and T2 * * * * * * until the following screen is displayed.
- Page 70 • This parameter allows the technician to • The user name is displayed continuously program a 16 character user name. on the display on the second line. Name LaMarzocco Enter P a ssword After accessing the “Technical” programming menu and entering the password, use the buttons T1 and T2 * * * * * * until the following screen is displayed.
- Page 71 Program Dose • This parameter allows the operator to • It is possible to set the dose for both a program the amount of coffee (brewing short and a long shot on the same key. amount) each button • The setting of the first group is keyboard.
- Page 72 Program Dose • This parameter allows the operator to • It is possible to set the dose for both a program the amount of coffee (brewing short and a long shot on the same key. amount) each button • The setting of the first group is keyboard.
- Page 73 (only on ABR espresso machine models) Program Dose • This parameter allows the operator to • It is possible to set the dose for both a program the amount of coffee (brewing short and a long shot on the same key. weight) for each button on the keyboard.
- Page 74 (only on ABR espresso machine models) Program Dose • This parameter allows the operator to • It is possible to set the dose for both a program the amount of coffee (brewing short and a long shot on the same key. weight) for each button on the keyboard.
- Page 75 (only on ABR espresso machine models) Program Dose • This parameter allows the operator to select the coffee brewing mode among those available: pulse, mass and brew ratio. • PULSE mode: control of doses in volume • MASS mode: control of doses in mass •...
- Page 76 (only on ABR espresso machine models) Program Dose • This parameter allows the operator to select the coffee brewing mode among those available: pulse, mass and brew ratio. • PULSE mode: control of doses in volume • MASS mode: control of doses in mass •...
- Page 77 Program Dose • This parameter allows the operator to • For greater accuracy and consistency of view and manually change each dose for the doses, it is recommended that you each key. set each key. After accessing the “Technical” programming menu and entering the password, use the buttons T1 until the following screen is displayed.
- Page 78 Program Dose • This parameter allows the operator to • For greater accuracy and consistency of view and manually change each dose for the doses, it is recommended that you each key. set each key. Except for the first group, you can set the function for each key.
- Page 79 (only on ABR espresso machine models) Program Dose • This parameter allows the operator to • For greater accuracy and consistency of view and manually change each dose for the doses, it is recommended that you each key. set each key. After accessing the “Technical”...
- Page 80 (only on ABR espresso machine models) Program Dose • This parameter allows the operator to • For greater accuracy and consistency of view and manually change each dose for the doses, it is recommended that you each key. set each key. Press the button T3 to exit the submenu.
- Page 81 (only on ABR espresso machine models) Program Dose • This parameter allows the operator to • For greater accuracy and consistency of view and manually change each dose for the doses, it is recommended that you each key. set each key. After accessing the “Technical”...
- Page 82 (only on ABR espresso machine models) Program Dose • This parameter allows the operator to • For greater accuracy and consistency of view and manually change each dose for the doses, it is recommended that you each key. set each key. Press the button T1 or T2 to view the coffee mass of each group.
- Page 83 (only on ABR espresso machine models) Program Dose • This parameter allows the operator to • The dose can be set by pulses or by view and manually change each dose for mass (weight). each key. • For greater accuracy and consistency of the doses, it is recommended that you set each key.
- Page 84 Program Dose • This parameter allows the operator to copy the doses present of each key to the others. After accessing the “Technical” programming menu and entering the password, use the buttons T1 until the following screen is displayed. Press the T3 button to enter the doses programming procedure.
- Page 85 Program Dose • This parameter allows the operator to copy the doses present of each key to the others. Press T1 or T2 to continue with the programming of the other parameters. Press T2 and T3 at the same time to exit the programming mode and return to the normal use of the espresso machine.
- Page 86 Program Dose • This parameter allows the operator to cancel all the doses set. After accessing the “Technical” programming menu and entering the password, use the buttons T1 until the following screen is displayed. Press the T3 button to enter the doses programming procedure. Press the button T1 or T2 to display the following menu.
- Page 87 Program Dose • This parameter allows the operator to cancel all the doses set. Press T1 or T2 to continue with the programming of the other parameters. Press T2 and T3 at the same time to exit the programming mode and return to the normal use of the espresso machine.
- Page 88 Program Dose • This parameter enables the technician to check of the flowmeter. After accessing the “Technical” programming menu and entering the password, use the buttons T1 until the following screen is displayed. Press the T3 button to enter the doses programming procedure. Press the button T1 or T2 to display the following menu.
- Page 89 Program Dose • This parameter enables the technician to check of the flowmeter. Press T1 or T2 until the display shows the exit menu, press the T3 button to return to the G r oup Dose Exit “Technical” programming. Press T1 or T2 to continue with the programming of the other parameters.
- Page 90 (only on ABR espresso machine models) Program Scales • This parameter enables the technician to set some scale parameters like: Enabling/disabling offset parameter; - Setting the weight reading time; - Calibrating the scales; - Updating the scale software. After accessing the “Technical” programming menu and entering the password, use the buttons T1 until the following screen is displayed.
- Page 91 (only on ABR espresso machine models) Program Scales • This parameter enables the technician to set some scale parameters like: Enabling/disabling offset parameter; - Setting the weight reading time; - Calibrating the scales; - Updating the scale software. Calibrate Press the T3 button to start the calibration procedure.
- Page 92 (only on ABR espresso machine models) Program Scales • This parameter enables the technician to set some scale parameters like: Enabling/disabling offset parameter; - Setting the weight reading time; - Calibrating the scales; - Updating the scale software. Use T1 and T2 to display the hardware and software version installed.
- Page 93 Water Dose • This parameter allows the operator to • This feature can be enabled or disabled. program the amount of water (brewing amount) for the water button. After accessing the “Technical” programming menu and entering the password, use the buttons T1 and T2 until the following screen is displayed.
- Page 94 Water Dose • This parameter allows the operator to • This feature can be enabled or disabled. program the amount of water (brewing amount) for the water button. To program the brewing time, press the water button to start and then press it again to stop when the desired P r ogram Water Dose dose is achieved.
- Page 95 : D WHU' R V H • This parameter allows the operator to • This feature can be enabled or disabled. program the amount of water (brewing amount) for the water button. Water Dose Settings Water Dose Press the T3 button to return to the “Technical”...
- Page 96 & R I IHH% R L OHU • This parameter enables the technician though the temperature of the boiler to set various parameters of the coffee may vary slightly, the temperature of the boiler. water exiting the group is constant. •...
- Page 97 Coffee Boiler compensated by use of the “Coffee T. • It is not recommended that this number Offset” parameter. is changed. Changes to this parameter • The OFFSET parameter is used to can cause unexpected results. calibrate the coffee boiler temperature •...
- Page 98 & R I IHH% R L OHU Coffee Boiler Settings Alternatively, you can exit the “Technical” programming and return to the normal use of the espresso machine LaMarzocco 00:00 CB 93.8 °C SB by pressing T2 and T3 at the same time. DANG E R 7+ ( 67($ 0 % 2 ,/(5&...
- Page 99 Temperature Pressure Steam Boiler 247°F/119°C 1.0 bar • This parameter enables the technician 260°F/127°C 1.5 bar to set various parameters of the steam boiler. 264°F/129°C 2.0 bar • The temperature of saturated water is proportional to the pressure inside the •...
- Page 100 Steam Boiler { dZ ‰ Œ uš Œ .oo] vP t/d, WhDW oo} Á • š Z } À Œ oo] • ‰ v• ] vP ‰ Œ • • µ Œ ] vš Z Œ Á š Z š Z v] ] v š } • oš š Z Ÿ À Ÿ } v } ( } ] oŒ...
- Page 101 6WHDP % R L OHU within approximately one minute of the • This procedure is recommended in case temperature reaching 140°C, disable the machine should remain inactive for the function and replace the valve. more than 8 hours and in any case at •...
Need help?
Do you have a question about the strada av and is the answer not in the manual?
Questions and answers