Table of Contents
Advertisement
Quick Links
Advertisement
Table of Contents

Related Manuals for NZ AutoTraps AT220

Summary of Contents for NZ AutoTraps AT220
- Page 1 AT220 Manual NZ AutoTraps...
-
Page 2: Table Of Contents
ONTENTS AT220 Components ..........2 Health & Safety: ............ 3-4 Trap Button and LED ..........5 Setting up the AT220 ..........6 Package contents: ............6 Mounting the AT220: ..........7-8 Filling the bait: ............... 9 Bait Pouch Hints: ............10 Connecting/Replacing the battery: ...... -
Page 3: At220 Components
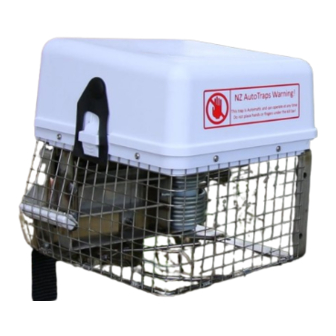
2 AT220 C OMPONENTS Possum keyhole Bait Bottle ( Older Model) Or Pouch (under lid). Trigger Eyes Kill Bar Trap PCB controller Spring kill power Trap Reset Motor Rechargeable Drive Assembly Battery. NZ AutoTraps AT220 Manual 7/31/2023... -
Page 4: Health & Safety
& S EALTH AFETY The AT220 is designed to kill Possums and can cause serious harm to the user if not treated with care and caution. The trap trigger is sensitive and can be activated by a bump or knock. - Page 5 ✓ If any necessary intervention is in the path of the kill bar, then we recommend to use the NZAT Long Gripper, see page 17 NZ AutoTraps AT220 Manual 7/31/2023...
-
Page 6: Trap Button And Led
It is important to identify these before continuing as they are required in a substantial portion of the tasks. Please find them now Button LED (light) NZ AutoTraps AT220 Manual 7/31/2023... -
Page 7: Setting Up The At220
AT220 ETTING UP THE ACKAGE CONTENTS AT220 automatic resetting and rebaiting trap • 1x battery pack • 1x complementary battery charger (Single purchases only) * • 500ml bait bottle or 350ml bait pouch • 2x mounting screws *Bulk and repeat purchases may not include a charger... -
Page 8: Mounting The At220
AT220: OUNTING THE Follow carefully to maximise the capabilities of the AT220 WARNING: BEFORE MOUNTING OR HANDLING THE AT220 BE SURE THE KILL BAR IS DOWN AND THE BATTERY IS DISCONNECTED For Possums, rats, and mice: The trap is best mounted 300mm (bottom of rat ladder! )- above a ramp or small platform. - Page 9 Check bait block overflow: The best trap and ramp position is when bait block overflow runs on to the keyhole and then on to the ramp. Reposition the trap or ramp as required to let the bait overflow fall on to the ramp. NZ AutoTraps AT220 Manual 7/31/2023...
-
Page 10: Filling The Bait
Select trap Auto. Press the Button 4 times, LED changes to green and the trap reset will restart. Extra Bait can be Purchased from our Website: NZAutoTraps.com NZ AutoTraps AT220 Manual 7/31/2023... -
Page 11: Bait Pouch Hints
The pouch lies on its side. The bottom fits under the loop-Black cable tie used for photo. The clear pipe is pushed through the cap after the pouch is in place. NZ AutoTraps AT220 Manual 7/31/2023... -
Page 12: Connecting/Replacing The Battery
If the trap is not set: the LED will be constant green and begin resetting OR the LED will blink a red fault code. Refer to LED functions page 19 for all the LED functions. NZ AutoTraps AT220 Manual 7/31/2023... -
Page 13: Charging The Battery
APPROXIMATELY AN HOUR FOR THE RED LED TO INDICATE IT IS CHARGED WARNING: WHEN YOU UNPLUG THE USB END ALSO UNPLUG THE BATTERY. DO NOT LEAVE THE BATTERY CONNECTED TO THE USB FOR EXTENDED PERIODS NZ AutoTraps AT220 Manual 7/31/2023... - Page 14 Once it is set the LED will go out, if you now Press the Button once, the LED blinks green, highlighting that your trap is set and working. If not blinking green see Button and LED page 19-20 NZ AutoTraps AT220 Manual 7/31/2023...
-
Page 15: Quick Visit Checks
To fire the trap during the day you can press the Button once to get the green light, the trap is now in manual mode and the trigger is active. THE TRAP CAN STILL FIRE IF BUMPED. NZ AutoTraps AT220 Manual 7/31/2023... -
Page 16: Clearing Set Up
To make clearing easier we want the trap to be partially set. Follow the flow chart as below, with the following images showing what 1/2-3/4 set means when viewing the kill bar sprocket lifting lug. NZ AutoTraps AT220 Manual 7/31/2023... - Page 17 Reset Lug at 1/2-3/4 set position. Trap showing 1/2 set position, note position of sprocket lifting lug at approx. 1/2 way along kill bar plate. (Half set) NZ AutoTraps AT220 Manual 7/31/2023...
- Page 18 2 presses of button LED chenages to red . (Trap reset Drive manual mode) Note: Manual Pump mode will time out after 20 minutes. Use Option 1 if you are wanting to disable the trap for extended periods. NZ AutoTraps AT220 Manual 7/31/2023...
-
Page 19: Clearing Debris
Disconnect the battery if you are wanting this state for extended periods. WARNING: DO NOT PUT HANDS OR FINGERS UNDER THE KILL BAR. MAINTAINANCE OF THE TRAP CAN BE PERFORMED SAFELY WITHOUT PLACING HANDS INSIDE OF THE TRAP NZ AutoTraps AT220 Manual 7/31/2023... -
Page 20: Led And Button Functions
The Button has 4 different press combinations, 1 press, 2 presses, 3 presses and 4 presses. Remember to delay at least three seconds between combinations. The trap has three different modes, automatic, Trap reset drive manual mode and pump drive manual mode. NZ AutoTraps AT220 Manual 7/31/2023... -
Page 21: Led Functions
To press the Button will start the reset sequence LED constant Trap is in Reset Drive The Button will drive reset drive Manual when pressed 4 presses to end manual If left, manual will timeout and reset NZ AutoTraps AT220 Manual 7/31/2023... - Page 22 The Button will run the bait pump amber Manual when pressed 4 presses to end manual. If left, manual will timeout Trap just triggered. No action required. Possum detector is Bump trap, LED should flicker red working NZ AutoTraps AT220 Manual 7/31/2023...
-
Page 23: Button Functions
Four presses to exit manual hold in or bait if trap is in manual manual Note 1: Wait at least 3 seconds between press combinations. But when completing a combination, you will want to click the button quickly NZ AutoTraps AT220 Manual 7/31/2023... -
Page 24: Making The Trap Safe
Long term safe is where the kill bar is down resting against bottom plate, and the battery is disconnected. To make the trap “Long Term Safe” first make the trap short term safe as described above then disconnect the battery. NZ AutoTraps AT220 Manual 7/31/2023... -
Page 25: Trouble Shooting
Trouble Shooting-Use this guide to step through a trap problem. ’ ½ RAP WON T RESET OR IS ONLY NZ AutoTraps AT220 Manual 7/31/2023... -
Page 26: Trap Keeps Going Off
RAP KEEPS GOING OFF NZ AutoTraps AT220 Manual 7/31/2023... -
Page 27: Trap Wont Trigger
RAP WONT TRIGGER ONTACT ETAILS Website: www.NZAutoTraps.com Further Resources : https://nzautotraps.com/pages/how-to-use-the-at220 Email:info@nzautotraps.com NZ AutoTraps AT220 Manual 7/31/2023...
Need help?
Do you have a question about the AT220 and is the answer not in the manual?
Questions and answers