Advertisement
Introduction
Thank you for purchasing the Interfit F121 flash light with touch screen. It benefits from several features including; a large power output and built-in regulating circuit, which can ensure stepless dimming and accurate colour temperature. The output of the modelling lamp can be adjusted independently or in line with the flash tube power adjustment. It has fast recycling speed and accurate power adjustments. It benefits from touch screen controls and can be triggered remotely using the Interfit on-camera remote INT910 (Sold separately). Please read these instructions before using the Interfit F121. Thank you.
Function instruction

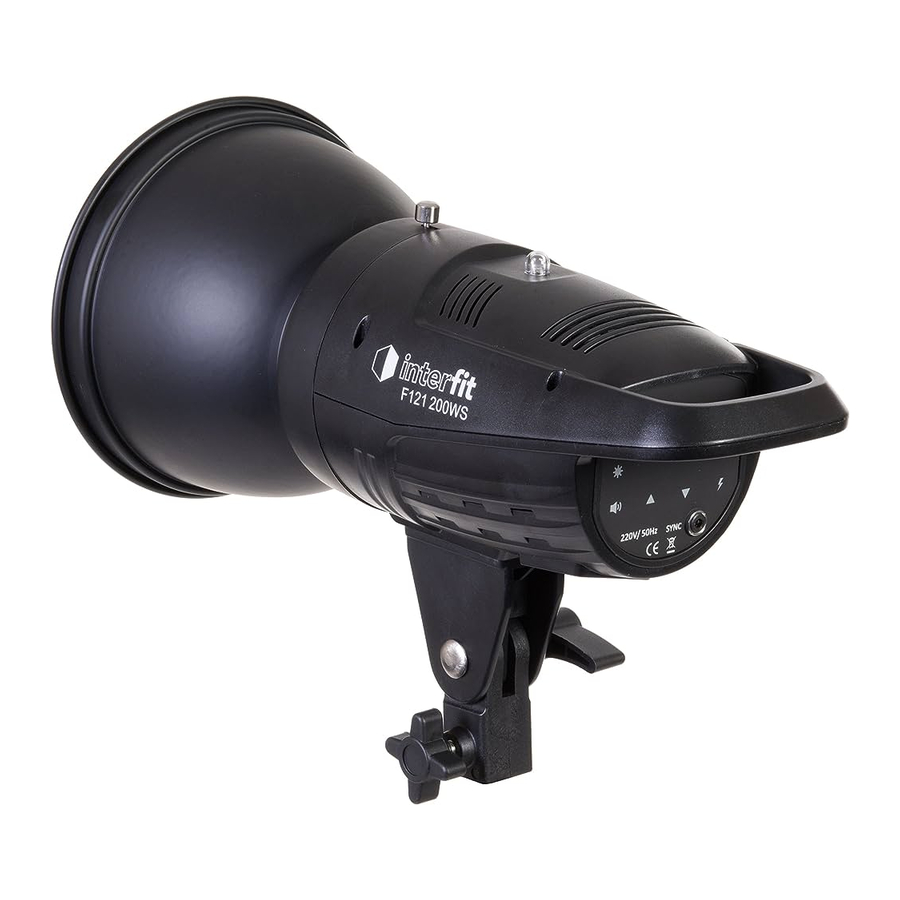
- sensor
- beep indicator
- modelling lamp indicator
- modelling lamp mode button
- flash tube power display
- beep on/off button
- increase power button
- power socket
- power switch
- sync socket φ3.5
- decrease power button
- test button
- recycling indicator
- wireless channel/sensor selection button
- channel indicator
- sensor indicator
Operation Instructions
- Please ensure the power switch is in the OFF position before connecting the power lead. Once connected, change the power switch to ON and the unit will power up.
- Once the unit has finished charging, the OK indicator will be lit. Then press the Test Button [L] to test the flash.
- To change the modelling lamp mode press [D], the Prop indicator will light up and the modelling lamp will be turned on, this indicates that your F121 is in sync mode and adjusting the power of flash tube will adjust the modelling lamp too.
Press the modelling lamp mode button [D] again, the Prop indicator will turn off, the Free indicator will be lit and the LED display will be flashing, which indicates that you are independently adjusting the modelling lamp brightness. If the LED display stops flickering, this indicates that your F121 has resumed back to flash power adjustment mode.
To switch the modelling lamp off press the modelling lamp mode button [D] again, so that the Free indicator and the modelling lamp are both off. - To turn the Audio Indicator (beep) on, press the beep on/off button [F], the Audio Indicator light will be lit. To turn off press the button again and the Audio Indicator light will turn off
- Press the Power Up button [G] to increase the power. The maximum power is
- Press the Power Down button [K] to decrease the power. The minimum power is 2.0. At the same time, the flash tube will flash once automatically to discharge the higher powered flash.
- To change the wireless mode, press the wireless channel/sensor selection button [N], the Cell indicator will light up, indicating the sensor flash triggering function is on; To switch the sensor flash triggering mode off and switch to wireless channel triggering press the button [N] again so that the first indicator light is lit (1), this indicates that the first channel is on.
Press the button [N] again, the first indicator will turn off, while the second indicator will turn on (2), indicating the second channel is on.
Press the button [N] again and the first and second indicator will be lit (1+2), which means the third channel is on.
Press the button [N] again, both the first and second light will be off, which means the fourth channel is on. - To utilize the wireless features the Interfit on-camera remote SKU: INT910 (Sold separately) is required.
Important Directions For Use
- Please connect the power cord to a properly grounded electrical outlet, switch off the power supply when not in use.
- To avoid burns or injury, do not touch the reflector and the lamp when in use since the temperature is very high when on.
- If the LED displays the error codes E1, E2 or E3 stop using the device immediately and contact the retailer from who you purchased your unit.
- To prevent damage to the internal components, the power of the modelling lamp should not be used above 75w.
- Do not use in a wet environment.
Wireless channel remote settings
(Interfit on-camera Remote INT910 sold separately)

Battery required: A23/MN21/LRV08
| Channel Number | Remote Display | Indicator |
| 1 |  | 1 |
| 2 |  | 2 |
| 3 |  | 1&2 on |
| 4 |  | 1&2 off |
Technical data
| Specification | 100WS | 200WS |
| Guide No. | GN28 | GN42 |
| 100% recycling time | 1-2S | |
| Flash adjustable rate | 2.0-7.0 | |
| Modelling lamp power | 75W | |
| Colour temperature | 5600˚K ± 200˚K | |
| Triggering mode | Wireless, Light sensor sync, Sync cord | |
| Trigger voltage | 5.6V | |
| Sensor sync distance | ≥10M | |
| Working voltage | 220V/50Hz or 120V/60Hz | |

Documents / ResourcesDownload manual
Here you can download full pdf version of manual, it may contain additional safety instructions, warranty information, FCC rules, etc.
Advertisement

Need help?
Do you have a question about the F121 and is the answer not in the manual?
Questions and answers