
Related Manuals for Harman AMX MIO-R3


Summary of Contents for Harman AMX MIO-R3
- Page 1 All manuals and user guides at all-guides.com IN STR U CT IO N MAN U AL M I O - R 3 M I O M O DE RO R - 3 R E M O TE KI T MI O- R3 MI O- R3- CC...
- Page 2 All manuals and user guides at all-guides.com IMPORTANT SAFETY INSTRUCTIONS READ these instructions. KEEP these instructions. HEED all warnings. FOLLOW all instructions. DO NOT use this apparatus near water. CLEAN ONLY with dry cloth. DO NOT block any ventilation openings. Install in accordance with the manufacturer's instructions. DO NOT install near any heat sources such as radiators, heat registers, stoves, or other apparatus (including amplifiers) that produce heat.
-
Page 3: Table Of Contents
All manuals and user guides at all-guides.com Table of Contents Table of Contents Overview ......................5 The Mio Modero® R-3 ....................... 5 FCC Compliance ........................ 5 Specifications ........................6 Touch And Tilt Sensor ....................... 6 Inserting or Replacing the Lithium-Ion Battery..............6 Battery Low Indicator .......................... - Page 4 All manuals and user guides at all-guides.com Table of Contents SLEEP-# ....................................15 @SSL...................................... 15 @SST ..................................... 15 @SWK ....................................15 ^TXT ...................................... 15 Send_Commands......................16 @BRT ..................................... 16 ^CFG ...................................... 16 ^UNI ...................................... 16 ZAP!......................................16 ZIGC ....................................... 16 ZIGP .......................................
-
Page 5: Overview
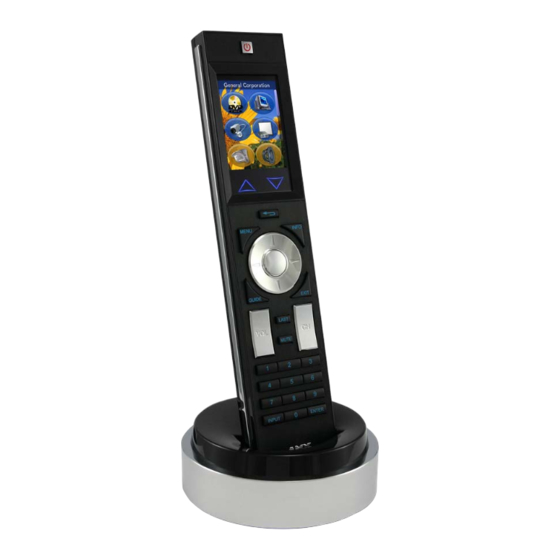
All manuals and user guides at all-guides.com Overview Overview ® The Mio Modero The Mio Modero R-3 is an elegant hand-held remote providing ZigBee Wireless control of a wide coverage area, two-way communication and control of every system device. Unique device IDs allow the R-3 to operate independently of other R-3 remotes within the same area. -
Page 6: Specifications
All manuals and user guides at all-guides.com Overview NOTE: This device has been evaluated and found to be compliant with the FCC Rules for RF Exposure when the device is operated at a minimum separation distance of 2 cm. from the user and nearby persons. Operation of this device at closer distances should be avoided. -
Page 7: Battery Low Indicator
All manuals and user guides at all-guides.com Overview Lithium-Ion Battery Correct path for battery wires and connector Rechargeable Battery Port Connection Rear view - Battery Compartment Rechargeable Battery Port on The Mio Remote FIG. 2 NOTE: Make sure to inset the battery wires in the case as shown in FIG. 2, or the wires may be damaged when replacing the battery door. -
Page 8: Patents
All manuals and user guides at all-guides.com Overview Turn the unit over so that the buttons are facing you. Lift the top assembly away from the PCB. If necessary, push out the standard buttons from the front of the top assembly. Drop on your custom button pad and verify the alignment with the guide posts on the PCB. -
Page 9: Setup Mode
All manuals and user guides at all-guides.com Setup Mode Setup Mode Overview The Setup mode allows you to set the following device features on the Mio R-3: Transmit Mode Timeout Adjustment Download Mode Debug Mode Firmware Version ... -
Page 10: Firmware Version
All manuals and user guides at all-guides.com Setup Mode Firmware Version Pressing button 5 on the remote displays the remote and ZigBee firmware versions currently loaded on the remote. To view the available firmware versions, press the Move Up arrow on the scroll wheel (refer to the The Mio Modero® R-3 section on page 5 for more information) to scroll up. -
Page 11: Programming The Mio R-3
All manuals and user guides at all-guides.com Programming The Mio R-3 Programming The Mio R-3 Overview Most functionality of the Mio R-3 is handled using the KeypadBuilder application. Go to www.amx.com for the KeypadBuilder Instruction Manual. The Mio R-3 recognizes a select number of Serial Commands. For a full list and descriptions, consult the Serial Commands on page 13. -
Page 12: Channel Codes
All manuals and user guides at all-guides.com Programming The Mio R-3 Channel Codes The following table gives the channel codes associated with each button on the Mio R-3. Thirty-six of the buttons change channel codes based on what button was last pressed. Nine of the buttons always emit the same channel code regardless of what button was last pressed. -
Page 13: Serial Commands
All manuals and user guides at all-guides.com Programming The Mio R-3 Serial Commands The Mio R-3 remote supports a few commands that can be uploaded to the device using a terminal program such as HyperTerminal. These commands are not needed for normal usage or programming of the remote. Serial Commands @BRT Set Brightness level - This command can be used to customize the brightness of the red LEDs that backlight the power... -
Page 14: Gly
All manuals and user guides at all-guides.com Programming The Mio R-3 Serial Commands (Cont.) ^GLY Set a glyph to display Syntax: '^GLY-<variable text address range>,<glyph number>'" Example: SEND_COMMAND Panel,"'^GLY-1,10'" Set a glyph with index 10 to the Mio-R3 display. Note: This only works if a glyph f ile has been loaded from KeypadBuilder. IRMODE #\ Sets the IR transmission frequency to either 38 or 455KHz Syntax:... -
Page 15: Sho
All manuals and user guides at all-guides.com Programming The Mio R-3 Serial Commands (Cont.) ^SHO Show or hide text with a set variable text range Syntax: "'^SHO-<variable text address range>,<command value>'" Variables: • variable text address range = 1 - 6; the address range corresponds to the dynamic line number. •... -
Page 16: Send_Commands
All manuals and user guides at all-guides.com Programming The Mio R-3 Serial Commands (Cont.) ^UNI Set Unicode text. For the ^UNI command (%UN and ^BMF command), the Unicode text is sent as ASCII-HEX nibbles. Syntax: SEND_COMMAND <DEV>,"'^UNI-<vt addr range>,<button states range>,<unicode text>'" Variables: •... -
Page 17: Fml
All manuals and user guides at all-guides.com Programming The Mio R-3 Send_Commands (Cont.) ^FML Sets a line of the display to a menu line Syntax: "'^FML-<variable text address range>,S'" Variables: • variable text address range = 1; the address range corresponds to the dynamic line number. Example: SEND_COMMAND Panel,"'^FML-1,S'"... -
Page 18: Jst
All manuals and user guides at all-guides.com Programming The Mio R-3 Send_Commands (Cont.) ^JST Set text alignment using a numeric keypad layout for those buttons with a defined address range Syntax: '^JST-<variable text address range>,<new text alignment>'" Variable: • variable text address range = 1; the address range corresponds to the dynamic line number. •... -
Page 19: Sst
All manuals and user guides at all-guides.com Programming The Mio R-3 Send_Commands (Cont.) @SST Sends a string to the master upon start up Syntax: "'@SST-<new text>'" Variables: • new text = 1 - 20 ASCII characters. Default string is STARTUP. Example: SEND_COMMAND Panel,"'@SST-Panel Start'"... -
Page 20: Mio Remote Charging Base
All manuals and user guides at all-guides.com Mio Remote Charging Base Mio Remote Charging Base Overview The Mio remotes are complemented with a Mio-RCC charging base (FG147-02). Insert MIO-R3 front Mio-RCC Charging Base FIG. 5 Angle barrel power connector (Bottom View) (Top View) Charging contacts Mio Remote Charging Base (Top and Bottom view) -
Page 21: Mio-Rcc Specifications
All manuals and user guides at all-guides.com Mio Remote Charging Base Mio-RCC Specif ications The specifications for the Mio remote charging base and kit are as follows: Mio-RCC (FG147-03K) with Base (FG147-02) Specif ications Dimensions (HWD) Charging Base - 1.61 (4.09 cm) (height); 4.25 (10.80 cm) (diameter) Lithium Ion Battery - 2.13”... - Page 22 All manuals and user guides at all-guides.com © 2016 Harman. All rights reserved. Modero, NetLinx, AMX, AV FOR AN IT WORLD, and HARMAN, and their respective logos are registered trademarks Last Revised: of HARMAN. Oracle, Java and any other company or brand name referenced may be trademarks/registered trademarks of their respective companies.
Need help?
Do you have a question about the AMX MIO-R3 and is the answer not in the manual?
Questions and answers