Advertisement
Quick Links
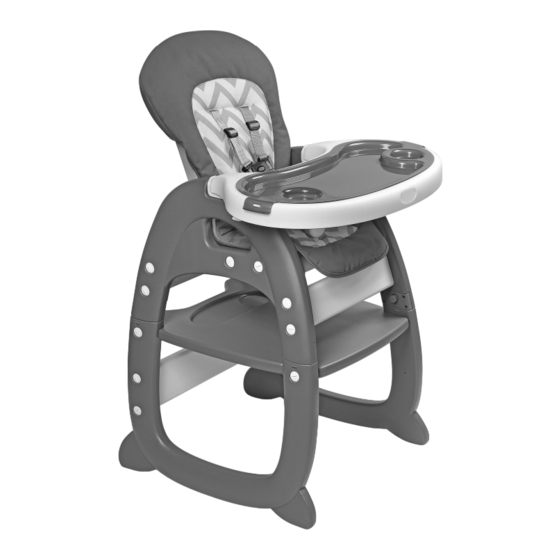
ENVEE II™ HIGHCHAIR
WITH PLAYTABLE
CONVERSION
Assembly Instructions. Adult Assembly
Required. Read all instructions before use.
This manual is part of the product and
must be kept for future reference.
MODEL NUMBER*:
93701 - Gray/Green
93702 - Gray/Chevron
VERSION CODE*:
2.0/0717/TG
* These numbers are needed if replacement parts are requested
FOR REPLACEMENT PARTS:
http://www.badgerbasket.com/parts
* Actual chair
may vary slightly from shown
Badger Basket
, PO Box 227, Edgar, WI 54426-0227 USA • Web: www.badgerbasket.com
®
U.S. Based Customer Service Toll-Free (Mon-Thurs 7:00 AM-4:00 PM CST): 1-800-236-1310
2.0/0717/TG
Phone: 715-352-2311 • Fax: 715-352-3163
Advertisement

Related Manuals for Badger Basket ENVEEII 93701


Summary of Contents for Badger Basket ENVEEII 93701
- Page 1 * These numbers are needed if replacement parts are requested FOR REPLACEMENT PARTS: http://www.badgerbasket.com/parts * Actual chair may vary slightly from shown Badger Basket , PO Box 227, Edgar, WI 54426-0227 USA • Web: www.badgerbasket.com ® U.S. Based Customer Service Toll-Free (Mon-Thurs 7:00 AM-4:00 PM CST): 1-800-236-1310 2.0/0717/TG...
-
Page 2: Before You Begin Assembly
RESULT IN SERIOUS INJURY OR DEATH READ ALL INSTRUCTIONS before use of this product. Keep instructions for future use. Use only the parts and hardware provided by Badger Basket . Do not use the product if it is damaged, broken, or missing parts. Hardware ®... - Page 3 TABLE CAP CHAIR RAIL ASSEMBLY TOOL C×2 D×4 A×1 SEAT ASSEMBLY WITH PAD AND 5PT HARNESS TABLE RAIL CHAIR LEFT SIDE CHAIR RIGHT SIDE B×1 G×1 E×1 F×1 TABLE LEFT SIDE MAIN TRAY T-BAR H×1 N×1 K×1 TABLE TOP J×1 SEAT BOLT INSERT TRAY FRONT FEET...
- Page 4 STEP 1: Connect the SEAT BOTTOM (B) to the SEAT BACK (B). Secure the belt for the SEAT PAD (B). Fully insert the SEAT BOLT (L) through the hinge on the SEAT ASSEMBLY (B).
- Page 5 STEP 2: Insert the SEAT ASSEMBLY (B) into the corresponding holes on the CHAIR RIGHT SIDE (F). Insert the TWO CHAIR RAILS (C) into the corresponding holes on the CHAIR RIGHT SIDE (F). The Chair Rails will insert only one direction (match up the shape of the holes). Attach the CHAIR LEFT SIDE (E) to the SEAT ASSEMBLY (B) and TWO CHAIR RAILS (C).
- Page 6 STEP 3: Insert the TABLE TOP (J) into the corresponding holes on the TABLE RIGHT SIDE (I). YOU MUST MATCH UP THE D1 and D2 INDICATORS THAT ARE MOLDED INTO THE PLASTIC PARTS. Insert the TABLE RAIL (G) into the corresponding holes on the TABLE RIGHT SIDE (I). The Table Rail will insert only one direction (match up the shape of the holes).
- Page 7 STEP 4: CHAIR connects securely to the TABLE at each of the four legs, as shown here. You will hear an audible "click" to indicate the parts are properly connected together. Gently tug upwards on the chair to be sure all four legs are properly connected.
- Page 8 3 POSITIONS To recline the seat, press and hold the latch on the rear of the seat, and push the seat back forwards or backwards as needed. You have a choice of three positions. When you release the latch, you will hear an audible "click"...
- Page 9 STEP 6: To convert the HIGHCHAIR to a TABLE AND CHAIR, first remove the tray,then push in the release buttons on the chair legs and pull up on the chair to separate it from the table. Next use the FOUR TABLE CAPS (D) to cover the connecting posts on the table. The caps and table posts are permanently marked to help you align them properly (D1, D2, D3, and D4)
- Page 10 Follow these diagrams for removing/attaching the seat pad as needed for cleaning and maintenance. These diagrams show how to unbuckle and remove the harness belts and remove the pad, and then reverse the process for putting it together again.
Need help?
Do you have a question about the ENVEEII 93701 and is the answer not in the manual?
Questions and answers