Table of Contents
Advertisement
Quick Links
PRODUCT MANUAL
Rotary Surface Cleaner Washer
4000PSI, 21" Surface Cleaner,16" Water Broom
MODEL: TMG-GSW40
Please read the product manual completely before assembly
Check against the parts list to make sure all parts are received
Wear proper safety goggles or other protective gears while in assembly
Missing parts or questions on assembly?
Please call: 1-877-761-2819 or email: cs@tmgindustrial.com
Do not return the product to dealer, they are not equipped to handle your requests
WWW. T M G IND US T R I A L .C O M
T ol l Fr e e: 1 - 8 7 7 - 7 6 1 - 2 8 1 9
Advertisement
Table of Contents

Related Manuals for TMG TMG-GSW40


Summary of Contents for TMG TMG-GSW40
- Page 1 PRODUCT MANUAL Rotary Surface Cleaner Washer 4000PSI, 21” Surface Cleaner,16” Water Broom MODEL: TMG-GSW40 Please read the product manual completely before assembly Check against the parts list to make sure all parts are received Wear proper safety goggles or other protective gears while in assembly Missing parts or questions on assembly? Please call: 1-877-761-2819 or email: cs@tmgindustrial.com...
-
Page 2: Table Of Contents
Contents 1. Introduction....................................02 2. Products Identification...................................03 3. Safety Guidelines...................................03 4. Products Specifications.................................07 5. Parts Identification and Features..............................08 6. Unpacking &Assembly...................................12 7. Setting Up the Before Use................................12 8. Safe Working Environment................................15 9. Start up and Stopping Procedure..............................16 10. Operation.......................................17 11. Stopping the Pressure Washer..............................18 12. -
Page 3: Products Identification
2. Products Identification RECORD IDENTIFICATION NUMBERS If you need to contact an Authorized Dealer for information on servicing, always provide the product model and identification numbers. You will need to locate the model, revision and serial number for the machine and record the information in the places provided below. - Page 4 3. Safety Guidelines (continued) DANGER- RISK TO BREATHING • Running engine gives off carbon monoxide, an odorless, colorless, poison gas. • Breathing carbon monoxide can cause nausea, fainting or death. • Some chemicals or detergents may be harmful if inhaled or ingested, causing severe nausea, fainting or poisoning.
- Page 5 3. Safety Guidelines (continued) WARNING-RISK TO FLUID INJECTION • The high pressure stream of water that this equipment produces can cut through skin and its underlying tissues, leading to serious injury and possible amputation. Spray gun traps high water pressure, even when engine is stopped and water is disconnected, which can cause injury.
- Page 6 3. Safety Guidelines (continued) DANGER-- RISK OF HOT SURFACES • Contact with hot surfaces, such as engines exhaust components, could result in serious bum. During operation, touch only the control surfaces of the pressure washer. Keep children away from the pressure washer at all times. They may not be able to recognize the hazards of this product. DO NOT let hoses come in contact with very hot engine muffler during or immediately after use of your pressure washer.
-
Page 7: Products Specifications
4. Products Specifications Model No. TMG-SCW40 Max Pressure 4000PSI Max Flow 4.5GPM Pump Model TMG-PMP48,Triplex, Engine Direct Drive Power and Type KOHLER CH440, Manual Start High Pressure Hose ID5/16" x 30FT Nozzle 0°、15°、25°、40° and Soap Surface Cleaner 21” Water Broom 16”... -
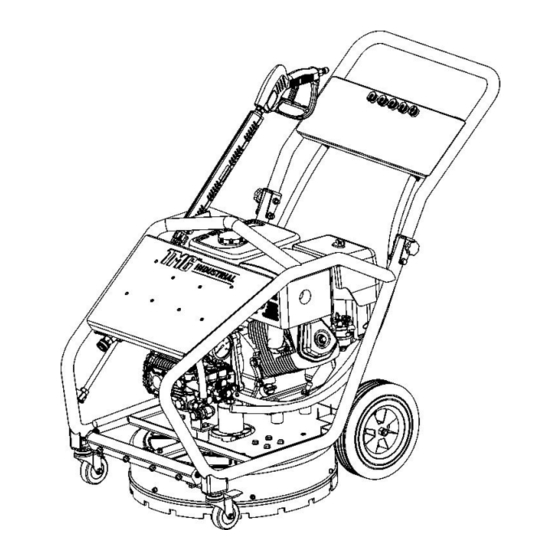
Page 8: Parts Identification And Features
5. Parts Identification and Features Surface Cleaner W W W . T M G I N D U S T R I A L . C O M P 0 8 / 3 1 T o l l F r e e : 1 - 8 7 7 - 7 6 1 - 2 8 1 9... - Page 9 5. Parts Identification and Features (Continued) 5.1 Triplex Pump 5.2 Surface Cleaner W W W . T M G I N D U S T R I A L . C O M P 0 9 / 3 1 T o l l F r e e : 1 - 8 7 7 - 7 6 1 - 2 8 1 9...
- Page 10 5. Parts Identification and Features (Continued) 5.3 Engine 5.4 Standard Accessories W W W . T M G I N D U S T R I A L . C O M P 1 0 / 3 1 T o l l F r e e : 1 - 8 7 7 - 7 6 1 - 2 8 1 9...
- Page 11 5. Parts Identification and Features (Continued) 5.1 General Technology PSI: Pounds per square inch -common unit measure used for water pressure, air pressure, hydraulic pressure and pounds of force. GPM: Gallons per minute (liters per minute [metric]) -common unit measure used for flow rate of water. Bypass Mode:...
-
Page 12: Unpacking &Assembly
6. Unpacking & Assembly 6.1 Unpacking 1.Carefully cut the box down the sides then remove the tool and any accessories from the box. Make sure than all items are included Unit is heavy. Do not attempt to lift and remove the pressure washer unit from the carton. - Page 13 7. Setting Up Before Use (Continued) 7.2 Add Oil To The Engine 1. Place pressure washer on a flat, level surface. 2. Clean area around oil fill and remove yellow oil fill cap. 3. Using oil funnel (optional), slowly pour contents of provided oil bottle into oil fill opening.
- Page 14 7. Setting Up Before Use (Continued) 7.4 Attaching High Pressure Hose to Spray Gun 1. Pull back the slip ring on quick-disconnect fitting of high pressure hose. 2. Insert quick-disconnect plug on spray gun into female quick-disconnect on high pressure hose 3.
-
Page 15: Safe Working Environment
8. Safe Working Environment Pressure Washer Location Clearances and Air Movement • Exhaust heat/gases can ignite combustibles, structures or damage fuel tank causing a fire. Keep at least 5 ft. (1.5 m) clearance on all sides of pressure washer including overhead. Place pressure washer in a well ventilated area, which will allow for removal of deadly exhaust gas. -
Page 16: Start Up And Stopping Procedure
9. Startup Procedure • RISK OF EYE INJURY. Spray can splash back or propel objects. • Always wear safety goggles when using this equipment or in vicinity of where equipment is in use. • Before starting the pressure washer, be sure you are wearing adequate safety goggles. -
Page 17: Operation
10. Operation 1. Washing With Water Broom 1. Ensure all connections are secure. Turn the water supply completely "ON". (DO NOT START PRES-SURE WASHER!) 2. Turn the Water Broom Switch ON, water will begin flowing from the nozzles of the Surface Cleaner. Ensure nozzles are not clogged and spray pattern is not erratic. -
Page 18: Stopping The Pressure Washer
11. Stopping the Pressure Washer How to Stop Your Pressure Washer 1. To stop the engine using the ON/OFF switch: Turn the Ignition switch to OFF, close the fuel valve. 2. To stop the engine using the Fuel Valve: Close the Fuel Valve and wait for the engine to stop. NOTE: Avoid letting fuel remain in the carburetor for lone periods as this can clog carburetor passages with impurities resulting in malfunctions. -
Page 19: Adjusting Spray Pressure
13. Adjusting Spray Pressure Pressure Rinsing 1. Remove black spray tip from nozzle extension. 2. Select and install desired high pressure spray tip. 3. Keep spray gun a safe distance from area you plan to spray. 4. Increase (decrease) spray pressure by turning pressure control knob clockwise (counterclockwise). -
Page 20: Maintenance
15. Maintenance To ensure efficient operation and longer life of your pressure washer a routine maintenance schedule should be prepared and followed. If the equipment is used in unusual conditions such as high-temperature or dusty conditions more frequent maintenance checks will be required. Before performing any maintenance be aware that the equipment should be completely shutdown, depressurized and allowed to cool down. - Page 21 15. Maintenance ( Continued) 15.5 High Pressure Hose: The high pressure stream of water can cut Replace the high pressure hose when the hose through skin and its underlying tissues, leading to serious injury and possible have any of the below circumstance: amputation.
-
Page 22: Storage
16. Storage 1. After General / Regular Use 1 . When completing pass through drain, watch for tape marker on hose as you pull the hose out. 2. Reduce pressure gradually with pressure regulator knob until pressure gauge is at zero. 3. -
Page 23: Troubleshooting
17. Troubleshooting PROBLEM PROBABLE CAUSE SOLUTION Engine shuts down 1. 0ut of fuel. 1. Fill fuel tank. when running. 2. Low Engine Oil 2. Add oil. 1. Rocker switch set to "OFF" position. 1. Set switch to "ON" position. 2. Fuel valve is in "OFF" position. 2. - Page 24 17. Troubleshooting ( Continued) PROBLEM PROBABLE CAUSE SOLUTION 1. Kinked or collapsed garden hose. 1. Remove kink or replace worn hose. 2. Water supply not turned on. 2. Turn water supply on. No Water Flow. 3. Clogged nozzle. 3. Remove nozzle & clean orifices. 4.
- Page 25 17. Troubleshooting ( Continued) PROBLEM PROBABLE CAUSE SOLUTION 1. Seal has drag. 1. Allow for break-in period. Rotating Bar Will 2. Snap ring dislodged. 2. Do not use! Contact your customer service. Not Rotate 3. Seal malfunction. 3. Do not use! Contact your customer service. 4.
-
Page 26: Pressure Washer Exploded View & Parts List
18. Exploded View & Parts List W W W . T M G I N D U S T R I A L . C O M P 2 6 / 3 1 T o l l F r e e : 1 - 8 7 7 - 7 6 1 - 2 8 1 9... - Page 27 18. Exploded View & Parts List (Continued) REF NO. DESCRIPTION Q’TY REF NO. DESCRIPTION Q’TY Nut M6 Spray wand Pressure gun Bolt M8x30 Pressure pump Engine Bolt M8x35 0 degree nozzle tip Spring washer D8 15 degree nozzle tip Plain washer D8 25 degree nozzle tip Pressure gauge 40 degree nozzle tip...
- Page 28 18. Exploded View & Parts List (Continued) SURFACE CLEANER ASSEMBLY REF NO. DESCRIPTION Q’TY REF NO. DESCRIPTION Q’TY Clevis pin Nut M10 Bridge pin Fixing support Clamp ring Retainer Bolt Rotary wheel Lower plate Aluminum support Swivel assembly Spray bar Deck Spray nozzle Nut M6...
- Page 29 18. Exploded View & Parts List (Continued) SWIVEL ASSEMBLY REF NO. DESCRIPTION Q’TY REF NO. DESCRIPTION Q’TY O-ring Grease nipple Swivel housing Bearing retainer O-ring Snap ring Compression spring Bearing back-up ring O-ring Upper bearing Bolt Bearing spacer Washer O-ring Lower bearing Back-up ring Rotor shaft...
- Page 30 18. Exploded View & Parts List (Continued) W W W . T M G I N D U S T R I A L . C O M P 3 0 / 3 1 T o l l F r e e : 1 - 8 7 7 - 7 6 1 - 2 8 1 9...
- Page 31 18. Exploded View & Parts List (Continued) PRESSURE PUMP ASSEMBLY REF NO. DESCRIPTION Q’TY REF NO. DESCRIPTION Q’TY Checking valve cap Bolt, crankcase cover Oil drain plug Outlet plug, manifold O-ring, oil drain plug Thermal relief valve Vented oil cap Washer, bolt, manifold Crankcase cover Bolt, manifold...
Need help?
Do you have a question about the TMG-GSW40 and is the answer not in the manual?
Questions and answers