Table of Contents
Advertisement
Quick Links
C2 Quick Reference Card
Your choice is appreciated!
C2 is the Fanotec's second generation of controllers, with OLED display,
external battery and support for two MECHA rotators.
Configurations like C2-P1-E2 and C2-E2-E2 are heavy-duty and
affordable dual-axis pan-tilt head solutions for full-size DSLRs and
lenses.
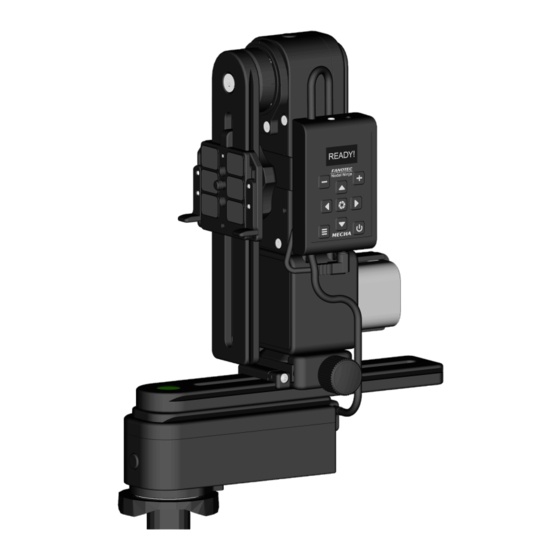
Get Your Equipment Ready
as shown in this image.
1 — Controller to upper rotator
built-in cable
2 — C2 controller
3 — Controller to lower rotator
built-in cable
4 — Upper rail
5 — Upper rotator
6 — Attachment strap
7 — External battery
8 — Lower rail
9 — Nadir adapter
10 — Lower rotator
Power on MECHA by long pressing the
can also be used as an emergency stop.
!
If the display is not showing anything, the battery may be
completely discharged and needs to be replaced.
Check which Working Mode is Set
1. After powering MECHA on, the display should
show the Preset (P) Menu, which means the SIMPLE
MODE is ON, and you can skip the next step.
2. If the display shows the rotators in use and the
IP address, the ADVANCED MODE is ON, and it is recommended to
switch to SIMPLE MODE. Long press the
8
Mode, next press the
button to switch to Config (C) Menu, then press
S
the
button to change the first option to SIMPLE MODE.
Check the battery level by pressing
Navigate through Config and Preset menus using the arrow buttons.
Switch between menus using the
Change and Check some Config Settings
+
OLED Brightness – Press the
+
9
either the
or
button to adjust its value (from 1 to 255).
0
button. The power button
8
button to enter Menu
0
. Press it again to exit.
8
button.
button to enter edit mode, then use
© 2023 FANOTEC | MECHA C2 Quick Reference Card v.1
ROTATOR 1 is.../ ROTATOR 2 is... — Press either
mode, then set the lower rotator / upper rotator.
ALWAYS ON NO POWER OFF — Press either
mode, then set MECHA to shut down automatically after a certain
number of minutes of inactivity, or vice versa, to keep it always on.
USE NN IR is ON / OFF — Press the
two options. Choose ON to be able to use Nodal Ninja IR Remote.
FIRMWARE VERSION — Press the
firmware version for all MCUs (microcontroller units) and connected
rotators. The first ‒ MECHA's firmware ‒ is the one you update over the
internet using the UPDATE options.
Simple Rotations
In the Preset (P) Menu, navigate to SIMPLE
ROTATIONS, then press
Set POSITION, as in the image.
After pressing the first button, quickly press the second one. Use the
second button combination for rotation in the opposite direction.
Lower rotator
4 9
5 9
• 45° rotations:
,
4 +
5 +
• 90° rotations:
,
4 8
5 8
• 180° rotations:
,
Note that the rotation angle for the above button combinations
can be set in the Config (C) Menu: INTERVAL 1/2/3.
For continuous rotation press and hold the arrow buttons, one at a
time. For example, for continuous left rotation, press and hold
0
When pressing
to check the battery level, you can also use the
button combinations above for simple rotations.
Upper Rail Positions
The basic positions required for presets are:
Parked (1) — the upper rail is oriented vertically down.
Level (2) — the upper rail is in the horizontal position.
Raised (3) — the upper rail is oriented vertically upwards.
S
+
or
to enter edit
S
+
or
to enter edit
S
button to switch between the
S
button to show the current
S
. The display will show:
Upper rotator
7 9
6 9
,
7 +
6 +
,
7 8
6 8
,
4
.
Advertisement
Table of Contents

Related Manuals for MECHA C2

Summary of Contents for MECHA C2
- Page 1 DSLRs and firmware version for all MCUs (microcontroller units) and connected lenses. rotators. The first ‒ MECHA's firmware ‒ is the one you update over the Get Your Equipment Ready internet using the UPDATE options.
- Page 2 Access the UI with Your Smartphone • Set MECHA in AP mode using the Config option: Default Wi-Fi is AP / STA / AP+STA / OFF. • Tap the Settings icon on your device. Under Wireless and Networks, Here are some basic settings: make sure Wi-Fi is turned on, then tap Wi-Fi.
Need help?
Do you have a question about the C2 and is the answer not in the manual?
Questions and answers