Table of Contents
Advertisement
Quick Links
Advertisement
Table of Contents

Related Manuals for MECHA C2

Summary of Contents for MECHA C2
- Page 1 MECHA C2 User’s Guide v.01.10 C2 USER’S GUIDE September 2, 2021 © 2021 FANOTEC...
-
Page 2: Table Of Contents
Simple Rotations ................16 Firmware Update Using a Hot-spot........C2’s Menu Mode ..........Using C2’s Menus ..............Creating a Preset in C2’s Menu Mode........ Panorama with Automatic Shooting Pattern Using C2’s Menu ..................Panorama Using C2’s Menu ......Setting the Rotators Using C2’s Menu ..........32 Test Panoramas .............. - Page 3 How to Access the UI.......... About the User Interface ............. Set MECHA in AP, STA, or AP+STA Mode at - + ≡ on Display ..47 Access the User Interface (UI) with a Smartphone ..Access the User Interface (UI) on Your Computer Connected to a Wireless Network ........
- Page 4 Loading a Preset ................85 Modifying a Preset................88 Saving a Preset.................88 Preset Power Code .................89 Show your own presets in C2’s Preset Menu ....Using a preset name as a base name ...........91 Directional preset name ..............92 MECHA’s Simple Scripting (MSS) ........
- Page 5 MECHA C2 User’s Guide v.02.8.2 How to Set Both MECHA and Smartphone to Have Internet Access............Panorama Using MECHA’s Buttons...... Panorama with Automatic Shooting Pattern Using only the MECHA’s Buttons................ MECHA’s Current Codes ........Current Codes List ..............Appendix MECHA’s S (Shots) Language........
- Page 6 How to use this User’s Guide Welcome to the MECHA C2 User’s Guide! C2 is our second generation of controllers, with OLED display, external battery, and support for two MECHA rotators. Before you start reading page-by-page, go section-by-section, looking at titles, tables, highlighted paragraphs, images, etc.
-
Page 7: Warnings
MECHA C2 User’s Guide v.02.8.2 WARNINGS WARNINGS to Dual Axis MECHA Users ● Test MECHA WITHOUT a camera mounted first! ● Please test for camera clearance before running any program. ● Test any preset supplied or adjusted WITHOUT a camera mounted FIRST, especially when the clearance is not enough. -
Page 8: Simple Mode
MECHA C2 User’s Guide v.02.8.2 Simple Mode Before practicing what you read in this section, please make sure that C2 works in Simple Mode. Power on MECHA by pressing the button for 3 to 5 seconds (long press). It may take about 35-45 seconds to start, then MECHA reaches the idle status and the display will show 1. -
Page 9: Introduction
Please see C2 – C1 Differences and Similarities for more details. The OLED display can guide you through all the major operations and settings, making C2 much more intuitive than the single-axis C1 controller with LED indicators only. © 2021 FANOTEC... -
Page 10: Mecha Controller C2 Features
● CAM port to trigger camera focus and shutter release. ● Support any camera with a wired remote release port. ● Multipurpose AUX port for ○ Commanding MECHA Start/Stop and other functions with a wired or wireless RF remote. ○ Commanding MECHA various functions with NN IR remote. -
Page 11: Before First Use
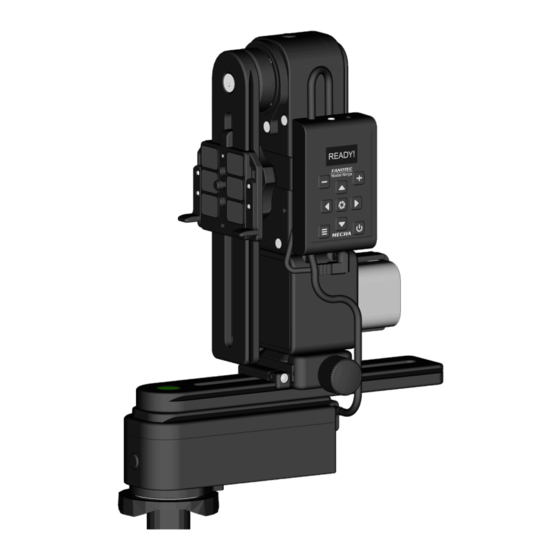
MECHA C2 User’s Guide v.02.8.2 Before First Use Get your equipment ready Note the numbers 1 and 2 printed on the back of the controller, and then connect the controller to the rotators as follows: ● the end of the cable 1 to the lower rotator ●... - Page 12 MECHA C2 User’s Guide v.02.8.2 The lower rotator is the rotator mounted under the lower rail of the device, and the upper rotator is the vertical rotator, mounted on the upper rail. Although the controller can be mounted in several ways, we recommend that you mount it on the upper rotator, using its attachment strap, as shown in the image below.
-
Page 13: Related Videos
Installation Instruction for Dual-Axis MECHA C2-E2 With NN6 (F9922) �� https://youtu.be/iEyR3Jq9j34 Installation Instruction for Dual Axis Mecha C2-E1 With NN3 MK2 (F9920) First Batch �� https://youtu.be/VKEyS24MNgY Installation Instruction for Dual Axis MECHA C2-E1 With NN3 MK3 (F9921) First Batch ��... -
Page 14: C2'S Buttons
It can also be used to switch between pair options (ON/OFF) and show details about the current option. Power button — use it to power on/off MECHA (long press), to confirm or cancel some operations and show the battery percentage. -
Page 15: Power On And Test
PANORAMA TEST PARKED option, which tells the MECHA C2 to execute a panorama to the right, as follows: 12 shots around, 3 rows ‒ at 0° and +/- 45° ‒ plus zenith and nadir, starting from parked position. -
Page 16: Check The Battery Level
If necessary, replace the battery. Always use a 9-19V battery, according to the technical specifications. If the display is not showing anything, the battery may be completely discharged and needs to be replaced. NOTE. When the BATTERY warning is shown on C2’s display, it can be canceled with the button. ��... - Page 17 MECHA C2 User’s Guide v.02.8.2 1. For the lower rotator ● For 45° rotations: < ○ Press then quickly press > ○ Press then quickly press , for the opposite direction. ● For 90° rotations: < ○ Press then quickly press >...
- Page 18 If the above simple rotations do not work as expected, the rotators in use may not be set correctly (see Set the Rotator Using C2’s Menu), or the intervals 1[-], 2[+] and 3[=] are not the default ones in the Config Menu or on the Configuration page.
- Page 19 MECHA C2 User’s Guide v.02.8.2 Parked, Level and Raised Positions Simple Rotations mentioned above are very helpful when the upper rail needs to be in a certain position. The basic positions required for presets are shown in the image below, and they are:...
-
Page 20: Firmware Update Using A Hot-Spot
MECHA, and wait until MECHA reaches the idle status (and the Preset (P) Menu is shown on C2’s display). ● If MECHA doesn’t reach this status, then please power it off, by pressing button 3 seconds, and contact us at mecha@nodalninja.com. - Page 21 The update may take up to 5 minutes, but it could take longer in case of slow Internet connection. For more details on using C2’s menus, please read C2’s Menu Mode. Please do not turn off MECHA while updating the firmware! © 2021 FANOTEC...
-
Page 22: C2'S Menu Mode
C2’s Menu Mode Using C2’s Menus C2’s current menus are Preset (P) Menu and Config (C) Menu. A preset is a set of instructions and configuration settings, that can be saved and used when needed, to perform specific operations much faster. For example, some presets contain all the information that MECHA needs to execute a whole panorama. - Page 23 Blank page numbers will be displayed in smaller fonts. Press the center button of C2 to confirm, execute or show details about the current option. Use these buttons to adjust values in edit mode.
-
Page 24: Creating A Preset In C2'S Menu Mode
MECHA C2 User’s Guide v.02.8.2 Creating a Preset in C2’s Menu Mode Creating a preset in C2’s Menu Mode is very simple, fast and preferable when you do not want to access the User Interface for various reasons. The preset can be used immediately to shoot a panorama and it can also be edited later or deleted if no longer needed. - Page 25 MECHA C2 User’s Guide v.02.8.2 ○ Image overlap (percent). Values in the range 5-80% are allowed, or go to the next parameter if you do not want to change the current value. ○ Coverage area: → 360 180 for a full panorama →...
- Page 26 MECHA C2 User’s Guide v.02.8.2 ○ Wake (W) — Pause for camera wake-up. ○ Before (B) — Pause before each triggering sequence. ○ After (A) — Delay after each triggering sequence or individual triggering. ○ Row order. Possible values for row order are: MDU, MUD, UMD, UDM, DMU, DUM, MD, MU, UM, UD, DM, DU, M, D, U, where M means middle row, D - down, U - up.
- Page 27 ○ Load profile — Light, Medium, and Heavy. ○ Speed in revolutions per minute. ○ Micro-stepping value, simple or combined. ○ Wait / Rewind — These options tell MECHA to wait after the last shot, or to rewind to the initial position. © 2021 FANOTEC...
- Page 28 MECHA C2 User’s Guide v.02.8.2 Press the button to cancel and exit edit mode, if necessary. ● A flashing parameter means the value can be adjusted using the buttons (hold down the desired button to speed up the adjustment). ></\ ●...
- Page 29 MECHA C2 User’s Guide v.02.8.2 What happens if the direction of rotation is not specified? If the direction of rotation is not specified when a preset is created, then when launching the preset from the Preset (P) Menu it will ask for direction (ROT.
-
Page 30: Panorama With Automatic Shooting Pattern Using C2'S Menu
This method requires the firmware version (1)2272 or newer, and works for any lens from 4 to 1000mm, including fisheye lenses. MECHA will compute a preset for your lens based on the data it receives when performing the following procedure: ●... - Page 31 ● The following message appears on the display to remind you what to do next, and you have 10 seconds to read it: ● After 10 seconds, MECHA starts to rotate slowly to the right, and you have to press the button when the target object is out of the camera's view, as stated in the message.
-
Page 32: Panorama Using C2'S Menu
The following options available in the Config (C) Menu can be used to tell MECHA what type of rotators are connected to it, if you purchased them separatelly, or changed the rotator type, or if you want to be sure MECHA has the correct one set. -
Page 33: Test Panoramas
PANORAMA TEST PARKED option: Press the button to confirm. This option tells the MECHA C2 to execute a panorama to the left or right, as follows: 12 shots around, 3 rows ‒ at 0° and +/- 45° ‒ plus zenith and nadir, starting from parked position. -
Page 34: Test Without Camera - Raised Position
MECHA C2 User’s Guide v.02.8.2 This option tells the MECHA C2 to execute a panorama to the left or right, as follows: 12 shots around, 3 rows ‒ at 0° and +/- 45° ‒ plus zenith and nadir, starting from level position. -
Page 35: Basic Information About Shooting
● If none of the available presets are suitable for the type of panorama you want to shoot, select any EMPTY option in the Preset (P) Menu and create a new preset as we have already shown in Creating a preset in C2’s Menu Mode section. -
Page 36: Shooting In Step-By-Step Mode
Custom Partial Panorama Using Two Corners When creating a preset using the C2’s Preset Menu, one can set a Coverage area less than 360°x180° if a partial panorama is needed. But this partial panorama is vertically centered. To be able to shoot a custom partial panorama, MECHA needs to know the upper left corner and down right corner of the area to be photographed. - Page 37 ● If necessary, after you finish setting the corners and Set POSITION is shown again on the display, you can set the initial view by using the arrow buttons. ● Then press the button to execute the preset. �� https://youtu.be/bleU7YEFZSc Partial Panorama Using Two Corners – MECHA C2 © 2021 FANOTEC...
-
Page 38: C2'S Menu Options
MECHA C2 User’s Guide v.02.8.2 C2’s Menu Options This chapter briefly describes C2's menu options to give you an idea about what you can do using the menu. First, to be able to use a certain option, find or navigate to that option <>/\... -
Page 39: Config (C) Menu
The main difference between the two modes is that in SIMPLE MODE you are always in one of C2's menus and some operations are therefore easier to perform. ● MECHA ID — Press the button to show the MECHA’s ID, which is an... - Page 40 This particular MECHA +ASSISTANT can be either C1 or C2 as long as it is in STA mode and is connected to the AP of the main C2 unit. You can set a fixed IP address for the +ASSISTANT unit, in its Configuration page, like IP:192.168.8.110 SN:255.255.255.0...
- Page 41 Say 100.0 for 100.0 mm. ○ Switch to REAL MOVE. Now MECHA creates a conversion factor and will interpret all the numeric values as real values. 100.0 will be 100 mm on the REAL device wherever these numeric values are used, in button intervals, presets, or scripts.
- Page 42 MECHA is powered off. If the upper rotator has a position sensor, MECHA will use it as reference and the rotation will be more accurate. When adjusting the LEVEl AMOUNT: ○...
- Page 43 10 seconds. ○ Now MECHA will count the shutter detections from camera via the AUX port and show on C2’s display the number of detections after 10 seconds of idling. For example, if you trigger the camera 4 times, the display should show 4 if the test is successful.
- Page 44 ○ If Rotator 2 sensor is DISABLED (or not supported), by pressing then quickly , MECHA will perform a 90º rotation up, and by pressing then quickly , it will perform a 90º rotation down.
- Page 45 90° and -90°. Other values may be useful for backlash reasons or to have a certain overlap. MECHA will use these values in scripts that contain Z and N. ● UPDATE — Press the button to re-update the current firmware.
- Page 46 MECHA C2 User’s Guide v.02.8.2 ○ After a few seconds, you are asked to repeat the step above, so press again the button when the reset option appears on the display. ○ Then the power button symbol start flashing on the display, which...
-
Page 47: How To Access The Ui
● pressing will set MECHA in AP+STA mode If you missed the setting time, power MECHA off and on again, and this time make sure you act faster. Also, if the desired option is already selected, then you don’t have to select it again. -
Page 48: Access The User Interface (Ui) With A Smartphone
Once the smartphone is connected to the MECHA’s SSID, the MECHA’s User Interface can be accessed in browser at 192.168.8.1 When MECHA is in STA or AP+STA, it can also connect to the SSID of a particular network, other than MECHA’s own SSID, and as a result the User Interface of MECHA can also be accessed at the address given in that particular network, like this: 192.168.1.100... -
Page 49: Access The User Interface (Ui) On Your Computer Connected To A Wireless Network
MECHA saves only the last accessed network. ● To be able to see MECHA’s UI on your PC, MECHA must be in STA, or AP+STA, mode. -
Page 50: Test Using The Ui
Simple, and – Advanced. Although C2 is designed to work for dual axis applications, you may use it for single axis applications as well, so with C2 you can use both dual axis (DAC) and single axis presets. UI Test ‒ Parked, Level, Raised To perform the same tests that you did before using the C2’s Preset (P) Menu,... - Page 51 MECHA C2 User’s Guide v.02.8.2 To load the preset, tap the [Load] button, if visible, under Presets list. Otherwise, it means the UI complexity is S (Simple) and some buttons and options are not visible, and the selected preset is already loaded.
-
Page 52: Advanced Mode
MECHA C2 User’s Guide v.02.8.2 Advanced Mode © 2021 FANOTEC... -
Page 53: User Interface (Ui)
Current Codes List the end of the guide. ○ Configuration page — User: admin, and default password: Mecha. ○ What’s new? — The page where you can find information about the current firmware version and the versions published so far. - Page 54 MECHA C2 User’s Guide v.02.8.2 ● Status Feedback — In the next area, the MECHA’s ID, the Refresh rate of the motor/controller status and the Current lower rotator are displayed, followed by the Current angle position for both rotators, and the Current status (shots remaining, position, repeat set).
- Page 55 MECHA will also offer to download a map.zip file containing three small .png images. The images are the same for any map. A high resolution set is also available here, with Mecha as zip password: https://www.nodalninja.com/MECHA-MAP/map-png.zip ● [Template] button — Downloads a PTGui file that can be applied to a real set of images.
- Page 56 ● TRG — Number of camera triggerings for each position. Select zero if no triggering is needed. When using automatic exposure bracketing in continuous shooting or self-timer mode, MECHA treats it as 1 triggering. In our example: 1 triggering. ● AF (Auto-Focus) — Duration of AF signal time, for example, 0.05. If the value is negative, the AF signal will be ON during the entire image sequence.
- Page 57 E:SHT C. or E:SHT C1 is set in preset. Both options work as a variable pause. In the case of the E: SHT C1 option, MECHA sends only One Signal to the camera and waits for TRG confirmations. This is useful...
- Page 58 NN IR Remote to continue. → E: BTN > CT — MECHA will only wait for TRG confirmations with the > button on the controller or NN IR Remote, then it will use the learned delay(s) to finish the preset.
- Page 59 ○ The 21< code switches MECHA to or off pause mode, the same as clicking the [Pause] button on UI, or on IR Remote. ○ While MECHA is in pause mode, the text „PAUSE” is shown on C2’s display. © 2021 FANOTEC...
- Page 60 MECHA C2 User’s Guide v.02.8.2 ○ If MECHA is in pause mode and a preset is started, MECHA will pause before every position, resulting in step-by-step movement, and the text „STEP BY STEP” is shown on C2’s display. > ○ When MECHA runs a preset and is paused, you can press , or on IR Remote, or [PAUSE/NEXT] on UI, to continue to the next position.
- Page 61 MECHA C2 User’s Guide v.02.8.2 ● [Delete] button — Deletes the selected preset. ● [Import] button — Imports a preset and displays it in the Presets list, or multiple presets at once, if all_presets(..).mps file is given when importing. ● [Export] button — Exports the selected preset, or exports all the presets, if Presets is selected.
- Page 62 ● [Reboot] button — Restarts MECHA, similar to restarting a computer. ● Default page at start — MECHA's home page, or start page, can be one of the following pages: Row, Ring, or New (like in our example). Select the desired option from the list.
- Page 63 MECHA C2 User’s Guide v.02.8.2 MECHA will show the connection status on the display when trying to connect to Wi-Fi in STA or AP+STA mode. The process can be stopped by pressing the button if you know that the targeted Wi-Fi is not in range.
-
Page 64: Configuration Page
Default Mode — The possible values for Default Mode are: AP, STA, AP+STA, No Wi-Fi. The Default Mode set here will be the current mode for MECHA after powering on. However, the Default Mode can be changed by pressing one of - + ≡... - Page 65 Wi-Fi power is 100. In our example (see the image below), it is 100. AP Mode SSID — The name of MECHA’s nettwork. This is how it is displayed in the list of available networks on your device.
-
Page 66: Sta Mode
MECHA C2 User’s Guide v.02.8.2 Using — This is the IP of the current device connected to MECHA. In our example, 192.168.2.187. STA Mode Static IP — Remember that the IP address to access the MECHA’s User Interface on your computer is dynamic. Therefore, it changes from time to time. -
Page 67: Rotator Settings
MECHA C2 User’s Guide v.02.8.2 Power OFF after — If this field is not empty, then the value specified here tells MECHA to power off if there is no activity a number of seconds equal to this value. The second Power OFF after field — The same as the first field, but it refers to the period of time immediately after powering on MECHA, when no presets are executed. -
Page 68: Buzzer Pwm And Start Page
Menu). If the test fails, please perform the test again with this option disabled. Shutter Confirmation via other MECHA — If enabled, the shutter confirmation will work via other MECHA for C2+ as well if camera and PC-Sync cable are connected to another C1/C2 mounted on hot shoe. © 2021 FANOTEC... - Page 69 ○ -45.0=1A rotates MECHA -45.0° from Home position, absolute. ○ ^45.0=1A rotates MECHA 45.0° from previous position, incremental. ○ ^-45.0=1A rotates MECHA -45.0° from previous position, incremental. ● H=1A returns MECHA to Home position set by HS or by the power button. © 2021 FANOTEC...
-
Page 70: Reverse Direction Of Rotations
Switch the Up - Down rotation when done by MECHA’s buttons — Check this checkbox if you want to change the sense of up/down rotation when it is done manually using the buttons. -
Page 71: Arrow Buttons
● Overlap on Height — 0.25 ● Overlap on Width — 0.25 Arrow Buttons Arrow buttons Speed [RPM] — Rotational speed when a button is held down. If the RPM is zero, pressing MECHA's directional buttons, the rotator will © 2021 FANOTEC... - Page 72 MECHA C2 User’s Guide v.02.8.2 start slowly and accelerates afterwards, if the button is kept pressed. Useful for precise alignment done with the buttons of the controller or IR remote. Arrow buttons Interval 1 [deg] — Rotation angle for <- >-...
-
Page 73: Favorite Codes
. Right after the rotation, this angle can be edited in the C2’s menu, with the possibility to omit the confirmation of the change, meaning that you can press the button instead of pressing the button as usual. - Page 74 Set Battery min in C Menu Battery min can be set in C2’s C (Config) Menu as well. In this case, it is recommended to fully charge the battery before powering on MECHA, then access this menu and adjust the value using the buttons.
- Page 75 Battery Extra Warning if Under Percent. The warning beep will be loud regardless of other beep settings. When the BATTERY warning is shown on C2’s display, the warning can be canceled with the button. Another warning will be shown when the battery reaches 0%.
- Page 76 How to test the BATTERY warning? First check the battery level on C2’s display, or find and select the BATTERY PERCENTAGE option in C (Config) Menu, page 1: Then enter any value greater then this in the field below: Scroll to the bottom of the Configuration page and click the [Apply] button to save the new settings.
-
Page 77: More From Server, Zlm, Firmware, Oled
— If enabled, MECHA C2 will start quickly and show the latest preset used, selected and ready to be executed. Another preset can be selected instead by pressing the arrow buttons on C2 controller. Or one can exit from C2’s P Menu with the button or switch to C Menu with the button. -
Page 78: Technical Details - Ip Addresses, Fw
IP addresses at which the User Interface can be accessed: ● the first is the static address for access from smartphones: 192.168.8.1 ● and the second, which is displayed only when MECHA is in STA mode, is the dynamic IP for accessing the User Interface on your computer. -
Page 79: Backup And Restore Data
[Restore Data] button — Uploads the archive downloaded with the [Backup Data] button. [Connect to Wi-Fi] button — Initiates the process of connecting to a Wi-Fi network to use MECHA in STA (Station) mode or for firmware update. Please User Interface – Connect to Wi-Fi for more details. -
Page 80: Other Updating Methods
MECHA C2 User’s Guide v.02.8.2 Other Updating Methods If MECHA is not connected to a Wi-Fi with Internet access, it will ask for a SSID name and password, as a guest asks if Wi-Fi is available in your home, to be able to check something on the Internet, a Wi-Fi the guest will connect the phone to. - Page 81 ● When the update is complete, a few beeps are heard, and the new firmware version is displayed at the top of the page. If it is not displayed in 1-2 minutes, refresh the page or reconnect the smartphone to MECHA, if necessary.
-
Page 82: Working With Presets
Being connected with your smartphone, or computer, to the MECHA’s SSID (MECHA’s Wi-Fi), enter one of the following urls in the browser address bar and tap Access, or press the Enter key (this will overwrite the preset already... - Page 83 , and . There are no numbers displayed on these buttons of C2 controller, but you may remember that they are also used to enter the numbers 1, 2 and 3, respectively. This parameter is required. ● The second parameter – s – is the number of shots around; the third parameter can be used instead.
-
Page 84: How To Create Your Own Presets Using The Ui
MECHA C2 User’s Guide v.02.8.2 How to Create Your Own Presets Using the UI Besides the very simple method with buttons only (see Panorama with Automatic Shooting Pattern), and the url with parameters method (see Programming a Preset Using Parameters), the following is the method using the UI. -
Page 85: Loading A Preset
Wi-Fi network (for example, one created by your wireless router), acting as a client. Out of the box, MECHA works in AP mode. Since it does not have a wireless modem, it does not have Internet access. A device connected to it may also lose Internet access. - Page 86 MECHA C2 User’s Guide v.02.8.2 To find out more about a preset, you can choose a higher level of complexity for the UI from the drop down list next to [info] button, at the top of the page. Select A3, which is the most advanced level.
- Page 87 ● 1 TRG — 1 triggering. This is the number of camera triggerings for each position. Select zero if no triggering is needed. When using automatic exposure bracketing in continuous shooting or self-timer mode, MECHA treats it as 1 triggering.
-
Page 88: Modifying A Preset
MECHA C2 User’s Guide v.02.8.2 ● 16+128 uStep — Micro-stepping value, simple or combined; for example, different values for acceleration + constant speed region. ● Medium Load — Means a profile for an average load. The other options are Light, Heavy, and Ring. -
Page 89: Preset Power Code
The preset name can be preceded by a power code of maximum 7 digits. This feature also allows you to execute the preset using MECHA’s buttons. For example, if the preset name is 01 C2 6 shots: P-> ○ use to execute the preset to the right, P-<... -
Page 90: Show Your Own Presets In C2'S Preset Menu
Menu Mode. By default, on the first page of C2’s Preset Menu are shown some default presets, while pages 2-8 are blank and can be used in two ways: ● either to create presets directly in the Preset Menu, as shown in Creating a preset in C2’s... -
Page 91: Using A Preset Name As A Base Name
030-039, then this preset is automatically listed on page 3, and so on. In short, to be able to see in C2’s Preset Menu a preset created in the User Interface, access the User Interface and rename the preset adding a code from the range 020-089 and a space to the beginning of the preset name. -
Page 92: Directional Preset Name
MECHA C2 User’s Guide v.02.8.2 ○ Press the button to select the preset 020 kit-lens-pano (the power code is shown on the display). ○ Press the button to enter the number for 1 and 2). > < ○ Press either the button to specify the direction of rotation. -
Page 93: Mecha's Simple Scripting (Mss)
MSS scripts are row and column oriented and help you photograph a panorama with few clicks or button presses, without the need to understand the script. You only provide the focal length, and MECHA generates the script. MECHA’s Simple Scripting (MSS) Starting with firmware version (1)2116, MECHA’s Simple Scripting (MSS) - Page 94 In the example above, the pause is infinite, and to continue you need to > press , the right button of MECHA, or the equivalent UI button, [RIGHT]. Now let’s have a closer look at scripting using the MSS Language. For dual axis applications, MECHA needs to know its starting position. This can be parked, level, or raised.
-
Page 95: Shooting Panorama Made Easy For Dual Axis
Why level? Because this is the default position in Preferred MSS pattern on the Configuration page. If you have changed this setting, then you need to position the upper rail according to your setting. 2. Connect to the MECHA's User Interface (see the chapter How to Access UI). -
Page 96: Mss Script Explained
MECHA C2 User’s Guide v.02.8.2 When you click/tap the OK button, MECHA creates a script for you to shoot a full panorama, according to the focal length provided: The settings provided by the script have priority over the other settings. - Page 97 Configuration page. If you notice that instead of a 90° rotation, MECHA seems to rotate more or less, the cause could be a wrong setting regarding the type of the rotators you use.
-
Page 98: What Needs To Be Changed, Sometimes, In Real Situations
MECHA C2 User’s Guide v.02.8.2 What Needs to be Changed, sometimes, in Real Situations Instead of a single Zenith, more Zeniths may be needed, say, for flare reasons, in which case Z can be replaced with Zx2, for example, which will produce 2 Zeniths 180°... -
Page 99: Using Pause In Mss Script
MECHA C2 User’s Guide v.02.8.2 Using Pause in MSS Script Let’s take a pause. Sometimes, to the above, we need a pause, say, before the horizontal row, or before Nadir, to be sure we are out of view. The pause can be added using P, so NN IR 0x12 will mean: at a tilt of 0°, a row of 12 positions, while... -
Page 100: Let's Take A More Dense Approach With More Photos Toward Gigapixel Imagery
45° degrees wide, instead of 360°, with the same camera-lens combo. To achieve this, we need to add (45), which tells MECHA that only a bit over 45 degrees should be taken. -
Page 101: Rewind After Each Row
For example, for 50mm (FF equiv.): SL,0x18,-28.30x17,-56.60x12,28.30x17,56.60x12, ZZ,NN,RW Shooting in Horizontal Zigzag Pattern The HZ term in MSS script indicates shooting in Horizontal Zigzag pattern. MECHA will change the sense of rotation after each row. For example, for 50mm (FF equiv.): © 2021 FANOTEC... -
Page 102: Script For 2 Focal Lengths - Mecha Dual Axis
Example of partial panorama with explicit intervals for lower rotator (24°) and upper rotator (36°) in Horizontal Zigzag, 4 rows, 8 columns: SL,54x8^24,18x8^24,-18x8^24,-54x8^24,HZ Script for 2 Focal Lengths - MECHA Dual Axis Script for shooting a spherical panorama using 50 mm and 24 mm lenses or focal lengths:... -
Page 103: Download More Presets From Server
For example, the sequence _P_ in a preset name means that the preset includes a pause. ● (S) in a preset name means that the preset is not saved yet on MECHA. ● Save the presets you find useful, as showed in... -
Page 104: How To Set Both Mecha And Smartphone To Have Internet Access
Smartphone to Have Internet Access In this chapter, we will explain how to set both MECHA and smartphone to have Internet access, and also how to enable the update and use your device for usual Internet browsing at the same time. - Page 105 MECHA, and to maintain it on while using MECHA, for example disable any automatic turn-OFF of hot-spot on phone/device. Now your device is connected to the Internet and to MECHA, and you can download presets from server. © 2021 FANOTEC...
-
Page 106: Panorama Using Mecha's Buttons
○ the first – in order to trigger the camera ○ and the second – after the camera was triggered. ● After that, MECHA will rotate slowly to the right and wait for another press of the power button, , right after the sheet of paper is out of the camera's frame. - Page 107 MECHA C2 User’s Guide v.02.8.2 ● Then MECHA will go back to the initial position and start to slowly tilt down and, again, wait for another press of the power button, when the sheet of paper is out of the camera's view.
-
Page 108: Mecha's Current Codes
This code executes the Button 1 preset to the left. All codes end with either the > or < sign, which usually tells MECHA to execute the preset to the right or to the left. See all standard current codes below. - Page 109 MECHA C2 User’s Guide v.02.8.2 2< 2> Executes the Preset 2 to the left or to the right. By default, the Preset 2 consists of 6 shots around, or it is the preset saved with the [Save2] UI button. 3<...
- Page 110 If “AAA“ is shown, MECHA is in AP mode, and the IP address is 192.168.8.1 If “!!!“ is shown, Wi-Fi is OFF. If either “.0“ or “0.0.0.0“ is shown, MECHA is not in AP mode, nor does it have an IP assigned. In this case, a restart, then pressing the button - + ≡...
- Page 111 Then MECHA will go back in the initial position and wait for one of the , or buttons to be pressed, to assign the computed preset to that particular button.
- Page 112 MECHA C2 User’s Guide v.02.8.2 12321< → BACKLASH COMPENSATION Backlash compensation calibration for the lower rotator. After the code is entered, MECHA will turn slowly to the right. After that, you have to press the button when you see/feel that MECHA starts moving very slightly to the left.
- Page 113 Speed calibration for the lower rotator. The procedure takes 1 hour and is silent, the motor is not moving. Please wait until MECHA turns OFF automatically, and don't use the web interface during this time. This is a one-time procedure, which you can omit if you wish, as default factory calibration is good.
- Page 114 32123< Updates the firmware, if possible. To update the firmware using the 32123< code, MECHA must be in STA or AP+STA mode and connected to a Wi-Fi with Internet access, before entering the code. Depending on Default Mode, it may be necessary to enable temporarily STA or AP+STA at start via buttons, then enter the 32123<...
- Page 115 When the power symbol starts flashing on the display, press the button (short press). 231231231< →FACTORY RESET ! This code will restore your MECHA to its original factory settings and needs to be entered twice, as follows: 1) enter 231231231< and wait until the display shows “please execute again, then press power“, then...
-
Page 116: Appendix
MECHA C2 User’s Guide v.02.8.2 Appendix © 2021 FANOTEC... -
Page 117: Mecha's S (Shots) Language
Access the Row page using the User Interface, and select Scripted. As a result, a blank text area is displayed in which you will write the script. The script starts with the initial position of MECHA, as follows: S={position in degrees} Please note that usually MECHA’s position refers to the position/... - Page 118 MECHA C2 User’s Guide v.02.8.2 For example, use the buttons to go from raised to parked and back. Parked Level Raised Adjust the position using buttons The naming conventions to match for starting and ending positions the preset for dual axis presets available via before starting More from Server...
-
Page 119: Three Row Panorama + Nadir + Zenith - Example 1 (Sl)
In the parked position, the camera – mounted on the upper rail – is facing up, as in the image on the right, and MECHA has to rotate the upper rail 90° to photograph the first row, as required in our example. - Page 120 MECHA C2 User’s Guide v.02.8.2 If the start position is raised, S=-90. For the level position, S=0, or S= (S=0 is equivalent to S=). Level Parked Raised Other S=90 S=-90 S=45 After the start position, we have to specify the details for the first position,...
- Page 121 Before launching the panorama, enter 38 in the number of shots field, via Custom option, then click/tap either the [RIGHT] or [LEFT] button. We will explain in another example how to tell MECHA to wait or take extra shots in a particular orientation, so on.
-
Page 122: Panorama Using Loop In Script - Example 3 (Sl)
MECHA C2 User’s Guide v.02.8.2 Panorama Using Loop in Script ‒ EXAMPLE 3 (SL) S=90, 1=0_0, =10(^3_30, =^3), =10(^-3_30, =^-3), S=90, — Start from parked position. 1=0_0, — The first position is at =0_0 =10(^3_30, — From the next position, we will start a loop (round brackets) 10 times that sets horizontal rotations of 30°... - Page 123 When the camera is facing up, and its buttons and display are not accessible, you can add P to the first shot: 1=P0_0, MECHA will pause before the first shot, and will continue only after you click the [PAUSE] button on > UI or press the button on controller.
-
Page 124: C2 - C1 Differences And Similarities
MECHA C2 User’s Guide v.02.8.2 C2 – C1 Differences and Similarities ● C2 can be connected to two rotators, so it can control two rotators simultaneously. ○ C1 can control only one rotator at a time. For dual axis applications, you need either one C2 controller and two rotators or two C1 controllers and two rotators. - Page 125 A code can be entered using the C2’s buttons and can also be selected from the C2’s Config (C) menu.
- Page 126 Wi-Fi network, or even via the Internet, with a device connected to the Internet. ● On both C1 and C2, for complex tasks, or to assign complex tasks to a single button, the User Interface can be used.
- Page 127 MECHA C2 User’s Guide v.02.8.2 Useful links: https://www.nodalninja.com/Manuals/mecha-card.pdf MECHA Quick Reference Card https://www.nodalninja.com/manual Quick reference guides and complete manuals. https://www.youtube.com/user/Fanotec Fanotec Youtube Channel https://www.youtube.com/user/NodalNinja Nodal Ninja Youtube Channel https://forum.nodalninja.com/ Nodal Ninja's Panoramic Photography Forum https://www.fanotec.com/ Fanotec International Limited official website Developed and manufactured by Fanotec International Limited.
Need help?
Do you have a question about the C2 and is the answer not in the manual?
Questions and answers