Advertisement
Quick Links
Advertisement

Related Manuals for SOYO SY-P4VTP


Summary of Contents for SOYO SY-P4VTP
- Page 1 SY-P4VTP Motherboard Quick Start Guide...
- Page 2 (The chipset cooler is as sufficient as the chipset fan based on a different design.) For immediate Technical questions, please visit SOYO tech support link at http://www.soyousa.com/support...
- Page 3 It is the policy of SOYO Computer Inc. to respect the valid patent rights of third parties and not to infringe upon or to cause others to infringe upon such rights.
- Page 4 SY-P4VTP Quick Start Guide Introduction Congratulations on your purchase of the SY-P4VTP Motherboard. This Quick Start Guide illustrates the steps for installing and setting up your new Motherboard. This guide provides all users with the basic steps of Motherboard setting and operation.
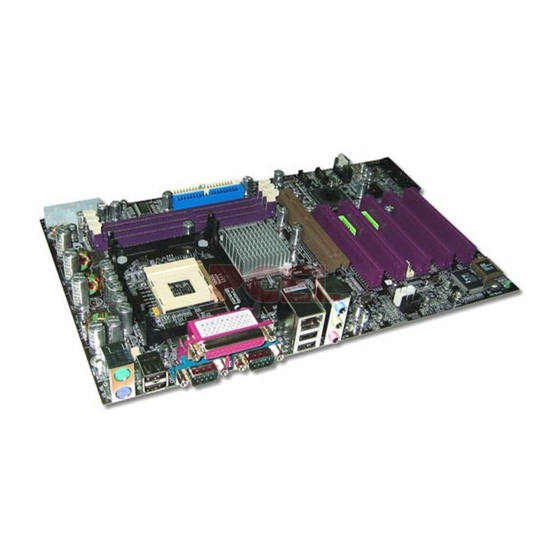
- Page 5 SY-P4VTP Quick Start Guide SY-P4VTP Motherboard Layout PS/2 KB PS/2 Mouse PS/2 Mouse Connector Connector +12V Power 1394 USB ATX Power COM A IDE 1 IDE 2 COM B USBLAN MIC IN / Center & Bass out Audio out / Front out...
-
Page 6: Key Features
The SY-P4VTP supports PC2100, PC2700 and PC3200 DDR (non-registered and non-ECC) Memory memory modules. SOYO COMBO Setup menu, to fully configure your memory settings. 1x AGP master 4x/8x slot (1.5v only) 5x 32-bit bus master PCI slots ITE IT8705F Super I/O controller supporting:... - Page 7 SY-P4VTP Quick Start Guide 8237 Integrated Parallel ATA controller supporting up to 4x UDMA 33/66/100/133 Parallel ATA devices. Storage 8237 Integrated Serial ATA controller supporting up to 2x UDMA 150 hard disks in normal or RAID 0,1 mode USB 2.0 8x USB 2.0 compliant ports (4x on rear IO panel, 4x pin headers.)
-
Page 8: Installation
Follow the directions in this section which is designed to guide you through a quick and correct method to install your new SY-P4VTP Motherboard. For detailed information, please refer to the SY-P4VTP Motherboard User's Manual and Technical Reference online manual on the CD-ROM that came with your Motherboard. -
Page 9: Install The Motherboard
SY-P4VTP Quick Start Guide Install the Motherboard We will now begin the installation process. Please follow the systematic procedure designed to lead you to a complete and correct installation. Step 1- Install the Central Processing Unit (CPU) Step 2- Install memory modules... - Page 10 SY-P4VTP Quick Start Guide Configure Memory Step 2. Your board comes with three DIMM sockets, providing support for up to 3GB of main memory using unbuffered and non-ECC DIMM modules. On this motherboard, DRAM speed can be set independent from the CPU FSB speed.
- Page 11 SY-P4VTP Quick Start Guide Connections to the Motherboard Step 4. This section tells how to connect internal peripherals and the power supply to the motherboard. The internal peripherals consist of IDE devices (HDD, CD-ROM), Floppy Disk Drive, Chassis Fan, Front Panel Devices (Internal Speaker, Reset Button, IDE LED and power switch), Wake-On-LAN card and other devices.
- Page 12 SY-P4VTP Quick Start Guide HDD LED ACPI LED PWRBT RESET Pin9 Pin10 Pin7 Pin8 Pin4 Pin5 Pin1 Pin2 LED Anode LED Cathode 2.5V_DDR Control Pin Power On/Off Control PIN Power On/Off: PWRBT Connect your power switch to this header (momentary switch type).
- Page 13 SY-P4VTP Quick Start Guide CMOS Clear (JP5) In some cases the CMOS memory may contain wrong data, follow the steps below to clear the CMOS memory. Clear the CMOS memory by momentarily shorting pin 2-3 on jumper JP5. This jumper can be easily identified by its white colored cap.
- Page 14 SY-P4VTP Quick Start Guide Onboard LAN LED Definition When this LED is lit, this This is the LAN activity LED. means the LAN is running It will blink when it is active. at 100 mbps, if it is not lit, the Onboard LAN is working at 10 mbps.
-
Page 15: Quick Bios Setup
SY-P4VTP Quick Start Guide Quick BIOS Setup After the hardware installation is complete, turn the power switch on, then press the <DEL> key during the system diagnostic checks to enter the Award BIOS Setup program. The CMOS SETUP UTILITY will be shown on the screen. Then, follow these steps to configure the CPU settings. - Page 16 In that case the following dialog will pop up. Please choose your motherboard model number and press OK. (SOYO CD Start Up Program Menu) Now the SOYO-CD Start Up Menu will come up as shown on the following page:...
- Page 17 SOYO motherboard the system uses and displays the corresponding model name. The user's manual files included on the SOYO CD are in PDF (Postscript Document Format). In order to read a PDF file, the appropriate Acrobat Reader software must be installed on your system.
- Page 18 SY-P4VTP Quick Start Guide Install Drivers and Utilities Step 2. Click the Install Drivers button to display the list of driver software that can be installed for your Motherboard. The Start Up program displays the drivers available for the particular model of Motherboard you own. We recommend that you only install those drivers.
- Page 19 Check the Latest Releases Step 3. Click the 'Connect to SOYO website' button to go the SOYO Website to find the latest BIOS, manual and driver releases for your motherboard. This button will only work if your computer is connected to the internet through a network or modem connection.
- Page 20 SY-P4VTP Quick Start Guide After Windows XP installation, your device manager should look like this:...
- Page 21 SY-P4VTP Quick Start Guide After driver installation, your Windows XP device manager should look like this: Note: To install the USB 2.0 driver, please update to Windows XP service pack 1.
- Page 22 SY-P4VTP Quick Start Guide Directory list of the driver CD...
-
Page 23: Via Usb2.0 Driver Installation
SY-P4VTP Quick Start Guide VIA USB2.0 Driver Installation Installing the VIA LAN Drivers under Windows XP USB 2.0 Drivers are available for download using Windows Update for both Windows XP. Alternatively, installing service pack 1 will also install the USB 2.0 drivers. -
Page 24: Via 8237 Serial Ata Driver Installation
SY-P4VTP Quick Start Guide VIA 8237 Serial ATA Driver Installation You can use your VIA 8237 (SATA1,SATA2) as Normal IDE function. RAID function. (RAID0, 1) To use SATA1 and SATA2 as normal IDE, please do the following steps Go to the CMOS setup... - Page 25 SY-P4VTP Quick Start Guide Win XP will prompt you that a message that the driver is newer than the default driver, press S (use the driver on floppy) to continue. The follow-on interface will list the devices to be installed, in which “VIA 8237 SATARaid SATARaid controller for windows XP”...
- Page 26 SY-P4VTP Quick Start Guide Quick Trouble shoot tips Boot-up Issues The system does not power-up, no beeping sound heard and the CPU fan does not turn on. Check if the power cord is plug to the power source. Check if the power is connected to the M/B.
- Page 27 SY-P4VTP Quick Start Guide The system turns on for some seconds then shuts down by itself. Check if the CPU fan is connected to the CPUFAN1 connector. The CPU might be overheating. Check the CPU FAN if it is defective or see if the CPU fan is in contact with the CPU.
- Page 28 Dragon plus! board) or 6BA+ IV_2AA2 which means SY-6BA+ IV motherboard with 2AA2 BIOS. Where can I find the latest BIOS for my motherboard? Please go to the technical support page of one of the SOYO websites (Taiwan: www.soyo.com.tw; USA: http://www.soyousa.com/), and look up your motherboard to find the latest BIOS revision.
- Page 29 The BIOS chip is defective due to an unsuccessful flash, contact your nearest SOYO branch for re-flashing. Is there a way to reprogram my BIOS after an unsuccessful flash? There is no other way, you need to send back the BIOS ROM to your nearest SOYO branch for re-flashing. VGA Issue I cannot set my VGA to go higher than 16 color (640x 480).
- Page 30 SY-P4VTP Quick Start Guide The sound and everything else works fine except that the recorder and microphone do not work. What is wrong? Please go to sound properties and check if the recorder and microphone are enabled in the audio rack.
- Page 31 SY-P4VTP Quick Start Guide How to contact us: If you are interested in our products, please contact the SOYO sales department in the region you live. If you require Technical Assistance, please contact our Technical Support in the region you live.
- Page 32 Edition : October 2003 Version 1.1 SY-P4VTP SERIAL...
Need help?
Do you have a question about the SY-P4VTP and is the answer not in the manual?
Questions and answers