WOODLAND SCENICS JUST PLUG JP5680 - Lighting System Instructions Manual
- Instructions (4 pages) ,
- Instructions (2 pages)
Advertisement
- 1 BEFORE YOU PROCEED
- 2 GETTING STARTED
- 3 LIGHTS & HUB SET (JP5700), LIGHT HUB (JP5701) AND SEQUENCING LIGHT HUB
- 4 SEQUENCING LIGHT HUB – HOW TO SEQUENCE LIGHTS
- 5 EXPANSION HUB (JP5702)
- 6 CONNECTING HUBS TOGETHER
- 7 LIGHTS & HUB SET (JP5700) AND LIGHT HUB (JP5701)
- 8 SEQUENCING LIGHT HUB (JP5680)
- 9 Documents / Resources
BEFORE YOU PROCEED
Read through instruction booklet entirely. Comply with all operating instructions. Failure to follow instructions could result in damage to the product or personal injury. Do not modify or tamper with any electronic components. Combine products from the Just Plug Lighting System only, unless otherwise instructed.
Save these instructions.
GETTING STARTED
The Just Plug Lighting System is made up of Ports, Plugs and Cables. This simple connection system makes it quick and easy to light one building or an entire city.
How to Connect a Plug to a Port
Align locking tabs on Plug with front of Light Hub, Sequencing Light Hub or
Expansion Hub. Insert Plug into Hub Port until locking tabs click into place (Fig. 1).

How to Remove a Plug from a Port
Grasp top edge of Plug and pull firmly.
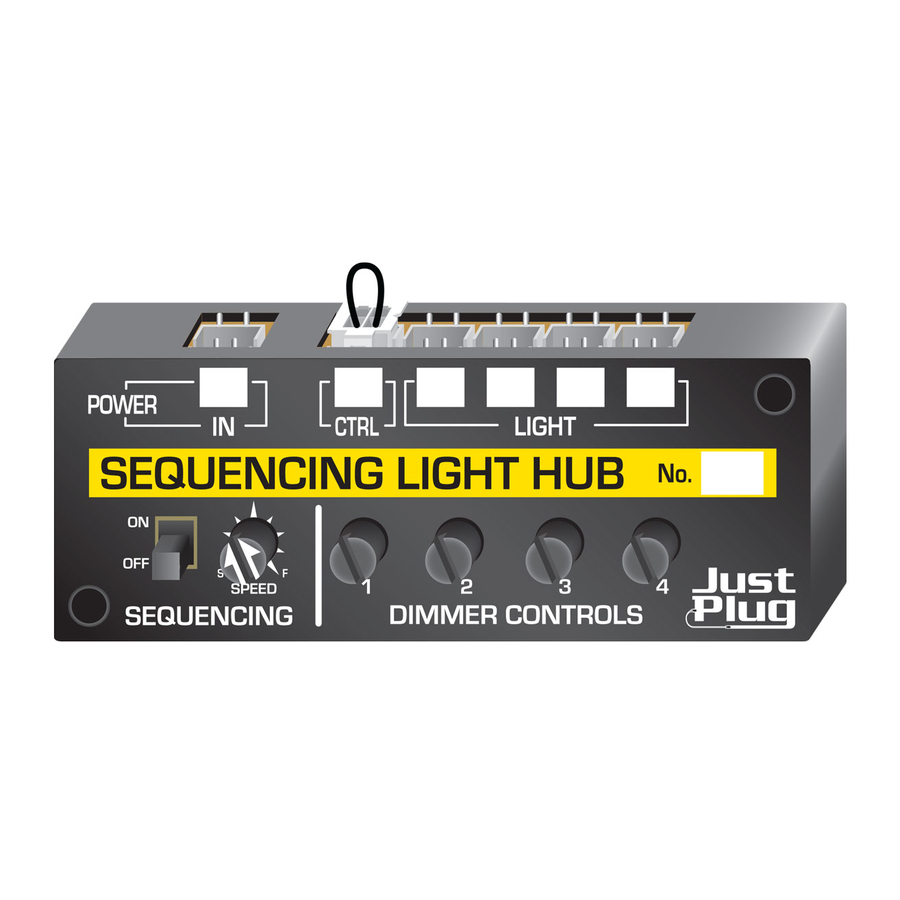
LIGHTS & HUB SET (JP5700), LIGHT HUB (JP5701) AND SEQUENCING LIGHT HUB
Light Hubs and Sequencing Light Hubs supply power to Just Plug LED Lights.
- To power Light Hub and Sequencing Light Hub, insert Power Supply (JP5770-JP5773) plug into POWER IN Port (or use a 16-20VAC or 24VDC train power pack, Fig. 5).

- Do NOT remove CTRL Port Plug (unless using Auxiliary Switch (JP5725) or connecting to DCC).
- Plug LED Lights (JP5736-JP5749, JP5754, JP5755), Port Sharing Device (JP5681), Linker Plugs (JP5685) or Built-&-Ready Buildings into LIGHT Ports.
- Lights & Hub Set includes two Stick-On Lights. To secure Lights in building, remove release paper from back of LED and stick on where desired.
- Rotate Dimmer Controls to adjust light brightness (adjusts from very bright to off).
- Use dedicated spaces on front of Hub to label according to your lighting configuration.
- To mount Hub, use included Tape or Screws.

SEQUENCING LIGHT HUB – HOW TO SEQUENCE LIGHTS
The Sequencing Light Hub automatically switches LED lights on and off in sequence, just like they would in a real city's nightscape. When multiple Sequencing Light Hubs are used on a layout an even more random effect can be achieved.
To initiate sequence:
- Turn ON/OFF switch to ON.
- On SPEED Dial, "S" = Slow / "F" = Fast. Rotate Dial to increase or decrease the speed of lights turning on and off.
EXPANSION HUB (JP5702)
Connect Light Hubs and Sequencing Light Hubs to Expansion Hub to expand your lighting system.

Do not plug LED Lights into Expansion Hub.
- To power Expansion Hub, insert Power Supply (JP5770-JP5773) plug into POWER IN Port (or use a 16-20VAC or 24VDC train power pack, Fig. 5).
- Do NOT remove CTRL Port Plug (unless using Auxiliary Switch (JP5725) or connecting to DCC).
- Use included Connecting Cables to connect to Light Hubs (Fig. 2),
 - Step 1")
Sequencing Light Hubs, another Expansion Hub (Figs. 3 and 4),
 - Step 2")
train power pack (Fig. 5) or DCC relay unit (Fig. 6).
 - Step 3")
- Use dedicated spaces on front of Hub to label according to your lighting configuration.
- To mount Hub, use included Tape or Screws.
 - Step 1")
 - Step 2")
 - Step 3")
CONNECTING HUBS TOGETHER
Use Connecting Cables (included with Expansion Hub)
Connect Light Hubs and Sequencing Light Hubs to Expansion Hub
Insert Connecting Cable Plug into Expansion Hub HUB Port and opposite Plug into Light Hub or Sequencing Light Hub POWER IN Port (Fig. 2).
Connect Expansion Hub to Expansion Hub
Insert Connecting Cable Plug into POWER OUT Port on powered Expansion Hub. Insert opposite Plug into POWER IN Port on add-on Expansion Hub (Fig. 3). Keep expanding your lighting system (Fig. 4).
Power Hubs from a Train Power Pack
Cut off one Connecting Cable Plug with wire cutters and strip approximately 1" of wire. Connect bare wires to the accessory terminals on a 16-20VAC or 24VDC power pack. Insert Plug on other end of Connecting Cable into Hub POWER IN Port (Fig. 5).
Control Just Plug Lighting System with DCC
Cut off one Connecting Cable Plug with wire cutters and strip approximately 1" of wire. Connect bare wires to DCC relay unit (follow DCC manufacturer instructions for proper installation of wires). Insert Plug on other end of Connecting Cable into Hub CTRL Port (Fig. 6).
Verify Connecting Cable is plugged into the CTRL Port before applying power.
 TIP! For additional realism, install Sequencing Light Hubs in combination with Light Hubs to light buildings. Use Light Hubs to light buildings where you want to show nighttime occupants still bustling around the office or home. Use the Sequencing Light Hub to light buildings where occupants are turning lights ON/OFF. Use the Masking Paint in Light Block Kit (JP5716) to black out a few windows for added realism.
LIGHTS & HUB SET (JP5700) AND LIGHT HUB (JP5701)
 AND LIGHT HUB (JP5701)")
SEQUENCING LIGHT HUB (JP5680)
")
Do not look directly into LED lights when in operation.
Model making product. Not a toy! Not suitable for children under 14 years!

RoHS Compliant
WOODLAND SCENICS®
Manufactured by WOODLAND®
PO BOX 98, LINN CREEK, MO 65052 • M8
woodlandscenics.com

Documents / ResourcesDownload manual
Here you can download full pdf version of manual, it may contain additional safety instructions, warranty information, FCC rules, etc.
Download WOODLAND SCENICS JUST PLUG JP5680 - Lighting System Instructions Manual
Advertisement


Need help?
Do you have a question about the JUST PLUG JP5680 and is the answer not in the manual?
Questions and answers