Advertisement
Quick Links
Support and E-Warranty Certificate
https://www.vevor.com/support
CHICKEN PLUCKER MACHINE
USER MANUAL
We continue to be committed to offering tools at competitive prices. "Save Half", "Half Price",
or any other similar expressions used by us only represent an estimate of savings you might
benefit from buying certain tools with us compared to the major top brands and do not
necessarily mean to cover all categories of tools offered by us. You are kindly reminded to
verify carefully when placing an order with us if you are saving half in comparison with the top
major brands.
Advertisement

Related Manuals for VEVOR TM-5

Summary of Contents for VEVOR TM-5
- Page 1 Support and E-Warranty Certificate https://www.vevor.com/support CHICKEN PLUCKER MACHINE USER MANUAL We continue to be committed to offering tools at competitive prices. "Save Half", "Half Price", or any other similar expressions used by us only represent an estimate of savings you might benefit from buying certain tools with us compared to the major top brands and do not necessarily mean to cover all categories of tools offered by us.
- Page 2 CustomerService@vevor.com This is the original instruction, please read all manual instructions carefully before operating. VEVOR reserves a clear interpretation of our user manual. The appearance of the product shall be subject to the product you received. Please forgive us that we won't inform you again if...
- Page 3 ·SAFETY INSTRUCTIONS For your safety and the safety of others, the following precautions must be observed when operating the chicken plucker machine: 1. Ensure the safety of the power supply: install the leakage switch on the grounding wire of the chicken, duck, and goose plucker. Before use, plug in the power supply and turn on the switch to check whether the rotary table operates normally.
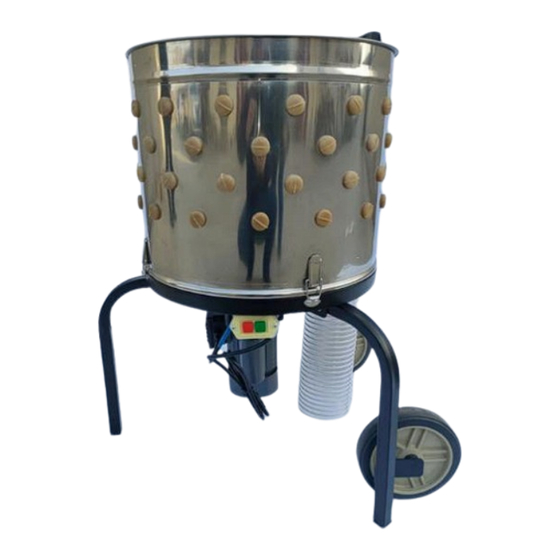
- Page 4 ·STRUCTURE DIAGRAM Parts name Handle Finger Barrel body Stabilizer blade Drain connection Wheel Leakage protection plug Switch Electric motor High pressure nozzle...
- Page 5 ·ASSEMBLY AND USE Step 1: Check all accessories. Step 2 : Installation of the drain pipe. First, hold both sides of the drain pipe mouth with two hands. Then, aim at the base drain mouth and insert it directly.
- Page 6 Step 3 : Installation of wheels. Install the wheel on the leg and tighten the screws. Step 4:Installation of leg with wheels.
- Page 7 First, directly correspond the serial number of the support leg with wheels to the serial number on the baseplate one by one. Then, insert the support leg with wheels into the corresponding baseplate slot, insert the screws, and tighten the nuts onto the screws with a wrench.
- Page 8 Step 6: Connect the plug to the power supply and turn on the machine. Step 7: The knife edge should be as small as possible when the chicken is slaughtered. After slaughter, the chicken should be soaked in warm water (about 30 ℃) to make feathers wet.
- Page 9 Step 11: After 2-3 minutes, remove the feathers and take out the chicken. Connect the high-pressure nozzle with a water pipe. Spray and rinse off the poultry feathers. ·TROUBLESHOOTING INSTRUCTION Problem Reason Solution Incomplete de-feather Rubber fingers loss Replace rubber fingers Uneven scalding Uniform scalding temperature temperature...
- Page 10 ·CLEAN, CARE AND STORAGE RULES Care and cleaning: The chicken plucker machine needs to be used with a faucet and a water pipe, making it convenient for feathers cleaning and keeping the neatness and beauty of the machine. The chicken plucker machine is made of stainless steel, which is not easy to rust. After use, please clean it with tap water and wipe it.
- Page 12 Support and E-Warranty Certificate https://www.vevor.com/support...
Need help?
Do you have a question about the TM-5 and is the answer not in the manual?
Questions and answers