Kasco C-20 - Portable Timer & Temperature Control Quick Start Guide
- Owner's manual (22 pages) ,
- Instructions (2 pages) ,
- Quick start manual (2 pages)
Advertisement
INTRODUCTION

Completely read these instructions and warnings prior to installing and operating your Kasco equipment.
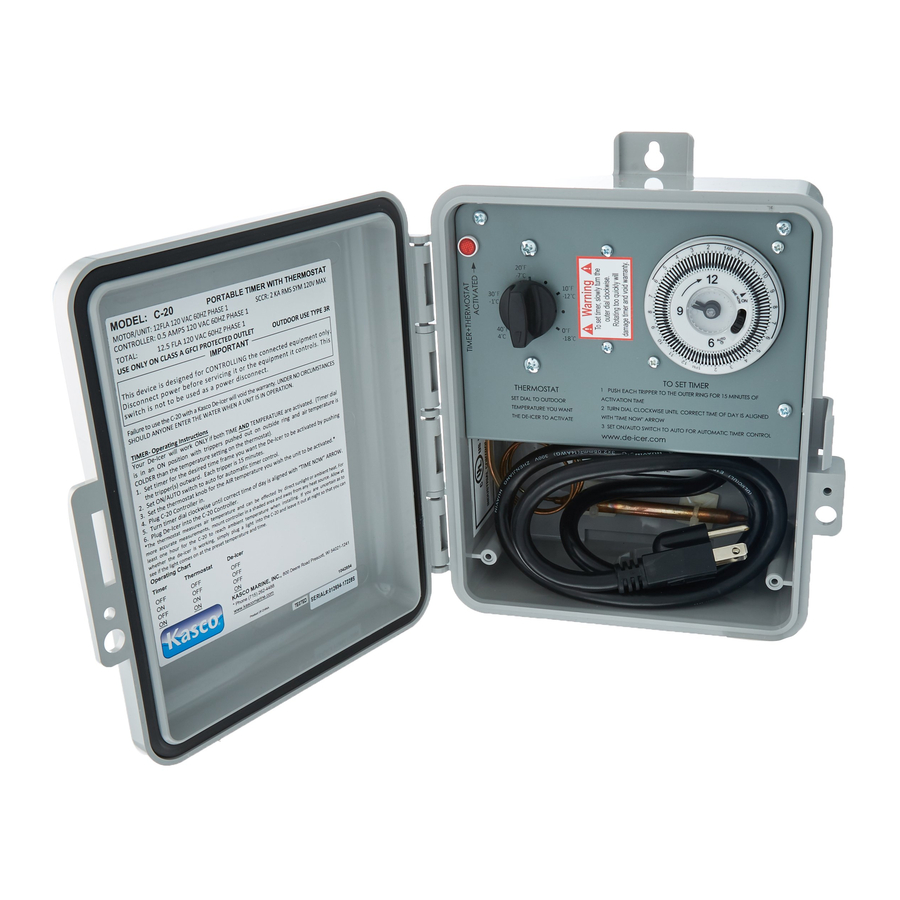
This portable timer is designed to CONTROL the connected equipment only. THIS SWITCH IS NOT TO BE USED AS A POWER DISCONNECT! Unplug The
C-20 and the equipment it controls before servicing. Mount at least 5 ft. from open water. Refer to your de-icer owner's manual for additional safety and de-icer installation/operation instructions. The C-20 is designed to operate only ONE Kasco de-icer.
INSTALLATION
The C-20 must be mounted upright on a vertical surface or post. For the most accurate operation do not mount in direct sunlight. Mount close to an outdoor receptacle to allow slack in the C-20 power cord. Mount high enough above ground level for easy use and to prevent ground moisture/flooding from damaging the C-20. Use corrosion resistant screws to mount the C-20. One screw for the top hanger slot and one for the bottom mounting tab to secure the C-20. Insert your de-icer power cord through the hole in the bottom of the C-20 enclosure. Allow enough slack to prevent strain on the plug. You may also need to provide a tether (another point to hold the cord in place) to prevent your de-icer power cord from slipping into the water. You can install the closure plate provided by snapping into place from the outside of the enclosure hole. Note: Install closure plate with 3R (outdoor use) rating to maintain enclosure environmental integrity.
UNDER NO CIRCUMSTANCES SHOULD ANYONE ENTER THE WATER WHEN A UNIT IS IN OPERATION.
SETTING THE TIMER AND THERMOSTAT
The C-20 energizes your De-icer only when both the timer and thermostat turn on. The Indicator light will illuminate when both timer and thermostat are on (de-icer outlet is energized).
| Timer | Thermostat | De-icer |
| OFF | OFF | = OFF |
| ON | OFF | = OFF |
| OFF | ON | = OFF |
| ON | ON | = ON |
TIMER SETTING
- Push each tripper to the outer ring for every 15 minutes of activation time. Note: For most efficient and effective De-Icing, do not set the timer in segments of less than one hour activation time. (Set 4 trippers on together for 1 hour minimum.)
- Turn timer dial clockwise until correct time-of-day is aligned with "TIME NOW" arrow.
- Set AUTO/ON switch to AUTO for automatic timer control.
Note: Setting the timer switch to ON will allow the de-icer to operate by the thermostat only (timer output is always on).
THERMOSTAT SETTING
Simply set the thermostat dial to the temperature you want the de-icer to turn on. (Remember the timer must also be set to ON or AUTO for the de-icer to energize.) The thermostat has a 6°F ON/OFF differential. This differential helps prevent short cycling of the de-icer. Set the thermostat to the desired ON temperature and it will shut off approximately 6°F above the ON setting.
Note: The C-20 control must acclimate to the outdoor ambient temperature for proper operation. Allow at least 1 hour for the C-20 to adjust to ambient temperature.
OPERATING RECOMMENDATIONS
Use the following tips and suggestions to assist in customizing your settings for local conditions.
- De-icers will create small localized currents the longer they run. Fewer and longer operation cycles will prove to be more effective than more frequent and shorter operating cycles.
- Fresh water freezes at 32°F, salt water at 28°F, and brackish water will freeze somewhere in between. Setting the thermostat a couple degrees below the freezing point can minimize unneeded operation time. brackish water will freeze somewhere in between. Setting the thermostat a couple degrees below the freezing point can minimize unneeded operation time.
- Daily observation is required for all de-icing installations. Adjust operating times based on when you can observe the operation. This will help you check the de-icer is operating properly.
- Several factors can increase freeze rate. Such as, wind, snow, and colder temperatures. When picking operation times, set the de-icer to operate more when conditions promote quicker freezing.
- Your settings will likely require some fine tuning. Remember to observe your de-icer installation and be prepared to adjust your settings of the C-20. Thermostat tolerance may also need to be adjusted for. The actual ON/OFF point of the thermostat may be -/+ 2.7°F of the actual ambient temperature.
- Operating with fewer, longer cycles will provide the most efficient de-icing. The following is an example of setting the timer over a 24 hour period. The 4 ON cycles below allow for more operating time during dark hours and less during daytime hours. (This is suggested due to increased freezing rate at night).
| Cycle | Time | Length |
| ON | 7:00 a.m. - 9:00 a.m. | 2 hr |
| OFF | 9:00 a.m. - 1:00 p.m. | 4 hr |
| ON | 1:00 p.m. - 3:00 p.m. | 2 hr |
| OFF | 3:00 p.m. - 7:00 p.m. | 4 hr |
| ON | 7:00 p.m. - 10:00 p.m. | 3 hr |
| OFF | 10:00 p.m. - 12:00 a.m. 2 hr | |
| ON | 12:00 a.m. - 5:00 a.m. | 5 hr |
| OFF | 5:00 a.m. - 7:00 a.m. | 2 hr |
This sample would allow the de-icer to operate a maximum of 12 hours in a 24 hour period. During the ON cycles, the thermostat would determine if the de-icer operates based on its dial setting. Actual settings and durations of run time will depend on your installation requirements and regional demands for de-icing.
- To bypass the timer and operate only on temperature, set the timer ON/AUTO switch to ON. This will turn the timer output on indefinitely and cycle the De-icer on temperature.
- To bypass the thermostat and operate only on time, set the thermostat to its highest temperature setting. Use the timer settings to cycle the de-icer.
Note: If the ambient temperature rises above the thermostat highest setting, it will shut off the de-icer. - When not in use (summer time), store the C-20 indoors away from salt air. This will help extend the life of the C-20 controller.
- Operate with the door closed to keep salt air away from internal components.
- Mount the C-20 out of direct sun light. This will prevent excessive internal heating of the controller. Internal heating may prevent the C-20 from operating correctly.
Kasco Marine, Inc. 800 Deere Rd.
Prescott, WI 54021
PH (715) 262-4488
FAX (715) 262-4487
www.kascomarine.com
www.de-icer.com

Documents / Resources
References
Download manual
Here you can download full pdf version of manual, it may contain additional safety instructions, warranty information, FCC rules, etc.
Download Kasco C-20 - Portable Timer & Temperature Control Quick Start Guide
Advertisement


Need help?
Do you have a question about the C-20 and is the answer not in the manual?
Questions and answers