Table of Contents
Advertisement
Available languages
Available languages
Quick Links
DVT30
mit Innenstation DVT30Mv.2
Digitale Funk Video-Türsprechanlage
D
Bedienungsanleitung Seite 2
Interphone numérique vidéo sans fil
F
Mode d'emploi page 16
Digitaal draadloos deurcommunicatiesysteem
NL
Gebruiksanwijzingen page 29
Digital Wireless Video Door Intercom
GB
Operating instructions page 42
Timpianto digitale radio e videocitofono
I
Instruzioni per funzionamento page 54
Advertisement
Table of Contents

Related Manuals for Indexa DVT30Mv.2


Summary of Contents for Indexa DVT30Mv.2
- Page 1 DVT30 mit Innenstation DVT30Mv.2 Digitale Funk Video-Türsprechanlage Bedienungsanleitung Seite 2 Interphone numérique vidéo sans fil Mode d'emploi page 16 Digitaal draadloos deurcommunicatiesysteem Gebruiksanwijzingen page 29 Digital Wireless Video Door Intercom Operating instructions page 42 Timpianto digitale radio e videocitofono Instruzioni per funzionamento page 54...
-
Page 2: Bestimmungsgemäße Verwendung
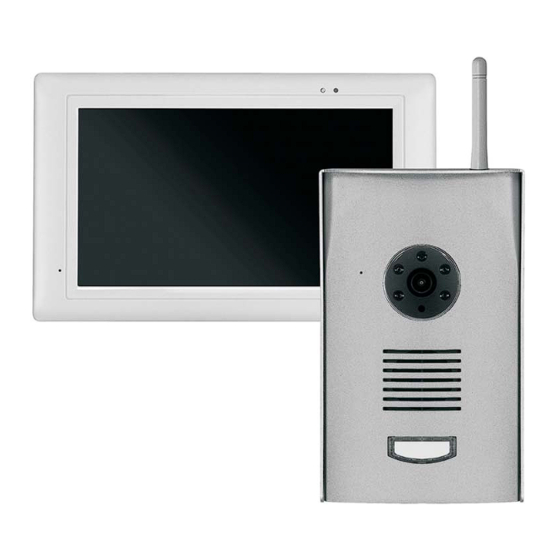
Außenstation DVT30K mit 15 V Netzgerät und einer Innenstation oder falsche Bedienung verursacht werden. DVT30Mv.2 mit einem 5 V Netzgerät. Die Kamera ist für den Betrieb in privaten Haushalten konzipiert. Beachten Der 7 Zoll-Monitor der Innenstation lässt sich über die Bildschirmoberfläche Sie die Vorschriften bezüglich Videoüberwachung und Tonaufnahme. - Page 3 1 2 3 4 5 6 7 8 9 10 11 12 13 14 (15-22) 23 24 25 28 29 30 31 32 33 34 35 36 37 39 40 2 0 1 5 - 0 1 - 0 7 P M 0 9 : 4 6 : 3 3 41 42 43 44 45 46 47 48 49 50 51 52 53 54 55 56...
-
Page 4: Technische Daten
76 Dübel 78B Ersatzdichtung für 4. Ausstattung (s. Abb. A) 77 Abstandhalter Antennenloch [67] Innenstation DVT30Mv.2 mit Bedienleiste 78A Ersatzdichtung für 79 Halterung 1 Mikrofon 16 - Abdeckung [50] 80 Abstandsplatte 2 Bildschirm Bilddarstellungstaste 3 Innenstation 17 - Sprechtaste (nur Anschluss-Beispiele Türöffner... - Page 5 Verhindern Sie, dass die Netzgeräte mit Feuchtigkeit in Berührung Abmessungen Gehäuse 107 x 176 x 41 mm kommen und tauchen Sie die Geräte nicht ins Wasser ein! Andernfalls droht Lebensgefahr! Innenstation DVT30Mv.2 " Betreiben Sie die Geräte ausschließlich mit den mitgelieferten Betriebsspannung DC (Netzgerät) Netzgeräten.
- Page 6 Reichweite durch Wände (insbesondere Stahlbeton-Wände) und Decken 7. Platzierung der Geräte deutlich geringer (typisch ca. 20 m). Blechflächen z.B. Kühlschrank, Bevor Sie die Stationen montieren, planen Sie zuerst deren Montagestelle. Blechregale, Wärmeschutzglas und bedampfte Spiegel schirmen auch die Überprüfen Sie von dort aus vor der Montage die Funktion der Außenstation Funkübertragung ab.
- Page 7 [76] an der Wand. Löcher [67] und schrauben Sie mit dem mitgelieferten Bei Batteriebetrieb: Schraubendreher [36] die zwei Schrauben fest. Lösen Sie die sieben Schrauben [53] an, ohne sie vom Deckel [49] zu Wird das Antennenkabel verwendet, befestigen Sie die Halterung [80] an entfernen.
- Page 8 Stecken Sie das Netzgerät in eine geeignete Netzsteckdose, die Power- dem Bildschirm signalisieren die Aufnahme). Die Aufnahme kann erst 14 Anzeige [12] leuchtet grün. Sekunden nach Beginn der Aufnahme durch Drücken der Aufnahmetaste Entfernen Sie die Schutzfolie vom Monitor. [21] gestoppt werden, ansonsten endet sie automatisch nach einer Minute.
-
Page 9: Erweiterte Funktionen
Öffnen Sie durch Drücken der Taste > [15] die Bedienleiste der Innenstation. Wählen Sie das Hauptmenü durch Drücken der Menütaste [22] aus. Wählen Sie die Kameraeinstellungen [81] aus. Wählen Sie den gewünschten Kamerakanal 2 bis 4 [92] aus. Drücken Sie die Taste “Paarung” [91]. Die Funkverbindungs-Anzeige [11] an der Innenstation blinkt grün. Drücken Sie nun innerhalb von ca. - Page 10 Hinweise: Nach Beginn der Aufnahme erscheint unten links “REC IN PROCESS WAIT 14 SEC”. Erst nach Ablauf der 14 Sekunden kann die Aufnahme beendet werden. Bei Batteriebetrieb der Außenstation ist eine manuelle Aufnahme nur möglich, wenn mindestens eine Kamera 2 bis 4 aktiviert ist. Bei Batteriebetrieb der Außenstation funktioniert während der manuellen Aufnahme in der Bedienleiste [14] nur die Lautstärketaste [20].
- Page 11 [82] - Aufnahmeeinstellungen (REKORDEREINSTELLUNGEN, s. Abb. G) [95] - 24 Stunden-AUFNAHMEZEITPLAN (Zeit und Art der Aufnahme auswählen) Hier finden Sie einen Zeitplan für 24 Stunden, gültig für alle vier Kanäle und für jeden Tag (AM12:00 = 0 Uhr in der Nacht bis PM11:00 = 11 Uhr in der Nacht).
- Page 12 [98] - ereiche für Bewegungserkennung bei Pixeländerungen (ERFASSUNGSBEREICH EINSTELLEN) Bei Aufnahmen durch Bewegungserkennung werden bei einem unruhigen Hintergund wesentlich mehr Aufnahmen ausgelöst, was zu unnötig vielen Aufnahmen führt und auch unnötig viel Speicherplatz verbraucht. Hier können Sie nun einstellen, welche Flächen des Bildschirms (über den Bildschirm ist ein rechteckiges Raster gelegt) als Erkennungsflächen im Bewegungserkennungsmodus aktiv sind, d.
- Page 13 DARSTELLUNG IM RUHEMODUS / ANZEIGE SPRECHSTELLE IM RUHEMODUS (Vollbild-Darstellung des Kamerabildes der Außenstation) / 10SEK. INTERVALLE (die Kamerabilder von Außenstation und aller aktivierten Kameras werden als Sequenz mit 10 Sekunden Verweildauer angezeigt) / 10SEK. INTERV. OHNE SPRECHST. (die Kamerabilder aller aktivierten Kameras 2 bis 4 werden als Sequenz mit 10 Sekunden Verweildauer angezeigt) Hinweis: Ist nur die Kamera 1 (Außenstationskamera) aktiviert, ist nur das Vollbild-Darstellung der Außenstation sichtbar.
-
Page 14: Wartung Und Reinigung
öffnet. 16. Batteriewechsel der Außenstation Klicken Sie “Finish” an. Die Installation ist nun beendet, auf dem Desktop Ist nach dem Drücken der Klingeltaste [47] kein Ton an der Außenstation zu erscheint das Icon “Sec 24 Media Player”. hören oder erscheint nach dem Klingeln nur noch 1 Balken in der Batterieanzeige [13], ist ein Batteriewechsel erforderlich. -
Page 15: Optionales Zubehör
Die Dauer der Klingeltonmelodie ist fest eingestellt und kann nicht geändert werden. Vereinfachte EU-K onformitätserklärung Hiermit erklärt INDEXA GmbH, dass der Funkanlagentyp DVT30 der Richtlinie 2014/53/EU entspricht. Der vollständige Text der EU-Konformitätserklärung ist unter der folgenden Internetadresse verfügbar: http://www.indexa.de/w2/f_CE.htm . - 15... -
Page 16: Instructions D'utilisation
DVT30K avec un chargeur secteur 15 V et d'une station intérieure engendrer des accidents. Le fabricant décline toute responsabilité pour les DVT30Mv.2 avec un chargeur secteur 5 V. dommages résultants d'une utilisation non-conforme ou d'une mauvaise Le moniteur de 7" de la station intérieure est commandé via la surface de manipulation. - Page 17 Accessoires 4. Équipement (voir illustr. A) 33 Câble d'extension 73 Plaque pour le nom de Station intérieure DVT30Mv.2 avec barre de commande 34 CD avec logiciel de remplacement Microphone 16 - Bouton visualisation 74 Couvercle de rechange pour Écran d'affichage...
-
Page 18: Données Technique
à une tension de 230 V ~, 50 Hz et est équipé d'un fusible Dimensions boitier 107 x 176 x 41 mm adéquat. Station intérieure DVT30Mv.2 Vérifiez que les piles ne soient pas en court-circuit et ne soient pas jetées au " Tension d'alimentation DC (chargeur) feu. - Page 19 Le signal sans-fil peut être influencé par des champs électriques et par 7. Emplacement des appareils d'autres appareils radio. Veuillez vous assurer de l'éloignement suffisant Avant de monter la camera, définissez tout d'abord l'emplacement de des micro-ondes, téléphones sans-fil, téléphones portables, routeurs, montage.
-
Page 20: Mise En Service
Placez les 6 piles AA alcalines (non incluses dans les éléments livrés) en basse tension de l'adaptateur secteur 12 V et branchez la fiche du cordon respectant la polarité dans le logement des piles [55]. N'utilisez pas de sur une prise secteur adéquate. piles rechargeables. -
Page 21: Fonctions De Base
Actionnez le bouton Marche/Arrêt [24] sur la station intérieure jusqu'à ce peut se régler en actionnant le bouton de volume [20]. La fonction que le témoin d'alimentation [12] soit rouge. La station intérieure est d'interphonie peut être désactivée en actionnant à nouveau la touche de maintenant en marche, l'écran de bienvenue s'affiche, puis le bouton >... -
Page 22: Fonctions Étendues
13. Fonctions étendues 13.1 Barre de commande [14] Actionnez le bouton [15] pour afficher la barre de commande. Actionnez le bouton [15] pour masquer la barre de commande. [16] - Sélection du mode d'affichage En actionnant le bouton de sélection du mode d'affichage [16], vous pouvez sélectionner le mode mosaïque ou le mode plein écran des caméras 1 à 4 (le canal 1 a été... - Page 23 13.2 Menu principal (voir fig. E) Actionner le bouton Menu [22] pour ouvrir le menu principal. Actionner les différents symboles pour appeler les fonctions voulues. En appuyant sur le bouton [85], vous reculez d'une étape ou vous fermez le menu principal et la barre de commande. Le menu principal et la barre de commande se ferment automatiquement après environ 2 minutes sans utilisation d'un bouton.
- Page 24 " X=MANUEL "seul l'enregistrement manuel est possible pour tous les canaux sur 24 heures en actionnant le bouton d'enregistrement. Pour pouvoir paramétrer individuellement chacune des 24 heures , sélectionnez d'abord " X=MANUEL " [99]. Vous pouvez alors paramétrer individuellement chacune des plages (donc chacune des heures [100]) en actionnant le bouton de façon répétée : M= : les canaux 2 et 3 peuvent enregistrer automatiquement après toute détection de mouvements au cours de cette heure, un enregistrement manuel est possible à...
- Page 25 [87] - Liste des événements Actionnez les boutons et pour faire défiler vers le haut ou vers le bas la liste des dossiers et des fichiers. Les fichiers sont d'abord triés par date, puis par heure dans la journée puis par ordre chronologique. Données affichées : Heure de début et de fin de l'enregistrement Déclenchement de l'enregistrement (M = enregistrement après détection de mouvement / S = enregistrement continu / X = enregistrement après actionnement du bouton d'enregistrement ou sur coup de sonnette)
-
Page 26: Installation Du Logiciel
[105] - Modifier la langue du menu et réinitialiser les paramètres d'usine (RÉTABLIR CONFIGURATION D´ORIG.) Vous pouvez choisir entre l'anglais, l'allemand et le français pour la langue du menu. Si vous changez de langue, l'écran est lui aussi réinitialisé avec les paramètres d'usine, et la version du système s'affiche sur le moniteur. -
Page 27: Entretien Et Nettoyage
Pour interrompre l'enregistrement, cliquez sur le bouton ; pour quitter la Fixez le couvercle sur la station externe à l'aide des sept vis. ³ Revissez éventuellement le câble d'antenne sur le raccord de la station lecture, cliquez sur le bouton . -
Page 28: Cartes Mémoires Compatibles
Déc laration de conformité simplifiée Les cartes mémoires suivantes sont compatibles avec le système DVT30: Le soussigné, INDEXA GmbH, déclare que l'équipement radioélectrique du type connu: compatible: jusqu'à 32 GB micro SDHC DVT30 est conforme à la directive 2014/53/UE. Le texte complet de la... -
Page 29: Gebruik Volgens De Voorschriften
DVT30K met een nettransformator 15 V en een binnenstation opnames worden op een micro-SD kaart (niet bij de levering inbegrepen) DVT30Mv.2 met een nettransformator 5 V. opgeslagen. Als er extra optionele DF270K-A camera's zijn aangemeld, kan bij De 7 inch-monitor van het basisstation is te bedienen via het beeldscherm bewegingsdetectie in het beeld automatisch een opname plaatsvinden. -
Page 30: Technische Gegevens
73 Reserve naambordje 78A Reservedichting voor afdekking 4. Uitrusting (zie afb. A) 74 Reserve-afdekking voor [50] Binnenstation DVT30Mv.2 met bedieningspaneel beltoets 79BReservedichting voor 75 Schroef antenneopening [67] 1 Microfoon 16 - Toets 76 Plug 79 Houder 2 Beeldscherm schermweergave 77 Afstandshouder... - Page 31 Anders Afmetingen behuizing 107 x 176 x 41 mm dreigt levens- en verwondingsgevaar! Binnenstation DVT30Mv.2 Voorkom dat de nettransformatoren met vocht in aanraking komen en " Bedrijfsspanning...
- Page 32 draadloze overdracht ook. 7. Plaatsing van de apparaten De radio-overdracht kan door sterke elektrische velden en andere Voordat u de camera monteert, plant u eerst de montageplaats. Controleer van zendontvangapparaten worden beïnvloed. Let erop dat u voldoende daaruit de functie van de camera en de draadloze overdracht, alvorens te afstand houdt van: magnetrons, radiotelefoons, router, gsm's, monteren.
- Page 33 Til de deksel van het buitenstation. na het vastschroeven naar boven wijst (zie afb. D). Plaats 6 alkalische AA-batterijen (niet bij de levering inbegrepen) met Bij aansluiting van deuropeners de litzenkabel(s) aan de elektrische de polen in de juiste richting in het batterijvak [55] (geen accu's deuropener(s) verbinden overeenkomstig het aansluitingsdiagram (zie af.
- Page 34 Bij werking op batterijen is de batterijweergave [13] voor het buitenstation binnenstation kan worden ingesteld door het indrukken van de volumetoets rechtsboven op het ingeschakelde binnenstation pas te zien na het eerste [20]. De spreekfunctie kan door het opnieuw indrukken van de spreektoets bellen.
-
Page 35: Uitgebreide Functies
13. Uitgebreide functies 13.1 Bedieningspaneel [14] Door het indrukken van de toets [15] wordt het bedieningspaneel geopend. Door het indrukken van de toets [15] wordt het bedieningspaneel gesloten. [16] - Schermweergave selecteren Door het herhaaldelijk indrukken van de toets schermweergave [16] kan worden gewisseld tussen de quadweergave en volledig scherm van camera's 1 t/m 4 (kanaal 1: wordt op de fabriek met het buitenstation gekoppeld;... - Page 36 13.2 Hoofdmenu (zie afb. E) Door het indrukken van de menutoets [22] wordt het hoofdmenu geopend. Door het indrukken van de symbolen worden de gewenste functies bereikt. Door het indrukken van [85] gaat men een stap terug resp. sluiten het hoofdmenu en het bedieningspaneel. Het hoofdmenu alsmede het bedieningspaneel sluiten automatisch als er ca.
- Page 37 S+ alle vier de kanalen nemen continu gedurende een uur op; X= alleen handmatige opname door het indrukken van de opnametoets is mogelijk gedurende een uur en voor alle vier de kanalen. Fabrieksinstelling: alle kanalen alleen handmatige opname voor alle 24 uren Aanwijzing: Bewegingsdetectie vindt plaats door de software bij pixelveranderingen binnen het geactiveerde bewegingsbereik van het camerabeeld.
- Page 38 Een bewegingsdetectie tijdens de opname wordt door markering [66] van het betreffende camerakanaal 2 t/m 4 weergegeven (beweging wordt ook weergegeven bij een doorlopende opname en een handmatige opname), een opname door het bellen wordt door markering van camerakanaal 1 weergegeven.
- Page 39 [84] - Volume van het binnenstation / Alarmtoon (ALARM BUZZER) Alarm toon na een bewegingsdetectie in- (ON) of uitschakelen (OFF) Aanwijzing: Ook wanneer het volume op een eerder moment helemaal omlaag gezet is, is het alarm te horen. Fabrieksinstelling: OFF Beltoonvolume van het binnenstation Door het indrukken van de toets wordt de beltoonvolume van het binnenstation ingesteld.
-
Page 40: Onderhoud En Reiniging
Een garantie voor deze reikwijdte is echter niet mogelijk, omdat de plaatselijke 17. Reset omstandigheden op de opstelplek deze negatief kunnen beïnvloeden. Mocht de software "vastgelopen" zijn, zodat geen functies kunnen worden Een verslechtering van de reikwijdte is bijv. te verwachten door de volgende opgeroepen met de toetsen, dan dient u een reset of herstart te verrichten, invloeden: waarbij de stroomtoevoer kort wordt onderbroken. -
Page 41: Fouten Zoeken
Indexa GmbH 22. Vereenvoudigd EU- Paul-Böhringer-Str. 3 Conformiteitsverklaring 74229 Oedheim Hierbij verklaar ik, INDEXA GmbH, dat het type radioapparatuur, DVT30, Duitsland conform is met Richtlijn 2014/53/EU. De volledige tekst van de EU- www.indexa.de conformiteitsverklaring kan worden geraadpleegd op het volgende... -
Page 42: Proper Use
The digital wireless video door intercom DVT30 consists of outdoor station accepted for consequential damages or for damages caused by improper use or DVT30K with a 15 V mains adapter and indoor station DVT30Mv.2 with a 5 V incorrect operation. No liability will be accepted for consequential damages mains adapter. -
Page 43: Technical Data
78A spare seal for cover (50) 4. Features and Equipment (s. fig. A) 74 spare cover for bell push 78B spare seal for antenna hole (67) Indoor station DVT30Mv.2 with control bar 75 screw 79 bracket 1 microphone 16 image button... -
Page 44: Location Of Equipment
Only operate the device from the supplied power supplies. Before connecting the power supply to the mains, ensure that the mains current Indoor station DVT30Mv.2 " complies with 230 V ~, 50 Hz and is fitted with a fuse according to... - Page 45 Position the camera so that no direct light or sunshine falls on the lens. Avoid 8. Installation and connection of the outdoor strong back lighting behind the visitor: in this case, the person appears darker station on the image. Check the camera image before mounting. Provisionally Remove the outdoor station [41] from the mounting bracket [63].
- Page 46 If fixed, push the antenna through the underside of the antenna hole Connect the DC-plug of the 5 V DC mains adapter [70] to the mains [68]. adapter connection [32] of the indoor station. To increase to distance use Push the outdoor station up into the mounting bracket until it touches the extension cable [33] between the mains adapter and indoor station.
-
Page 47: Basic Functions
when the stations are next to each other, then they must be paired again 11. Basic functions (see chapter 13.2 Pairing). After pressing the door bell button [47] the outdoor station confirms with The strength of the received wireless signal is indicated in the top left hand one chime and the indoor station rings with up to six chimes (chime melody corner [11] of the monitor. -
Page 48: Manual Recording
If the outdoor station is battery powered then these functions are available within one minute from the door bell button [47] being pressed Speech button [17]: Press the speech button. The activated speech function is indicated by the speech symbol in yellow with a black ring. The sound from the microphone [42] of the outdoor station can be heard through the speaker [25] of the indoor station. - Page 49 [93] - Brightness of the image If required the brightness of the image can be adjusted. Press the brightness button to adjust the brightness, which is represented in bars. Default setting: 2 bars Ring tone volume of the outdoor station (only for camera channel 1) Press the button to adjust the ring tone volume of the outdoor station, which is represented in bars.
- Page 50 To stop a continuous or motion detection recording, open the control bar by pressing the [15] symbol, press the record button [21] and then immediately afterwards the menu button [22]. Now you are in the main menu. and can change the recording settings. If you leave the main menu without changing the settings, the recording will recommence immediately.
- Page 51 Default: Screen always on. [104] - Display image in idle mode (MULTI CHANNELS IDLE DISPLAY) After a period of two minutes without any buttons being pressed by the user, the displayed image changes to the idle image which can be selected between: DISPLAY QUAD DURING IDLE TIME / DISPLAY DOORPHONE (outdoor station) DURING IDLE TIME / AT 10 SEC INTERVALS (the camera in the outdoor station and any other activated camera will be displayed in sequence / AT 10 SEC INTERVALS W/O DOORPHONE (any additional camera will be displayed in sequence, if only one additional camera is activated this will be displayed continuously)
-
Page 52: Wireless Range
14.2 Viewing recordings using the installed software Unscrew the seven screws [53] without removing them from the cover Insert the microSDHC card into the PC. [49]. Click on the desktop icon “Sec24MediaPlayer” to open the player. Lever the cover from the outdoor station. Click on “Load”. -
Page 53: Compatible Memory Cards
The following memory cards are compatible with DVT30: conformity known: compatible: up to 32 GB microSDHC Hereby, INDEXA GmbH declares that the radio equipment type DVT30 is in known: not compatible: from 64 GB microSDHC compliance with Directive 2014/53/EU. The full text of the EU declaration of... -
Page 54: Manuale Di Istruzioni
L'impianto digitale radio e videocitofono DVT30 è composto da una stazione movimento. esterna DVT30K con alimentatore 15 V e una stazione interna DVT30Mv.2 con Ogni altro utilizzo o modifica all'apparecchio è da ritenersi non conforme e alimentatore 5 V. -
Page 55: Specifiche Tecniche
69 Alimentatore15 V DC 77 Distanziatore 4. Dotazione (v. fig. A) 70 Alimentatore 5 V DC 78A Guarnizione di ricambio per Stazione intern a DVT30M con barra dei comandi 71 Viti di sicurezza copertura [50] 1 Microfono 16 Pulsante 72 Cavo per antenna 78BGuarnizione di ricambio con foro 2 Schermo visualizzazione... -
Page 56: Avvertenze Di Sicurezza
Eviti che gli alimentatori vengano a contatto con l'umidità e non Dimensioni corpo 107 x 176 x 41 mm immergere mai gli apparecchi in acqua! Pericolo di vita! Stazione interna DVT30Mv.2 " Fare funzionare gli apparecchi solo con gli alimentatori in dotazione. Tensione di esercizio... - Page 57 7. Posizionamento degli apparecchi La trasmissione radio può essere compromessa da forti campi elettromagnetici e altre apparecchiature radio. Tenere conto che vi deve Prima di montare la telecamera, studiare il luogo di montaggio. Provare se in essere una sufficiente distanza con: forni a microonde, radiotelefoni, questo luogo la telecamera funziona correttamente e controllare la router, cellulari, apparecchi radio nella gamma 2,4 GHz (ad es.
-
Page 58: Messa In Funzione
Fissare nuovamente il coperchio sulla stazione esterna con le sette viti. B e C). Consultare anche i dati riportati nelle istruzioni fornite con Sollevare con attenzione la copertura in plastica dal tasto campanello [47 l'apriporta o gli apriporta. - una targhetta di ricambio per il nome [73] è fornita in dotazione], Per collegare l'alimentatore collegare la spina del cavo di collegamento rimuovere la targhetta per il nome, munire di dicitura, riposizionare sul con la presa a bassa tensione dell'alimentatore 12 V e inserire la presa... -
Page 59: Funzioni Di Base
10.2 Messa in funzione della stazione interna Se uno o due apriporta elettrici sono stati collegati alla stazione esterna, Inserire eventualmente nell'alloggiamento [30] una scheda micro-SDHC essi possono essere attivati in qualsiasi momento, se la stazione esterna è compatibile, vuota, leggibile e non protetta, di classe 4 (o maggiore) alimentata a corrente, premendo il pulsante apriporta/apriportone [ 18 / (max. - Page 60 13. Funzioni ampliate 13.1 Barra dei comandi [14] Premendo il pulsante [15] si apre la barra dei comandi. Premendo il pulsante [15] si chiude la barra dei comandi. [16] - Selezione visualizzazione immagine Premendo più volte il pulsante di visualizzazione immagine [16] si passa dalla modalità di visualizzazione quad all'immagine a schermo intero delle telecamere da 1 a 4 (canale 1: già...
- Page 61 Per la registrazione audio da telecamere aggiuntive accoppiate, la modalità di visualizzazione dell'immagine selezionata è determinante: Se è stata selezionata la visualizzazione quad e schermo intero sulla stazione esterna, viene registrato l'audio della stazione esterna quando il tasto campanello è attivato;...
- Page 62 Per regolare nello stesso modo tutti i quattro canali per l'intero periodo di 24 ore , premere nella barra superiore [99] su "M=MOTION": i canali 2-4 possono registrare in modo automatico dopo aver rilevato un movimento; è possibile effettuare una registrazione manuale di tutti i quattro canali in qualsiasi momento (solo le telecamere attivate da 2 a 4 possono rilevare movimenti, la stazione esterna non ha alcuna funzione di rilevamento di movimento) "S=SCHEDULE"...
- Page 63 inutile di registrazioni e occupa inutilmente più memoria interna. Qui è possibile quindi impostare le aree dello schermo (sullo schermo è presente una griglia rettangolare) da attivare come aree di rilevamento nella modalità con rilevamento di movimento: in queste aree di rilevamento la memoria video andrà...
- Page 64 immagini di tutte le telecamere attivate da 2 a 4 vengono visualizzate in sequenza con un tempo di fermo di 10 secondi ). Nota: Se è stata attivata solo la telecamera 1 (telecamera della stazione esterna), sarà visibile solo la visualizzazione a schermo intero della stazione esterna.
-
Page 65: Manutenzione E Pulizia
14.2 Visualizzazione delle registrazioni con il software fornito [36] e rimuovere le viti. installato Estrarre con cura la stazione esterna [41] dalla custodia di protezione [63] Inserire la scheda micro SDHC nel PC. e svitare eventualmente il cavo dell'antenna dal collegamento antenna Fare clic sull'icona "Sec 24 Media Player"... -
Page 66: Accessori Opzionali
Antenna con 10 m di cavo di collegamento attenazione conformità UE 5 dB, Art. Nr. 27247 Il frabbricante,INDEXA GmbH, dichiara che il tipo di apparecchiatura radio DVT30 è conforme alla direttiva 2014/53/UE. Il testo completo della Schede di memoria compatibili dichiarazione di conformità...
Need help?
Do you have a question about the DVT30Mv.2 and is the answer not in the manual?
Questions and answers