
Related Manuals for Leister MINIFLOOR


Summary of Contents for Leister MINIFLOOR
- Page 1 English MINIFLOOR Drive unit Leister Technologies AG Galileo-Strasse 10 6056 Kaegiswil Switzerland +41 41 662 74 74 leister@leister.com www.leister.com...
-
Page 2: Table Of Contents
Table of contents 1. Important safety instructions 2. Application 2.1 Intended use 2.2 Non-intended use 3. Technical data 4. Transport 5. Device description 5.1 Overview of device parts 5.2 Extension cable 6. Operating readiness 6.1 Operating readiness 6.2 Parameter settings 6.3 Work environment/Safety 6.4 Starting the device 7. -
Page 3: Important Safety Instructions
Please read the Operating Instructions carefully before use and keep them for future reference. MINIFLOOR Drive unit You can find more information on the MINIFLOOR at www.leister.com 1. Important safety instructions Warning Hazardous voltage – danger to life Life-threatening electric shock possible due to electrical voltage. The device is only to be connected to sockets and extension cables with a protective earth conductor. -
Page 4: Application
Minimum overhead clearance with TRIAC AT is 295 mm. 2. Application 2.1 Intended use Drive unit for the welding of floors with additionally available hot-air rod tools from Leister and Weldy, such as the TRIAC AT. 2.2 Non-intended use Any use other than the use specified in 2.1 or beyond the intended use is deemed to be improper use. -
Page 5: Technical Data
3. Technical data MINIFLOOR TRIAC AT drive unit hot air hand tool Voltage 100 – 230 100/120/230 Power 1500/1600/1600 Frequency 50 / 60 50 / 60 Drive m/min 0.5 – 4.5 – ft./min 1.8 – 14.8 Air volume l/min (20°C) 120 – 240 –... -
Page 6: Device Description
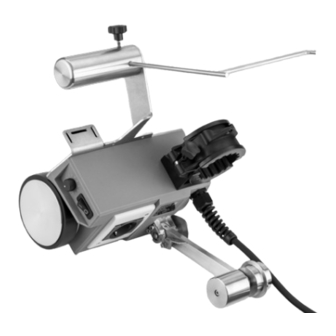
5. Device description 5.1 Overview of device parts 1. Power supply cord 15. Rubber band 2. Clamping screw 16. Hot air hand tool clamping device 3. Guide wheel 17. Lug for welding rod 4. Guide arm 18. Hot air hand tool outlet 5. -
Page 7: Extension Cable
5.2 Extension cable • A minimum cross-section must be observed when 50 m 3 × 1,5 mm² 230 V~ up to extension cables are used. up to 100 m 3 × 2,5 mm² • The extension cable must be authorized for the utiliza- 50 m 3 ×... - Page 8 (24) may lead to poor welding results! D. Connect the hot air hand tool (22) to the outlet on the MINIFLOOR (18). E. Roll up the cable for the hot air hand tool (22) and attach to the ap-...
- Page 9 F. Insert the unwinding device (11) into the hole (10) and fasten it in place with the clamping screw (12). G. Alternatively, without the unwinding de- vice, guide the welding rod through the lug (17). H. Inspect the position of the adjusting screw for the starting switch (20).
-
Page 10: Parameter Settings
I. Align the hot air hand tool (22), rapid welding nozzle (24),, and guide wheel (3) with the welding groove. If the guide wheel (3) jumps to the right out of the welding groove during welding, the running accuracy can be optimized by turning the hot air hand tool (22) clockwise. -
Page 11: Work Environment/Safety
Use extension cables with protective conductors only! The MINIFLOOR must not be used in areas with explosion and/or ignition hazards. Ensure a stable position during work. The power supply cord (1) must be able to move freely and must not hinder the user or third parties while working. -
Page 12: Welding Sequence
7. Welding Sequence 7.1 Preparation Carry out test welds according to the welding instructions from the material manufacturer and the national standards or directives. Check the test weld. • Adjust the welding speed, heating, and blowers. • It is important to reach the welding temperature (heating time approx. 3–5 min). Risk of entanglement! Fingers, hair, or items of clothing can be drawn in. -
Page 13: Welding Sequence Without Unwinding Device
7.3 Welding Sequence without unwinding device • Without the unwinding device, guide the Without unwinding device welding rod through the lug (17). End of the welding process • Once the welding process is complete, swivel the hot air hand tool (22) into the parking position. -
Page 14: Switching Off The Device
• Check the power supply cord (1) and plug for electrical and mechanical damage. 9. Faults • If drive wheels are blocked, switch off the main switch of the hot air hand tool (22) and the MINIFLOOR (6). 10. Maintenance •... -
Page 15: Disposal
When you are disposing of our products, please observe the national and local regulations. 13. Conformity EU Declaration of Conformity Leister Technologies AG, Galileo-Strasse 10, CH-6056 Kägiswil, Switzerland confirms that this product in the model made available for purchase, fulfills the requirements of the following EU directives. Directives:... - Page 16 • Heating elements are excluded from warranty obligations or guarantees. • Guarantee or warranty claims cannot be asserted for devices that have been converted or changed by the purchaser or for which non-original Leister spare parts have been used. Sales and service center...
Need help?
Do you have a question about the MINIFLOOR and is the answer not in the manual?
Questions and answers