Advertisement
INTRODUCTION
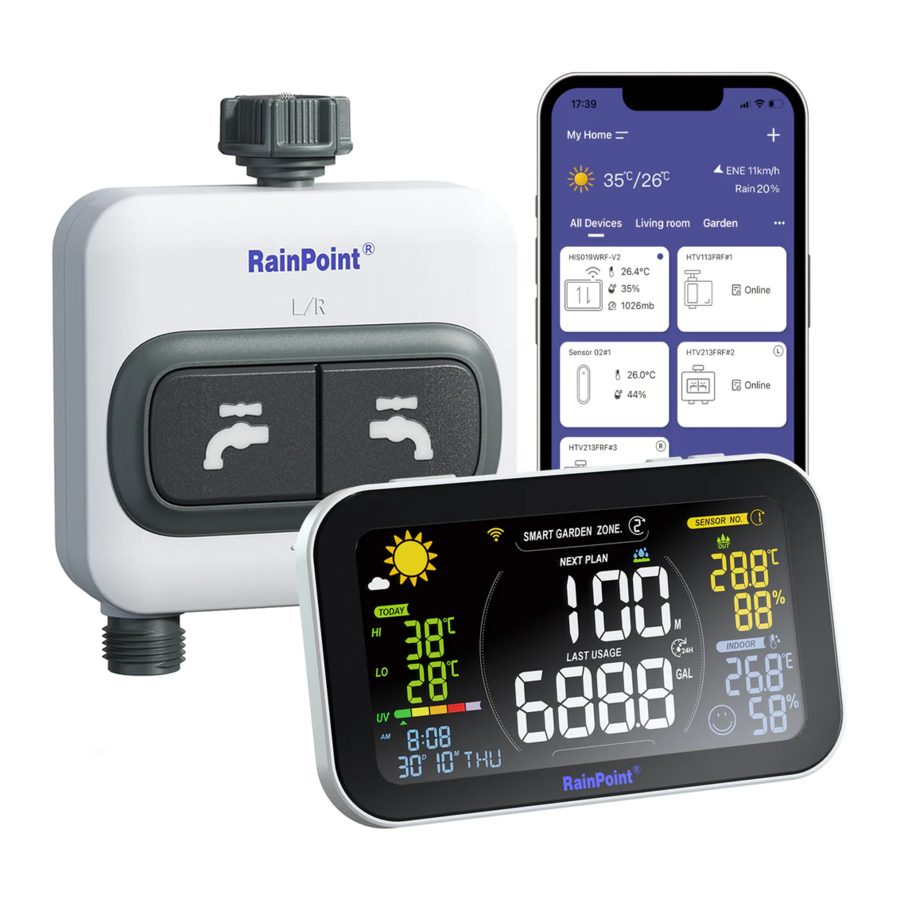
Welcome to the RAINPOINT smart family! Please read the manual before using to learn about the features and functions.
WI-FI DISPLAY HUB HIS019WRF-V2
Product Overview

Cable Port (Always keep the cable powered when pairing and remote control)
Note: WIFI connection will consume a lot of battery, please use DC power supply, battery is only used as backup power.
Button Introduction
| Buttons | Functions |
| Wi-Fi |
|
| Light |
|
| ZONE |
|
| SENSOR |
|
LCD Screen Overview

- Weather forecast for reference
- Freezing point alert
- Failed to connect
- WIFI signal indication
- Next watering plan time/ Watering remaining time
- Smart garden zones
- Watering reminder
- Low battery display of water timers
- Indoor thermo-hygrometer
- Sensor No.
- Outdoor thermo-hygrometer
- Soil sensor
- Low battery display of sensors
- Rainfall sensor
- Data of the sensors (If there is no sensors connect, the screen will show the data on the network)
- Low battery display of hub
- The temperature detected by hub
- The humidity detected by hub
- Indoor comfort level indicator
- Rain delay
- Water usage
- Manual watering
- Smart backlight mode
- Calender
- Current time
- UV level
- Lowest temperature for today
- Highest temperature for today
 To get accurate displays, please keep the devices away from any a freezing place, direct sunlight, rain, or any heat place.
 | DRY: Humidity ≤40% |
 | COMFORT: 40% ≤Humidity≤ 70% 68°F(20℃) ≤Temperature≤ 82.4°F(28℃) |
 | WET: Humidity ≥ 70% |
Specification
Detect Indoor Temperature: (9.9ºC~50ºC)-14ºF~122ºF, (±1℃)±3.6°F
Detect Indoor Humidity: 1%RH~99%RH, ±5%RH
UV Index: 0~15
5 Levels Backlight: OFF, 10%, 30%, 50%, 100%
Input: 100-240V~50/60Hz 0.3A
Output: 5V-1.2A
Power Supply: 5V DC adapter (included) or 3 x AA batteries (not included)
( Note: Please use the batteries for back up ONLY.)
WORK ON APP
APP Installation
Download
- HOMGAR APP downloads or scan the QR code to download:


- Create an account and log in:
Follow the instructions to sign up account or log in with an existing account and start matching devices!

Before Connection
To assure your display hub to connect to Wi-Fi, it will need to meet the following requirements:
- Please make sure the phone is connecting with 2.4GHz Wi-Fi before using HOMGAR app. The hub has to keep staying under 2.4GHz Wi-Fi to work normally.
- When to start and keep Wi-Fi connection, please keep the power cable on to make sure the hub works normally. Battery is just for back up.
- IOS Requirements: Mobile device with iOS 11.0 (or higher) with cellular or Wi-Fi service.
- Android Requirements: Mobile device with Android OS 6.0 (or higher) with cellular or Wi-Fi service
- Please do not use public Wi-Fi networks.
- The hub and device are better to be within 10 feet (3m) during pairing.
- If you need to change the working Wi-Fi network, press and hold Wi-Fi button and recenter your new Wi-Fi information on the APP.
Connection
 Tips:
Tips:
Please scan the QR code or search the link to access the video to connect the device quickly and easily.

Setup Video: https://www.youtube.com/watch?v=6tNFDQa3N1k
Smart WiFi Connection
- Power on the hub with the power cable and follow the steps below to connect:

- After register account and get into the APP page, find "+" button on the top right corner of the APP's Home Page.
![]()
- Select "Display Hub", then enter the Wi-Fi information and go next.


Tips: Please select 2.4Ghz WiFi If your router is a dual-band router, and you cannot identify the 2.4Ghz or 5Ghz WiFi, please tap the blue words ''Common router setting method'' to name the 2.4Ghz WiFi differently, then you can select it individually.

- On the device, press and hold the "Wi-Fi" button for about 5 sec until it shows "SCAN".
![]()
![]()
- When "SCAN" appears, check "All steps completed" box and then select "Next" to start searching devices.
![]()
- When device found, select
![]() to add the device and enter the name you prefer.
to add the device and enter the name you prefer.

- Congratulations! Now you successfully add the device to your APP.
![]()


AP Connection
If Smart Connection Mode does not work well, you can also try to use AP Connection Mode.
- Power on the hub with the power cable and follow the steps below to connect:

- After register account and get into the APP page, find "+" button on the top right corner of the APP's Home Page.
![]()
- Select "Display Hub", then enter the Wi-Fi information and go next.

- Click Switch Mode in the upper right corner to switch to AP Connection.
![]()
- On the device, press and hold the "Wi-Fi" button for about 5 sec until it shows "SCAN ". Hold the "WiFi" button for 2 seconds until the display shows "AP".

- When "AP SCAN" appears, check "All steps completed" box and then select "Go Connecting" to connect the phone with below the hot spots (HomGar_xxx). Note: If the phone pops up with no signal and need to switch WiFi, please do not switch to keep Hot spot of connected devices.

- Back to the app and click "Next" to continue adding devices automatically.

- Congratulations! Now you successfully add the device to your APP.
![]()


APP Overview
Tips: Please scan the QR code or search the link to access the video to operate the device quickly and easily.

Setup Video: http://bit.ly/3WR5kWP
APP Home Page
- Home Management: Set home name, location and other information to manage your garden irrigation system intelligently and accurately.
- All Devices: All added devices will be displayed here.
- Local Weather: the corresponding weather data will be displayed.
- Room System Management: After setting the location of the home, Show the related devices in different rooms.
- Add Devices: Add the Smart + series devices to start setup your system management.
- Home: The APP home page.

Plan Page
List all of your irrigation plans for water timers. You can manually turn on or off the plan by the button on the right.
There is also a manual Rain Delay button to put off all plans if there is raining.

Event Page
Review all the events that have occurred. Learn more about how your smart system works.

Me and Basic Settings
Manage your account, home, basic settings, and other options. You can also find unit format and notification button in these settings.

Notes: After the hub and sub-devices are connected, the selection of the sub-devices will be displayed on both the APP home page and the hub's device page. You can click the device icons in the "All Devices" list to enter the device page, or find them in the "Sub-devices" list on the hub's device page.
Device Page

- Device Setting
- Barometric Pressure
- Current Temperature and Humidity
- The Highest and Lowest Temperature
- The Highest and Lowest Humidity
- Sub-device Management
- Device Data Chart
Device Settings

Tips:
- Rain display needs to work with the rain gauge, which is purchased separately.
- Weather display is the weather display for only today or both today and tomorrow.
- Warning settings is to set the alert for specific values of temperature and humidity.
- Sensor No. Settings is to set the display order for the sensors and controllers.
- Timing settings need to work with the precision clock, which is purchased separately.
- Receive Channel is only for when the sub-devices cannot be connected. You don't need to change it unless you have to.
BASIC SUB-DEVICES
How to Connect
If you need to connect the sub-device, please connect the hub or display hub of Rainpoint Smart+ series first.
There are two ways you can connect the sub-devices:
"Add Device" button on the top right corner of the APP home page

"Sub-devices" management in the hub's device page

HTV113FRF Smart 1-Zone Water Timer

- Find "1-ZONE Water Timer" or the icon
![]() to add HTV113FRF Smart 1-Zone Water Timer when adding sub-devices.
to add HTV113FRF Smart 1-Zone Water Timer when adding sub-devices. - Inset the batteries, and then the indicator will quickly blink in red. At the same time, select "NEXT" on the APP and start searching devices.
- Keep the timer and the hub close to each other, and they will connect automatically.
- Besides that, you can also hold the button to reset and connect again.
- After successfully connecting, the next watering plan time for each valve will display in the middle of the hub's screen.
- You can also hold the ZONE button on the hub to manually turn on the valve for 10 mins.
 to add HTV113FRF Smart 1-Zone Water Timer when adding sub-devices.
 Tips:
If you need more detail information about the operation, please scan the QR code or search the link to access the video to check the device quickly and easily.

Setup Video: http://bit.ly/3jgJQVA
HTV213FRF Smart 2-Zone Water Timer

- Find "2-ZONE Water Timer" or the icon
![]() to add HTV213FRF Smart 2-Zone Water Timer when adding sub-devices.
to add HTV213FRF Smart 2-Zone Water Timer when adding sub-devices. - Inset the batteries, and then the indicator will quickly blink in red. At the same time, select "NEXT" on the APP and start searching devices
- Keep the timer and the hub close to each other, and they will connect automatically.
- Besides that, you can also hold the button to reset and connect again.
- After successfully connecting, the next watering plan time for each valve will display in the middle of the hub's screen.
- You can also hold the ZONE button on the hub to manually turn on the valve for 10 mins.
Tips:
If you need more detail information about the operation, please scan the QR code or search the link to access the video to check the device quickly and easily.

Setup Video: http://bit.ly/3jlUEBV
HCS014ARF Outdoor Thermo-Hygrometer Sensor

- Find "Air Humidity Sensor"or the icon
![]() to add HCS014ARF Outdoor Thermo-Hygrometer Sensor when adding sub-devices.
to add HCS014ARF Outdoor Thermo-Hygrometer Sensor when adding sub-devices. - Select "Next" and start searching devices. At the same time, insert the batteries, and then the red indicator will quickly blink once. Please make sure the APP is already in searching before power on the sensor.
- Keep the timer and the hub close to each other, and they will connect automatically.
- After successfully connecting, the detected data will display in right side of the hub's screen under"SENSOR".
 to add HCS014ARF Outdoor Thermo-Hygrometer Sensor when adding sub-devices.
 Tips:
If you need more detail information about the operation, please scan the QR code or search the link to access the video to check the device quickly and easily.

Setup Video: https://www.youtube.com/watch?v=fRiQhy-CqOwg
HCS021FRF Soil Moisture Sensor

- Find"Soil Moisture Sensor"or the icon to add the sensor.
- Inset the batteries, and then the indicator will quickly blink in red. At the same time, select"NEXT"on the APP and start searching devices.
- Keep the sensor and the hub close to each other to connect automatically.
- Besides that, you can also hold the button to reset and reconnect if you fail to connect for the first time.
- After successfully connecting, the real-time soil moisture and surface temperature will display on the top right corner of the hub's screen.
Tips:
If you need more detail information about the operation, please scan the QR code or search the link to access the video to check the device quickly and easily.

Setup Video: http://bit.ly/3jlwZle
HCS008FRF Water Flow Meter

- Find"Flow Meter"or the icon
![]() to add the sensor.
to add the sensor. - Insert the batteries and the flow meter will get into the pairing mode automatically. At the same time, select"NEXT"on the APP and start searching devices.
- Keep the sensor and the hub close to each other to connect automatically.
- Besides that, you can also re-insert the batteries to reset and reconnect if you fail to connect for the first time.
- After successfully connecting, the real-time water flow rate and other information will show on the device home page.
 to add the sensor.
 Tips:
If you need more detail information about the operation, please scan the QR code or search the link to access the video to check the device quickly and easily.

Setup Video: http://bit.ly/3WMKuYF
TROUBLESHOOTING
| Problems | Some Solution |
| Power problem |
|
| Disconnection |
|
| Outdoor sensor drains batteries quickly |
|
| Device offline |
|
Have Questions?
 Email: service@rainpointus.com
 WEB:www.rainpointonline.com
 WhatsApp: +1 626-780-5952

 US Free Hotline(English): +1 833-381-5659
(MON-FRI 9:30 AM-5:30 PM PST)
EU Free Hotline(English Deutsch): +44 800-808-5337
(MON-FRI 9:00 AM-5:00 PM CET )

Documents / Resources
References
App Store 上的“HomGar”
![play.google.com]() Google Play
Google Play![www.youtube.com]() #RainPoint | How to setup the Smart Garden Irrigation Hub .#morethanwatersaving - YouTube
#RainPoint | How to setup the Smart Garden Irrigation Hub .#morethanwatersaving - YouTube![bit.ly]() 【HIS019WRF-V2】Garden Control Hub Setup Guideline - YouTube
【HIS019WRF-V2】Garden Control Hub Setup Guideline - YouTube![bit.ly]() 【HTV113】1-Zone Water Timer Setup Guideline - YouTube
【HTV113】1-Zone Water Timer Setup Guideline - YouTube![bit.ly]() 【HTV213】2-Zone Water Timer Setup Guideline - YouTube
【HTV213】2-Zone Water Timer Setup Guideline - YouTube![www.youtube.com]() - YouTube
- YouTube![bit.ly]() 【HCS021】Soil & Sunlight Sensor Setup Guideline - YouTube
【HCS021】Soil & Sunlight Sensor Setup Guideline - YouTube![bit.ly]() 【HCS008】Wi-Fi Water Flow Meter Setup Guideline - YouTube
【HCS008】Wi-Fi Water Flow Meter Setup Guideline - YouTube![www.rainpointonline.com]() Smart Watering, Sprinkler & Drip Systems
Smart Watering, Sprinkler & Drip Systems
Download manual
Here you can download full pdf version of manual, it may contain additional safety instructions, warranty information, FCC rules, etc.
Download RainPoint Smart+ HIS019 - Irrigation Display Hub Manual
Advertisement


Need help?
Do you have a question about the Smart+ HIS019 and is the answer not in the manual?
Questions and answers