
Related Manuals for ClearWater R-40

Summary of Contents for ClearWater R-40
- Page 1 The Healthy Alternative to Chlorine MineralPURE Mineral Ionization Installation & Pool Care Manual Model R-40 Residential Pools...
-
Page 2: L R-40 .) Specifications
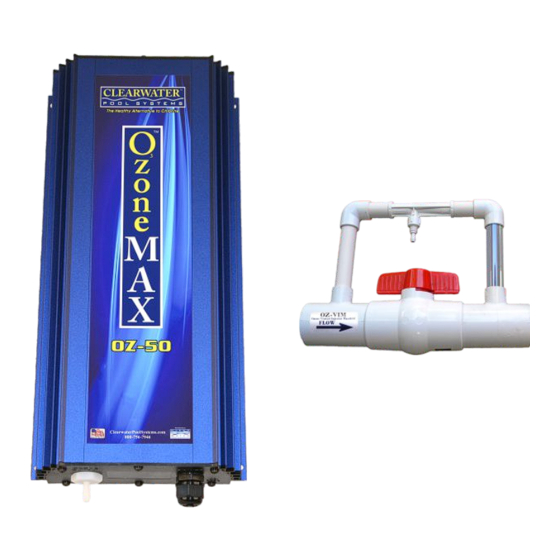
OzoneMAX Vacuum-ultraviolet Ozone Systems Add ozone to your system - By adding a ozone generator to your system, you can virtually eliminate adding any oxidizers to your pool. Contact your dealer for more information. Model • Complements the MineralPURE ionizer OZ-50 •... -
Page 3: Table Of Contents
We also strongly recom- mend you add the Clearwater Ozone Max system for additional benefits. You can now truly enjoy your swimming pool – the way it was meant to be. You will be swimming in natural "mineral spring"... -
Page 4: A.) Important Safety Instructions
Disconnect the unit and have the problem corrected by a qualified service representative before using. 5. READ AND SAVE THIS INSTRUCTION MANUAL. 6. Turn off the power to the R-40 before detaching the electrode connectors. 7. Disconnect the pump from the main power (or control unit) before inspecting or working on the pump. -
Page 5: B.) Identifying The R-40 Components
B.) Identifying the R-40 Components What comes in the R-40 box, all the components listed below. 2” Slip/Slip/Threaded tee (1) 2” to 1 ⁄ ” Reducers (2) CLF-01 R-40 Control Box (1) connected Electrode Wire Assembly (1) Copper Test Kit (1) -
Page 6: C.) Tools And Materials Required
Location Return to Pool The MineralPURE R-40 should be installed at the pool’s pump and filter area. The preferable location to mount the electrode chamber(s) is after the pool’s pump and filter, but it can be installed before the pool’s pump and filter if needed. The electrode chamber(s) will need to be within 10 feet of the control box for an electrical connection. -
Page 7: E.) Installing The
E.) Installing the R-40 First - Mount the Flow Cell Tee Read All Instructions First 2. 2. 1.) Turn off the pump and close all valves. Disconnect all sources of power going to the timer or pump. 2. 2. 2. - Page 8 FAILURE TO SET THE R-40 ON THE PROPER VOLTAGE CAN CAUSE PROBLEMS: If the actual voltage was 220VAC, and the R-40 was set on 110VAC, the internal fuse will blow. If the actual voltage was 110VAC, and the R-40 was set on 220VAC, the R-40 will not work at 100% efficiency.
- Page 9 4.) Make sure the surface is flat, firm, and as close to the power source as possible. Connecting the Electrode Cable 5.) Connect the two electrode wires coming from the MineralPURE R-40 (inside the gray colored jacket) to the two electrode terminals. It does not matter which (red or black) wire is connected to the electrode terminals.
- Page 10 Choosing the Power Source When locating the power source, the R-40 should turn on and off when the pump and motor does. The best location is the pool's timer box. If no timer box exists, you can use the pump motor as its power source by removing the back plate.
- Page 11 It is possible to connect the control box to a regular outlet or junction box. Although this is not recommended because the control box should shut off whenever the swimming pools pump motor is off. If the R-40 control box is left running when there is no water flowing past the electrodes, damage to the electrode(s) or electrode cell chamber(s) could result.
-
Page 12: F.) Balancing The Pool's Water
(see next chapter, “G. Starting up the System”, page 15) Before starting up the MineralPURE R-40, the copper level should be tested. There may be readings of copper sulfate in the water from leached copper piping or from a copper based algaecide. Correct the problem by either locating the copper pipe (usually next to a water heater) and balancing the pH, or eliminating any algaecides completely. - Page 13 The most important factor in the pool’s water chemistry is the pH reading. It should be kept between 7.2 and 7.6 at all times. If the pH gets too high, the R-40’s ions lose their effectiveness and can fall out of solution.
-
Page 14: G.) Starting Up The System / Operation Instructions
Testing for Copper-Ions Keep the R-40 on its highest setting (5) if you want to reach these levels the fastest when first starting up the system. Once the ideal copper-ion level has been reached, turn down the control knob one notch and test a couple of days later. -
Page 15: H.) Proper Procedures Of Maintaining A Healthy Pool
Indicator Lights On the face plate of the R-40 control box are three indicator lights. The top light - Power indicator -lets you know that power is going to the control box. This light should stay on all the time as long as the power source is on. The bottom two lights - Alternating Electrode Indicators - lets you know a charge is going to the electrodes. -
Page 16: I.) Cleaning And/Or Replacing The Electrodes / User Maintenance
The entire chamber is replaced and a new set is screwed into the tee. Always use plenty of teflon tape around the threads to prevent leaking. Electrode Reordering Information: Replacement Electrode - Part # CLE-02 - residential copper electrode for the R-40 Model. -
Page 17: J.) Troubleshooting
1.) High algae growth and cloudy water / Ion level too low. A high algae growth or cloudy water will use up all available copper ions in the water that the R-40 can produce. This would result in a low ion level. - Page 18 Can't Obtain the Proper Copper-Ion Level (continued) 3.) Make sure the R-40 is set on the correct voltage. A R-40 set on 220VAC with the power source at 110VAC will cut the power output in half. An R-40 set on 110VAC with the power source at 220VAC will blow the internal fuse.
- Page 19 The R-40 should read about 500 mA on max (setting number 5). NOTE: These actual readouts will vary slightly, so do not be alarmed if you get a reading of 530 mA on the R-40. The readings should lower as the control knob is turned to a lower setting.
-
Page 20: K.) Removing The Circuit Board
K.) Removing the Circuit Board If the R-40 control box needs to be replaced for any reason, the R-40 was designed so that only the circuit board needs to be checked out. This allows for all external electrical connections and the enclosure to remain at the same location during repair. - Page 21 L.) R-40 Ionizer Specification Sheet Water Specifications Pool Size: up to 40,000 U.S. gallons Ionization Method: electrolysis of copper or copper/silver alloy electrodes Electrode Chamber: 2” schedule 40 tee with bushings for 2” or 1 ½” PVC pipe Electrode: one set 3" long, comprised of copper (CLE-02)
-
Page 22: M.) Quick Chart
2.) Maintain Ion level between .15 and .20 ppm Follow directions located inside the “Ion Test Kit” that is included with the R-40 to determine the ion level in your pool. If the reading is too high, lower the R-40 ionizer output level by turning the control knob counter-clockwise. -
Page 23: N.) Notes
N.) Notes MineralPURE Mineral Ionization... - Page 24 The Healthy Alternative to Chlorine MineralPURE Mineral Ionization Manufactured by Sustainable Solutions for Our Future Licensed technology Licensed technology ClearwaterPoolSystems.com Phone: 727-562-5186 • Toll Free: 800-756-7946 (SWIM) 01/19...
Need help?
Do you have a question about the R-40 and is the answer not in the manual?
Questions and answers