Frymaster COMPUTER MAGIC - Control Panel Programming Manual
- Operating instructions (2 pages) ,
- Programming instructions (2 pages)
Advertisement
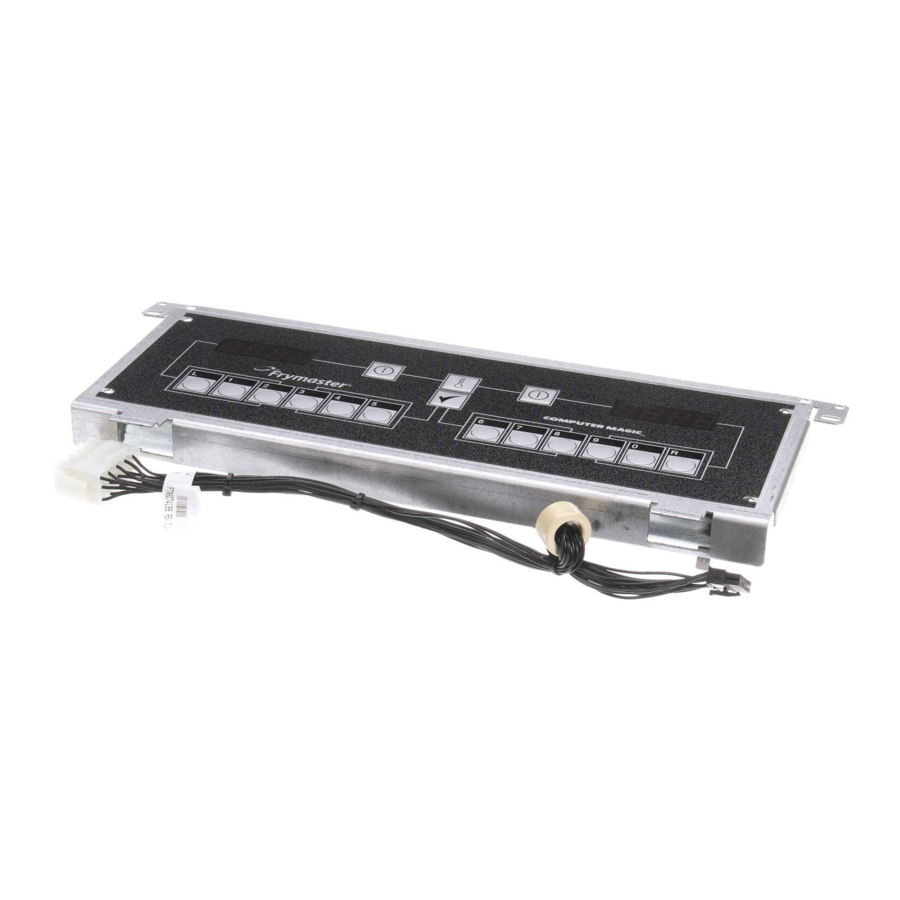
DEVICE OVERVIEW

- Lighted Display -- left side display of various functions and operations.
- Lighted Display -- right side display of various functions and operations.
- Thermometer Button -- locks in program after set up is complete and displays frypot oil temperature.
- ON/OFF Button -- controls power supply for left side of split frypot.*
- ON/OFF Button -- controls power supply for right side of split frypot.*
- / 7. Product and Coding Buttons -- allows access to the computer and programming functions.
- Programming Button -- locks in the programming selected for product buttons.
*On full frypot, either left or right button will control power.

FRYER MUST BE FILLED WITH OIL, SHORTENING OR WATER BEFORE TURNING ON COMPUTER. COMPUTER CANNOT BE PROGRAMMED DURING A COOKING CYCLE.
PROGRAMMING INSTRUCTIONS FOR THE FRYMASTER COMPUTER. PLEASE READ INSTRUCTIONS BEFORE PROGRAMMING COMPUTER.
FULL POT
- Press ON/OFF BUTTON, Item 4 or 5.
- To enter program mode, press PROGRAMMING BUTTON (Item 8), "CODE" will appear in left display. If you have pressed this button in error and do not wish to program, simply press PROGRAMMING BUTTON (Item 8), again.
![warning]() NOTE: Computer will flash "BUSY" if cooking is in progress.
NOTE: Computer will flash "BUSY" if cooking is in progress. - Enter Code Number: Press 1,6,5,0 in that sequence on Item 6 and 7. (Your program will not be accepted unless these numbers are entered. This prevents an unauthorized person from changing your present instructions.) Press PROGRAMMING BUTTON (Item 8), to lock in code.
- "SP-r" (SET POINT) will appear in the left display (Item 1). This is for setting temperature; temperature previously selected will be displayed in the right display (Item 2). Enter temperature desired. Press PROGRAMMING BUTTON, (Item 8) to lock in temperature setting. If you do not need to change the temperature, press PROGRAMMING BUTTON (Item 8).
- "SELP" (SELECT PRODUCT) appears in Item 1. Press the product button to be programmed (L, 1, 2, 3, 4, 5, 6, 7, 8, 9, 0, R). Press PROGRAMMING BUTTON (Item 8), to lock in code.
- "SENS" (SENSITIVITY) appears in Item 1. The sensitivity number previously selected will be displayed in Item 2. Enter the new desired sensitivity number. Press PROGRAMMING BUTTON (Item 8) to lock in sensitivity setting. If you do not need to change the sensitivity, press PROGRAMMING BUTTON (Item 8).
 NOTE: SENS -- Sensitivity is a built-in feature that causes the computer to adjust cooking time to compensate for the drop in shortening temperature when a basket of product is placed into the fryer. Different food products will vary in density, basket load size and initial temperature. Food products will also vary in how well cooked a product is required to be. A proper sensitivity setting for each product will assure a high-quality product each time. For example: four ounces of french fries can be programmed to be cooked to the same quality as two and onehalf pounds. Some experimenting with the range of 1 to 9 may be required to obtain the desired quality to meet your specifications.
- "COOC" (COOK) is now displayed in Item 1. If a cooking time has been entered in the program prior to this programming, it will appear in Item 2. If that time is correct, press PROGRAMMING BUTTON (Item 8). If you wish to change that time, enter the numbers desired. The new time will be displayed in Item 2. Press PROGRAMMING BUTTON (Item 8). Press PROGRAMMING BUTTON (Item 8), to lock in code.
- "SH-" is now displayed in Item 1. If your product requires shaking during the cooking process, set the time by pressing the number of minutes to cook before shaking. This number will appear in the right display (Item 2).
Example: Total Cook Time 3:00 minutes
Shake After Cooking 1:00 minute - Set the desired shake time. At the end of the set time, a beeper will sound, and the product button will flash for 3 seconds. If none is required, set the time at "0" and press PROGRAMMING BUTTON (Item 8).
- "HD-" will appear in Item 1. Set the time you require forholding the cooked product, 13 seconds to 60 minutes. Press PROGRAMMING BUTTON (Item 8). If you do not wish to use the HOLD time, enter "0" and press PROGRAMMING BUTTON (Item 8). "SELP" will again display in Item 1. If more products are to be programmed, return to Step 5 and follow all instructions to this point.
ADDITIONAL HOLD TIME INSTRUCTIONS
Programming hold timer to another product button: In the event the same product is being cooked in more than one basket, any product button can be programmed to use the hold timer normally used with a different product button. Example: Program button "3" for 7:00 minutes hold time. Then when programming button "R" for hold time, press address 4. Both "3" and "R" will then use the same hold time of 7:00 minutes. See below for button numbers and their assigned address numbers. Any other button can be programmed to use the same hold time.
BUTTON L 1 2 3 4 5 6 7 8 9 0 R
ADDRESS 1 2 3 4 5 6 7 8 9 10 11 12
- When you complete your program, lock in the program by pressing THERMOMETER BUTTON (ITEM 3).
SPLIT POT
- Press either ON/OFF BUTTON, Item 4 or Item 5.
- To enter the program modes, press PROGRAMMING BUTTON (Item 8). "CODE" will appear in the left display (Item 1). If you have pressed this button in error and do not wish to program, simply press PROGRAMMING BUTTON, (Item 8) again.
![warning]() NOTE: You cannot program the computer while it is in the cook mode. The computer will flash "BUSY" if cooking is in progress.
NOTE: You cannot program the computer while it is in the cook mode. The computer will flash "BUSY" if cooking is in progress. - Enter Code Number: Press 1,6,5,0 in that sequence on Item 6 and 7. (Your program will not be accepted unless these numbers are entered. This prevents an unauthorized person from changing your present instructions.)
- "SP-r" (SET POINT) will appear in Item 1; this is for setting the cooking temperature for the right side of split pot. The temperature previously selected will be displayed in Item 2. Enter new temperature desired. Press PROGRAMMING BUTTON (Item 8) to lock in temperature setting. If you do not wish to change the set point, press PROGRAMMING BUTTON (Item 8).
- "SP-L" (SET POINT) will appear in the left display (Item 1). This is for setting the cooking temperature for the left side of split pot. The temperature previously selected will be displayed in the right display (Item 2). Enter the new temperature desired and press PROGRAMMING BUTTON (Item 8) to lock in temperature setting. If you do not wish to change the set point, press PROGRAMMING BUTTON (Item 8).
- "SELP" (SELECT PRODUCT) will appear in Item 1. Select buttons "L" through "5" (Item 6) for programming the left side of split pot; select buttons "6" through "R" (Item 7) for programming the right side of split pot. Press the product button (Item 6 or 7) to be programmed.
- "SENS" will appear in Item 1. Refer to steps 6-11 under Full Pot Programming Instructions to program individual product buttons.
BOIL FEATURE
- Before buttoning the fryer(s) ON, close the frypot drain valve(s): fill empty frypot with mixture of cold water and FRYMASTER FRYER 'N' GRIDDLE cleaner. Follow instructions when mixing.
![]()
ON EARLY SPLIT POT COMPUTERS, BOTH POTS WILL GO TO BOIL OPERATION. ON CURRENT SPLIT POT COMPUTERS, BOIL MODE WILL NOT TURN ON BOTH SIDES OF COMPUTER. EACH SIDE WILL HAVE TO BE TURNED ON SEPARATELY. - To program computer for Boil Feature, press ON/OFF BUTTON (Item 4 or 5).
- Press PROGRAMMING BUTTON (Item 8) "CODE" will appear in the left display.
- Enter Code Number: Press 1,6,5,3 in that sequence. The right display will read BOIL. The temperature is automatically set for a temperature of 195°F (91°C). The fryer will attain this proper boil temperature and remain there until the OFF button (Items 4 or 5) is pressed which cancels the boil-out mode. In high-altitude locations, the fryer must be monitored constantly for over-boil conditions. If over-boil conditions occur, turn off fryer immediately, allow to cool and re-enter boil mode to continue the boil-out operation.
FRYER RECOVERY TIME CHECK
- The computer automatically checks the recovery time each time the pot temperature drops below 250°F (121°C). To check recovery time, press PROGRAMMING BUTTON (Item 8) "CODE" will appear in the left display (Item 1).
- Enter Code Number: Press 1,6,5,2 in that sequence on Items 6 and 7. The recovery time will appear in both displays, (Item 1 and Item 2) for five seconds.
TEMPERATURE SELECTION MODE -FAHRENHEIT TO CELSIUS
- To change the computer temperature from Fahrenheit to Celsius or Celsius to Fahrenheit, press ON/OFF BUTTON (Item 4 or 5).
- Press the PROGRAM BUTTON (Item 8). "CODE" will appear in left display (Item 1).
- Enter Code Number 1,6,5,8 in that sequence on Items 6 and 7. The computer will automatically toggle the temperature from Fahrenheit to Celsius or Celsius to Fahrenheit.
- Press the THERMOMETER BUTTON (Item 3) to display the temperature in the newly selected mode.
CONSTANT OIL-TEMPERATURE-DISPLAY MODE
- The cooking oil temperature will be displayed constantly at all times. To program constant temperature display, press ON/OFF BUTTON (Item 4 or 5).
- Press the PROGRAM BUTTON (Item 8). "CODE" will appear in left display (Item 1).
- Enter Code 1,6,5,L in that sequence on Items 6 and 7. The COMPUTER DISPLAY (Item 2) for full pot (Item 1 and 2) for split pot will display oil temperature constantly.
- To remove the constant oil-temperature display, repeat step 2 and 3.
![warning]() NOTE: During product cooking process, the cooking time will not be displayed, but timing is taking place.
NOTE: During product cooking process, the cooking time will not be displayed, but timing is taking place.
8700 Line Avenue
Shreveport, LA 71106-6800
USA
Tel: 1-800-221-4583
Fax: 318-868-5987
E-mail: info@frymaster.com
Bu letin No. 818-5031 7/09
Tel: 318-865-1711 www.frymaster.com
Litho in U.S.A. ©Frymaster

Documents / Resources
References
Download manual
Here you can download full pdf version of manual, it may contain additional safety instructions, warranty information, FCC rules, etc.
Download Frymaster COMPUTER MAGIC - Control Panel Programming Manual
Advertisement


Need help?
Do you have a question about the COMPUTER MAGIC and is the answer not in the manual?
Questions and answers