
Related Manuals for gmc aircon GMCP10E


Summary of Contents for gmc aircon GMCP10E
- Page 1 Portable Air Conditioner Owner’s Manual MODEL: GMCP10E PLEASE READ AND SAVE THESE INSTRUCTIONS pg. 1 For enquiries or support: visit www.gmcaircon.co.za or contact us on 012-661 1173...
-
Page 2: Important Notes
IMPORTANT NOTES Dear Customer Your new GMC Portable Aircon has been manufactured in a state-of-the-art facility and has passed the strictest quality control procedures. Please read this manual carefully before using your appliance for the first time and then please store this manual in a safe place for future reference. -
Page 3: Table Of Contents
TABLE OF CONTENTS COVER PAGE…......................1 IMPORTANT NOTES…..................... …2 TABLE OF CONTENTS… .................... 3 BEFORE YOU BEGIN…...................4 SAFETY GUIDELINES……… ..................5,6 PRODUCT OVERVIEW………………................7,8 INSTALLATION…………..................9,10,11,12,13 OPERATION.....................14,15,16,17 WIFI SETTINGS …………….…...................18,19 CLEANING AND CARE ………………………………………………………………………………………20,21 TROUBLESHOOTING ………………………………………………………………………………………….22 DECOMMISSIONING …………………………………………………………………………………………..23 SPECIFICATIONS………………………………………………………………………………………………….24... -
Page 4: Before You Begin
BEFORE YOU BEGIN If you have purchased your product from an online platform and you require assistance, please contact us before returning the product. We are able to assist quicker and we will resolve ALL issues for you. We are the no.1 rated aircon company online and customer service is our no.1 priority. PRODUCT DESCRIPTION Our powerful portable air conditioners are great cooling solutions for single rooms, creating a comfortable atmosphere in your space. -
Page 5: Safety Guidelines
• Cleaning and user maintenance shall only be completed by a competent adult. • The refrigerant loop is sealed. Only a qualified GMC Aircon technician can service this unit. Please contact our team on 012-661-1173 • Do not discharge the refrigerant into the atmosphere. - Page 6 OPERATIONAL SAFETY GUIDELINES WARNING! Install the unit in rooms which exceed 10 m². • If the supply cord is damaged, it must be replaced by the manufacturer, or its service agent. • Always operate the unit from a power source of equal voltage, frequency and rating as indicated on the product identification plate.
-
Page 7: Product Overview
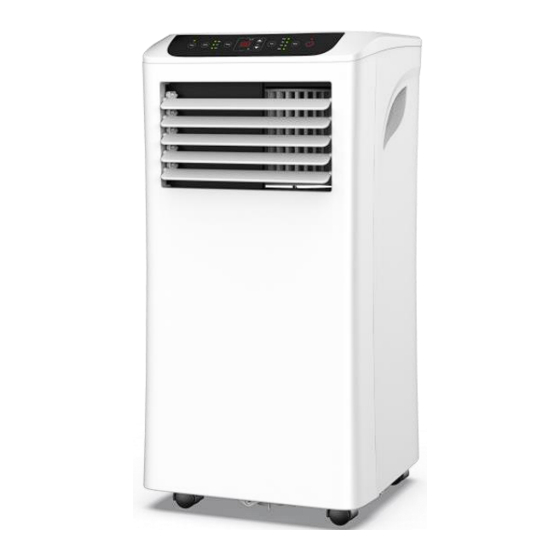
PRODUCT OVERVIEW Drain opening Control panel Power cord with sealing plug Air outlet with Recessed adjustable handle louver Air outlet with adjustable Air Exhaust louver Note: The appearance is only for reference. Please see the real product for detailed information. pg. - Page 8 FEATURES • 24-hr Timer • 2 Speed Fan • 2 Year Warranty • 3 in 1 - Cooling, Dehumidifying and Ventilating • 10000BTU - Cooling Only • Applicable Room Area: Up to 20m2 • Dehumidifier - 24L/Day Capacity • Easy Window Connection kit •...
-
Page 9: Installation
INSTALLATION UNPACKING Unpack the carton and take the appliance and accessories out. ⚫ Accessories: ⚫ 1. Exhaust hose ◼ 2. Hose connector ◼ 3. Window kit adapter ◼ 4. Remote control ◼ 5. Window kit ◼ pg. 9 For enquiries or support: visit www.gmcaircon.co.za or contact us on 012-661 1173... - Page 10 CHOOSE YOUR LOCATION If tipped/delivered at more than 45° angle. Please allow the unit to stand upright for at least 24 hours before start up, as this will allow the gas in the compressor to settle before use. Place the unit on a firm, level surface in an area with at least 50cm of free space around it to allow for proper air circulation.
- Page 11 ATTACH THE EXHAUST HOSE Your new GMC portable air conditioner will not operate correctly unless the exhaust hose is installed and vented through an outside area. This is so the exhaust (Hot Air) can be expelled from the room. Please note this is a universal window kit which is shipped with all portable aircons worldwide.
- Page 12 Step 2: Connect the windows kit adapter to the other end of the exhaust hose. Step 3: Extend the adjustable window kit the length of your window. Connect the exhaust hose to the window kit. Step 4: Close your window to secure the kit in place. It needs to hold the windows kit firmly in place, It is recommended that t secure the window kit with duct tape if required.
- Page 13 Step 5: Attach the hose connector to the exhaust air outlet of unit. Step 6: Adjusting the length of the flexible exhaust hose, and avoid bends in the hose. Then place AC near an electrical outlet. Step 7: Adjust the louver at the air outlet, and then switch on the unit. pg.
- Page 14 OPERATING INSTRUCTIONS CONTROL PANEL AND DISPLAY FUNCTION KEYS AND INDICATORS POWER Press to switch the machine on or off. Press to switch the operation mode between cool, MODE dry and fan. MODE This will display the Mode Setting between cool, dry Indicator and fan.
- Page 15 REMOTE CONTROL FUNCTION KEYS AND INDICATORS POWER Press to switch the machine on or off. TIMER Sets a time for the unit to automatically start or stop SLEEP Press to turn sleep mode on or off. Increasing/Decreasing the desired temperature or UP/DOWN timer setting.
-
Page 16: Operation
SETTINGS Start-up and Shutdown Press POWER to turn the unit on. The unit runs in in FAN as default. Press MODE button to select the desired operation mode. Press POWER again to turn off the power. Operational modes The unit has four operation modes: Cool, Fan, Dry and sleep(Please note that Sleep mode can only be accessed via the remote control)... - Page 17 TIMER SETTING (1hour-24hours): The timer has two ways of operation: Press +/- Press Timer key to To turn off repeatedly to set the turn on the timer (When power on) delay OFF time. function. Press +/- Press Timer key to To turn on repeatedly to set the turn on the timer...
-
Page 18: Wifi Settings
WIFI SETTINGS When you plug in your new GMC portable aircon the WIFI led button will flash on the display panel. Please note you will need to give the APP access to your WIFI router as this is how they ‘connect/talk’ to each other. Please follow the instructions below on how to connect. - Page 19 When WIFI indicator flashes, open “Smart Life” APP, the unit will connect via Bluetooth automatically. ● Method 2 When WIFI indicator , select “Add Device”-“Large Home Appliances”- flashes “Portable Air Conditioner (Wi-Fi)”, and follow the instructions on the display. Check the status of the WIFI indicator and choose the correct status. If the WIFI indicator flash , it can connect directly.
-
Page 20: Cleaning And Care
CLEANING AND CARE CLEANING THE AIR FILTER (every two weeks) Dust collects on the filter and restricts the airflow. The restricted airflow reduces the efficiency of the system and if it becomes blocked it can cause damage to the unit. The air filter requires regular cleaning. - Page 21 DRAINAGE Self- evaporating system The self-evaporating system uses the collected water to cool the condenser coils for better efficient performance. There is a drainage tank built inside the portable aircon – you do not need to empty this tank when in cooling mode. If you are in drying or using in high humidity areas you will need to drain the tank when it is full.
-
Page 22: Troubleshooting
TROUBLESHOOTING Symptom Inspection Solution ✓ Check the power connection ➢ Insert the power cord securely is in securely. into the wall/Outlet. ✓ Check if the water level ➢ Empty the drain pan by The unit is not indicator lights up? removing the rubber plug. -
Page 23: Decommissioning
DECOMMISSIONING Long-Term Storage - If you will not be using the unit for an extended period of time (more than a few weeks) it is best to clean the unit and dry it out completely. Please store the unit per the following steps: 1. - Page 24 GMC 10,000 BTU Portable Aircon Model: GMCP10E Technical Parameters Cooling Capacity (BTU) 10000Btu (2930W) Power Supply AC220-240V/50Hz Rated Input W (Cooling) 1114W Rated Current Amps (Cooling) 5.0A Dehumidifier capacity 24L/DAY Rated Energy efficiency ratio 2,61 Refrigerant/Charge R290 Air Circulation 310m³/h Sound Power level ≤50dB(A)
-
Page 25: Rating Label
RATING LABEL pg. 25 For enquiries or support: visit www.gmcaircon.co.za or contact us on 012-661 1173... -
Page 26: Service And Warranty
SERVICE AND WARRANTY GMC Airconditioning CC was established in 1995 and is one of South Africa's leading cooling and heating companies. We pride ourselves on 100% customer satisfaction and have the highest online rating of all heating and cooling companies in South Africa. We will strive to ensure you are 100% satisfied with your product.
Need help?
Do you have a question about the GMCP10E and is the answer not in the manual?
Questions and answers