
Subscribe to Our Youtube Channel
Related Manuals for Cosori CCO-R252-SUS


Summary of Contents for Cosori CCO-R252-SUS
- Page 1 User Manual 11-in-1 26-Quart Ceramic Air Fryer Oven Questions or Concerns? support@cosori.com | (888) 402-1684 Mon–Fri, 9:00 am–5:00 pm PST/PDT...
- Page 2 CONTACT OUR CHEFS Our helpful, in-house chefs are ready to assist you with any questions you might have! Email: recipes@cosori.com Toll-Free: (888) 402-1684 Mon–Fri, 9:00 am–5:00 pm PST/PDT On behalf of all of us at COSORI, Happy cooking!
-
Page 3: Table Of Contents
1 x User Manual Care & Maintenance 1 x Recipe Book + QSG Troubleshooting Warranty Information Customer Support Specifications Model CCO-R252-SUS Power Supply AC 120V, 60Hz Rated Power 1,800W Approx. 26.4 qt / 25 L, Capacity 9 Slices of Toast, 12”... -
Page 4: Important Safeguards
READ AND SAVE THESE INSTRUCTIONS IMPORTANT SAFEGUARDS Follow basic safety precautions when using your oven. Read all instructions. Key Safety Points Contact Customer Support (see page 30). • Do not use third-party replacement parts • Do not touch hot surfaces. Use handle. or accessories, as this may cause injuries. - Page 5 While Cooking • To turn the oven off, press and hold All the buttons will shut off except Press and hold to turn the oven back • To avoid risk of fire or electric shock, do not place oversized foods or metal utensils into the oven.
-
Page 6: Wire Rack
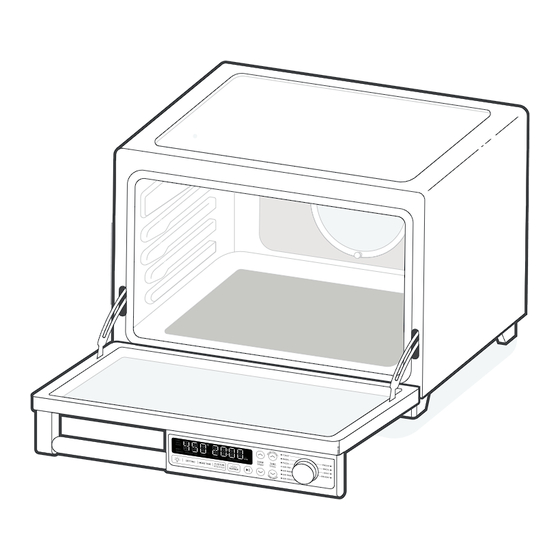
GETTING TO KNOW YOUR AIR FRYER OVEN Air Fyer Oven Diagram A. Handle H. Fry Basket B. Door Roasting Rack Insert C. Control Panel Sheet Tray D. Ceramic Burner K. Wire Rack E. Oven Light (Inside Oven) L. Thermometer Input Power Cord G. - Page 7 Control Panel A. Light Button G. Start/Pause Button B. LED Display H. Increase/Decrease C. Setting Button Temperature D. More Time Button Increase/Decrease Time E. Custom Button Cooking Functions K. Control Knob Burner Button Display Diagram L. Doneness Indicators Q. Thermometer Indicator M.
- Page 8 CONTROLS Start/Pause Button • Press and hold to rapidly increase or decrease the time. • Tap to start/pause a cooking function. • When using the Toast or Bagel cooking functions, tap to adjust the • Tap during preheating to skip the preheating number of slices from 1 to 9.
- Page 9 Setting Button • Tap to adjust oven settings (see Oven Settings, page 22). Light Button • Tap to turn the oven light on/off. • If not manually turned off, the light will turn off automatically after 45 seconds. • The light turns on when the door is open and during the last 10 seconds of a cooking function.
-
Page 10: Before First Use
BEFORE FIRST USE Setting Up Remove all packaging around and inside the oven. 2. Place on a stable, level, heat-resistant surface, away from anything that can be damaged by heat. 3. Wash all accessories and wipe down the inside of the oven (see page 23). 4. - Page 11 COOKING WITH YOUR AIR FRYER OVEN Rack Positions CAUTION: • The outer surface of the oven, including Each cooking function has a recommended the oven door, is hot during and after use. slot position that you can slide a tray or Do not touch hot surfaces.
-
Page 12: Fry Basket
Recommended Accessory Positions – 1 Layer Rack Air Sous Toast Bagel Pizza Air Fry Air Bake Air Roast Position Vide Wire Wire Rack Rack Sheet Tray on Wire Fry Basket Wire Rack Rack Roasting Wire Rack Rack Insert* Rack Proof Broil Dehydrate Burner... - Page 13 Using the Thermometer Note: To use the thermometer function, 2. Place the food into the oven. Plug the you need a COSORI thermometer. For more thermometer into the thermometer information and to purchase a thermometer, input. [Figure 3.3] contact Customer Support (see page 30).
- Page 14 USING PRESETS: a. Tap TIME to select a preset. b. Turn the control knob to select the type of meat: Steak, Pork, Chicken, or Fish. c. Tap TEMP to adjust the desired doneness, according to the following chart: Rare Med Rare Med Well Well Steak...
-
Page 15: Cooking Functions
COOKING FUNCTIONS Cooking functions are programmed with an ideal time and temperature for cooking certain foods. For more information on each cooking function, see its individual section. The following chart shows the default settings and additional details about each cooking function: Cooking Functions Quick Reference Chart Cooking Temp/... - Page 16 Preheating • Try lighter settings for raisin toast, white bread, and thinly sliced bread. The following cooking functions • Try darker settings for rye, whole automatically include preheat: Pizza, Air Fry, wheat, heavier-textured bread, and fresh bread. Air Bake, and Air Roast. 1.
- Page 17 5. When preheating is finished, the oven Note: Time and temperature are set automatically. Time increases with bagel shade level and number will beep. of slices. 6. Remove any cardboard, plastic, paper, or other flammable materials. Open the 4. Tap to begin toasting.
- Page 18 a. Tap during preheating to skip the 4. Tap to begin preheating. preheating stage. will blink on the display. 5. When preheating is finished, the oven a. Tap during preheating to skip the will beep. preheating stage. 6. Open the oven door and place food in 5.
- Page 19 4. Tap a. Tap TEMP to begin preheating. to adjust the will blink on the display. temperature between 120°–180°F. b. Tap TIME to adjust the a. Tap during preheating to skip the time between 1 min–24 hr. preheating stage. 4. Tap to begin cooking.
- Page 20 a. If needed, tap to add more a. Tap TEMP to adjust the cooking time. temperature between HIGH, MID, and LOW. 5. The oven will stop heating and beep b. Tap TIME to adjust the when finished. time between 1–30 min. Broil Function (“BROIL”) 5.
- Page 21 4. Optionally, customize the temperature a. If needed, tap to add more and time. You can do this anytime cooking time. during cooking. 6. The oven will stop heating and beep a. Tap TEMP to adjust the when finished. temperature between 85°–180°F. Burner Function (“BURNER”) b.
- Page 22 Saving Custom Settings 5. Tap to begin cooking. The display will show the timer counting down. to save your own customized a. If needed, tap to add more cooking function, so you can easily recreate cooking time. your favorite recipe. CAUTION: The ceramic burner gets very hot 1.
-
Page 23: Care & Maintenance
CARE & MAINTENANCE Do not use a dull or nicked blade. Clean oven accessories (including trays, etc.) and oven interior after every use. Hold the scraper at about a 30° angle to the cooktop. Note: If used correctly, the metal scraper •... - Page 24 b. Use a sponge to spread the paste on the trays and scrub. Let the trays sit for 15 minutes before rinsing. c. Wash trays with soap and water. • Dry thoroughly. Cleaning the Vents • Use a vacuum cleaner with a brush or crevice attachment to clean the vents.
- Page 25 TROUBLESHOOTING Problem Possible Solution Make sure the oven is plugged in. The oven won’t turn on. Try plugging the oven into a different outlet. Reset your circuit breaker. The circuit breaker trips This oven requires a 15-amp circuit breaker. Make sure the oven is the only every time.
- Page 26 TROUBLESHOOTING (CONT.) Display shows Error Code The oven has been stored at a temperature lower than -7°F / -22°C. Place “E4”. the oven at room temperature and try again. Display shows Error Code There is a control signal issue. Contact Customer Support (see page “E13”.
- Page 27 FCC SUPPLIER’S DECLARATION OF CONFORMITY (SDOC) Arovast Corporation hereby declares that this equipment is in compliance with FCC requirements. The declaration of conformity may be consulted in the support section of our website, accessible from www.cosori.com...
-
Page 28: Warranty Information
Damages caused by connecting peripherals, exclusive discretion, either (i) refund the purchase price if additional equipment or accessories other than those the purchase was made directly from the online COSORI recommended in the user manual. store, (ii) repair any defects in material or workmanship, •... - Page 29 BY YOU FOR THE DEFECTIVE PRODUCT, NOR SHALL Contact our Customer Support team via WE UNDER ANY CIRCUMSTANCES BE LIABLE FOR ANY support@cosori.com. CONSEQUENTIAL, INCIDENTAL, SPECIAL OR PUNITIVE Once our Customer Support team has approved your DAMAGES OR LOSSES, WHETHER DIRECT OR INDIRECT.
-
Page 30: Customer Support
If you have any questions or concerns about your new product, please contact our helpful Customer Support Team. Support Hours Arovast Corporation 1202 N. Miller St., Suite A Mon–Fri, 9:00 am–5:00 pm PST/PDT Anaheim, CA 92806, USA Email: support@cosori.com Toll-Free: (888) 402-1684 *Please have your invoice and order ID ready before contacting Customer Support. - Page 31 NOTES...
- Page 32 Questions or Concerns? Mon–Fri, 9:00 am–5:00 pm PST/PDT support@cosori.com | (888) 402-1684 DL06052023AC_CCO-R252-SUS_us.print...
Need help?
Do you have a question about the CCO-R252-SUS and is the answer not in the manual?
Questions and answers