Advertisement
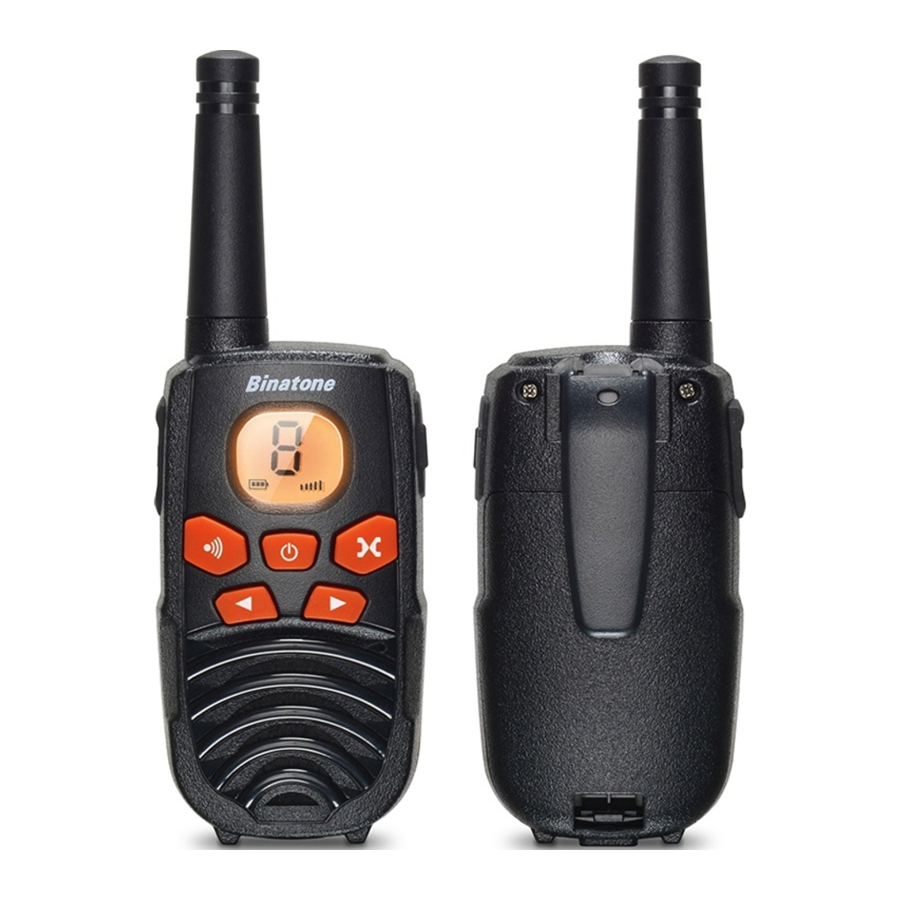
Device Overview

- LCD screen
Displays the current Channel selection and other radio symbols. - Antenna
- Power
![]() button
button
press and hold to turn the PMR unit ON or OFF. - Power charge socket
![]() & Headset socket
& Headset socket ![]()
micro-USB socket for charging installed batteries
2.5mm headset socket - PTT(push to talk) button
press and hold to transmit. - CALL
![]() button
button
press to send a ringing tone to other PMR units. - MENU
![]() button
button
press to program the PMR settings. - UP
![]() /DOWN
/DOWN ![]() buttons
buttons
press to change channels, volume, and to select settings during programming. - MIC(microphone)
- Speaker


LCD Screen

 | Channel Number. Changes from 1 to 8 as selected by the user. |
 | Indicates battery charge level |
 | Displays when Scan function is activated |
 | Displays with frequency when the FM radio is activated |
 | Displays when Key Lock function is activated |
 | Displays when transmitting a signal. |
 | Displays when receiving a signal. |
 | Indicates the speaker volume level |
Installation
Removing the Belt clip
- Pull the belt clip latch away from the PMR.
- While pulling the belt clip latch, push up the belt clip as shown in Fig. 1.
Installing the Belt clip
- Slide the belt clip into the slot as shown in Fig. 2.
- A "click" indicates the belt clip is locked into its position.
![]()

Installing the Batteries
- Unclip the battery compartment cover.
- Insert the 3xAAA batteries. Position the batteries according to the polarity marking in the battery compartment. See Fig.3
- Replace the battery cover. See Fig. 4.


Notes:
- Use only same type and make of batteries on the PMR units.
- The PMR units have a built-in Power Saver (PS) for maximum battery life, but when not in use, turn the units OFF to save battery power.
- Remove the batteries if the units will not be used for a long period of time.
Charging the batteries using Adapter
Insert the USB connector (5.0V DC/400mA) mains adaptor into the power-in micro-USB socket in the side of the Radio unit. Plug the mains USB adaptor into a suitable mains socket with the switch on the socket to Off, and then turn it On.


Risk of explosion if battery is replaced by an incorrect type. Dispose of used batteries according to the instructions.
Use only AAA size Ni-MH, 1.2V, 600mAh rechargeable batteries.
The Latitude 250 must be charged using the mains USB adaptor provided. Using any other USB adaptor will result in any non-compliance with EN60950-1 and will invalidate the approvals and warranty.
It takes about 10 hours to fully recharge the batteries if they completely run down. New batteries take up to 14 hours to fully charge.
Note:
- Do not mix battery types when using the PMR unit.
- The PMR unit has a built-in power saver (PS) for maximum battery life, but when not in use, turn the units Off to save the battery power.
- Remove the batteries if the unit will not be used for a long period of time.
- Dispose of used batteries safely at a recycling centre. NEVER put them anywhere they could get burnt or punctured.
Battery meter
The battery icon is located in the left corner of the LCD panel. This battery icon indicates the battery level, and when it reaches its minimum level, the handset will emit two beep tones and then it will automatically turn Off the power.
Battery life
The PMR has a built in power saver feature to make the batteries last longer. But when you are not using the handset, it's better to switch off to save the battery power.
Operation
The talk range depends on the environment and terrain. It will reach up to about 5km in wide open spaces, without obstructions such as hills, buildings or trees.
Don't use two PMR units too close together otherwise you may get loud feedback interference.
Turning the Unit ON/OFF
To Turn ON;
- Press and hold the
![]() (Power) button. A special "beep" sound will be heard. The LCD screen will display the current channel.
(Power) button. A special "beep" sound will be heard. The LCD screen will display the current channel.
 (Power) button. A special "beep" sound will be heard. The LCD screen will display the current channel.
To Turn OFF;
- Press and hold the
![]() (Power) button. A single "beep" will be heard and LCD screen will turn blank.
(Power) button. A single "beep" will be heard and LCD screen will turn blank.
Adjusting the speaker volume
There are 8 volume levels, the current speaker volume level is displayed on the LCD screen.
To adjust the speaker volume level, press the  button to increase, or press the
  button to decrease. The LCD screen will display the speaker volume icon bars ascending, or descending respectively.
Receiving a Call
The unit is continuously in receive mode when the unit is turned ON and not transmitting. When a signal is received on the current channel, the receive signal icon "RX" will be displayed on the LCD screen.
Transmitting (sending)
- Press and hold the PTT button to transmit your voice. The transmit signal icon "TX" will display on the LCD screen.
- Hold the unit in a vertical position with the Mic (Microphone) 5 cm away from the mouth. While holding the PTT button, speak into the microphone in a normal tone of voice.
- Release the PTT button when you want to finish transmitting.

- In order for other people to receive your transmission, they must also be on the same channel that you are currently using. Refer to the "Changing Channel" section for more information.
- When the PTT and/or CALL buttons are continuously pressed, your PMR cannot receive any transmissions.
Roger Beep
The Roger beep is a tone which is automatically transmitted whenever the PTT button is released. This alerts the receiving party that you have ended the transmission.
Changing Channels
The PMR has 8 available channels. To change channels, in normal mode;
- Press the
![]() (Menu) button, the channel icon "1" on the LCD screen will start blinking.
(Menu) button, the channel icon "1" on the LCD screen will start blinking. - While the Channel icon is blinking, press the
![]() or
or ![]() button to select the desired channel. The channel changes from 1 to 8, or vice versa.
button to select the desired channel. The channel changes from 1 to 8, or vice versa. - Press the
![]() (Menu) button to confirm your setting and return to the standby mode.
(Menu) button to confirm your setting and return to the standby mode.
 (Menu) button, the channel icon "1" on the LCD screen will start blinking.
 Calling (Paging) Tone
You can use the CALL button to send a tone to other users on the same channel. To activate this feature;
- With the PMR in normal mode, press and release the
![]() button. The unit will transmit a 2-second page tone to any other unit/s set with the same channel within transmitting range
button. The unit will transmit a 2-second page tone to any other unit/s set with the same channel within transmitting range
Channel Scan
Your radio can scan the 8 channels for any activity. This allows to find other radios without having to manually change the channel. To activate this feature:
- Press and hold the
![]() and
and ![]() button at the same time and channel scanning will start immediately, with SC displayed on the screen and the channel number cycling through the channels. When a signal is detected, the unit will pause on that channel, while receiving the signal and for a further 3 seconds.
button at the same time and channel scanning will start immediately, with SC displayed on the screen and the channel number cycling through the channels. When a signal is detected, the unit will pause on that channel, while receiving the signal and for a further 3 seconds. - Press the PTT button to stop scanning and talk on that channel, or press the
![]() or
or ![]() button to manually restart the scanning.
button to manually restart the scanning. - To stop scanning, press the
![]() button and return to standby mode.
button and return to standby mode.
Monitor Feature
You can use the Monitor feature to check for weaker signals in the current channel.
To activate this feature:
- Press and hold the
![]() and
and ![]() button at the same time. The receiving icon "RX" appears on the display, and the speaker turns on and plays any signals on the current channel.
button at the same time. The receiving icon "RX" appears on the display, and the speaker turns on and plays any signals on the current channel. - Press the
![]() button to stop the monitoring.
button to stop the monitoring.
To Lock the Buttons
With the buttons lock you can still transmit (TX), or call the current channel, but you can not change the volume. To activate this feature;
In the standby mode, press and hold the ![]() until the
until the ![]() icon appears on the LCD screen.
icon appears on the LCD screen.
To unlock the buttons
Press and hold again the ![]() button until the
button until the ![]() icon disappears on the LCD screen.
icon disappears on the LCD screen.
FM Radio function
While in standby mode, press and release the power button. The FM Frequency will display in the LCD screen. Press the Up or Down button to adjust the FM frequency channel.
You can still transmit (TX) and receive (RX) calls on your current channel, with the FM radio being interrupted during calls.
Press and release the Power button to go back to PMR frequency mode.
Power Saving
Your PMR unit has special circuitry designed to extend the life of your battery. When the unit is not used for 4 seconds, it will automatically switch into a low power mode. The Power saving feature does not affect the PMR ability to receive transmissions. When a signal is detected, it automatically returns to full power mode
Low Battery Meter Indicator
![]() The PMR can detect the low battery level when the battery voltage goes low. When the battery voltage is at a low level, the empty battery symbol will appear and start to blink.
The PMR can detect the low battery level when the battery voltage goes low. When the battery voltage is at a low level, the empty battery symbol will appear and start to blink.
The battery icon will continue to blink until the battery is totally drained.
Note: To have good communication, when the battery is at a low level, recharge or replace the batteries with new ones.
Microphone/Earphone/Charger Jack
The Latitude 250 is equipped with an auxilliary microphone, earphone, and charge jack located at the opposite side to the PTT button.
Note: It requires a microphone/earphone with a 2.5mm, jack connector and this is not supplied with your Latitude 250.
Using a Hands free kit (Headset)
You can plug a hands free kit into the right side of your Latitude 250 handset.
With a headset connected, you still need to press the PTT button to transmit and talk with other radios.

Specifications
Channel Frequency Table
| Channel | Frequency(MHz) | Channel | Frequency(MHz) |
| 1 | 446.00625 | 5 | 446.05625 |
| 2 | 446.01875 | 6 | 446.06875 |
| 3 | 446.03125 | 7 | 446.08125 |
| 4 | 446.04375 | 8 | 446.09375 |
| Channels Available | 8 Channels |
| Output Power (TX) | 0.5W |
| Range | Up to 5km(3.1 Miles). |
Effective Range
The Transmission range of the product is dependent on the environment terrain where it is being used, the following diagram attempts to guide the user on the sort of performance to expect for everyday use.

Range Check
The Transmission range will be affected as shown in the above diagram. The transmitting range typical values for different environment conditions will be (1) 5 km (2) 2.5 km (3) 1km. It should be remembered that these are only guide values as actual achieved distances will be dependent on the environment and terrain.
Guarantee
The Binatone Latitude 250 is fully guaranteed for 12 months from the date of purchase shown on your sales receipt. The guarantee does not cover damage by misuse or negligence, or by excessive voltage.
Please keep your sales (till) receipt - this is your guarantee. You should also keep the original packaging materials.
When unpacking your Binatone Latitude 250, check for visible damage. If you see any damage, do not use the PMR - return the whole unit to where you bought it.
If your Binatone Latitude 250 develops a fault, refer to the "Troubleshooting Guide." section of this manual. If you can't solve the problem, return the whole unit as follows;
While the unit is under guarantee
- Pack up all the parts of your Latitude 250, using the original packaging. Remember to include the mains adaptor.
- Return the unit to the store where you bought it, and make sure you take your sales receipt as your proof of purchase.
- In the unlikely event that you need to return your Latitude 250 to our Repair Centre while it is under Guarantee, please include the sales receipt. There may be a handling charge for the repair of your unit under Guarantee.
Repair after the Guarantee has expired
- If the unit is no longer covered by the Guarantee, first follow step 1 as for repair under Guarantee, Then...
- Call our service Department on 0844 557 9677 and ask for a quotation of the repair charge, and details of where to send your Latitude 250 for repair.
- Return your Latitude 250 to the address given by the Service Department, making sure to include your name and address, and a cheque or postal order for the value of the repair charge.
This does not affect your statutory rights.
Binatone Telecom plc operates a policy of continuous product improvement, and so reserves the right to make changes to the product and functions without prior notice.
Troubleshooting Guide
| Symptom | Solution |
| No power. |
|
| Reception is weak. |
|
| Cannot change channels. |
|
| Range is limited. |
|
| Sound distortion problems. |
|
| No communication |
|

Mon-Fri from 8.00am to 8.00pm
Sat from 8.30am to 2.00pm
0844 557 9677 (UK only - Calls cost 7p per minute plus your telephone company's access charge.)
/ 0818 762092 ROI or send email to us:
enquiries@binatone-support.co.uk www.binatoneglobal.com
BINATONE TELECOM PLC
1 Apsley Way London NW2 7HF,United Kingdom.
Tel: +44(0) 20 8955 2700
Fax: +44(0) 20 8344 8877
e-mail: binatoneuk@binatonetelecom.co.u

Documents / Resources
References

Download manual
Here you can download full pdf version of manual, it may contain additional safety instructions, warranty information, FCC rules, etc.
Advertisement

Need help?
Do you have a question about the 250 and is the answer not in the manual?
Questions and answers