Bauer 21505C-B, 58671 - 20V Cordless 4 Gallon Backpack Chemical Sprayer Manual
- Owner's manual & safety instructions (12 pages)
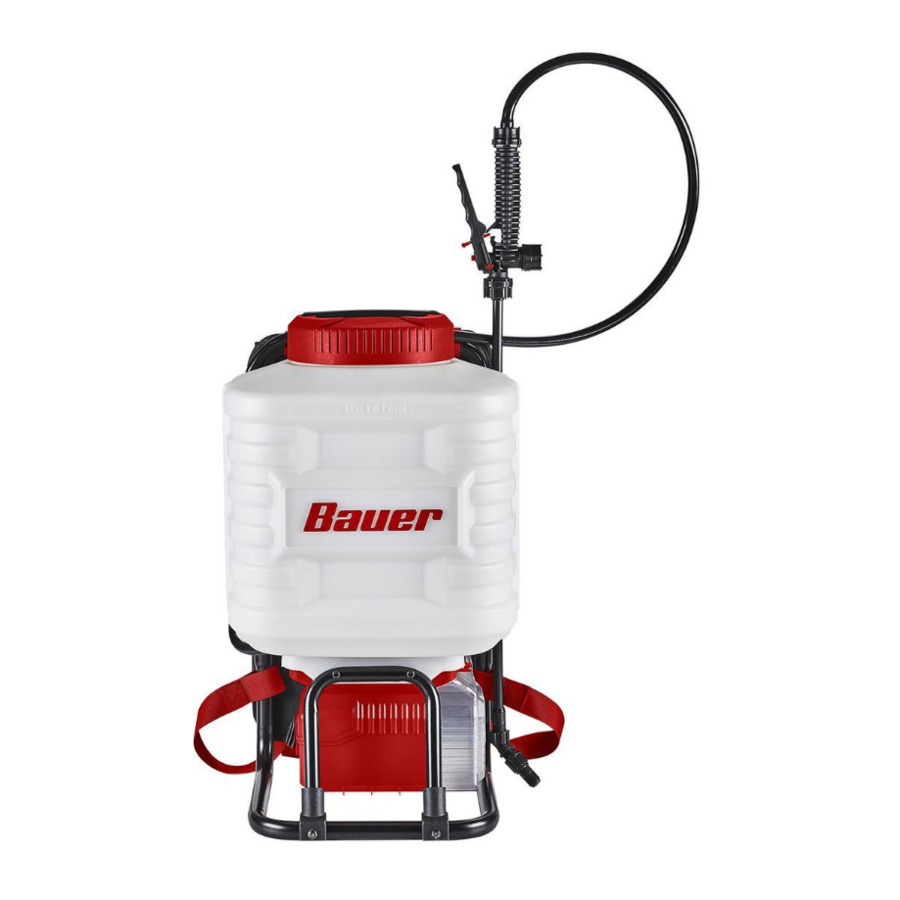
Advertisement
Introduction
Save This Manual
Keep this manual for the safety warnings and precautions, assembly, operating, inspection, maintenance and cleaning procedures. Write the product's serial number in the back of the manual near the assembly diagram (or month and year of purchase if product has no number). Keep this manual and the receipt in a safe and dry place for future reference.
When unpacking, make sure that the product is intact and undamaged. If any parts are missing or broken, please call 1-888-866-5797 as soon as possible.

Read this material before using this product. Failure to do so can result in serious injury.
SAVE THIS MANUAL.
WARNING SYMBOLS AND DEFINITIONS
 | This is the safety alert symbol. It is used to alert you to potential personal injury hazards. Obey all safety messages that follow this symbol to avoid possible injury or death. |
 | Indicates a hazardous situation which, if not avoided, will result in death or serious injury. |
| | Indicates a hazardous situation which, if not avoided, could result in death or serious injury. |
 | Indicates a hazardous situation which, if not avoided, could result in minor or moderate injury. |
| NOTICE CAUTION | Addresses practices not related to personal injury. |
IMPORTANT SAFETY INSTRUCTIONS
When using electric gardening appliances, basic safety precautions should always be followed to reduce the risk of fire, electric shock, and personal injury, including the following:
READ ALL INSTRUCTIONS
Battery Precautions
- Do not charge appliance in rain, or in wet locations.
- Do not use battery-operated appliance in rain.
- Remove or disconnect battery before servicing, cleaning, or removing material from the gardening appliance.
- Do not dispose of the battery in a fire. The cell may explode. Check with local codes for possible special disposal instructions.
- Do not open or mutilate the battery. Released electrolyte is corrosive and may cause damage to the eyes or skin. It may be toxic if swallowed.
- Exercise care in handling batteries in order not to short the battery with conducting materials such as rings, bracelets, and keys. The battery or conductor may overheat and cause burns.
Lithium Battery Safety Warnings

LITHIUM BATTERIES STORE A LARGE AMOUNT OF ENERGY AND WILL VENT FIRE OR EXPLODE IF MISTREATED:
- Keep Battery Pack dry.
- DO NOT DO ANY OF THE FOLLOWING TO THE BATTERY PACK:
- Open,
- Drop,
- Short-circuit,
- Puncture,
- Incinerate, or
- Expose to temperatures greater than 265°F.
- Charge Battery Pack only according to its Charger's instructions.
- Inspect Battery Pack before every use; do not use or charge if damaged.
Personal Safety
- Follow all guidelines regarding chemicals sprayed, including MSDS instructions and EPA regulations.
- Dress Properly - Do not wear loose clothing or jewelry. They can be caught in moving parts. Use of rubber gloves and substantial footwear is recommended when working outdoors. Wear protective hair covering to contain long hair.
![]() Wear ANSI-approved safety goggles and heavy-duty work gloves. Use face or dust mask if operation is dusty.
Wear ANSI-approved safety goggles and heavy-duty work gloves. Use face or dust mask if operation is dusty.- Avoid Unintentional Starting - Do not carry plugged-in appliance with finger on switch. Be sure switch is off when plugging in.
- Do not Overreach - Keep proper footing and balance at all times.
- Stay Alert - Watch what you are doing. Use common sense. Do not operate appliance when you are tired.

Gardening Appliance Use and Care
- Avoid Dangerous Environment - Do not use appliances in damp or wet locations.
- Do not Use In Rain.
- Keep Children Away - All visitors should be kept at a distance from work area.
- When servicing use only identical replacement parts.
- Use Right Appliance - Do not use appliance for any job except that for which it is intended.
- Do not Force Appliance - It will do the job better and with less likelihood of injury at the rate for which it was designed.
- Store Idle Appliances Indoors - When not in use, appliances should be stored indoors in dry, and high or locked-up place - out of reach of children.
- Check Damaged Parts - Before further use of the appliance, a guard or other part that is damaged should be carefully checked to determine that it will operate properly and perform its intended function. Check for alignment of moving parts, binding of moving parts, breakage of parts, mounting, and any other condition that may affect its operation. A guard or other part that is damaged should be properly repaired or replaced by a qualified technician unless indicated elsewhere in this manual.
Vibration Hazard
This appliance vibrates during use. Repeated or long-term exposure to vibration may cause temporary or permanent physical injury, particularly to the hands, arms and shoulders. To reduce the risk of vibration-related injury:
- Anyone using vibrating appliances regularly or for an extended period should first be examined by a doctor and then have regular medical check-ups to ensure medical problems are not being caused or worsened from use. Pregnant women or people who have impaired blood circulation to the hand, past hand injuries, nervous system disorders, diabetes, or Raynaud's Disease should not use this appliance. If you feel any symptoms related to vibration (such as tingling, numbness, and white or blue fingers), seek medical advice as soon as possible.
- Do not smoke during use. Nicotine reduces the blood supply to the hands and fingers, increasing the risk of vibration-related injury.
- Wear suitable gloves to reduce the vibration effects on the user.
- Use appliances with the lowest vibration when there is a choice between different processes.
- Include vibration-free periods each day of work.
- Grip appliance as lightly as possible (while still keeping safe control of it). Let the appliance do the work.
- To reduce vibration, maintain the appliance as explained in this manual. If any abnormal vibration occurs, stop use immediately.
General Safety
- Use only for water or water-based fertilizers, herbicides, pesticides, and sealers. Do not use to spray combustible or corrosive chemicals.
- Follow all guidelines regarding chemicals sprayed, including MSDS instructions and EPA regulations.
- Do not point Sprayer at yourself, other people, or animals.
- Industrial applications must follow OSHA requirements.
- Make sure liquid used in Sprayer is not dirty, sandy, or viscous.
- This product is not a toy. Do not allow children to play with or near this item.
- Inspect before every use; do not use if parts are loose or damaged.
- Do not use appliance for other than intended use.
- Maintain labels and nameplates on the appliance. These carry important safety information. If unreadable or missing, contact Harbor Freight Tools for a replacement.
- The warnings, precautions, and instructions discussed in this instruction manual cannot cover all possible conditions and situations that may occur. It must be understood by the operator that common sense and caution are factors which cannot be built into this product, but must be supplied by the operator.
SAVE THESE INSTRUCTIONS.
Specifications
| Battery Type | Bauer 20V 3.0Ah Li-Ion Battery Pack (64816, sold separately) |
| Charger Type | Bauer 20V 3.0A Li-Ion Charger (57006, sold separately) |
| Tank Capacity | 4 Gallon |
| Working Pressure | Up to 90 PSI |
| Hose Length | 53' |
Set Up Instructions
Read the ENTIRE IMPORTANT SAFETY INSTRUCTIONS section at the beginning of this manual including all text under subheadings therein before set up or use of this product.
TO PREVENT SERIOUS INJURY FROM ACCIDENTAL OPERATION:
Make sure that the Power Switch/Trigger is in the off-position and unplug the tool from its electrical outlet before performing any procedure in this section.
Note: For additional information regarding the parts listed in the following pages, refer to the Assembly Diagram.
Components

Assembly
- Insert Handle into Spray Wand.
- Slide Nut onto threaded coupling and hand tighten securely. Make sure Spray Wand and Handle are securely connected. See Figure A.

Figure A: Spray Wand and Handle Attachment
- Attach Nozzle by threading it onto the Elbow. Make sure connection is secure. Do not overtighten. See Figure B.

Figure B: Elbow Attachment
![warning]() Note: If necessary, loosen Nut holding the Spray Wand and Handle. Rotate the Wand until it is aligned with the nozzle pointing downward. Retighten the Nut by hand.
Note: If necessary, loosen Nut holding the Spray Wand and Handle. Rotate the Wand until it is aligned with the nozzle pointing downward. Retighten the Nut by hand. - The Hose comes pre-assembled to the Handle. If Hose comes loose, slide Nut on hose away from Hose end. Insert Hose end into Hose Connector. Slide Nut over the opening and Hose End. Hand tighten and make sure all connections are secure. See Figure C.

Figure C: Hose Connection


Tool Set Up
Filling the Tank
- Unscrew and remove Tank Lid.
- Fill Tank with the desired amount of liquid to no higher than top of fill line.
- Replace Lid on Tank. Make sure Lid is tightened securely before use.
Adjusting the Spray Nozzle
- Loosen the Nozzle for a stream spray.
- Tighten the Nozzle for a fan spray.
Operating Instructions
Read the ENTIRE IMPORTANT SAFETY INFORMATION section at the beginning of this manual including all text under subheadings therein before set up or use of this product.
Battery Charging
Charge Battery after unpacking and before using this tool. Follow instructions included with battery charger (sold separately).
General Operation
- Before operating the gardening appliance, put on ANSI-approved safety goggles and other safety gear (sold separately).
- To attach Battery Pack, raise the Battery Cover on the side of the Backpack. See Figure D.

Figure D: Battery Pack Attachment - Align the raised rib on the Battery Pack with the groove in the Battery Port and place the Battery Pack in the tool.
- Make sure the latches on the Battery Pack snap in place. Make sure the Battery Pack is secured in the tool before beginning operation.
- Lower the battery cover.
- To remove Battery Pack, press button on front of the Battery Pack to release the Battery and remove it from the tool.
- To turn the Sprayer on, turn Power Switch to the On Position.
- To start the spray of liquid, squeeze the Trigger. Release the Trigger to stop the flow of liquid.
- To turn the Sprayer off, turn Power Switch to the Off Position.
- When finished spraying:
- Point Wand in safe direction and depressurize the Tank by pressing down on the Trigger.
- Dispose of liquid according to manufacturer guidelines.
- Clean the Sprayer according to Maintenance Instructions.
- Store Sprayer in a safe, dry, clean location out of reach of children and out of sunlight.
- To prevent accidents, turn off the appliance and remove its Battery Pack after use.

Trigger Lock
- The lock-on feature is convenient when spraying for an extended period of time or when covering a large area.
- To engage the Trigger Lock, depress the Trigger and slide Trigger Lock forward.
- To release the Trigger Lock, depress the Trigger and slide Trigger Lock backward.
Note: Make sure the trigger lock is not engaged before inserting the battery pack into the sprayer.
Maintenance and Servicing
Procedures not specifically explained in this manual must be performed only by a qualified technician.
TO PREVENT SERIOUS INJURY FROM ACCIDENTAL OPERATION:
Make sure that the Power Switch/Trigger is in the off-position and unplug the tool from its electrical outlet before performing any procedure in this section.
TO PREVENT SERIOUS INJURY FROM TOOL FAILURE:
Do not use damaged equipment. If abnormal noise or vibration occurs, have the problem corrected before further use.
Cleaning, Maintenance, and Lubrication
- BEFORE EACH USE, inspect the general condition of the tool. Check for:
- leaking, swollen, or cracked battery pack,
- loose hardware,
- misalignment or binding of moving parts,
- cracked or broken parts, and
- any other condition that may affect its safe operation.
- AFTER USE, clean external surfaces of the appliance with clean, moist cloth.
- AFTER EVERY USE, clean the Sprayer:
- Reinstall Battery Pack and Flush with water until Tank is empty.
- Clean Nozzle and Tank Strainer.
- Allow to air-dry with the Tank open.
- After dry, replace Strainer and Tank Lid.
Note: Do not use flammable cleaners or abrasive cleaners when cleaning tool.
- Disconnect battery pack and store battery pack, charger, and tool in dry, indoor area out of reach of children and away from metal objects (i.e., paperclips, coins) to prevent shorting.
- "Li-Ion battery must be recycled or disposed of properly.
Cleaning Nozzle
- If Nozzle becomes plugged, remove Battery Pack and make sure tool is in Off Position.
- Unscrew and remove Nozzle from Spray Wand. Push a small wire through the cross holes to clear any debris. If necessary, rinse the cross holes and Nozzle with clean water.
- Wipe Nozzle and cross holes with a clear dry cloth and reinstall Nozzle.
Visit our website at: http://www.harborfreight.com
Email our technical support at: productsupport@harborfreight.com
For technical questions, please call 1-888-866-5797.

Documents / Resources
References
Download manual
Here you can download full pdf version of manual, it may contain additional safety instructions, warranty information, FCC rules, etc.
Download Bauer 21505C-B, 58671 - 20V Cordless 4 Gallon Backpack Chemical Sprayer Manual
Advertisement


Need help?
Do you have a question about the 21505C-B and is the answer not in the manual?
Questions and answers