Table of Contents
Advertisement
Available languages
Available languages
INSTRUCTION MANUAL
UK: Air conditioner
NL: Airco
FR: Climatiseur
DE: Klimaanlage
PL: Klimatyzator
CZ: Klimatizace
IT: Aparato de aire acondicionado
SK: Climatizzatore
ES: Klimatizácia
MODEL: 14000 BTU
ITEM: 871125219587
A.I.&E. Adriaan Mulderweg 9-11,
5657 EM Eindhoven, The Netherlands
Edco UK Ltd,1st Floor Two Chamberlain
Square, B3 3AX, Birmingham, UK
Made in P.R.C. © copyright
Advertisement
Table of Contents

Related Manuals for Lifetime Air 14000 BTU


Summary of Contents for Lifetime Air 14000 BTU
- Page 1 DE: Klimaanlage PL: Klimatyzator CZ: Klimatizace IT: Aparato de aire acondicionado SK: Climatizzatore ES: Klimatizácia MODEL: 14000 BTU ITEM: 871125219587 A.I.&E. Adriaan Mulderweg 9-11, 5657 EM Eindhoven, The Netherlands Edco UK Ltd,1st Floor Two Chamberlain Square, B3 3AX, Birmingham, UK...
- Page 2 Air conditioner 14000BTU INSTRUCTION MANUAL…………………………….……. page Airco 14000BTU HANDLEIDING…………………………….………………….. pagina 24 FR : Climatiseur de 14 000 Btu MANUEL D’UTILISATION…………………………….…… page Klimaanlage 14000 BTU BEDIENUNGSANLEITUNG…………………………….…. Seite Klimatyzator 14000BTU INSTRUKCJA OBSŁUGI…………………………….………. strona 94 Klimatizace 14000BTU NÁVOD K POUŽITÍ…………………………….……………. strana 117 Climatizzatore 14000BTU MANUALE D'ISTRUZIONI…………………..………….…...
- Page 3 English 1. Safety instructions Page 3 2. Product description Page 9 3. Before using for the first time Page 13 4. Operation of the air conditioner Page 17 5. Draining condensation water Page 19 6. Maintenance Page 20 7. Problems and solutions Page 22 8.
- Page 4 • Caution, certain refrigerants do not have an odour. • Install, use and store the appliance in a room with a floor surface of at least 14 m2 (for 14000 BTU/h). • Only install this appliance when it complies with local/national legislation and standards.
- Page 5 • This appliance is only suitable for an earthed socket with a connection voltage of 220-240V~, 50Hz. • The appliance MUST always be connected to an earthed socket. If the power supply is not earthed, it is absolutely not permitted to connect the appliance. •...
- Page 6 • Do not use the appliance if plug, cable or appliance are damaged, or if the appliance no longer functions properly or if it is damaged in any other way. If this is the case, consult the retailer or our maintenance service. Never replace the plug or cable yourself.
- Page 7 the warranty of the appliance. • Always lift the appliance with two persons. • Always make sure the appliance is placed on a sturdy, flat surface. • Do not leave the appliance unsupervised if the appliance is in use. • If you want to move the appliance, make sure the appliance is switched off.
- Page 8 • This appliance is only suitable for household use. If the appliance is not used as intended, no compensation can be claimed in case of defects or accidents and the warranty will be invalidated. WARNING Specific information for appliances with R290 refrigerant gas. •...
- Page 9 in the possession of a suitable certificate from an authorized organization, to ensure that these persons are authorized to handle refrigerants in a safe way in accordance with the specifications that apply within the industry. • Repairs may only be performed as recommended by the manufacturer of the appliance.
-
Page 10: Product Description
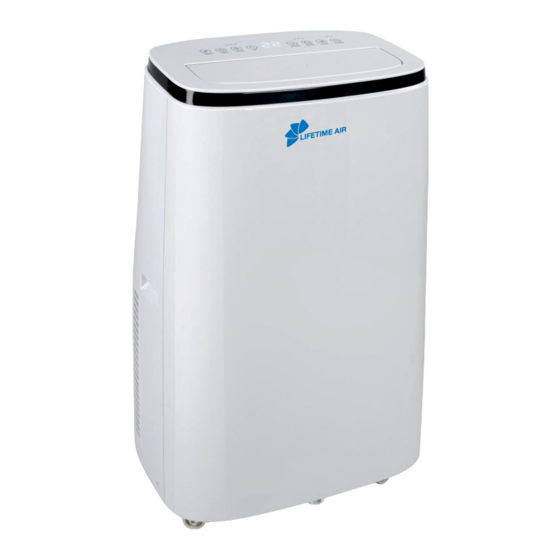
2. Product description Front Back 1. Mask 10. Drainage hole 2. Front housing 11. Power cord (Pantone 427C) 3. Omni-directional wheel Requiring 1,8m 4. Top cover being exposed 5. Swing leaf 12. Power cord plug (adjustable according 6. Rear housing to customer requirements) 7. - Page 11 Control setting 1. Swing key 4. Up key 7. Mode selection key 2. Timer key 5. Display window 8. Sleep mode key 3. Fan speed selection key 6. Down key 9. Power key When the device is powered on for the first time, you will hear a small beep, and the devices display window will light up.
- Page 12 Power Key: Press this key to turn the device on and off . In case of power on, press the key to turn the device off. In case of power off, press the key to turn the device on . Remote control 1.
- Page 13 or rechargeable (nickel-cadmium) batteries. • Batteries can explode or leak when exposed to open fire. Discard batteries at a waste collection facility or a recognized waste collection point. • Remove the batteries from the remote control when the appliance is not being used for a longer period of time (winter storage) and keep them in a cool, dry place.
-
Page 14: Before Using For The First Time
3. Before using for the first time Follow these instructions when using the appliance for the first time: Carefully unpack the air conditioner and all accessories and remove all packaging material and any promotional stickers. Keep the packaging (plastic bags and cardboard) out of reach of children. After unpacking the appliance, carefully check it for external damage that may have occurred during transport. - Page 15 Installing the air discharge hose Place the appliance near a window or opening, so that the air can flow to the outside via the discharge hose. 1. Carefully pull out the discharge hose (B) until the required length is achieved. 2.
- Page 16 REMARK: Optimum operation of the air conditioner depends on the length of the discharge hose and the number of bends. Try to limit both. The supplied flexible discharge hose has a maximum length of approx. 150 cm and corresponds with the capacity of the air conditioner.
- Page 17 Note: • Do not use extension tubes or replace the hose with different hoses, or this may cause a malfunction. The exhaust hose must not be blocked; otherwise it may cause overheating.
- Page 18 4. Operation of the air conditioner The air conditioner can be operated by using the control panel on the appliance or with the provided remote control. • Choose a location near a socket. • Install the discharge hose in accordance with the images and make sure the window is closed as much as possible.
- Page 19 Dehumidification 1. Press the power button (1) and select “dehum” (2) on the operating panel or press the selection button (see point 1 cooling) on the remote control and select the “dehum” function. 2. The fan speed is automatically set to low (this cannot be changed). 3.
- Page 20 5. Draining condensation water When the air conditioner is not used for a longer period of time, remove the rubber cap from the drain opening at the bottom of the appliance and place an empty bucket under the outlet. The water will flow out of the tank. This device has two drainage methods.
-
Page 21: Maintenance
6. Maintenance Note: Before cleaning the air conditioner, switch off the appliance by means of the ON/OFF key, wait a few minutes, and remove the plug from the socket. Cleaning the exterior Clean the exterior of the appliance with a slightly damp cloth and then wipe it with a dry cloth. - Page 22 Unit storage 1. Unscrew the drainage cover, unplug the water plug and discharge the water inside the unit. 2. Turn on the device, adjust it to low fan mode and maintain this state until the drainage pipe is dry. 3. Turn off the device, unplug the power plug and wrap the power cable around the wrapping post.
-
Page 23: Problems And Solutions
7. Problems and solutions First check the following before submitting the air conditioner for repair. Problem Reasons Solutions There is no electricity. Turn the device on after connecting it to a socket with electricity. The water-full indicator is on. Discharge the water inside the device. The ambient temperature is too low Recommendation to use the device at or too high... -
Page 24: Technical Specifications
8. Technical specifications Model number 871125219587 Voltage 220-240V~ 50Hz Connected load 1610 Watt Cooling capacity 14000 BTU/h (4.2kW) EE Class 2.61 Power consumption kW 1.610 Power consumption Standby ≤1W Current consumption nom. A 7.1 Air displacement max. m3/h Suitable for m3 Refrigerant / GWP type/gr R-290 / 3 /280 g. - Page 25 Nederlands 1. Veiligheidsinstructies Pagina 25 2. Productbeschrijving Pagina 32 3. Voorafgaand aan het eerste gebruik Pagina 36 4. Gebruik van de airco Pagina 40 5. Condenswater aftappen Pagina 42 6. Onderhoud Pagina 43 7. Problemen en oplossingen Pagina 45 8. Technische specificaties Pagina 46...
- Page 26 • Opgelet, bepaalde koelmiddelen zijn geurloos. • Plaats, gebruik en bewaar het apparaat in een ruimte met een vloeroppervlak van ten minste 14 m2 (voor 14000 BTU/h). • Plaats dit apparaat uitsluitend als het voldoet aan de lokale/nationale wetgeving en normen.
- Page 27 • Het installeren moet volledig aansluiten bij de lokaal geldende voorschriften, omstandigheden en normen. • Het apparaat is alleen geschikt voor gebruik op droge plekken binnenshuis. • Controleer de netspanning. • Dit apparaat is alleen geschikt voor een geaard stopcontact met een aansluitspanning van 220-240 V ~ 50 Hz.
- Page 28 • Wees om redenen van veiligheid altijd voorzichtig als er kinderen in de buurt van dit apparaat zijn, net als bij elk ander elektrisch apparaat. • Gebruik het apparaat niet als de stekker, het snoer of het apparaat is beschadigd, als het apparaat niet meer goed werkt of als het op andere wijze is beschadigd.
- Page 29 OPGELET! • Sluit de ruimte waarin dit apparaat wordt gebruikt nooit zodanig af dat deze volledig luchtdicht is. Dit voorkomt dat er een vacuüm in deze ruimte ontstaat. Onderdruk (=vacuüm) kan de veilige werking van bijv. geisers, afzuigkappen en ovens verstoren.
- Page 30 • In geval van een defect mag u de reparaties nooit zelf uitvoeren; een geactiveerde veiligheidsvoorziening in het apparaat kan duiden op een defect dat niet kan worden hersteld door verwijdering of vervanging van deze veiligheidsvoorziening. Er mogen alleen originele onderdelen worden gebruikt.
- Page 31 • Dit apparaat bevat 280 gram R290-koelgas (zie het gegevensplaatje op de achterkant van het apparaat). • R290 is een koelgas dat in overeenstemming is met de Europese milieurichtlijnen. Boor nooit door een deel van het koelcircuit. • Als het apparaat wordt geplaatst, gebruikt of opgeborgen in een ruimte zonder ventilatie, moet de ruimte zodanig worden ingericht dat ophoping van koelmiddel door een lek wordt voorkomen.
- Page 32 KOELMIDDEL (CE) N 842/2006: Deze airco bevat het koelmiddel R290. De hoeveelheid koelmiddel bedraagt minder dan 1 kg en zit vervat in een gesloten koelcircuit. Het koelmiddel tast de ozonlaag niet aan. Volgens het Kyotoprotocol is het echter een broeikasgas en kan het - als het vrijkomt in de omgevingslucht - dus bijdragen aan de opwarming van de aarde.
- Page 33 2. Productbeschrijving Voorkant Achterkant 1. Korf 10. Afvoergat 2. Voorbehuizing 11. Snoer (Pantone 427C), waarvan 1,8 m 3. Omnidirectioneel wiel beschikbaar moet zijn 4. Bovenafdekking 12. Snoerstekker (instelbaar conform eisen van klant) 5. Oscilleerblad 13. Handvat 6. Achterbehuizing 14. Continu-afvoergat 7.
- Page 34 Bedieningspaneel 1. Oscilleerknop 4. Omhoogknop 7. Moduskeuzeknop 5. Displayvenster 8. Slaapmodusknop 2. Timerknop 6. Omlaagknop 9. Stroomknop 3. Keuzeknop ventilatorsnelheid Wanneer het apparaat voor het eerst wordt aangezet, hoort u een korte pieptoon en gaat het displayvenster van het apparaat aan. Oscilleerknop: Druk op deze oscilleerknop en het oscilleerblad gaat omhoog en omlaag oscilleren.
- Page 35 slaapmodus aan te zetten. Het apparaat zal vervolgens energiebesparend en stil werken. Stroomknop: Druk op deze knop om het apparaat aan en uit te zetten. Als het apparaat aanstaat, druk u op de knop om het uit te zetten. Als het apparaat uitstaat, druk u op de knop om het aan te zetten.
- Page 36 Opmerking: • Als de afstandsbediening wordt vervangen of niet meer wordt gebruikt, dient u de batterijen te verwijderen en weg te gooien overeenkomstig de toepasselijke wetgeving, want ze zijn schadelijk voor het milieu. • Meng oude en nieuwe batterijen niet door elkaar. Gebruik geen mengsel van alkaline-, standaard- (koofstof-zink) of oplaadbare (nikkel-cadmium) batterijen.
-
Page 37: Voorafgaand Aan Het Eerste Gebruik
3. Voorafgaand aan het eerste gebruik Volg deze instructies wanneer u het apparaat de eerste keer gebruikt: haal de airco en alle accessoires voorzichtig uit de verpakking en verwijder al het verpakkingsmateriaal en eventuele reclamestickers. Houd de verpakking (plastic zakken en karton) buiten het bereik van kinderen. Controleer het apparaat nadat het uitpakken zorgvuldig op uitwendige schade die tijdens het vervoer kan zijn ontstaan. - Page 38 Aanbrengen van de luchtafvoerslang Zet het apparaat bij een raam of opening, zodat de lucht via de afvoerslang naar buiten kan stromen. 1. Trek de afvoerslang (B) voorzichtig uit tot de gewenste lengte is bereikt. 2. Schroef het ene uiteinde van de afvoerslang (B) in de vierkante aansluiting (A). 3.
- Page 39 OPMERKING: De optimale werking van de airco hangt af van de lengte van de afvoerslang en het aantal bochten. Probeer beide te beperken. De meegeleverde flexibele afvoerslang heeft een maximale lengte van ong. 150 cm en is afgestemd op de capaciteit van de airco.
- Page 40 Opmerking: • Gebruik geen verlengslangen en vervang deze niet door andere slangen, want dit kan een storing veroorzaken. De afvoerslang mag niet geblokkeerd zijn, want hierdoor kan oververhitting ontstaan.
- Page 41 4. Gebruik van de airco De airco kan worden bediend met het bedieningspaneel op het apparaat of met de meegeleverde afstandsbediening. • Kies een plek in de buurt van een stopcontact. • Breng de afvoerslang aan overeenkomstig de afbeeldingen en zorg dat het raam zo dicht mogelijk is.
- Page 42 Ontvochtiging 1. Druk op de stroomknop (1) en selecteer ‘ontvochtigen’ (2) op het bedieningspaneel of druk op de keuzeknop (zie punt 1, koelen) op de afstandsbediening en selecteer de functie ‘ontvochtigen’. 2. De ventilatiesnelheid wordt automatisch op een lage snelheid gezet (dit kan niet worden veranderd).
- Page 43 5. Condenswater aftappen Wanneer de airco langere tijd niet wordt gebruikt, dient u het rubberen dopje van de aftapopening aan de onderkant van het apparaat te verwijderen en een lege emmer onder de afvoer te plaatsen. Al het water zal uit het reservoir stromen. Deze machine heeft twee aftapmethodes.
- Page 44 6. Onderhoud Opmerking: Voordat u de airco gaat reinigen, moet u het apparaat uitzetten met behulp van de AAN-UIT-knop, een paar minuten wachten en de stekker uit het stopcontact halen. De buitenkant reinigen Maak de buitenkant van het apparaat schoon met een licht vochtige doek en neem deze daarna af met een droge doek.
- Page 45 De luchtinlaten schoonmaken Om het apparaat zo goed mogelijk te laten werken, kunt u de luchtinlaten schoonmaken met een stofzuiger met daarop een zachte borstel als mondstuk. Opslag van het apparaat 1. Schroef de afdekking van het aftappunt los, haal de waterstop eruit en laat het water uit het apparaat weglopen.
-
Page 46: Problemen En Oplossingen
7. Problemen en oplossingen Controleer eerst het volgende voordat u de airco voor reparatie inlevert. Problemen Oorzaken Oplossingen Er is geen elektriciteit. Steek de stekker in een spanningvoerend stopcontact en zet de airco aan. De water-vol-indicator gaat knipperen. Laat het water uit het apparaat weglopen. De omgevingstemperatuur is te hoog of Aanbevolen wordt om de machine bij een te laag... -
Page 47: Technische Specificaties
8. Technische specificaties Modelnummer 871125219587 Voltage 220-240 V ~ 50 Hz Aansluitvermogen 1610 watt Koelvermogen 14000 BTU/u (4.2kW) EE-klasse 2,61 Energieverbruik kW 1.610 Energieverbruik in stand-by ≤1 W Huidig stroomverbruik nom. A Luchtverplaatsing max. m3/u Geschikt voor m3 Koelmiddel/GWP-type/gr R-290/3/230 g. - Page 48 Français 1. Consignes de sécurité Page 48 2. Description du produit Page 55 3. Avant la première utilisation Page 59 4. Fonctionnement du climatiseur Page 63 5. Drainage de l’eau de condensation Page 65 6. Entretien Page 66 7. Problèmes et solutions Page 68 8.
- Page 49 • Attention, certains réfrigérants n’ont pas d’odeur. • Installez, utilisez et stockez l’appareil dans une pièce avec une surface au sol d’au moins 14 m² (pour 14000 BTU/h). • Installez cet appareil uniquement lorsqu’il respecte la réglementation et les normes locales / nationales.
- Page 50 • Ne pincez jamais le cordon et évitez de le mettre en contact avec des bords coupants. • L’installation doit entièrement correspondre aux réglementations, conditions et normes locales applicables. • L’appareil est uniquement adapté à une utilisation dans des endroits secs, en intérieur. •...
- Page 51 • Pour des raisons de sécurité, soyez toujours prudent lorsque des enfants se trouvent à proximité de l’appareil, ainsi que de tout autre appareil électrique. • N’utilisez pas l’appareil si la fiche, le cordon ou l’appareil est endommagé(e), ou si l’appareil ne fonctionne plus correctement ou s’il a été...
- Page 52 ATTENTION ! • Ne fermez jamais la pièce où l’appareil est utilisé, car cela pourrait rendre la pièce complètement hermétique. Ceci évite qu’un vide ne se crée dans la pièce. Une pression négative (= un vide) pourrait perturber l’utilisation en toute sécurité...
- Page 53 retirant ou remplaçant ce dispositif de sécurité. Seules des pièces d’origine devraient être utilisées. • Ne plongez jamais l’appareil, le cordon ou la fiche dans l’eau. • Cet appareil est uniquement adapté à un usage domestique. Si l’appareil n’est pas utilisé comme prévu, aucun remboursement ne pourra être réclamé...
- Page 54 directives environnementales européennes. Ne percez aucune pièce du circuit de refroidissement. • Si l’appareil est installé, utilisé ou stocké dans une pièce sans ventilation, la pièce devrait être conçue de sorte que l’accumulation de réfrigérant en cas de fuite soit évitée. Cette accumulation pourrait causer un incendie ou un danger d’explosion en raison de l’ignition du réfrigérant par un appareil de chauffage électrique, un four ou une autre...
- Page 55 RÉFRIGÉRANT (CE) N 842/2006 : Ce climatiseur contient le réfrigérant R290. La quantité de réfrigérant est inférieure à 1 kg et contenue dans un circuit de refroidissement fermé. Le réfrigérant n’a pas de potentiel de destruction de l’ozone. Il s’agit néanmoins d’un gaz à effet de serre selon le protocole de Kyoto et il pourrait donc contribuer au réchauffement climatique s’il est libéré...
-
Page 56: Description Du Produit
2. Description du produit Avant Arrière 1. Masque 10. Orifice d’écoulement 2. Boîtier avant 11. Cordon électrique (Pantone 427C) 3. Roue omnidirectionnelle Nécessite 1,8 m exposé 4. Cache supérieur 12. Fiche du cordon électrique (réglable selon les 5. Portail battant exigences du client) 6. - Page 57 Réglage des commandes 1. Touche Balance 4. Touche Haut 7. Touche de sélection de mode 2. Touche Minuteur 5. Fenêtre d’affichage 8. Touche du mode Veille 3. Touche de sélection de 6. Touche Bas 9. Touche Marche/Arrêt la vitesse du ventilateur Au premier démarrage de l’appareil, un signal sonore se fait entendre, et la fenêtre d’affichage de l’appareil s’illumine.
- Page 58 Touche Marche/Arrêt : appuyez sur cette touche pour allumer et arrêter l’appareil. Si l’appareil est en marche, appuyez sur la touche pour arrêter l’appareil. Si l’appareil est arrêté, appuyez sur la touche pour le mettre sous tension. Télécommande 1. Alimentation : Appuyez sur le bouton pour mettre l’appareil sous tension ou hors tension.
- Page 59 • Les piles peuvent exploser ou fondre lorsqu’elles sont exposées à un feu ouvert. Déposez vos piles dans une installation de collecte de déchets ou dans votre point de collecte de déchets connu. • Retirez les piles de la télécommande lorsque l’appareil n’est pas utilisé pendant une longue période (stockage pour l’hiver) et conservez-les dans un endroit frais et sec.
-
Page 60: Avant La Première Utilisation
3. Avant la première utilisation Suivez ces consignes lorsque vous utilisez l’appareil pour la première fois : Déballez soigneusement le climatiseur et tous les accessoires et retirez tous les éléments d’emballage et autocollants promotionnels. Gardez l’emballage (sacs en plastique et carton) hors de portée des enfants. Après avoir déballé... - Page 61 Installation du tuyau d’évacuation de l’air Positionnez l’appareil près d’une fenêtre ou d’une ouverture, afin que l’air puisse circuler vers l’extérieur à l’aide du tuyau d’évacuation. 1. Tirez délicatement le tuyau d’évacuation (B) jusqu’à la longueur souhaitée. 2. Vissez une extrémité du tuyau d’évacuation (B) au raccord carré (A). 3.
- Page 62 Remarque : Le fonctionnement optimal du climatiseur dépend de la longueur du tuyau d’évacuation et du nombre de courbures. Essayez de limiter ces deux facteurs. Le tuyau d’évacuation flexible fourni mesure environ 150 cm maximum et correspond à la capacité du climatiseur. L’utilisation de tout autre tuyau ou rallonge pourrait causer un dysfonctionnement de l’appareil.
- Page 63 Remarque : • N’utilisez pas des tubes d’extension ou ne remplacez pas le tuyau par un autre, car cela pourrait causer un dysfonctionnement. Le tuyau d’évacuation ne doit pas être bloqué, car cela pourrait causer une surchauffe.
-
Page 64: Fonctionnement Du Climatiseur
4. Fonctionnement du climatiseur Le climatiseur peut être utilisé à l’aide du panneau de commandes sur l’appareil ou de la télécommande fournie. • Choisissez un endroit à proximité d’une prise. • Installez le tuyau d’évacuation conformément aux schémas et assurez-vous que la fenêtre est fermée autant que possible. - Page 65 Déshumidification 1. Appuyez sur le bouton marche / arrêt (1) et sélectionnez « dehum » (2) sur le panneau de commandes ou appuyez sur le bouton de sélection (voir le point 1 du paragraphe Refroidissement) de la télécommande et sélectionnez la fonction « dehum ». 2.
-
Page 66: Drainage De L'eau De Condensation
5. Drainage de l’eau de condensation Lorsque le climatiseur n’est pas utilisé pendant une longue période, retirez le capuchon en caoutchouc de l’orifice de drainage au bas de l’appareil et placez un seau vide sous l’ouverture. Toute l’eau s’écoulera du réservoir. Cette machine offre deux méthodes de drainage. -
Page 67: Entretien
6. Entretien Remarque : Avant de nettoyer le climatiseur, éteignez l’appareil à l’aide du bouton ON/OFF (marche / arrêt), attendez quelques minutes et débranchez la fiche de la prise. Nettoyage de l’extérieur Nettoyez l’extérieur de l’appareil à l’aide d’un chiffon légèrement humide, puis essuyez-le avec un chiffon sec. - Page 68 Stockage de l’unité 1. Dévissez le capuchon de drainage, débranchez l’arrivée d’eau et évacuez l’eau contenue à l’intérieur du corps. 2. Allumez la machine, réglez-la en mode ventilation basse et gardez cet état jusqu’au séchage complet du tuyau de drainage. 3.
-
Page 69: Problèmes Et Solutions
7. Problèmes et solutions Vérifiez dans un premier temps les problèmes suivants avant de soumettre le climatiseur à un réparateur. Problèmes Raisons Solutions Il n’y a pas d’électricité. Allumez-le après l’avoir raccordé à une prise avec courant électrique. Le témoin de réservoir d’eau plein Déversez l’eau qui est à... -
Page 70: Caractéristiques Techniques
8. Caractéristiques techniques Numéro de modèle 871125219587 Tension 220-240 V~ 50 Hz Charge connectée 1610 Watt Capacité de refroidissement 14000 BTU/h (4.2 kW) Classe EE 2,61 Consommation énergétique (kW) 1,610 Consommation énergétique en veille ≤1 W Consommation de courant nom. A Déplacement d’air max. - Page 71 Deutsch 1. Sicherheitshinweise Seite 71 2. Produktbeschreibung Seite 78 3. Vor der ersten Verwendung Seite 82 4. Betrieb der Klimaanlage Seite 86 5. Ablassen von Kondenswasser Seite 88 6. Wartung Seite 89 7. Probleme und Lösungen Seite 92 8. Technische Daten Seite 93...
- Page 72 • Achtung, einige Kältemittel sind geruchlos. • Installieren, verwenden und lagern Sie das Gerät in einem Raum mit einer Bodenfläche von mindestens 14 m² (für 14000 BTU/h). • Installieren Sie dieses Gerät nur, wenn es den lokalen/nationalen Vorschriften und Normen entspricht.
- Page 73 • Klemmen Sie keinesfalls das Kabel ein und schützen Sie das Kabel vor Kontakt mit scharfen Kanten. • Die Installation muss mit allen lokalen Vorschriften, Gesetzen und Normen übereinstimmen. • Das Gerät ist nur für die Verwendung an trockenen Orten in Innenräumen geeignet.
- Page 74 • Schließen Sie das Gerät KEINESFALLS mit einem Verlängerungskabel an. Wenn keine Schutzkontaktsteckdose vorhanden ist, lassen Sie diese von einem zugelassenen Elektriker installieren. • Gehen Sie aus Sicherheitsgründen stets vorsichtig vor, wenn sich Kinder in der Nähe des Geräts aufhalten, wie bei jedem anderen Elektrogerät auch.
- Page 75 • Kinder dürfen nicht mit dem Gerät spielen. • Das Gerät darf nicht von Kindern gereinigt oder gewartet werden, es sei denn, dies geschieht unter Aufsicht. ACHTUNG! • Schließen Sie den Raum, in dem das Gerät verwendet wird, keinesfalls vollständig luftdicht ab. Dadurch wird verhindert, dass in dem Raum ein Vakuum entsteht.
- Page 76 kann überlastet sein oder es kann ein Erdableitstrom vorliegen. • Nehmen Sie im Falle einer Störung keinesfalls selbst Reparaturen vor. Eine ausgelöste Sicherheitsvorrichtung im Gerät könnte auf einen Defekt hinweisen, der nicht durch Entfernen oder Ersetzen der Sicherheitsvorrichtung behoben werden kann. Es sollten nur Originalteile verwendet werden. •...
- Page 77 • Installieren, verwenden und lagern Sie das Gerät in einem Raum mit einer Bodenfläche von mindestens 14 m². • Dieses Gerät enthält 280 Gramm des Kältemittels R290. (Siehe Informationsschild an der Rückseite des Geräts.) R290 ist ein Kältemittelgas, das den Europäischen Umweltrichtlinien entspricht.
- Page 78 KÄLTEMITTEL (CE) N 842/2006: Diese Klimaanlage enthält das Kältemittel R290. Die Kältemittelmenge beträgt weniger als 1 kg und ist in einem geschlossenen Kühlkreislauf enthalten. Das Kältemittel hat kein Ozonabbaupotential. Es ist jedoch nach dem Kyoto-Protokoll ein Treibhausgas und könnte daher zur Erderwärmung beitragen, wenn es in die Atmosphäre freigesetzt wird.
- Page 79 2. Produktbeschreibung Vorderseite Rückseite 1. Abdeckung 9. Luftzufuhr 2. Vorderes Gehäuse 10. Ablassöffnung 3. Omnidirektionales Rad 11. Netzkabel (Pantone 427C) Min. 1,8 m freie Länge 4. Obere Abdeckung 12. Netzkabel (anpassbar an individuelle Situation) 5. Schwenkbare Lamellen 13. Griff 6. Hinteres Gehäuse 14.
- Page 80 Bedienelemente 1. Schwenktaste 4. Nach-oben-Taste 7. Moduswahltaste 2. Timer-Taste 5. Display 8. Taste für Schlafmodus 3. Taste zur Auswahl der 6. Nach-unten-Taste 9. Ein/Aus-Taste Lüftergeschwindigkeit Wenn das Gerät zum ersten Mal eingeschaltet wird, hören Sie einen Piepton und das Display des Geräts leuchtet auf. Schwenktaste: Drücken Sie die Schwenktaste und die schwenkbaren Lamellen beginnen, sich auf und ab zu bewegen.
- Page 81 Ein/Aus-Taste: Drücken Sie diese Taste, um das Gerät ein- oder auszuschalten. Drücken Sie die Taste bei eingeschaltetem Gerät, um das Gerät auszuschalten. Drücken Sie die Taste bei ausgeschaltetem Gerät, um das Gerät einzuschalten. Fernbedienung 1. Ein/Aus-Taste: Die Taste einmal drücken, um das Gerät ein- bzw.
- Page 82 Hinweis: • Wenn die Fernbedienung ersetzt wird oder nicht mehr verwendet wird, entfernen Sie die Batterien und entsorgen Sie diese gemäß den geltenden Gesetzen, da sie umweltschädlich sind. • Verwenden Sie keinesfalls alte und neue Batterien zusammen. Verwenden Sie keine Mischung aus Alkali-, Standard- (Kohle-Zink) und aufladbaren (Nickel-Cadmium) Batterien.
-
Page 83: Vor Der Ersten Verwendung
3. Vor der ersten Verwendung Bitte befolgen Sie diese Anweisungen, wenn Sie das Gerät zum ersten Mal benutzen: Packen Sie die Klimaanlage und alle Zubehörteile sorgfältig aus und entfernen Sie sämtliches Verpackungsmaterial und alle Werbeaufkleber. Bewahren Sie die Verpackung (Plastiktüten und Karton) außerhalb der Reichweite von Kindern auf. - Page 84 Installieren des Luftauslassschlauchs Stellen Sie das Gerät in der Nähe eines Fensters oder einer Öffnung auf, sodass die Luft über den Auslassschlauch nach außen strömen kann. 1. Ziehen Sie den Auslassschlauch (B) vorsichtig heraus, bis die erforderliche Länge erreicht ist. 2.
- Page 85 ANMERKUNG: Der optimale Betrieb der Klimaanlage hängt von der Länge des Auslassschlauchs und der Anzahl der Biegungen ab. Versuchen Sie, sowohl die Länge als auch die Anzahl der Biegungen zu minimieren. Der mitgelieferte flexible Auslassschlauch hat eine maximale Länge von ca. 150 cm und ist auf die Kapazität der Klimaanlage abgestimmt.
- Page 86 Hinweis: • Verwenden Sie keine Schlauchverlängerung und keine anderen Schläuche, da dies zu Fehlfunktionen führen kann. Der Auslassschlauch darf nicht blockiert werden, da es sonst zu einer Überhitzung kommen kann.
- Page 87 4. Betrieb der Klimaanlage Die Klimaanlage kann über das Bedienfeld am Gerät oder mit der mitgelieferten Fernbedienung bedient werden. • Wählen Sie einen Standort in der Nähe einer Steckdose. • Installieren Sie den Auslassschlauch gemäß den Abbildungen und stellen Sie sicher, dass das Fenster so weit wie möglich geschlossen ist.
- Page 88 2. Drücken Sie die Taste , um die Lüftergeschwindigkeit einzustellen (low/high, niedrig/hoch).
- Page 89 Entfeuchtung 1. Drücken Sie die Ein/Aus-Taste (1) und wählen Sie „Dehum“ (Entfeuchtung) (2) auf dem Bedienfeld oder drücken Sie die Auswahltaste auf der Fernbedienung und wählen Sie die Entfeuchtungsfunktion. 2. Die Lüftergeschwindigkeit ist automatisch auf niedrige Geschwindigkeit eingestellt und kann nicht geändert werden. 3.
- Page 90 5. Ablassen von Kondenswasser Wenn die Klimaanlage über einen längeren Zeitraum nicht benutzt wird, entfernen Sie die Gummikappe von der Auslassöffnung an der Unterseite des Geräts und stellen Sie einen leeren Eimer unter den Auslass. Das gesamte Wasser fließt aus dem Tank ab.
-
Page 91: Wartung
6. Wartung Hinweis: Schalten Sie die Klimaanlage vor der Reinigung mit der Ein/Aus-Taste aus, warten Sie einige Minuten und ziehen Sie dann den Stecker aus der Steckdose. Reinigen der Außenflächen Reinigen Sie die Außenseite des Geräts mit einem leicht feuchten Tuch und wischen Sie das Gerät dann mit einem trockenen Tuch ab. - Page 92 Reinigung der Lufteinlässe Damit das Gerät optimal arbeitet, können Sie die Lufteinlässe mit einem Staubsauger mit einer weichen Bürstendüse reinigen. Lagerung des Geräts 1. Schrauben Sie die Ablasskappe ab, ziehen Sie den Stopfen aus dem Wasserauslass heraus und lassen Sie das Wasser aus dem Inneren des Gehäuses ab. 2.
- Page 93 Schutzfunktionen 1. Frostschutz Im Kühlmodus wechselt das Gerät automatisch in den Schutzmodus, wenn die Temperatur des EVA-Rohrfühlers* zu niedrig ist. Steigt die Temperatur des EVA-Rohrfühlers auf einen bestimmten Wert, kehrt das Gerät automatisch in den Normalbetrieb zurück. * Der EVA-Rohrfühler hilft bei der Erfassung der Systemtemperatur am Verdampfer, um den Frostschutz bei niedrigen Temperaturen sowie den Schutz bei hohen Temperaturen zu gewährleisten.
-
Page 94: Probleme Und Lösungen
7. Probleme und Lösungen Überprüfen Sie zunächst Folgendes, bevor Sie die Klimaanlage zur Reparatur einschicken. Problem Ursachen Lösungen Die Stromversorgung ist Schalten Sie das Gerät ein, nachdem Sie es unterbrochen. an eine funktionierende Steckdose angeschlossen haben. Die Anzeige „Water Full“ (Wassertank Lassen Sie das Wasser aus dem Gerät ab. -
Page 95: Technische Daten
8. Technische Daten Modellnummer 871125219587 Anschlussspannung 220-240 V~, 50 Hz Anschlussleistung 1610 Watt Kühlleistung 14000 BTU/h (4,2 kW) EE-Klasse 2,61 Leistungsaufnahme kW 1,610 Stromverbrauch Standby ≤1 W Stromaufnahme nom. A Luftverdrängung max. m³/h Geeignet für m³ Kältemittel/GWP-Typ/g R-290/3/280 g Thermostatbereich °C 16 –... - Page 96 Polski 1. Zasady bezpieczeństwa Strona 95 2. Opis produktu Strona 102 3. Przed pierwszym użyciem Strona 106 4. Obsługa klimatyzatora Strona 110 5. Usuwanie skroplin Strona 112 6. Konserwacja Strona 113 7. Problemy i ich usuwanie Strona 115 8. Dane techniczne Strona 116...
- Page 97 • Nie wolno przewiercać ani palić urządzenia. • Przestroga, niektóre środki chłodnicze są bezzapachowe. • Urządzenie należy zamontować, użytkować i przechowywać w pomieszczeniu o powierzchni podłogi co najmniej 14 m2 (dla 14000 Btu/h). • Urządzenie wolno montować jedynie, kiedy spełnia wymagania lokalnych/krajowych przepisów i norm. WAŻNE •...
- Page 98 • Nigdy nie wolno zaciskać przewodu zasilającego i należy unikać kontaktu z ostrymi krawędziami. • Instalacja powinna całkowicie odpowiadać mającym zastosowanie lokalnym przepisom, wymaganiom i normom. • Niniejsze urządzenie jest przeznaczone do stosowania wyłącznie w miejscach suchych, w pomieszczeniach. • Sprawdzić napięcie zasilania. •...
- Page 99 • NIGDY nie wolno podłączać urządzenia z zastosowaniem przedłużacza. Jeżeli nie ma dostępnego gniazdka z uziemieniem, należy zlecić jego wykonanie wykwalifikowanemu elektrykowi. • Ze względów bezpieczeństwa należy zawsze zachować ostrożność, kiedy w pobliżu urządzenia znajdują się dzieci, podobnie jak w przypadku innych urządzeń elektrycznych. •...
- Page 100 • Dzieciom nie wolno bawić się urządzeniem. • Urządzenie nie może być czyszczone ani konserwowane przez dzieci o ile czynności te nie są wykonywane pod nadzorem. PRZESTROGA! • Nigdy nie wolno zamykać pomieszczenia, w którym urządzenie jest użytkowane, w taki sposób, że stanie się ono szczelne dla przepływu powietrza.
- Page 101 różnicowo-prądowego w rozdzielnicy elektrycznej. Grupa może być przeciążona lub pojawił się prąd upływu do ziemi. • W przypadku awarii nie wolno nigdy wykonywać napraw samodzielnie; aktywowane urządzenie zabezpieczające w urządzeniu może wykazywać usterkę, której nie można usunąć przez wyjęcie lub wymianę takiego urządzenia zabezpieczającego.
- Page 102 źródeł zapłonu (np. otwarty ogień, włączone urządzenie elektryczne lub gazowe). • Nie wolno przewiercać ani palić urządzenia. • Urządzenie należy zamontować, użytkować i przechowywać w pomieszczeniu o powierzchni podłogi co najmniej 14 m2. • Urządzenie zawiera 280 gramów czynnika chłodniczego R290 (patrz tabliczka informacyjna z tyłu urządzenia).
- Page 103 CZYNNIK CHŁODNICZY (CE) N 842/2006: Klimatyzator zawiera czynnik chłodniczy R290. Ilość czynnika chłodniczego jest mniejsza niż 1 kg i znajduje się on w zamkniętym obiegu chłodniczym. Czynnik chłodniczy nie stwarza zagrożenia dla pogorszenia warstwy ozonowej. Jednak, zgodnie z protokołem z Kyoto jest on gazem cieplarnianym i dlatego może wpływać...
-
Page 104: Opis Produktu
2. Opis produktu Przód Tył 1. Maska 10. Otwór odpływowy 2. Obudowa przednia 11. Przewód zasilania (Pantone 427C) – 3. Kółko nastawne konieczne wysunięcie przewodu o 1,8 m 4. Pokrywa górna 12. Wtyczka przewodu zasilania 5. Ruchoma żaluzja (dostosowywana do wymogów klienta) 6. - Page 105 Ustawienia sterowania 1. Przycisk wahadła 4. Przycisk „w górę” 7. Przycisk wyboru trybu 2. Przycisk zegara 5. Okno wyświetlacza 8. Przycisk trybu uśpienia 3. Przycisk wyboru 6. Przycisk „w dół” 9. Przycisk zasilania prędkości wentylatora Gdy urządzenie zostanie włączone po raz pierwszy, usłyszysz krótki sygnał dźwiękowy, a na urządzeniu zaświeci się...
- Page 106 W trybie uśpienia naciśnij przycisk „w górę” oraz przycisk wentylatora, aby włączyć tryb uśpienia, wtedy jednostka będzie pracować w cichym trybie oszczędzania energii. Przycisk zasilania: naciśnij ten przycisk, aby włączyć/wyłączyć urządzenie. Gdy urządzenie jest włączone, naciśnij ten przycisk, aby je wyłączyć. Gdy urządzenie jest wyłączone, naciśnij ten przycisk, aby je włączyć.
- Page 107 Uwaga: • Jeżeli pilot zdalnego sterowania zostanie wymieniony lub nie będzie dalej używany, należy wyjąc baterie i zutylizować je zgodnie z obowiązującymi przepisami, ponieważ stanowią one zagrożenie dla środowiska. • Nie używać jednocześnie starych i nowych baterii. Nie używać jednocześnie baterii alkalicznych, standardowych (węgiel-cynk) lub nadających się...
-
Page 108: Przed Pierwszym Użyciem
3. Przed pierwszym użyciem Przy pierwszym użyciu urządzenia wykonać poniższe instrukcje: Ostrożnie rozpakować klimatyzator i wszystkie akcesoria oraz usunąć cały materiał opakowania oraz wszelkie naklejki promocyjne. Przechowywać opakowanie (worki plastikowe oraz karton) w miejscu niedostępnym dla dzieci. Po rozpakowaniu urządzenia dokładnie sprawdzić, czy nie ma uszkodzeń zewnętrznych, które mogły powstać... - Page 109 Montaż przewodu tłoczenia powietrza Umieścić urządzenie w pobliżu okna lub otworu tak, aby powietrze mogło przepływać na zewnątrz przez przewód tłoczenia. 1. Ostrożnie wyciągać przewód tłoczenia (B), aż do uzyskania wymaganej długości. 2. Wkręcić końcówkę przewodu tłoczenia (B) do złączki kwadratowej (A). 3.
- Page 110 UWAGA: Optymalna praca klimatyzatora zależy od długości przewodu tłoczenia oraz ilości zakrętów. Spróbować ograniczyć oba parametry. Dostarczany elastyczny przewód tłoczenia ma długość około 150 cm i odpowiada wydajności klimatyzatora. Zastosowanie jakichkolwiek innych węży lub przedłużeń może spowodować uszkodzenie urządzenia. Powietrze powinno mieć możliwość przepływu bez jakichkolwiek przeszkód lub w przeciwnej sytuacji, może dojść...
- Page 111 Uwaga: • Nie stosować rur przedłużających ani nie zastępować przewodu innym, ponieważ może to spowodować usterkę. Przewód tłoczenia nie może być zablokowany — w przeciwnym razie może dojść do przegrzania.
- Page 112 4. Obsługa klimatyzatora Klimatyzatorem można sterować za pomocą panelu sterowania na urządzeniu lub dołączonego pilota zdalnego sterowania. • Wybrać lokalizację w pobliżu gniazdka. • Zamontować przewód tłoczenia zgodnie z rysunkami i upewnić się, że okno jest zamknięte tak bardzo jak to możliwe. •...
- Page 113 Osuszanie 1. Nacisnąć przycisk zasilania (1) i wybrać „dehum” (osuszanie) (2) na panelu sterowania lub nacisnąć przycisk wyboru (patrz punkt 1 chłodzenie) na pilocie i wybrać funkcję „dehum” (osuszanie). 2. Prędkość wiatru jest automatycznie ustawiana jako niska (tej nastawy nie można zmienić).
- Page 114 5. Usuwanie skroplin Jeżeli klimatyzator nie będzie używany przez dłuższy okres czasu, zdjąć gumową zaślepkę z otworu spustowego na spodzie urządzenia i umieścić puste wiadro pod wylotem. Cała woda spłynie do wiadra. Są dwa sposoby usuwania skroplin z urządzenia. Ręczne usuwanie skroplin 1.
- Page 115 6. Konserwacja Uwaga: Przed czyszczeniem klimatyzatora wyłączyć urządzenie za pomocą przycisku wyłącznika, odczekać kilka minut i wyciągnąć wtyczkę z gniazdka sieciowego. Czyszczenie powierzchni zewnętrznych Wytrzeć zewnętrzną stronę urządzenia lekko zwilżona miękką ściereczką, a następnie wysuszyć za pomocą suchej ściereczki. Jeśli konieczne, zewnętrzną stronę urządzenia można oczyścić...
- Page 116 Przechowywanie urządzenia 1. Odkręcić pokrywę spustu, wyciągnąć korek spustu wody i usunąć wodę z korpusu. 2. Włączyć urządzenie, ustawić tryb wentylacji z niskim wiatrem i utrzymywać ten stan do czasu wysuszenia przewodu spustowego wody. 3. Wyłączyć urządzenie, wyciągną wtyczkę z gniazdka sieciowego i owinąć przewód zasilający wokół...
-
Page 117: Problemy I Ich Usuwanie
3. Funkcja ochrony sprężarki 7. Problemy i ich usuwanie W celu zwiększenia żywotności sprężarki zastosowano funkcję 3-minutowego opóźnienia jej uruchomienia w przypadku jej wyłączenia Przed oddaniem klimatyzatora do naprawy należy najpierw sprawdzić następujące punkty. Problemy Przyczyny Rozwiązania Brak zasilania prądem elektrycznym. Włączyć... -
Page 118: Dane Techniczne
Numer modelu 871125219587 Napięcie 220–240 V ~50 Hz Obciążenie przyłączeniowe 1610 W Moc chłodzenia 14000 BTU/h (4.2 kW) Klasa wydajności energetycznej Współczynnik wydajności chłodniczej 2.61 Pobór mocy 1,610 kW Pobór mocy w trybie czuwania ≤1 W Pobór prądu nom. - Page 119 Čeština 1. Bezpečnostní pokyny strana 118 2. Popis produktu strana 124 3. Před prvním použitím strana 127 4. Provoz klimatizace strana 131 5. Vypuštění kondenzátu strana 133 6. Údržba strana 134 7. Problémy a řešení strana 136 8. Technické parametry strana 137...
- Page 120 Čeština 1. Bezpečnostní pokyny Před použitím spotřebiče se nejdřív důkladně seznamte s obsahem tohoto návodu a uschovejte si ho na bezpečném místě pro budoucí použití. • Nepoužívejte žádné prostředky k urychlení rozmrazování ani jiné čisticí prostředky kromě těch, které doporučuje výrobce.
- Page 121 • Instalace by měla plně odpovídat místně platným předpisům, podmínkám a normám. • Spotřebič je vhodný pouze pro použití v suchých interiérech. • Zkontrolujte síťové napětí. • Tento spotřebič je vhodný pouze pro uzemněnou zásuvku o napětí 220–240 V (50 Hz). •...
- Page 122 • Spotřebič nepoužívejte, pokud zástrčka, šňůra či spotřebič samotný nesou známky poškození, pokud spotřebič nefunguje správně nebo pokud je jakkoli poškozený. V takovém případě se obraťte na svého prodejce nebo na náš servis. Zástrčku ani šňůru nevyměňujte sami. • Pokud plánujete spotřebič nepoužívat, vyjměte zástrčku ze zásuvky.
- Page 123 • Nedodržení pokynů může mít za následek pozbytí platnosti záruky na tento spotřebič. • Spotřebič vždy zvedejte ve dvou osobách. • Spotřebič umístěte na masivní, rovný povrch. • Nenechávejte spotřebič bez dohledu, když je v provozu. • Při stěhování musí být spotřebič vypnutý. Při stěhování spotřebiče použijte obě...
- Page 124 VAROVÁNÍ Specifické pokyny pro spotřebiče s chladivem R290. • Pečlivě si přečtěte všechna varování. • Při rozmrazování a čištění spotřebiče používejte výhradně nástroje doporučené výrobcem. • Dejte spotřebič do místnosti, kde nejsou nepřetržitě aktivní zdroje zapálení (např. otevřený plamen, zapnuté elektrické...
- Page 125 osob musí být prováděny pod dohledem osoby, která umí zacházet s hořlavými chladivy. CHLADIVO (ES) č. 842/2006: Tato klimatizace obsahuje chladivo R290. Množství chladiva je menší než 1 kg a je obsaženo v uzavřeném chladicím okruhu. Chladivo nemá potenciál poškozování ozonu. Podle Kjótského protokolu se však jedná...
-
Page 126: Popis Produktu
2. Popis produktu Přední část Zadní část 1. Maska 9. Průduch 2. Přední kryt 10. Vypouštěcí otvor 3. Všesměrové kolečko 11. Napájecí šňůra (Pantone 427C), 1,8 m venku 4. Horní kryt 12. Zástrčka napájecí šňůry (možnost nastavení 5. Klapka oscilace podle požadavků... - Page 127 Ovládání 1. Tlačítko oscilace 4. Šipka nahoru 7. Tlačítko volby režimu 2. Tlačítko časovače 5. Okno zobrazení 8. Tlačítko režimu spánku 3. Tlačítko volby rychlosti 6. Šipka dolů 9. Vypínač ventilátoru Při prvním spuštění zařízení uslyšíte pípnutí a rozsvítí se okno zobrazení. 1.
- Page 128 Dálkové ovládání 1. Vypínač: Stisknutím tlačítka se spotřebič zapíná nebo vypíná. 2. Režim: Stisknutím tlačítka se přepíná mezi ochlazováním, zvlhčováním a větráním. 3. Šipka nahoru: Stisknutím tlačítka se zvyšuje teplota a hodnota časovače. 4. Šipka dolů: Stisknutím tlačítka se snižuje teplota a hodnota časovače.
-
Page 129: Před Prvním Použitím
3. Před prvním použitím Při prvním použití spotřebiče dodržujte uvedené pokyny: Pečlivě vybalte klimatizaci a veškeré příslušenství, sundejte veškerý obalový materiál a sejměte všechny reklamní nálepky. Uchovávejte obaly (plastové sáčky a kartony) mimo dosah dětí. Po vybalení pečlivě zkontrolujte, zda spotřebič nenese známky vnějšího poškození, ke kterému mohlo dojít během přepravy. - Page 130 Instalace vývodové hadice Umístěte přístroj k oknu či k příslušnému otvoru, aby vzduch mohl vývodovou hadicí proudit ven. 1. Opatrně vytáhněte vývodovou hadici (B), dokud nedosáhnete požadované délky. 2. Našroubujte konec vypouštěcí hadice (B) na hranatou spojku (A). 3. Našroubujte kulatou spojku (C) na druhý konec vypouštěcí hadice (B). 4.
- Page 131 POZNÁMKA: Optimální provoz klimatizace závisí na délce vývodové hadice a počtu záhybů. Zkuste oba parametry udržet na minimu. Dodaná ohebná vývodové hadice má max. délku cca 150 cm a odpovídá objemu klimatizace. Použití jakýchkoli jiných hadic či prodlužovacích kabelů může mít za následek poruchu spotřebiče. Vzduch by měl proudit bez jakýchkoli překážek, jinak by to mohlo vést k přehřátí...
- Page 132 Poznámka: • Nepoužívejte prodlužovací trubice ani je nenahrazujte jinými hadicemi, mohlo by to vést k nesprávné funkci. Vývodová hadice nesmí být ucpaná, jinak by mohlo dojít k přehřátí.
- Page 133 4. Provoz klimatizace Klimatizaci lze ovládat pomocí ovládacího panelu na spotřebiči nebo pomocí dálkového ovládání. • Vyberte místo poblíž zásuvky. • Podle obrázků nainstalujte vývodovou hadici a dbejte na to, aby bylo okno zavřené co nejvíc nadoraz. • Zapojte zástrčku do uzemněné zásuvky. •...
- Page 134 Odvlhčování 1. Stiskněte vypínač (1) a na ovládacím panelu vyberte odvlhčování (2) nebo vyberte funkci odvlhčování stiskem tlačítka výběru (viz bod 1 – chlazení) na dálkovém ovládání. 2. Rychlost proudění je automaticky nízká (nelze to změnit). 3. Při použití této funkce musíte připojit například vypouštěcí hadici na vypuštění kondenzátu.
- Page 135 5. Vypuštění kondenzátu Pokud se klimatizace delší dobu nepoužívá, sejměte gumový uzávěr z odtoku pod spotřebičem a pod odtok dejte prázdný kbelík. Z nádržky vyteče veškerá voda. Spotřebič nabízí dva způsoby vypuštění. Ruční vypuštění 1. Když se spotřebič vypne v důsledku dosažení maximálního objemu vody, vypněte ho a odpojte zástrčku ze zásuvky.
- Page 136 6. Údržba Poznámka: Než se pustíte do čistění klimatizace, nejdřív spotřebič vypněte vypínačem, počkejte pár minut a pak odpojte zástrčku ze zásuvky. Čištění vnějšku Očistěte vnější část spotřebiče mírně navlhčeným hadříkem a pak ji otřete suchým hadrem. Vnějšek spotřebiče můžete případně očistit i šetrným mycím prostředkem. •...
- Page 137 Skladování spotřebiče 1. Odšroubujte kryt odtoku, vyndejte vypouštěcí zátku a vypusťte vodu uvnitř těla spotřebiče. 2. Zapněte spotřebič, přepněte na režim nízkorychlostního proudění a tento stav udržujte, dokud nebude vypouštěcí trubka zcela suchá. 3. Vypněte spotřebič, odpojte síťovou zástrčku a napájecí šňůru omotejte kolem příslušných držáků...
-
Page 138: Problémy A Řešení
7. Problémy a řešení Než pošlete klimatizaci do servisu, pro veďte následující kontrolu. Problémy Důvody Řešení Chybí zdroj elektřiny. Zapojte spotřebič do elektrické zásuvky a pak ho zapněte. Svítí indikace plného stavu vody. Vypusťte vodu ze spotřebiče. Okolní teplota je příliš nízká nebo Spotřebič... -
Page 139: Technické Parametry
8. Technické parametry Modelové číslo 871125219587 Napětí 220–240 V~ 50 Hz Připojené zatížení 1610 W Chladicí kapacita 1 14000 BTU/h (4,2 kW) Třída EE 2,61 Spotřeba (kW) 1,610 Spotřeba (pohotovostní režim) ≤1 W Aktuální jmenovitá spotřeba A Max. výtlak vzduchu (m3/h) Ideální... - Page 140 Italiano 1. Istruzioni di sicurezza Pagina 139 2. Descrizione del prodotto Pagina 146 3. Primo utilizzo dell'apparecchio Pagina 150 4. Funzionamento del climatizzatore Pagina 154 5. Scarico dell'acqua di condensa Pagina 156 6. Manutenzione Pagina 157 7. Problemi e soluzioni Pagina 159 8.
- Page 141 • Tenere presente che alcuni refrigeranti sono inodore. • Installare, utilizzare e conservare l'apparecchio in un ambiente con una superficie calpestabile di almeno 14 m (per 14000 BTU/h). • Installare questo apparecchio solo se conforme alle leggi e alle norme locali/nazionali.
- Page 142 • Non utilizzare mai l'apparecchio in caso di danneggiamento del cavo o della spina. • Non serrare mai il cavo ed evitare il contatto con bordi acuminati. • L'installazione deve essere completamente conforme ai regolamenti, alle condizioni e alle norme locali applicabili. •...
- Page 143 • Prima di pulire o sostituire l'apparecchio o parti di esso, staccare sempre la spina dalla presa. • NON collegare mai l'apparecchio utilizzando una prolunga. Se la presa non è dotata di adeguata messa a terra, farne installare una da un elettricista qualificato. •...
- Page 144 • Le operazioni di pulizia o di manutenzione dell'apparecchio potranno essere eseguite dai bambini solo se supervisionati da un adulto. ATTENZIONE. • Non chiudere mai ermeticamente la stanza in cui viene utilizzato l'apparecchio. Questa condizione impedisce la formazione di vuoto nella stanza. Una pressione negativa (=vuoto) potrebbe compromettere il funzionamento di scaldaacqua, cappe di aspirazione, forni, ecc.
- Page 145 • In caso di guasto, non eseguire mai le riparazioni in modo autonomo; la presenza di un dispositivo di sicurezza danneggiato nell'apparecchio potrebbe indicare un difetto che non è possibile riparare attraverso la rimozione o la sostituzione del componente. Utilizzare unicamente componenti originali.
- Page 146 • Questo apparecchio contiene 280 grammi di gas refrigerante R290 (consultare la targhetta informativa posta sul retro dell'apparecchio). • R290 è un gas refrigerante conforme alle direttive ambientali europee. Non perforare mai il circuito di raffreddamento. • In caso di installazione, utilizzo o conservazione dell'apparecchio in un ambiente privo di ventilazione, quest'ultimo deve presentare caratteristiche tali da prevenire eventuali accumuli di refrigerante causati da una perdita.
- Page 147 REFRIGERANTE (CE) N 842/2006: questo climatizzatore contiene il refrigerante R290. Il refrigerante, la cui quantità è inferiore a 1 kg, è contenuto in un circuito di raffreddamento chiuso. Il refrigerante non possiede un potenziale di riduzione dell'ozono. Si tratta, tuttavia, di un gas a effetto serra ai sensi del protocollo di Kyoto che potrebbe pertanto contribuire al riscaldamento globale in caso di rilascio nell'atmosfera.
-
Page 148: Descrizione Del Prodotto
2. Descrizione del prodotto Parte anteriore Parte posteriore 1. Maschera 10. Foro di scarico 2. Alloggiamento anteriore 11. Cavo di alimentazione (Pantone 427C); 3. Rotella omnidirezionale 1,8 m scoperto 4. Coperchio superiore 12. Cavo e spina di alimentazione 5. Aletta (regolabili in base alle necessità... - Page 149 Impostazione comandi 1. Tasto oscillazione 4. Tasto su 7. Tasto di selezione delle 2. Tasto timer 5. Finestra display modalità 3. Tasto di selezione della 6. Tasto giù 8. Tasto modalità sospensione velocità del ventilatore 9. Tasto di accensione/ spegnimento In caso di prima accensione, il dispositivo emette un breve segnale acustico e la finestra del display si illumina.
- Page 150 Tasto modalità sospensione: in modalità raffrescamento, premere i tasti Su e ventilatore per attivare la modalità sospensione; a questo punto l'unità si imposta in modalità silenziosa e risparmio energetico. Tasto di accensione/spegnimento: premere questo tasto per accendere e spegnere il dispositivo. In caso di accensione, premere questo tasto per spegnere il dispositivo.
- Page 151 Nota: • In caso di sostituzione o inutilizzo del telecomando, rimuovere le batterie e smaltirle ai sensi della legislazione applicabile, in quanto si tratta di rifiuti tossici per l'ambiente. • Non utilizzare contemporaneamente batterie nuove e usate. Non utilizzare contemporaneamente batterie alcaline, standard (carbonato di zinco) o ricaricabili (nichel-cadmio).
- Page 152 3. Primo utilizzo dell’apparecchio In caso di primo utilizzo dell'apparecchio, attenersi alle istruzioni fornite di seguito: Prestando attenzione, disimballare il climatizzatore e tutti gli accessori e rimuovere l'intero materiale di imballaggio ed eventuali adesivi promozionali. Tenere l’imballaggio (sacchetti di plastica e cartone) fuori dalla portata dei bambini. Dopo aver disimballato l'apparecchio, controllarlo attentamente per verificare che non vi siano danni esterni che potrebbero essere stati causati dal trasporto.
- Page 153 Montaggio del tubo flessibile di scarico dell'aria Posizionare l'apparecchio nelle vicinanze di una finestra o un'apertura per consentire all'aria di uscire attraverso il tubo flessibile di scarico. 1. Prestando attenzione, estrarre il tubo flessibile di scarico (B) fino a ottenere la lunghezza desiderata.
- Page 154 N.B.: il funzionamento ottimale del climatizzatore dipende dalla lunghezza del tubo flessibile di scarico e dal numero di piegature. Provare a ridurre sia la lunghezza che il numero di piegature. Il tubo flessibile di scarico fornito presenta una lunghezza massima di circa 150 cm e corrisponde alla capacità del climatizzatore. L'utilizzo di altri tubi flessibili o prolunghe potrebbe danneggiare l'apparecchio.
- Page 155 Nota: • Per evitare di causare un malfunzionamento dell'apparecchio, non utilizzare prolunghe e non sostituire il tubo flessibile con componenti diversi. Non ostruire il tubo flessibile di scarico in quanto si potrebbe causare un rischio di surriscaldamento.
- Page 156 4. Funzionamento del climatizzatore È possibile azionare il climatizzatore utilizzando il pannello di controllo posto sull'apparecchio o il telecomando fornito in dotazione. • Scegliere un punto vicino a una presa. • Installare il tubo flessibile di scarico attenendosi alle illustrazioni e assicurandosi che la finestra sia il più...
- Page 157 Deumidificazione 1. Premere il pulsante di accensione (1) e selezionare la modalità "deum" (2) sul quadro dei comandi oppure premere il pulsante delle opzioni (v. punto 1 raffreddamento) sul telecomando e selezionare l'opzione "deum". 2. La velocità del flusso d'aria si imposta automaticamente sul valore basso (questa impostazione non può...
- Page 158 5. Scarico dell'acqua di condensa In caso di inutilizzo prolungato del climatizzatore, rimuovere il cappuccio di gomma dall'apertura dello scarico posizionata sulla parte inferiore dell'apparecchio e posizionare un contenitore vuoto sotto l'uscita. Ciò consente all'acqua di fuoriuscire completamente dal serbatoio. Questa macchina prevede due metodi di scarico.
-
Page 159: Manutenzione
6. Manutenzione Nota: prima di pulire il climatizzatore, spegnerlo utilizzando il tasto ON/OFF, attendere alcuni minuti e rimuovere la spina dalla presa. Pulizia delle superfici esterne Pulire le superfici esterne dell'apparecchio con un panno leggermente inumidito e strofinarle con un panno asciutto. Se necessario, è possibile pulire le superfici esterne dell'apparecchio utilizzando un detersivo liquido per piatti delicato. - Page 160 Conservazione dell'unità 1. Svitare il coperchio dello scarico, scollegare il tappo dell'acqua e scaricare l'acqua all'interno del corpo. 2. Accendere la macchina, impostare la modalità di ventilazione con flusso d'aria basso e mantenere questo stato fino a quando il tubo di scarico non si asciuga completamente. 3.
- Page 161 7. Problemi e relative soluzioni Controllare i parametri specificati di seguito prima di inviare il climatizzatore per la riparazione. Problemi Motivi Soluzioni Accenderlo dopo averlo collegato a una Assenza di elettricità. presa di corrente adeguatamente alimentata. La spia del contenitore di acqua pieno si Scaricare l'acqua all'interno del contenitore.
-
Page 162: Specifiche Tecniche
8. Specifiche tecniche Numero modello 871125219587 Tensione 220-240 V~ 50 Hz Carico connesso 1610 watt Capacità di raffrescamento 14000 BTU/h (4,2kW) Classe EE 2,61 Consumo energetico kW 1.610 Consumo energetico in modalità stand-by ≤1 W Consumo di corrente nom. A Spostamento aria max. - Page 163 Slovensky 1. Bezpečnostné pokyny strana 162 2. Popis produktu strana 168 3. Pred prvým použitím strana 172 4. Používanie klimatizácie strana 176 5. Vypúšťanie kondenzátu strana 178 6. Údržba strana 179 7. Problémy a riešenia strana 181 8. Technické údaje strana 182...
- Page 164 • Pozor, niektoré chladivá sú bez zápachu. • Spotrebič inštalujte, používajte a skladujte v miestnosti s podlahovou plochou najmenej 14 m2 (platí pre 14000 BTU/h). • Tento spotrebič inštalujte iba v prípade, že je v súlade s miestnou/ národnou legislatívou a normami.
- Page 165 • Skontrolujte napätie v elektrickej sieti. • Tento spotrebič možno pripájať iba k uzemnenej zásuvke s napätím 220 – 240 V~ 50 Hz. • Spotrebič MUSÍ byť vždy pripojený s uzemnením. Ak nie je elektrický prívod uzemnený, je absolútne zakázané spotrebič pripájať.
- Page 166 správne, alebo je akokoľvek poškodený. V takom prípade sa obráťte na predajcu alebo servis. Nikdy nevymieňajte zástrčku ani prívodný kábel sami. • Keď sa spotrebič nepoužíva, vždy ho odpojte z elektrickej zásuvky. • Poškodený prívodný kábel nechajte vymeniť jedine u predajcu alebo autorizovaného elektrikára/v autorizovanom servise.
- Page 167 • Spotrebič vždy umiestňujte na pevný a rovný povrch. • Nenechávajte spotrebič bez dozoru, pokiaľ je v prevádzke. • Ak chcete spotrebič presunúť, uistite sa, že je vypnutý. Pri premiestňovaní spotrebiča používajte obidve ruky. • Nikdy nepoužívajte spotrebič s dielmi, ktoré neodporučil alebo nedodal výrobca.
- Page 168 VÝSTRAHA Špecifické informácie týkajúce sa spotrebičov využívajúcich chladivo R290. • Pozorne si prečítajte všetky upozornenia. • Pri odmrazovaní a čistení spotrebiča používajte iba náradie odporúčané výrobcom. • Spotrebič skladujte v miestnosti bez trvalých aktívnych zdrojov plameňa (napr. otvorený plameň, zapnutý elektrický alebo plynový...
- Page 169 • Opravy smie vykonávať na základe odporúčania výrobcom spotrebiča. Údržba a oprava, ktorá vyžaduje pomoc iného školeného personálu, sa musí vykonať pod dohľadom osoby, ktorá vie, ako manipulovať s horľavými chladiacimi plynmi. CHLADIVO (CE) N 842/2006: Táto klimatizácia obsahuje chladivo R290. Množstvo chladiva je menej ako 1 kg a je uchované...
- Page 170 2. Popis produktu Predná strana Zadná strana 1. Maska 10. Vypúšťací otvor 2. Predný kryt 11. Napájací kábel (Pantone 427C) Vyžaduje sa 3. Všesmerové koliesko odhalená dĺžka 1,8m 4. Horný kryt 12. Zástrčka napájacieho kábla (nastaviteľná podľa 5. Výkyvná lišta požiadaviek zákazníka) 6.
- Page 171 Ovládací panel 1. Tlačidlo oscilácie 4. Šípka nahor 7. Tlačidlo výberu režimu 2. Tlačidlo časovača 5. Okienko displeja 8. Tlačidlo režimu spánku 3. Tlačidlo nastavenia 6. Šípka nadol 9. Tlačidlo napájania rýchlosti ventilátora Keď zariadenie prvý raz zapnete, budete počuť tiché pípnutie a displej prístroja sa rozsvieti.
- Page 172 Tlačidlo režimu spánku: Súčasným stlačením šípky nahor a tlačidla ventilátora v režime chladenia aktivujete režim spánku. Zariadenie bude pracovať v energeticky úspornom tichom režime. Tlačidlo napájania: stlačením tlačidla zapnete alebo vypnete zariadenie. Keď je zariadenie zapnuté, stlačením tlačidla napájania zariadenie vypnete. Keď je zariadenie vypnuté, stlačením tlačidla napájania zariadenie zapnete.
- Page 173 Poznámka: • Keď diaľkový ovládač vymeníte alebo ho už nebudete používať, vyberte z neho batérie a zlikvidujte ich v súlade s platnými predpismi, pretože sú škodlivé pre životné prostredie. • Nekombinujte staré a nové batérie. Nepoužívajte kombináciu alkalických, štandardných (zinko-uhlíkových) a nabíjateľných (nikel-kadmiových) batérií. •...
-
Page 174: Pred Prvým Použitím
3. Pred prvým použitím Pri prvom použití spotrebiča dodržiavajte nasledovné pokyny: Klimatizáciu a všetko príslušenstvo opatrne vybaľte a odstráňte všetok obalový materiál a propagačné nálepky. Obaly (plastové vrecia a kartóny) udržujte mimo dosahu detí. Po rozbalení spotrebiča pozorne skontrolujte, či nejaví známky vonkajšieho poškodenia, ku ktorému mohlo dôjsť... - Page 175 Inštalácie potrubia na vývod vzduchu Umiestnite spotrebič do blízkosti okna alebo otvoru, aby mohol vzduch prúdiť von cez vývodné potrubie. 1. Opatrne vytiahnite vývodnú rúru (B), kým nedosiahnete požadovanú dĺžku. 2. Naskrutkujte jeden koniec vývodnej rúry (B) na štvorcový konektor (A). 3.
- Page 176 POZNÁMKA: Optimálne fungovanie klimatizácie závisí od dĺžky vývodnej rúry a počtu záhybov. Snažte sa o minimalizovanie oboch. Dodaná ohybná vývodná rúra má maximálnu dĺžku približne 150 cm a zodpovedá kapacite klimatizácie. Použitie iných rúr či predĺžení môže spôsobiť nesprávne fungovanie spotrebiča. Vzduch musí prúdiť bez prekážok, inak hrozí...
- Page 177 Poznámka: • Nepoužívajte predlžovacie rúry, ani nevymieňajte existujúcu rúru za inú, inak môže dôjsť k nesprávnemu fungovaniu klimatizácie. Vývod nesmie byť upchatý, inak môže dôjsť k prehriatiu spotrebiča.
- Page 178 4. Obsluha klimatizácie Klimatizáciu možno ovládať pomocou ovládacieho panela na spotrebiči alebo dodaného diaľkového ovládača. • Vyberte miesto v blízkosti elektrickej zásuvky. • Namontujte vývodnú rúru podľa obrázkov a dbajte na to, aby bolo okno čo najviac zatvorené. • Zástrčku prístroja pripojte do uzemnenej zásuvky. •...
- Page 179 Odstraňovanie vlhkosti 1. Stlačte tlačidlo napájania (1) a vyberte režim odstraňovania vlhkosti (2) na ovládacom paneli alebo stlačte tlačidlo výberu režimu (viď bod 1 – chladenie) na diaľkovom ovládači a vyberte režim odstraňovania vlhkosti. 2. Rýchlosť prúdenia vzduchu sa automaticky zníži (nie je možné zmeniť). 3.
- Page 180 5. Vypúšťanie kondenzátu Ak klimatizáciu nebudete dlhší čas používať, zložte gumenú krytku z vypúšťacieho vývodu v spodnej časti spotrebiča a podložte podeň prázdne vedro. Z nádržky vytečie všetka voda. Prístroj ponúka dva spôsoby vypúšťania kondenzátu. Manuálne vypustenie 1. Keď sa prístroj zastaví z dôvodu naplnenia nádržky, vypnite ho a odpojte z elektrickej siete.
- Page 181 6. Údržba Poznámka: Pred čistením klimatizácie spotrebič vypnite tlačidlom ZAP./VYP., počkajte pár minút a potom odpojte zástrčku z elektrickej zásuvky. Čistenie zovňajška Vonkajšie kryty spotrebiča čistite mierne vlhkou utierkou a potom utrite suchou handričkou. V prípade potreby môžete vonkajšie povrchy spotrebiča vyčistiť jemným roztokom čistiaceho prostriedku.
- Page 182 Skladovanie zariadenia 1. Odskrutkujte kryt vývodu, vytiahnite zátku a vypustite zo spotrebiča všetku vodu. 2. Zapnite spotrebič a nastavte na režim ventilátora s nízkymi otáčkami. Ponechajte tento režim, kým sa vývodná hadička nevysuší. 3. Vypnite prístroj, odpojte ho z elektrickej siete a naviňte prívodný kábel na držiak. Nasaďte na vývod zátku a kryt.
-
Page 183: Problémy A Riešenia
7. Problémy a riešenia Pred odoslaním klimatizácie do opravy najskôr skontrolujte nasledovné. Problém Príčina Riešenie Nie je elektrina. Zapnite klimatizáciu po pripojení do elektrickej zásuvky. Kontrolka plnej nádrže svieti. Vypustite vodu zo spotrebiča. Okolitá teplota je príliš nízka alebo Odporúčame používať zariadenia v rozsahu vysoká... -
Page 184: Technické Údaje
8. Technické údaje Modelové číslo 871125219587 Napätie 220 – 240 V~ 50 Hz Príkon 1 610 Watt Chladiaci výkon 14000 BTU/h (4,2 kW) EE Class 2.61 Spotreba energie kW 1 610 Spotreba energie v pohotovostnom režime ≤1 W Menovitý prúd A Max. - Page 185 Español 1. Instrucciones de seguridad Página 184 2. Descripción del producto Página 191 3. Pasos previos al uso del aparato por primera vez Página 195 4. Funcionamiento del aire acondicionado Página 199 5. Drenar el agua de condensación Página 201 6.
- Page 186 Español 1. Instrucciones de seguridad Primero lea por completo con cuidado el manual de instrucciones en su totalidad antes de usar el aparato y guardar el manual en un lugar seguro para referencia futura. • No utilice agentes que aceleren el proceso de descongelación u otros agentes de limpieza que no sean los recomendados por el fabricante.
- Page 187 • El aparato sólo sirve para su uso en lugares secos, en interiores. • Compruebe la tensión de la red. • Este aparato sólo sirve para una toma de tierra, voltaje de conexión 220-240V~ 50Hz. • El aparato siempre DEBE estar conectado tierra. Si la fuente de alimentación no está...
- Page 188 • Por razones de seguridad, siempre tenga cuidado cuando haya niños cerca de este aparato, igual que con cualquier otro aparato eléctrico. • No utilice el aparato si el enchufe, el cable o el aparato están dañados, o si el aparato ya no funciona correctamente o si cualquier otra cosa del aparato esté...
- Page 189 ¡CUIDADO! • Nunca cierre la habitación donde se utiliza este aparato de tal manera que se quede totalmente hermético. Esto evita que se crea el vacío en esta habitación. Presión negativa (=vacío) podría interrumpir el funcionamiento seguro de los géiseres, campanas extractoras, hornos, etc.
- Page 190 eliminando o reemplazando el dispositivo de seguridad. Sólo se deben utilizar las piezas originales. • Nunca sumerja el aparato, el cable o el enchufe en agua. • Este aparato sólo es apto para uso doméstico. Si el aparato no se utiliza según lo previsto, no se puede reclamar ninguna compensación por defecto o accidente y la garantía será...
- Page 191 • Si el aparato se instala, se opera o se almacena en una habitación sin ventilación, la habitación debe ser hecha de tal manera que se evita la acumulación de refrigerante como resultado de una fuga. Esto podría llevar a un riesgo de incendio o explosión debido a la ignición del refrigerante por un aparato de calefacción eléctrica, una estufa u otra fuente de ignición.
- Page 192 REFRIGERANTES (CE) N 842/2006: Este aire acondicionado contiene el refrigerante R290. La cantidad de refrigerante es inferior a 1 kg y está contenido en un circuito cerrado de refrigeración. El refrigerante no tiene un potencial de agotamiento de la capa de ozono. Sin embargo, es un gas de efecto invernadero según el protocolo de Kioto y por lo tanto podría contribuir al calentamiento global cuando se libere a la atmósfera.
-
Page 193: Descripción Del Producto
2. Descripción del producto 1. Panel de control 10. Orificio de drenaje 2. Carcasa delantera 11. Cable de alimentación (Pantone 427C); 3. Rueda omnidireccional deben quedar 1,8 m a la vista 4. Cubierta superior 12. Enchufe del cable de alimentación 5. - Page 194 Ajuste de control 1. Botón de oscilación 4. Botón Arriba 7. Botón de selección de modo 2. Botón del temporizador 5. Pantalla 8. Botón de modo de inactividad 3. Botón de selección de 6. Botón Abajo 9. Botón de encendido velocidad del ventilador Cuando encienda el aparato por primera vez, oirá...
- Page 195 Botón de modo de inactividad: En el modo de refrigeración, pulse el botón Arriba y el botón de circulación de aire para activar el modo de inactividad. Cuando lo haga, el aparato pasará a un modo silencioso de ahorro de energía. Botón de encendido: pulse este botón para encender o apagar el aparato.
- Page 196 Nota: • Cuando se sustituya el mando a distancia o cuando ya no se vaya a utilizar, retire las pilas y deséchelas de acuerdo con la legislación aplicable, ya que son perjudiciales para el medio ambiente. • No mezcle pilas usadas y nuevas. No utilice una mezcla de pilas alcalinas, estándar (carbono-zinc) o baterías recargables (níquel-cadmio).
- Page 197 3. Pasos previos al uso del aparato por primera vez Siga estas instrucciones cuando utilice el aparato por primera vez: Desembale cuidadosamente el aire acondicionado y todos los accesorios y retire todo el material de embalaje y las pegatinas promocionales. Mantenga los envases (bolsas de plástico y cartón) fuera del alcance de los niños.
- Page 198 Instalación de la manguera de descarga de aire Coloque el aparato cerca de una ventana o una abertura, de modo que el aire pueda fluir hacia el exterior a través de la manguera de descarga. 1. Tire con cuidado de la manguera de descarga (B) hasta que se alcance la longitud requerida.
- Page 199 OBSERVACIONES: El funcionamiento óptimo del aire acondicionado depende de la longitud de la manguera de descarga y del número de curvas. Intente limitar ambos. La manguera de descarga flexible suministrada tiene una longitud máxima de unos 150 cm y se corresponde con la capacidad del aire acondicionado. El uso de cualquier otra manguera o extensión podría causar fallos en el aparato.
- Page 200 Nota: • No use tubos de extensión ni lo reemplace con otros tubos diferentes, o esto puede causar La salida no puede estar bloqueada si no puede causar sobrecalentamiento.
- Page 201 4. Funcionamiento del aire acondicionad Se puede operar el aire acondicionado desde el panel de control del aparato o con el mando a distancia suministrado. • Elija un lugar cerca de un enchufe. • Instale la manguera de descarga de acuerdo con las figuras y asegúrese de que la ventana esté...
- Page 202 Deshumidificación 1. Presione el botón de encendido (1) y seleccione “deshumidificación” (2) en el panel de control o presione el botón de selección (véase punto 1 refrigeración) en el mando a distancia y seleccione la función de “deshumidificación”. 2. La velocidad de ventilación es por defecto a baja velocidad (esto no se puede cambiar).
- Page 203 5. Drenar el agua de condensación Cuando no se utilice el aire acondicionado durante un período de tiempo prolongado, retire la tapa de goma de la abertura de desagüe situada en la parte inferior del aparato y coloque un cubo vacío debajo de la salida. Toda el agua saldrá del tanque.
-
Page 204: Mantenimiento
6. Mantenimiento Nota: Antes de limpiar el aire acondicionado, apague el aparato con la tecla de ENCENDIDO/APAGADO, espere unos minutos y retire la clavija del enchufe. Limpieza del exterior Limpie el exterior del aparato con un trapo ligeramente húmedo y luego límpielo con un trapo seco. - Page 205 Guardar el aparato 1. Desenrosque la tapa del drenaje, desenchufe el tapón de agua y descargue el agua dentro del aparato. 2. Encienda la máquina, ajústela al modo de ventilación de ventilación bajo y mantenga este estado hasta que el tubo de drenaje se seca. 3.
-
Page 206: Problemas Y Soluciones
7. Problemas y soluciones Primero compruebe lo siguiente antes de enviar el aire acondicionado para su reparación. Problemas Motivos Soluciones No hay electricidad. Enciéndalo tras conectarlo a un enchufe con electricidad. El indicador del tope de agua se Descargue el agua del interior. iluminará. -
Page 207: Especificaciones Técnicas
8. Especificaciones técnicas Modelo 871125219587 Tensión 220-240 V a 50 Hz Carga conectada 1.610 W Capacidad de refrigeración 14.000 BTU/h (4,2 kW) Clase de EE 2,61 Consumo de potencia (kW 1.610 Consumo de potencia (inactividad) ≤ 1 W Consumo nom. de corriente (A). Caudal máx. - Page 208 A The symbol above and on the go recyklingowi, zgodnie ze zrównoważonym product means that the product is ponownym użyciem zasobów materiałowych. classed as Electrical or Electronic Zwrot zużytego urządzenia. Prosimy skorzystać equipment and should not be disposed z istniejącego systemu zwrotu i gromadzenia with other household or commercial lub skontaktować...
Need help?
Do you have a question about the 14000 BTU and is the answer not in the manual?
Questions and answers