Advertisement
Quick Links
Advertisement

Subscribe to Our Youtube Channel
Related Manuals for PRIXTON PICASSO


Summary of Contents for PRIXTON PICASSO
- Page 1 PICASSO PROYECTOR PROJECTOR...
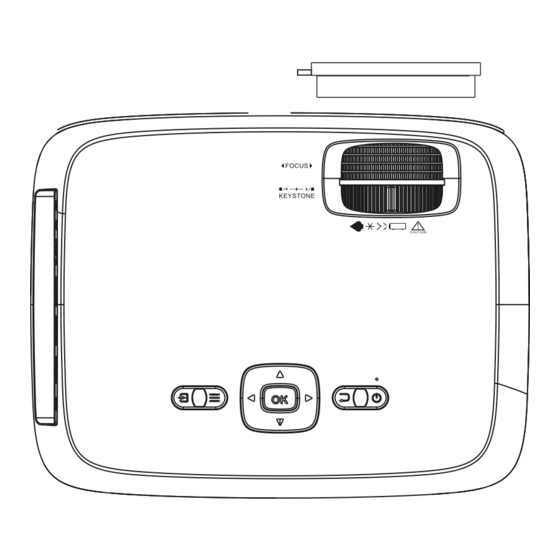
- Page 7 2 1 3 1 4 1 1. EXIT 11. AV OUT Jack 12. Micro SD Card 3. SOURCE 13. HDMI Port 1 4. MENU 14. HDMI Port 2 5. POWER 15. USB Port 6. Power On Indicator 16. AC IN Jack 7.
-
Page 8: Install Power Adapter
Install Power Adapter As shown in Picture 1 , connect the projector and the power source with the includde AC Power cable. Instrucciones de conexión Seleccione una fuente de entrada Verá la imagen de abajo cuando el proyector se encienda. Puede elegir entre las diferentes fuentes de entrada ( AV / HDMI1 HDMI1 / HDMI2 / Screen Mirroring / Reproductor multimedia) - Page 9 HDMI1 HDMI2 Screen Mirroring Media Player Conexión de dispositivo de vídeo AV Conecte la interfaz de AV del proyector con el cable AV, tal como se muestra en la imagen. Video CableI: YELLOW Audio Left Channel: WHITE Audio Right Channel: RED Female AV Cable(not included) AV OUT Portable DVD Player / Video Player...
-
Page 10: Conexión De Dispositivos De Audio
Conexión de dispositivos de audio El proyector puede conectarse a unos auriculares y a un sistema de audio con cable mediante una clavija de 3,5 mm (no incluida). El Bluetooth está desactivado por defecto al encender el proyector Bluetooth Activado/ por primera vez. - Page 11 NETLINK NETL...
- Page 12 NETLINK Netlink- Netlink-267...
- Page 13 NETLINK Netlink-267...
- Page 15 NETLINK...
- Page 16 Netlink-267A616D...
- Page 17 Bluetooth Select ON or OFF.
- Page 19 fin de proveer un mejor equipo. Declaración ue de conformidad simplificada Por la presente, La Trastienda Digital SL como propietaria de la marca comercial Prixton, ubicada en Avenida Cervantes 49, módulo 25, Basauri 48970, Bizkaia, declara que el tipo de equipo radioeléctrico que a continuación se expone:...
- Page 25 2 1 3 1 4 1 1. EXIT 11. AV OUT Jack 12. Micro SD Card 3. SOURCE 13. HDMI Port 1 4. MENU 14. HDMI Port 2 5. POWER 15. USB Port 6. Power On Indicator 16. AC IN Jack 7.
-
Page 26: Connection Instructions
Install Power Adapter As shown in Picture 1 , connect the projector and the power source with the includde AC Power cable. Connection Instructions Select an input source You will see the picture below when the projector is turned on. You can choose between the different input sources ( AV / HDMI1 / HDMI2 / Screen Mirroring/ Media Player) by pressing the "... -
Page 27: Using Bluetooth Playback
HDMI1 HDMI2 Screen Mirroring Media Player AV video device connection Connect the projector AV interface with the AV cable , as is shown in the pictures. Video CableI: YELLOW Audio Left Channel: WHITE Audio Right Channel: RED Female AV Cable(not included) AV OUT Portable DVD Player / Video Player ( not include )... - Page 28 Bluetooth is OFF by default when the projector rst powers ON Bluetooth On/O Turn on Bluetooth. The projector will begin searching for a nearby Bluetooth device ,choose one and connect successfully. Pairing to Bluetooth Wireless Speaker When successfully connected, the projector will display the Bluetooth name on the top right portion of the Main Menu screen, and ou will be heard through the Bluetooth receiver Attention...
- Page 29 NETLINK NETLINK NETLINK Netlink- Netlink-267...
- Page 30 NETLINK Netlink-267...
- Page 32 NETLINK Netlink-267A616D...
- Page 34 Bluetooth Select ON or OFF.
- Page 36 This product is guaranteed for 2 years from the date of purchase. When you have a problem that you can not solve, you must access the web www.prixton.com and click on the contact option to send us your assistance form.
- Page 39 2 1 3 1 4 1...
-
Page 40: Install Power Adapter
1. EXIT 11. AV OUT Jack 12. Micro SD Card 3. SOURCE 13. HDMI Port 1 4. MENU 14. HDMI Port 2 5. POWER 15. USB Port 6. Power On Indicator 16. AC IN Jack 7. TRAPEZOIDAL ADJ. Knob 17. IR Window (Rear Side ) 8. - Page 41 Instructions de connexion Sélectionnez une source d'entrée Vous verrez l'image ci-dessous lorsque le projecteur est allumé. Vous pouvez choisir entre les différentes sources d'entrée (AV / HDMI1 / HDMI2 / Diffusion d’écran/ Lecteur Media) en appuyant sur le bouton " Source " de l'écran tactile du Interface projecteur, ou de la télécommande.
- Page 42 Connexion d'un appareil vidéo AV Connectez l'interface AV du projecteur avec le câble AV, comme indiqué sur les images. Video CableI: YELLOW Audio Left Channel: WHITE Audio Right Channel: RED Female AV Cable(not included) AV OUT Portable DVD Player / Video Player ( not include )...
- Page 43 Le Bluetooth est désactivé par défaut lorsque le projecteur est Bluetooth On/O allumé pour la première fois Activez le Bluetooth. Le projecteur va commencer à chercher un appareil Bluetooth à proximité, sélectionnez un appareil et connectez-le. Jumelage Bluetooth Haut-parleur sans l Lorsque la connexion est établie, le projecteur a che le nom Bluetooth dans la partie supérieure droite de l'écran du menu principal, et vous serez entendu par le récepteur Bluetooth.
- Page 44 NETLINK NETLINK NETLINK Netlink- Netlink-267...
- Page 45 NETLINK Netlink-267...
- Page 47 NETLINK Netlink-267A616D...
- Page 49 être modifiées sans préavis afin d’améliorer le matériel. Déclaration de conformité simplifiée La Trastienda Digital SL, en tant que propriétaire de la marque Prixton, située dans Avenida Cervantes 49, módulo 25, Basauri 48970, Bizkaia, déclare que le type d'équipement radioélectrique indiqué...
- Page 52 2 1 3 1 4 1...
-
Page 53: Install Power Adapter
1. EXIT 11. AV OUT Jack 12. Micro SD Card 3. SOURCE 13. HDMI Port 1 4. MENU 14. HDMI Port 2 5. POWER 15. USB Port 6. Power On Indicator 16. AC IN Jack 7. TRAPEZOIDAL ADJ. Knob 17. IR Window (Rear Side ) 8. - Page 54 Collegamento del dispositivo HlMI The Il proiettore può essere collegato a dispositivi con funzione di ingresso HDMI. È compatibile con computer portatili, lettori DVD, lettori Blu-ray, Chromecast, TV Stick, ecc. Cavo HDMI not incluso. Il proiettore è dotato di 2 porte di input HDMI, ①...
- Page 55 Utilizzo della riproduzione Bluetooth English PICTURE OSD Language Bluetooth SOUND Restore Factory Default Panel Flip Rotate OPTION Info TIME Adjust Select Menu Connessione dispositivi audio Il proiettore può essere collegato ad una cuffia e ad un sistema audio cablato utilizzando un jack da 3,5mm ( non incluso) Projector Alla prima accensione del proiettore il Bluetooth è...
- Page 56 Connettere a uno Smartphone/Pad Con WiFi iOS (Due metodi) Senza WiFi Connessione wireless Con WiFi Android (Due metodi) Guida alla Senza WiFi connessione iOS (Un metodo) USB a cavo Lightning Connessione cablata Usb a Micro USB/ Cavo tipo C Android (Un metodo) (Devi scaricare la APP) Controlla prima il tuo ambiente wireless e poi collega il dispositivo seguendo correttamente la modalità...
- Page 57 NETLINK NETLINK NETLINK...
- Page 58 Netlink- Netlink-267...
- Page 59 NETLINK Netlink-267...
- Page 61 NETL Netlink-267A616D...
- Page 62 Politica di garanzia Questo prodotto è garantito per 2 anni dalla data di acquisto. Quando hai un problema che non puoi risolvere, devi accedere al sito www.prixton.com e fare clic sull`opzione di contatto per inviarci il tuo modulo di assistenza.
- Page 65 1. EXIT 11. AV OUT Jack 12. Micro SD Card 3. SOURCE 13. HDMI Port 1 4. MENU 14. HDMI Port 2 5. POWER 15. USB Port 6. Power On Indicator 16. AC IN Jack 7. TRAPEZOIDAL ADJ. Knob 17. IR Window (Rear Side ) 8.
-
Page 66: Install Power Adapter
Install Power Adapter As shown in Picture 1 , connect the projector and the power source with the includde AC Power cable. Verbindungshinweise Interface Wählen Sie eine Input-Quelle Ist der Projektor eingeschaltet, sehen Sie das unten abgebildete Bild. Sie können zwischen verschiedenen Input-Quellen wählen HDMI1 ( AV / HDMI1 / HDMI2 / Screen Mirroring/ Media Player), indem HDMI2... -
Page 67: Bluetooth-Playback
AV Videogerät-Verbindung Verbinden Sie das AV-Interface mit dem AV-Kabel, wie unten gezeigt. Video CableI: YELLOW Audio Left Channel: WHITE Audio Right Channel: RED Female AV Cable(not included) AV OUT Portable DVD Player / Video Player ( not include ) Male AV Cable HDMI1 HDMI2 Screen Mirroring... - Page 68 Bluetooth ist standardmäßig OFF, wenn sich der Projektor Bluetooth On/O einschaltet Schalten Sie Bluetooth ein. Der Projektor wird nach einem Bluetooth-Gerät in der Nähe suchen Wählen Sie eines aus Mit kabellosem und verbinden Sie es. Bluetooth- Lautsprecher Bei einer erfolgreichen Verbindung zeigt der Projektor den verbinden Bluetooth Namen oben recht im Hauptmenü...
- Page 70 NETLINK Netlink-267A616D...
- Page 72 Geräten und können ohne Vorankündigung geändert werden, um ein besseres Gerät anzubieten. Vereinfachte EU-einverständniserklärung La Trastienda Digital SL als Inhaber der Handelsmarke Prixton, mit dem Standort Avenida Cervantes 49, módulo 25, Basauri 48970, Bizkaia, erklärt hiermit, dass das im Folgenden detaillierte radioelektrische Gerät:...
- Page 75 2 1 3 1 4 1 1. EXIT 11. AV OUT Jack 12. Micro SD Card 3. SOURCE 13. HDMI Port 1 4. MENU 14. HDMI Port 2 5. POWER 15. USB Port 6. Power On Indicator 16. AC IN Jack 7.
- Page 76 Source Power Press to change Press to power on media source the projector. Exit mode. Menu Press and hold to Press to return to Press to access power OFF. a previous page or on-screen menu(s) setting in the on- and options. Arrows/OK screen menu(s).
- Page 77 Ligação Multimédia Insira o cartão USB / Micro SD ( cartão TF ) nas ranhuras correspondentes (como apresentado na imagem). Escolha a fonte de Multimédia, Selecione " Vídeo ", " Música ", " Fotografia " para introduzir o conteúdo que deseja reproduzir. HDMI1 HDMI2 Screen Mirroring...
- Page 78 O Bluetooth está DESLIGADO por defeito quando o projetor é Bluetooth Ligado/ ligado pela primeira vez Desligado Ligar o Bluetooth. O projetor irá começar a procurar um dispositivo de Bluetooth próximo, escolha um ligue-o Emparelhamento corretamente. com Bluetooth Coluna sem os Quando ligado com sucesso, o projetor irá...
- Page 79 NETLINK NETLINK NETLINK Netlink- Netlink-267...
- Page 80 NETLINK Netlink-267...
- Page 82 NETLINK Netlink-267A616D...
- Page 84 Declaração De Conformidade Simplificada Pela presente, a La Trastienda Digital SL, na qualidade de proprietária da marca comercial Prixton, com sede no Avenida Cervantes 49, módulo 25, Basauri 48970, Bizkaia, declara que o tipo de equipamento radioelétrico que de seguida se expõe:...
- Page 87 2 1 3 1 4 1...
- Page 88 1. EXIT 11. AV OUT Jack 12. Micro SD Card 3. SOURCE 13. HDMI Port 1 4. MENU 14. HDMI Port 2 5. POWER 15. USB Port 6. Power On Indicator 16. AC IN Jack 7. TRAPEZOIDAL ADJ. Knob 17. IR Window (Rear Side ) 8.
- Page 89 Apparaten met HlMI aansluiten De projector kan worden aangesloten op apparaten met HDMI-ingang. De projector is compatibel met laptops, dvd-spelers, Blu-ray-spelers, Chromecast, TV Stick etc. De HDMI-kabel is not inbegrepen. De projector is uitgerust met 2 HDMI-ingangen ①Als u uw apparaten op de ‘HDMI 1’-poort van de projector aansluit, selecteert u ingangsbron ‘HDMI 1’.
- Page 90 Bluetooth-playback gebruiken PICTURE OSD Language English Bluetooth SOUND Restore Factory Default Panel Flip Rotate OPTION Info TIME Select Menu Adjust Audio-apparaten aansluiten De projector kan worden aangesloten op een koptelefoon of een bekabeld audiosysteem met jack van 3,5 mm (niet inbegrepen). Projector Wanneer u de projector de eerste keer AANzet, is de Bluetooth Aan/Uit...
- Page 91 Verbinding met smartphone/pad Met wi iOS (Twee methodes) Zonder wi Draadloze verbinding Met wi Android (Twee methodes Aansluitingsgids Zonder wi iOS (Eén methode) USB voor verlichtingskabel Bekabelde verbinding USB voor Micro-USB/kabel type C Android (Eén methode) (U moet de APP downloaden) Controleer eerst uw draadloze omgeving en sluit vervolgens uw apparaat aan overeenkomstig de instructies.
- Page 92 NETLINK NETL NETLINK Netlink- Netlink-267...
- Page 93 NETLINK Netlink-267A616D...
- Page 95 NETLINK Netlink-267A616D...
- Page 97 Dit product heeft een garantie van 2 jaar vanaf de datum van aankoop. Als u een probleem hebt dat u niet kunt oplossen, moet u naar www.prixton.com gaan en op de contactoptie klikken om ons uw assistentieformulier toe te sturen.
Need help?
Do you have a question about the PICASSO and is the answer not in the manual?
Questions and answers