Advertisement
Quick Links
ASSEMBLY INSTRUCTIONS
HZHCJJ-V1
FTLFCT-0018
Pure & Easy
CONTACT US:
If you have any questions about the installation of YITAHOME® products, just contact us
at +1(888)-717-8084 from Mon-Fri 8:00 AM-16:30 PM PST / Saturday 8:00 AM-12:00 PMPST
or E-mail us at: after-sale.cs@hotmail.com
Alternative method to contact us(amazon.com orders only)
1.Log into your amazon account
2.Go to "Your Orders" and find the purchase
COFFEE TABLE
3.Click on "Contact Seller"
Advertisement

Related Manuals for YitaHome FTLFCT-0018


Summary of Contents for YitaHome FTLFCT-0018
- Page 1 FTLFCT-0018 Pure & Easy CONTACT US: If you have any questions about the installation of YITAHOME® products, just contact us at +1(888)-717-8084 from Mon-Fri 8:00 AM-16:30 PM PST / Saturday 8:00 AM-12:00 PMPST or E-mail us at: after-sale.cs@hotmail.com Alternative method to contact us(amazon.com orders only) 1.Log into your amazon account...
- Page 2 ASSEMBLY INSTRUCTIONS ASSEMBLY INSTRUCTIONS Notice: Item Item Qty. Qty. Reference Image Reference Image 1.Follow the installation instructions. Please confirm all accessories are preset before installation. 2.Do not fully tighten the screws during initial assembly.Fully tighten screws only once all pieces which are correctly assembled.
-
Page 3: Explosion Diagram
ASSEMBLY INSTRUCTIONS ASSEMBLY INSTRUCTIONS Explosion Diagram 2PCS 1PCS 1PCS... - Page 4 ASSEMBLY INSTRUCTIONS ASSEMBLY INSTRUCTIONS 4PCS 4PCS 1PCS × √ Tighten Ⓐ clockwise until all of their threads are engaged.
- Page 5 ASSEMBLY INSTRUCTIONS ASSEMBLY INSTRUCTIONS 8PCS 2PCS 8PCS 1PCS Arrow Arrow steps 1 steps 2 steps 3 The two boards fit vertically, place Ⓑ and match their holes with Ⓐ then tighten Ⓑ clockwise.
- Page 6 ASSEMBLY INSTRUCTIONS ASSEMBLY INSTRUCTIONS 8PCS 4PCS 4PCS 1.Insert four Ⓒ into ❺ ❻ to connect to ❷. Ensure Ⓐ of ❷ installed in the corresponding holes. 2.Insert eight Ⓑ into the corresponding holes and tighten them.
- Page 7 ASSEMBLY INSTRUCTIONS ASSEMBLY INSTRUCTIONS 4PCS 4PCS 2PCS 4PCS 1PCS 1.Insert four Ⓒ into ❹ to connect to ❻. Ensure Ⓐ of ❻ installed in the corresponding holes. 2.Insert four Ⓑ into the corresponding holes and tighten them.
- Page 8 ASSEMBLY INSTRUCTIONS ASSEMBLY INSTRUCTIONS 4PCS 4PCS 6PCS 10PCS 1PCS 1.Insert six Ⓒ into ❺, ❻ ❼ to connect to ❶. 1.Insert four Ⓒ into ❹ to connect to ❼. Ensure Ⓐ of ❼ installed in the corresponding holes. 2.Screw ten Ⓓ...
- Page 9 ASSEMBLY INSTRUCTIONS ASSEMBLY INSTRUCTIONS 4PCS 2PCS 1PCS STEP 1: Align Boards Ⓗ 1.Unscrew the 3.Tighten the 2.Move left or screw. screw right STEP 2: Adjust Ⓗ 1.Unscrew the 3.Tighten the 2.Move up or Board’ s Height screw. screw. down. STEP 3: Adjust Gap 1.Widen the gap by turning 2.Narrow the gap by turning the screw anticlockwise.
- Page 10 ASSEMBLY INSTRUCTIONS ASSEMBLY INSTRUCTIONS 8PCS 2PCS 2PCS 1PCS STEP 1: Tear off the buffer STEP 2: Arch the buffer plate’ s protective film. plate shown as figure.
-
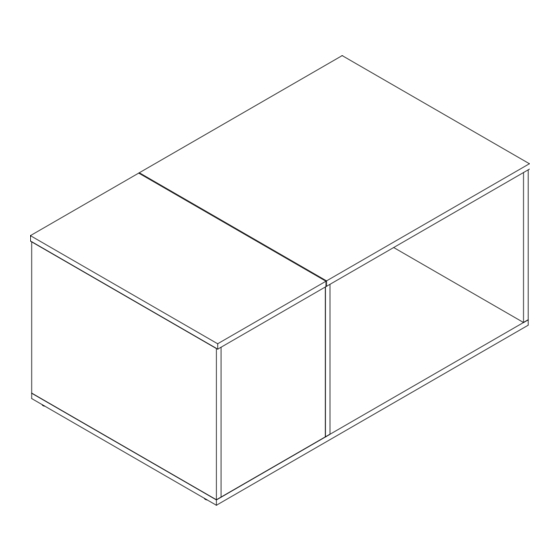
Page 11: Installation Completed
ASSEMBLY INSTRUCTIONS ASSEMBLY INSTRUCTIONS Installation Completed...
Need help?
Do you have a question about the FTLFCT-0018 and is the answer not in the manual?
Questions and answers