
Subscribe to Our Youtube Channel
Related Manuals for EMD Serono RebiSmart 3.0


Summary of Contents for EMD Serono RebiSmart 3.0
- Page 1 Instructions for Use Model: 3.0 RebiSmart® autoinjector delivers a pre-set dose of Rebif®.
-
Page 2: Table Of Contents
Contents Introduction to RebiSmart®.............6 Section 1.1 About the device ......................8 Section 1.2 Indications and contraindications ................9 Section 1.3 Safety precautions ....................... 10 Section 1.4 Device and supplies ..................... 12 Getting started ..................20 Section 2.1 Charging the device ..................... 22 Section 2.2 Enter device settings .................... - Page 3 Injecting medication with RebiSmart®........30 Section 3.1 Prepare for injection ....................32 Section 3.2 Attach needle ........................ 36 Section 3.3 Administer the injection ..................... 38 Section 3.4 Detach needle and confirm injection ..............40 Caring for the device.................42 Section 4.1 Storing device and cartridges ................... 44 Section 4.2 Taking care of your device ..................
- Page 4 Settings....................52 Section 5.1 Menu overview ......................54 Section 5.2 History ..........................55 Section 5.3 Injection settings ......................57 Section 5.4 Device settings ......................62 Section 5.5 Battery status ........................ 68 Troubleshooting..................70 Section 6.1 Interrupted injection ....................72 Section 6.2 Dropped device ......................74 Section 6.3 Warning and information messages ..............
- Page 5 Additional information for doctors or nurses......94 Section 7.1 Complete first time setup wizard ................96 Section 7.2 Clinical setup ......................... 100 Technical specifications and appendix.........104 Section 8.1 Technical data ....................... 106 Section 8.2 Explanation of symbols ....................108 Section 8.3 Electromagnetic specifications ................111...
-
Page 6: Introduction To Rebismart
Section 1 Introduction to RebiSmart® This section introduces you to 1.1 About the device RebiSmart® and provides important 1.2 Indications and contraindications 9 safety information about using 1.3 Safety precautions RebiSmart® to deliver Rebif® medication. 1.4 Device and supplies... -
Page 8: Section 1.1 About The Device
Section 1.1 About the device RebiSmart® is an electromechanical • RebiSmart® will not store or transfer any autoinjector which delivers a pre-set dose of personal information. Rebif® (interferon beta-1a for injection). • If you have any questions, talk to your •... -
Page 9: Section 1.2 Indications And Contraindications
Section 1.2 Indications and contraindications Indications for use: Contraindications for use: RebiSmart® is a reusable, electromechanical You should not use RebiSmart® if you software-controlled autoinjector intended for have severe dexterity, visual, upper subcutaneous (under the skin) injection of extremity or cognitive neurological Rebif®... -
Page 10: Section 1.3 Safety Precautions
Section 1.3 Safety precautions This section provides general precautions related to using RebiSmart®. Additional warnings and cautions related to specific instructions are highlighted throughout this booklet. If you have any questions after reading this section, do not hesitate to ask your doctor or nurse. Before you proceed, review these general warning and cautions. - Page 11 General warning and cautions (continued) • DO NOT change the injection settings on • To avoid administration of non-sterile RebiSmart® until you have discussed it medication: DO NOT use a Rebif® cartridge if it with your doctor or nurse. shows any signs of damage, •...
-
Page 12: Section 1.4 Device And Supplies
Section 1.4 Device and supplies Items provided in device packaging: 1 RebiSmart® 1 Battery 1 Battery charger* 1 Storage box Instructions for Use** autoinjector NOTE: Contact your doctor or nurse for information on the supply of medication cartridges and needles, or if you need replacements for RebiSmart® or any supplies. * Number of plug adapters may vary (included for different regions) ** Number of Instructions for Use booklets may vary (included for different languages). - Page 13 Other supplies needed: The following pages include details about each of the main components: • RebiSmart® autoinjector delivers Rebif® medication Alcohol wipes Rebif® cartridges • Rebif® cartridge containing Rebif® medication Serofine® needles (29G) • Serofine® needle Biohazard (sharps) container (29G) for every injection Not all cartridges, needles, or supplies are approved or available for use in all countries.
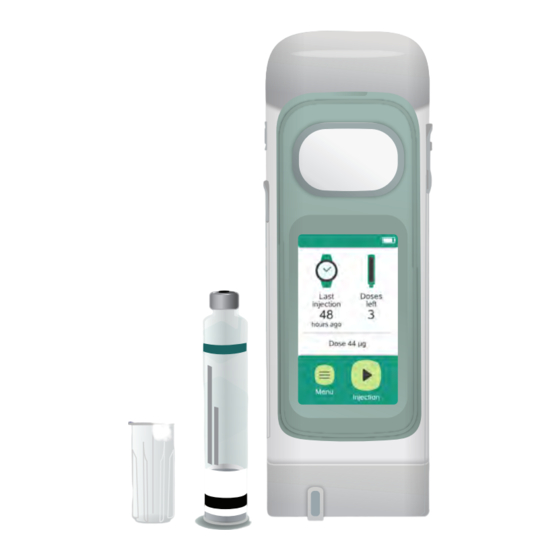
- Page 14 Section 1.4 Device and supplies (continued) RebiSmart® autoinjector RebiSmart® is an electromechanical device that automatically injects the set dose of medication through single-use needles it inserts and retracts on each injection. • The skin sensors around the needle cavity detect if the device is positioned correctly onto your skin.
- Page 15 Side views Battery On/Off button latch USB-C Cartridge port door latch Status light Battery Cartridge door Needle Skin cavity sensor...
- Page 16 Section 1.4 Device and supplies (continued) Touch screen Press buttons Swipe The touch screen provides current information, settings, and scroll instructions on how to administer an injection. You can press buttons, or swipe up and down on lists to navigate the screens and make selections.
- Page 17 Rebif® cartridges There are two Rebif® cartridge types compatible with RebiSmart®: 132 µg (44 µg/0.5 mL) • 132 µg (microgram, mcg), i.e., 3 doses of 44 µg (concentration: 44 µg/0.5 mL) • 66 µg, i.e., 3 doses of 22 µg (concentration: 22 µg/0.5 mL) Carefully check the Rebif®...
- Page 18 Section 1.4 Device and supplies (continued) Sterility Serofine® needles seal There is one Serofine® needle type Needle compatible with RebiSmart®: ® Serofine needle • 29G × 1/2” Needle (thickness: 0.33 mm × length: 12 mm ) 12 mm Carefully check the size (or gauge “G”) on the needle carton and the sterility seal of each individual needle to ensure if you 29G needle...
- Page 19 Discard supplies and device If you no longer use RebiSmart®, dispose of Use a sharps container to dispose of used it in accordance with your local regulation. needles after each injection and to dispose of Contact your doctor or nurse for more used cartridges.
-
Page 20: Getting Started
Section 2 Getting started This section provides instructions 2.1 Charging the device for setting up the device before 2.2 Enter device settings administering a first injection. 2.3 Inserting cartridge... - Page 21 Reminders and tips for getting started with RebiSmart® • You must receive appropriate training from your doctor or nurse before changing any settings and before using RebiSmart®. • Some device settings can only be changed by a doctor or nurse. If device set up is not complete, the on-screen injection button will remain disabled.
-
Page 22: Section 2.1 Charging The Device
Section 2.1 Charging the device NOTE: There are two ways to charge Confirm the battery is fully charged before the battery: using the device for the first time. If the battery is not charged, use the battery Charge the battery charger supplied with the device. - Page 23 Connect battery Insert battery Confirm battery is to power source into device fully charged Insert, Green steady slide up light • Plug the battery charger’s • Check the status light. Insert and slide battery USB-C plug into the If light is steady green, back up until it clicks in battery port.
-
Page 24: Section 2.2 Enter Device Settings
Section 2.2 Enter device settings RebiSmart® contains Set language Turn on device device and injection settings that will need to be set up before you can use the device. These Scroll settings can be changed later on as well. • Swipe up or down and Press and hold on/off press checkbox to select button until the display... - Page 25 Set date and Set time Set date time format Scroll • Swipe down or up to • Press checkbox to select • Swipe down or up across the date and time select current time screen to go the right format you prefer. month and select current •...
- Page 26 Section 2.2 Enter device settings (continued) Your doctor or nurse must enter clinical settings Your doctor or nurse must enter the clinical settings that control your dosing and treatment delivery. The on-screen injection button will remain disabled until the set-up is completed. If your doctor or nurse is not with you to do it, press “No”...
-
Page 27: Section 2.3 Inserting Cartridge
Section 2.3 Inserting cartridge Before injecting medication (as Get a new cartridge and inspect instructed in Section 3), you must first insert a new Rebif® Medication cartridge. When handling the MM-DD-YYYY Septum cartridge, handle with care. Check that the: • Packaging and cartridge label have the medication and NOTE dosage of Rebif®... - Page 28 Section 2.3 Inserting cartridge (continued) Open cartridge Unlock cartridge door door To unlock the cartridge door: Slide cartridge door latch up to open door. a. Open menu. NOTE: If device contains a cartridge b. Select injection settings. that is not empty, you will need to unlock c.
- Page 29 Insert cartridge Close cartridge door Insert cartridge into cartridge holder with Push cartridge door to close it. metal tip pointing down. NOTE: RebiSmart® may take up to 20 seconds to recognize the cartridge and go back into the menu.
- Page 30 Section 3 Injecting medication with RebiSmart® This section is a step-by-step 3.1 Prepare for injection guide for injecting medication 3.2 Attach needle with RebiSmart®. 3.3 Administer the injection 3.4 Detach needle and confirm injection...
- Page 31 Reminders and tips for injecting with RebiSmart® CAUTION • DO NOT use RebiSmart® if it is not working properly. • DO NOT attempt to modify, or repair the device, or an incorrect dose might be delivered. Contact your doctor or nurse in case of device malfunction. •...
- Page 32 Section 3.1 Prepare for injection Gather supplies NOTE If an injection plan is set up, a notice appears to tell you if it is the right time to inject (RebiSmart® will not provide a sound or LED reminder). Depending on which dose mode is Place all items listed below on a active, RebiSmart®...
- Page 33 Check device Wash hands Prepare injection site Before each injection, check Wash your hands well with Select and prepare your the device. Make sure the soap and water and dry injection site. Injection site cartridge and medication them with a clean towel. should be based on the correspond to the Rebif®...
- Page 34 Section 3.1 Prepare for injection (continued) Press injection Turn on device Press and hold on/off button until the Press on-screen injection button display switches on. to start the injection process. RebiSmart® will guide you step-by- After a few seconds the home screen will step to administer an injection.
- Page 35 NOTE: If you have set up the rotation guide feature, RebiSmart® will display the possible injection sites for your injection after pressing on-screen injection button (refer to ““Section 5.3 Injection settings”” to set up the rotation guide). Select an injection site: Green circle means you can Press Select an injection site...
- Page 36 Section 3.2 Attach needle Get a new needle Remove seal Needle size • Get a new Serofine® needle. Pull flap and fully remove sterility seal. • Check that needle size (gauge “G”) on the needle cap’s sterility seal is the same as the needle size on RebiSmart®...
- Page 37 Insert needle, let go Remove cap Needle Keep fingers cavity away When RebiSmart® screen tells you “Insert When RebiSmart® screen tells to, push the new needle”: needle cap sideways to remove it. DO NOT inspect the needle cavity when the •...
- Page 38 Section 3.3 Administer the injection Hold device against skin NOTE: If you DO NOT inject right away Chime sound, RebiSmart® will give you White ready light instructions to: • After 60 seconds - continue or cancel injection • After 10 minutes - insert an empty needle cap to unload the expired needle.
Need help?
Do you have a question about the RebiSmart 3.0 and is the answer not in the manual?
Questions and answers