Advertisement
www.kleton.com
www.kleton.com
www.kleton.com
TOOLS NEEDED
TOOLS NEEDED
Small Lock Washer x 4
Small Bolt x 4
Small Nut x 4
Small Bolt x 4
Small Nut x 4
Petit boulon x 4
Petit écrou x 4
Small Bolt x 4
Small Nut x 4
Medium Lock Washer x 8
Medium Bolt x 8
Medium Nut x 8
Medium Bolt x 8
Medium Nut x 8
Boulon moyen x 8
Écrou grand x 8
Medium Bolt x 8
Medium Nut x 8
Front Channel x 1
Large Bolt x 64
Large Nut x 62
Large Bolt x 61
Large Nut x 59
Grand Boulon x64
Grand écrou x62
Large Bolt x 61
Large Nut x 59
DRAWER TRACK
Back Panel x 1
Left Door x 1
Right Door x 1
Left Door x 1
Right Door x 1
Left Door x 1
Right Door x 1
Porte gauche x 1
Porte droite x 1
Middle Shelf x 1
Top Shelf x 1
Top Shelf x 1
Top Shelf x 1
Tablette supérieure x 1
Back Leg x 2
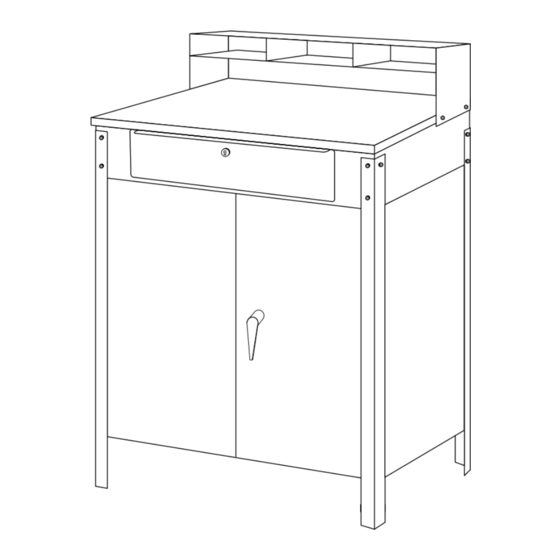
WALL MOUNT SHOP DESK
CABINET SHOP DESK
PUPITRE D'ATELIER AVEC ARMOIRE
Model FI518
Model FI520 / No modèle FI520
CABINET
CABINET
SHOP DESK
SHOP DESK
Model FI520
Model FI520
Phillips Screwdriver
Phillips Screwdriver
10 mm Wrench
10 mm Wrench
8 mm Wrench
8 mm Wrench
7 mm Wrench
7 mm Wrench
PARTS - PIÈCES
Drawer Lock x 1
Small Washer x 4
Small Washer x 4
Petite rondelle x 4
Small Washer x 4
Door Handle With Lock x 1
Medium Washer x 8
Medium Washer x 8
Rondelle moyenne x 8
Medium Washer x 8
RELEASE LEVER
Drawer Track x 2
Drawer Track x 2
Rail de tiroir x2
Drawer Track x 2
Desk Top x 1
Desk Top x 1
Desk Top x 1
Dessus de pupitre x 1
Side Panel x 2
Bottom Shelf x 1
Bottom Shelf x 1
Bottom Shelf x 1
Tablette inférieure x 1
Lock Bar x 1
Drawer x 1
Drawer x 1
Drawer x 1
Tioir x 1
Front Leg x 2
Front Leg x 2
Front Leg x 2
Patte avant x 2
www.kleton.com
TOOLS NEEDED / OUTILS REQUIS
TOOLS NEEDED
PARTS - PIÈCES
Small Bolt x 4
PARTS
PARTS
Medium Bolt x 8
Small Lock Washer x 4
1.
Remove drawer slides from the outsides of the
Small Lock Washer x 4
Petite rondelle de blocage x 4
drawer. Press the drawer slide release lever to
Small Lock Washer x 4
remove slides completely. (See Figure 4)
NOTE: Depending on the side, press release
Medium Lock Washer x 8
Large Bolt x 61
Medium Lock Washer x 8
lever either down or up to remove slides.
Rondelle de blocage moyenne x 8
Medium Lock Washer x 8
Front Channel x 1/ Canal avant x 1
Rondelle de blocage moyenne x 8
Figure 4
2. Attach drawer slides to drawer tracks using 2 small
bolts, washers, lock washers and nuts. Extend drawer
Left Door x 1
slide completely to attach to track. Insert center bolt
first to align front bolt hole. (See Figure 5)
Top Shelf x 1
Middle Shelf x 1
Middle Shelf x 1
Middle Shelf x 1
Tablette centre x 1
Figure 5
3. Insert drawer tracks into inside of desk top, aligning
front and back bolt holes. Drawer slides must
face inward. Use 4 large bolts and 4 large nuts to
assemble each drawer track to the desk top.
(See Figure 6)
CABINET
SHOP DESK
Model FI520
Phillips Screwdriver /
Tournevis Phillips
Phillips Screwdriver
10 mm Wrench
10 mm Wrench / Clé 10 mm
8 mm Wrench
8 mm Wrench / Clé 8 mm
7 mm Wrench
7 mm Wrench / Clé 7 mm
Small Nut x 4
Small Washer x 4
Medium Nut x 8
Medium Washer x 8
Drawer Lock x 1
Drawer Lock x 1
Verrou de tiroir x 1
Drawer Lock x 1
Door Handle with Lock x 1
Large Nut x 59
Door Handle With Lock x 1
Poignée de porte a/verrou x 1
Door Handle With Lock x 1
Front Channel x 1
Front Channel x 1
Right Door x 1
Back Panel x 1
Back Panel x 1
Back Panel x 1
Panneau arrière x 1
Front Leg x 2
Back Leg x 2
Back Leg x 2
Back Leg x 2
Patte arrière x 2
PARTS
Small Lock W
Medium Loc
Drawer Track x 2
Desk Top x 1
Bottom Shelf x 1
Side Panel x 2
Drawer x 1
Back Panel x 1
Side Panel x 2
Panneau arrière x 1
Lock Bar x 1
Lock Bar x 1
Lock Bar x 1
Barre de verrouillage x 1
Middl
Advertisement
Table of Contents

Related Manuals for Kleton FI520


Summary of Contents for Kleton FI520
- Page 1 WALL MOUNT SHOP DESK CABINET SHOP DESK CABINET SHOP DESK PUPITRE D’ATELIER AVEC ARMOIRE Model FI518 www.kleton.com www.kleton.com Model FI520 Model FI520 / No modèle FI520 CABINET CABINET SHOP DESK SHOP DESK www.kleton.com Model FI520 www.kleton.com Model FI520 TOOLS NEEDED / OUTILS REQUIS...
- Page 2 écrous. Allongez complètement les glissières de tiroir pour les fixer aux rails. Insérez le boulon du centre en premier pour aligner le trou du boulon avant. (Voir la figure 3) Figure 3 Figure 3 www.kleton.com...
- Page 3 4. Install middle shelf at desired height with 4 large nuts and 4 large bolts. Lip must face towards front of desk. Installez la tablette du centre à la hauteur désirée en utilisant 4 Figure 6 grands écrous, et 4 grands boulons. La bordure doit faire face au devant du pupitre. www.kleton.com...
- Page 4 Désassemblez la poignée de porte. Réassemblez la poignée de porte avec les barres de verrouillage. (Voir la figure 9) NOTE: Longer rod on lock bars must point down. NOTE : Les tiges plus longues des barres de verrouillage devraient pointer vers le bas. Figure 6 Figure 9 www.kleton.com...
- Page 5 Drawer slides must Figure 11 face inward. Use 4 large bolts and 4 large nuts to assemble each drawer track to the desk top. (See Figure 6) Figure 8 NOTE: Lip should face the bottom of desk. Figure 6 www.kleton.com www.kleton.com...
Need help?
Do you have a question about the FI520 and is the answer not in the manual?
Questions and answers