Advertisement
Quick Links
Kingsford Professional 41 Inch Ranchers
Steer Series Smoker & Charcoal Grill
Owner's Manual
Assembly and Operating Instructions
Model # SC2162903-KF
Tools required for assembly: (Not Included)
Pliers, Philips & Flathead Screwdrivers, Adjustable Wrench.
Keep this manual for future reference
SC2162903-KF - ENG
1 of 23
20170614-V1.1
Advertisement

Related Manuals for Kingsford PROFESSIONAL SC2162903-KF


Summary of Contents for Kingsford PROFESSIONAL SC2162903-KF
- Page 1 Kingsford Professional 41 Inch Ranchers Steer Series Smoker & Charcoal Grill Owner’s Manual Assembly and Operating Instructions Model # SC2162903-KF Tools required for assembly: (Not Included) Pliers, Philips & Flathead Screwdrivers, Adjustable Wrench. Keep this manual for future reference SC2162903-KF - ENG 1 of 23 20170614-V1.1...
- Page 2 WARNING Only use this grill on a hard, level, non-combustible, stable surface (concrete, ground, etc.) capable of supporting the weight of the grill. Never use on wooden or other surfaces that could burn. DO NOT attempt to remove charcoal grate/tray while coals are hot. ...
- Page 3 WARNING Use caution during assembly and while operating your grill to avoid scrapes or cuts from sharp edges of metal parts. Use caution when reaching into or under grill. When opening lid, be sure lid is fully opened and secure to prevent lid from closing unexpectedly. ...
- Page 4 OTHER REPRODUCTIVE HARM. For more information go to: www.P65Warnings.ca.gov. ASSEMBLY INSTRUCTIONS KINGSFORD PROFESSIONAL 41” THANK YOU FOR PURCHASING THIS RANCHERS STEER SERIES SMOKER & CHARCOAL GRILL Read all safety warnings & assembly instructions carefully before assembling or operating your grill.
-
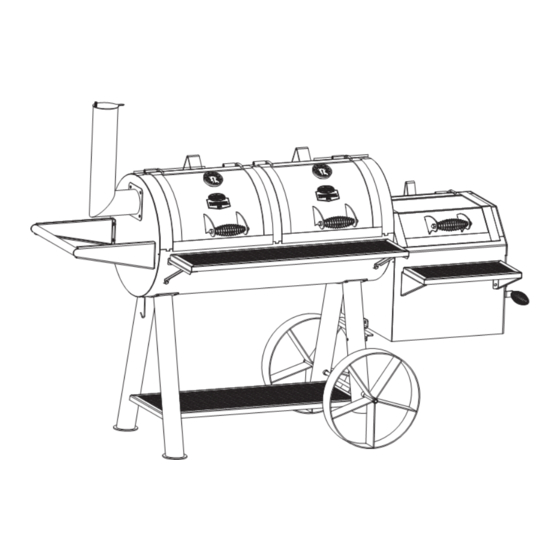
Page 5: Product Diagram
Product Diagram Component List 1. Main Chamber Lid 2. Main Chamber Body 3. Firebox Lid Support 4. Firebox Lid 1a: coil – 2 pcs 4a: coil - 1 pc 1b: nut - 4 pcs 4b: nut – 2 pcs 1c: rod - 2 pcs 2 pcs 1 pc 1 pc... - Page 6 9. Firebox Bracket 10. Firebox Cooking Grate 11. Charcoal Grate 12. Wheel 1 pc 2 pcs 1 pc 2 pcs 15. Main Chamber Top 16. Main Chamber Bottom 13. Wheel Axle 14. Firebox Front Table Cooking Grate Cooking Grate 1 pc 1 pc 3 pcs 3 pcs...
- Page 7 Hardware List Item No. Item name Diagram Bolt M8 x 16 Nut M8 Bolt M6 x 14 Lock Nut M12 Shoulder Bolt M8 x 18 Lock Nut M8 Spring Washer 8 mm dia. Washer 6 mm dia. Bolt M5 x 10 Hex Nut Wrench Screwdriver For assembly assistance, missing or damaged parts, please contact customer service at...
-
Page 8: Assembly Procedures
Assembly Procedures Step 1. Assemble 4 legs (Part # 20,21,22,23) using 16 pcs of Bolt M8 x 16 (A) and 16 pcs of Nut M8 (B) on Main Chamber Body (Part #2). Only Hand Tighten bolts and nuts in this step. #21 Left Rear Leg Front #20 Left Front Leg... - Page 9 Step 2. Insert Wheel Axle (Part #13) through the holes on Right Front Leg (Part #22) and Right Rear Leg (Part #23) Step 3. Insert Wheels (Part #12) through Axle (Part #13) and lock with 2 pcs of Lock Nut M12 (D) Step 4.
- Page 10 Step 5. Assemble Side Handle (Part #26) using 4 pcs of Bolt M8 x 16 (A) and 4 pcs of Nut M8 (B) on Main Chamber Body (Part #2). Step 6. Assemble Smoke Stack (Part #27) using 4 pcs of Bolt M8 x 16 (A) and 4 pcs of Nut M8 (B) to Main Chamber Body (Part# 2) SC2162903-KF - ENG 10 of 23...
- Page 11 Step 7. Assemble Main Chamber Front Table (Part #17) using 2 pcs of Bolt M8 x 16 (A) and 2 pcs of Nut M8 (B) on Main Chamber Body (Part #2) Step 8. Assemble Front Table Brackets (Part# 18) using 2 pcs of Bolt M6 x 14 (C) on Front Table (Part # 17).
- Page 12 Step 9. Insert Temperature Gauges (Part #24) to Main Chamber Lids (Part #1). Step 10. Assemble Firebox (Part #5) using 8 pcs of Bolt M8 x 16 (A) and 8 pcs of Nut M8 (B) to Main Chamber Body (Part #2) Suggestion: follow numeric sequence (#1,2,3,4,5,6,7,8) to attach bolts and nuts to attach firebox to main chamber...
- Page 13 Step 11. Assemble Firebox Bracket (Part #9) using 2 pcs of Bolt M6 x 14 (C) through the holes on Right Front Leg (Part #22) and Right Rear Leg (Part #23). Then use 1 pc of Bolt M8 x 16 (A) and 1 pc of Nut M8 (B) to assemble on Firebox (Part #5) Step 12.
- Page 14 Step 13. Assemble Firebox Lid Support (Part #3) using 2 pcs of Bolt M8 x 16 (A) and 2 pcs of Nut M8 (B) on Firebox (Part #5) Step 14. Assemble Firebox Lid (Part #4) using 1 pc of Bolt M5 x 10 (I) and 1 pc of Washer M6 (H) on Firebox (Part #5) Step 15.
- Page 15 Step 16. Assemble Firebox Door Handle (Part #7) using 1 pc of Shoulder Bolt M8 x 18 (E) and 1 pc of Lock Nut M8 (F) on Firebox Door (Part #6) Step 17. Place Main Chamber Bottom Cooking Grates (Part #16) into Main Chamber Body (Part #2) SC2162903-KF - ENG 15 of 23 20170614-V1.1...
- Page 16 Step 18. Place Top Cooking Grates (Part #15) Step 19. Place Firebox Charcoal Tray (Part#11) on the support rims of Main Chamber Body (Part into Firebox (Part #5) Step 20. Place Firebox Cooking Grates (Part # Step 21. Hook Grease Bucket Hanger (Part #25) 10) on the support rims of Firebox (Part #5) to the holes on bottom of Main Chamber Body (Part #2)
-
Page 17: Preparation For Use & Lighting Instructions
WARNING Place the grill outdoors on a hard, level, non-combustible surface away from roof overhang or any combustible material. Never use on wooden or other surfaces that could burn. Place the grill away from open windows or doors to prevent smoke from entering your house. - Page 18 instructions regarding the use of their product. Start with 5 pounds (2.3 kg) or less amount of charcoal and place charcoal in the center of charcoal grate of offset firebox. Step 3 Saturate charcoal with lighting fluid. With lid open, wait 2 to 3 minutes to allow lighting fluid to soak into charcoal. Store lighting fluid a safe distance from the grill.
- Page 19 WARNING DO NOT use grill without charcoal grate in place. DO NOT attempt to remove charcoal grate while grate contains hot coals. NOTE: to extend the life of your grill, make sure that hot coals and wood do not touch the walls of grill. IF USING CHARCOAL CHIMNEY STARTER, PROCEED TO STEP 5.
- Page 20 Cooking” section of this manual to avoid injury while adding wood. Regulating Heat To increase heat, add more wood and/or charcoal. Follow instructions in “Adding Charcoal/Wood During Cooking” section of this manual. To maintain the temperature, you may need to add more wood and/or charcoal during the cooking cycle. NOTE: Dry wood burns hotter than charcoal, so you may want to increase the ratio of wood to charcoal to increase the cooking temperature.
-
Page 21: After-Use Safety
AFTER-USE SAFETY WARNING Always allow grill and all components to cool completely before handling. Never leave coals and ashes in grill unattended. Make sure coals and ashes are completely extinguished before removing. Before grill can be left unattended, remaining coals and ashes must be removed from grill. Use caution to protect yourself and property. - Page 22 LIMITED WARRANTY 1. Manufacturer warrants this Product to be free from defects in workmanship and materials for a period of 90 days from the date of purchase, PROVIDED claims are submitted, in writing, with proof of purchase. 2. If any part of this item fails because of a manufacturing defect within the Limited Warranty Period, Manufacturer offers to replace such part(s) provide that such parts have not been improperly repaired, altered, or tampered with or subject to misuse, abuse or exposed to corrosive conditions.
- Page 23 Optional Custom Cover Available Please visit www.homedepot.com for more information Model #AC2256501-RG Model #AC2280401-KF 41” Ranchers Grill Cover 41" Ranchers Steer Series Grill Cover Should you encounter any problem Obtaining replacement parts CALL US FIRST Do not return product to the store WE CAN HELP Rankam (China) Manufacturing Co.
Need help?
Do you have a question about the PROFESSIONAL SC2162903-KF and is the answer not in the manual?
Questions and answers