Table of Contents
Advertisement
Quick Links
Advertisement
Table of Contents

Related Manuals for Kingsford SC2315801-KF


Summary of Contents for Kingsford SC2315801-KF
- Page 1 Stockade 49” Charcoal Smoker & Grill Owner’s Manual Assembly and Operating Instructions Model # SC2315801-KF Tools required for assembly: (Not Included) Pliers, Philips & Flathead Screwdrivers, Adjustable Wrench. Keep this manual for future reference. SC2315801-KF - ENG 1 of 22...
- Page 2 Never place more than 10 pounds on front tables. Do not lean on the front tables. ⚫ Do not allow charcoal and/or wood to rest on the walls of grill. Doing so will greatly reduce the life if the metal and finish of your grill. SC2315801-KF - ENG 2 of 22 20190703 V1.0...
- Page 3 KNOWN TO THE STATE OF CALIFORNIA TO CAUSE CANCER, AND CARBON MONOXIDE, WHICH IS KNOWN TO THE STATE OF CALIFORNIA TO CAUSE BIRTH DEFECTS OR OTHER REPRODUCTIVE HARM. For more information go to: www.P65Warnings.ca.gov. SC2315801-KF - ENG 3 of 22 20190703 V1.0...
- Page 4 Hand Tighten only at this time Tighten with tools at this time Some steps may require the assistance of a friend WARNING Hold lid firmly when taking parts out of grill body. Some parts are heavy. SC2315801-KF - ENG 4 of 22 20190703 V1.0...
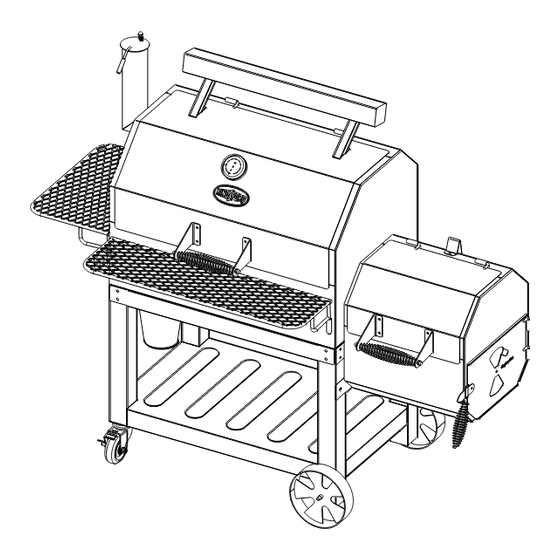
- Page 5 Product Diagram SC2315801-KF - ENG 5 of 22 20190703 V1.0...
- Page 6 14. Right Rear Leg 1 pc 1 pc 2 pcs 2 pcs 17. Firebox Bracket 18. Wheel Axle 19. Wheel 20. Lid Weight Bar 1 pc 1 pc 2 pcs 1 pc SC2315801-KF - ENG 6 of 22 20190703 V1.0...
- Page 7 1 pc 1 pc 25. Smoke Stack 26. Smoke Stack Lid 27 Caster 28. Temp Gauge 1 pc 1 pc 2 pcs 1 pc 29. Hook 30. Grease Bucket 1 pc 1 pc SC2315801-KF - ENG 7 of 22 20190703 V1.0...
- Page 8 Lock Nut M10 Cap Nut M8 Coil Spring Spring Washer ID6 For assembly assistance, missing or damaged parts, please contact customer service at customerservice@rankam.com or at 888-837-1380 DO NOT RETURN TO RETAILER SC2315801-KF - ENG 8 of 22 20190703 V1.0...
- Page 9 Step 1. Turn Bottom Storage (#3) upside down and then attach Legs (#11,12,13,14). Hand Tighten Bolts Only in this step Hardware A - 16 pcs Step 2. Attach Casters (#27), Wheel Axle (#18) and Wheels (#19) to Bottom Storage (#3) Hardware D - 2 pcs SC2315801-KF - ENG 9 of 22 20190703 V1.0...
- Page 10 Hardware A - 18 pcs Step 4. Attach Lid Handle (#21), Lid Weight Bar (#20) and Temperature Gauge (#28) to Main Chamber (#1) Hardware A - 8 pcs B - 6 pcs SC2315801-KF - ENG 10 of 22 20190703 V1.0...
- Page 11 Step 6. Attach Lid Handle (#21), Side Door Handle (#22) and Offset Firebox Vent (#23) to Offset Firebox (#2) Hardware A - 8 pcs B - 4 pcs C - 2 pcs G - 2 pcs SC2315801-KF - ENG 11 of 22 20190703 V1.0...
- Page 12 Step 7. Attach Offset Firebox (#2) to Main chamber (#1) Hardware A - 11 pcs B - 8 pcs Tips: Attach these 2 bolts first and hang offset firebox to main chamber. Then continue on attaching rest of bolts SC2315801-KF - ENG 12 of 22 20190703 V1.0...
- Page 13 Step 8. Attach Smoke Stack and Lid (#25,26) to Main Chamber Hardware A - 3 pcs B - 3 pcs E - 1 pc F - 1 pc Step 9. Place Charcoal Grate/Pan (#4) and Charcoal Basket (#5) into Smoker/Grill SC2315801-KF - ENG 13 of 22 20190703 V1.0...
- Page 14 Step 10. Place Cooking Grates (#7,8) into Smoker/Grill Step 11. Place Warming Rack (#6), Front and Side Tables (#9,10) onto Smoker/Grill SC2315801-KF - ENG 14 of 22 20190703 V1.0...
- Page 15 In windy weather, place the grill in an outdoor area that is protected from the wind. WARNING Read all safety warnings and instructions carefully before operating your grill. PREPARATION FOR USE & LIGHTING INSTRUCTIONS SC2315801-KF - ENG 15 of 22 20190703 V1.0...
- Page 16 Step 5 With coals burning strong, close the lid. Allow the temperature to reach 225°F (107°C). Maintain this temperature for 2 hours. SC2315801-KF - ENG 16 of 22 20190703 V1.0...
- Page 17 Store charcoal lighting fluid a safe distance from the grill. Step 4 With grill lid open, stand back and carefully light charcoal and allow to burn until covered with a light ash (approximately 20 minutes). SC2315801-KF - ENG 17 of 22 20190703 V1.0...
- Page 18 Adding Charcoal/Wood During Cooking Additional charcoal and/or wood may be required to maintain or increase cooking temperature. Step 1 SC2315801-KF - ENG 18 of 22 20190703 V1.0...
- Page 19 Chicken & Turkey Breasts 165º F Poultry Legs, Thighs & Wings 165º F Chicken, Whole 165º F Turkey, Whole 165º F This information is for quick reference. Always check up-to-date information at www.isitdoneyet.gov SC2315801-KF - ENG 19 of 22 20190703 V1.0...
- Page 20 ⚫ Never apply paint to the interior surface. Rust spots on the interior surface can be buffed, cleaned, and then lightly coated with vegetable oil or vegetable oil spray to minimize rusting. SC2315801-KF - ENG 20 of 22 20190703 V1.0...
- Page 21 All parts to be replaced will need to be shipped before replacement items will be sent. Follow the Customer Service Representative’s instructions exactly. If a return is necessary, it must be packed carefully and shipped prepaid. SC2315801-KF - ENG 21 of 22 20190703 V1.0...
- Page 22 18/F., New Lee Wah Centre, 88 Tokwawan Road, Kowloon, Hong Kong Please contact Customer Service at: customerservice@rankam.com or at 1 – 888 – 837 – 1380 Hours of Operation: 8:00am – 5:00pm Pacific Standard Time MADE IN CHINA SC2315801-KF - ENG 22 of 22 20190703 V1.0...
Need help?
Do you have a question about the SC2315801-KF and is the answer not in the manual?
Questions and answers