Table of Contents
Advertisement
Available languages
Available languages
Quick Links
Advertisement
Chapters
Table of Contents

Related Manuals for Klarstein DELICATESSA


Summary of Contents for Klarstein DELICATESSA
- Page 1 DELICATESSA / VICTORIA Induktionskochfeld Induction Hob Table de cuisson à induction Placa de inducción Piano cottura a induzione 10033021 10033022 10033027 10034243 10035198 10035266 10035267 10035268 10040201 10040202 www.klarstein.com...
-
Page 3: Table Of Contents
Sehr geehrter Kunde, wir gratulieren Ihnen zum Erwerb Ihres Gerätes. Lesen Sie die folgenden Hinweise sorgfältig durch und befolgen Sie diese, um möglichen Schäden vorzubeugen. Für Schäden, die durch Missachtung der Hinweise und unsachgemäßen Gebrauch entstehen, übernehmen wir keine Haftung. Scannen Sie den folgenden QR-Code, um Zugriff auf die aktuellste Bedienungsanleitung und weitere Informationen rund um das Produkt zu erhalten. -
Page 4: Produktdatenblatt
PRODUKTDATENBLATT Symbol Wert Einheit 10033021, 10033027, 10035266, 10035267, Modellkennung 10040201, 10040202 Art der Kochmulde Einbaukochmulde Anzahl der Kochzonen und/oder Kochflächen Heiztechnik (Induktionskochzonen und -kochflächen, Induktionskochzonen Strahlungskochzonen, Kochplatten) Bei kreisförmigen Kochzonen oder -flächen: Durchmesser der k.A. nutzbaren Oberfläche für Ø k.A. jede elektrisch beheizte Kochzone, auf 5 mm genau. - Page 5 Symbol Wert Einheit Modellkennung 10033022, 10035268, 10035198 Art der Kochmulde Einbaukochmulde Anzahl der Kochzonen und/oder Kochflächen Heiztechnik (Induktionskochzonen und -kochflächen, Induktionskochzonen Strahlungskochzonen, Kochplatten) Bei kreisförmigen Kochzonen oder -flächen: Durchmesser der Rechts Hinten nutzbaren Oberfläche für Ø Rechts Vorne jede elektrisch beheizte Kochzone, auf 5 mm genau.
- Page 6 Symbol Wert Einheit Modellkennung 10034243 Art der Kochmulde Einbaukochmulde Anzahl der Kochzonen und/oder Kochflächen Heiztechnik (Induktionskochzonen und -kochflächen, Induktionskochzonen Strahlungskochzonen, Kochplatten) Bei kreisförmigen Kochzonen oder -flächen: Durchmesser der Links nutzbaren Oberfläche für Ø Mitte jede elektrisch beheizte Rechts 21,6 Kochzone, auf 5 mm genau.
-
Page 7: Sicherheitshinweise
SICHERHEITSHINWEISE Stromschlagrisiko • Ziehen Sie den Netzstecker des Geräts aus der Steckdose, bevor Wartungen oder Reparaturen am Gerät durchgeführt werden. • Die Verbindung zu einen geerdeten Leitungssystem ist erforderlich und vorgeschrieben. • Veränderungen am elektrischen Leitungssystem dürfen nur von einem hierfür qualifizierten Elektriker durchgeführt werden. -
Page 8: Hinweise Zu Bedienung Und Wartung
• Warnung: Schalten Sie das Gerät zur Reduzierung der Stromschlaggefahr sofort aus, wenn die Oberfläche (Kochfeldoberfläche aus Glaskeramik oder ähnlichem Material die stromführende Teile schützt) Risse aufweist. • Legen Sie keine Metallobjekte, wie beispielsweise Messer, Gabeln, Löffel und Topfdeckel auf das Kochfeld, da diese dort sehr heiß werden könnten. •... - Page 9 VORSICHT Verbrennungsgefahr! Während der Verwendung werden die für den Nutzer zugänglichen Geräteteile so heiß, dass sie Verbrennungen verursachen können. Achten Sie darauf, dass ihr Körper, ihre Kleidung und andere Materialien als Kochutensilien die Kochplatte erst dann berühren dürfen, wenn diese vollständig abgekühlt ist. •...
-
Page 10: Funktionsweise
• Kinder oder Personen mit eingeschränkten geistigen Fähigkeiten sollten von einer für sie verantwortlichen Person bei der Verwendung des Geräts angeleitet werden um sicherzustellen, dass diese das Gerät verwenden können ohne sich selbst oder andere dadurch in Gefahr zu bringen. •... -
Page 11: Geräteübersicht 1
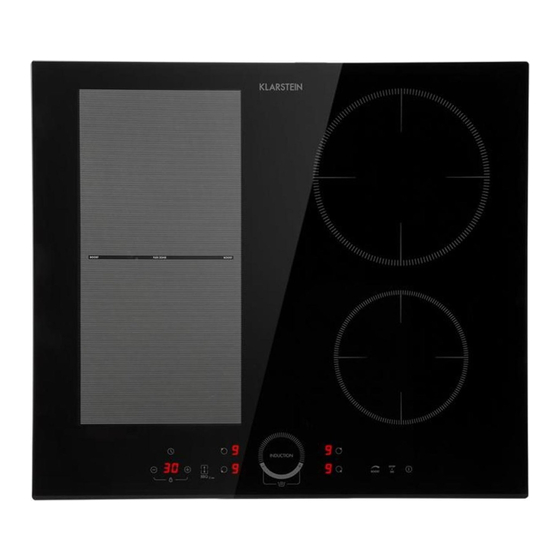
GERÄTEÜBERSICHT 10033022, 10035198, 10035268 2000 W Bereich, Steigerung bis 2500 W Bereich, Steigerung bis 2600 W zu 2800 W 1500 W Bereich, Steigerung bis Glasplatte zu 2000 W 2000 W Bereich, Steigerung bis Bedienfeld 2600 W 1500 W Bereich, Steigerung bis zu 2000 W... - Page 12 10033021, 10033027, 10035266, 10035267, 10040201, 10040202 2000 W Bereich, Steigerung bis 2500 W Bereich, Steigerung bis 2600 W zu 2800 W 1500 W Bereich, Steigerung bis 2500 W Bereich, Steigerung bis zu 2000 W zu 2800 W 2000 W Bereich, Steigerung bis Glasplatte 2600 W 1500 W Bereich, Steigerung bis...
- Page 13 10034243 2300 W Bereich, Steigerung bis Glasplatte 3000 W 1500 W Bereich, Steigerung bis Bedienfeld zu 1800 W 2000 W Bereich, Steigerung bis 2600 W...
-
Page 14: Bedienfeld
BEDIENFELD 10033021, 10033022, 10033027, 10035198, 10035266, 10035267, 10035268, 10040201, 10040202 Heizzonenauswahltaste Ein/Aus Timereinstellung / Tastensperre Boostfunktion Leistungseinstellung Steuerung flexibler Bereich / BBQ Stop + Go... - Page 15 10034243 Heizzonenauswahltaste Ein/Aus Timereinstellung Boostfunktion Leistungseinstellung Stop + Go Tastensperre Warmhaltetaste...
-
Page 16: Installation
INSTALLATION Vorbereitung der Arbeitsfläche Schneiden Sie die Arbeitsfläche gemäß den Maßen in der Zeichnung aus. Für Installationszwecke sollten mindestens 5 cm Arbeitsplatte um das Loch herum erhalten bleiben. Stellen Sie sicher, dass die Dicke der Arbeitsplatte mindestens 30 mm beträgt. Wählen Sie ein hitzebeständiges und isolierendes Arbeitsflächenmaterial aus. - Page 17 Hinweis: Der Sicherheitsabstand zwischen Kochfläche und dem Hängeschrank oberhalb der Kochfläche sollte mindestens 760 mm betragen. Hinweis: Bei den in der Tabelle dargestellten Maßen, handelt es sich um mm. min. 60 min. 20 Lufteintrittsöffnung Luftaustrittsöffnung 5 mm...
- Page 18 Vor der Installation Versichern Sie sich, dass: • die Arbeitsfläche eben ist und dass keine Bauteile die Platzanforderungen des Geräts beeinträchtigen. • die Arbeitsfläche aus hitzebeständigem und isolierendem Material besteht. • das ein Ofen, wenn das Gerät über ihm eingebaut wird, über einen eingebauten Kühlventilator verfügen muss.
- Page 19 Für Modelle 10033021, 10033022, 10035268, 10033027, 10040201, 10040202 Schraube Halterung Bohrloch Gehäuseboden Glas Halteklammer Schraube ST 3.5*8 Arbeitsplatte Unterseite Schraube Halteklammer Bohrung Gehäuseunterseite...
- Page 20 Vorsichtsmaßnahmen WARNUNG Verletzungsgefahr! Die Induktionskochfläche muss von qualifizierten Fachkräften oder Technikern installiert werden. Versuchen Sie niemals, das Gerät selbst einzubauen. • Das Gerät darf nicht direkt oberhalb von Geschirrspülmaschinen, Kühlschränken, Gefrierschränken, Waschmaschinen oder Trocknern installiert werden, da die Feuchtigkeit die Elektronik des Geräts beschädigen könnte. •...
-
Page 21: Inbetriebnahme Und Bedienung
• Wenn das Netzstromkabel beschädigt ist und ersetzt werden muss, kontaktieren Sie den Hersteller oder den Kundendienst, um Sach- und/oder Personenschäden zu vermeiden. • Wenn das Gerät direkt mit der Steckdose verbunden wird, muss ein omnipolarer Trennschutzschalter, mit einer Kontaktöffnung von mindestens 3 mm zwischen allen Kontakten, installiert werden. - Page 22 Auswahl des Kochgeschirrs Hinweis: Verwenden Sie nur induktionsgeeignetes Kochgeschirr. Suchen Sie nach dem Induktionssymbol auf der Verpackung oder auf der Topfunterseite. Sie können zur Überprüfung der Verwendbarkeit einen Magnettest durchführen. Bewegen Sie einen Magneten in die Richtung der Topfunterseite. Wenn der Magnet davon angezogen wird, ist der Topf induktionsgeeignet.
- Page 23 Heben Sie den Topf immer vom Induktionskochfeld herunter. Ziehen Sie nicht am Topf, da das Glas dadurch Kratzer bekommen könnte. Topfmaße Die Kochfelder passen sich, bis zu einem gewissen Grad, automatisch an den Durchmesser der Topfunterseite an. Die Topfunterseite muss entsprechend des Kochfeldes allerdings einen Mindestdurchmesser haben.
- Page 24 Berühren Sie den Regler für die Heizzonenauswahl, und die Anzeige neben der Taste blinkt. Stellen Sie eine Leistungsstufe ein, indem Sie den Regler berühren und den Finger in Richtung [-] oder [+] schieben. • Wenn Sie die Leistung nicht innerhalb von 1 Minute einstellen, schaltet sich das Induktionskochfeld automatisch aus.
- Page 25 Kochen beenden Berühren Sie die Kochzone, die Sie ausschalten möchten. Schalten Sie die Kochzone aus, indem Sie den Finger entlang des Reglers in Richtung [-] schieben. Vergewissern Sie sich, dass die Leistungsanzeige [0] und dann [H] anzeigt. Schalten Sie die gesamte Kochoberfläche ab, indem Sie die Taste An/Aus drücken.
- Page 26 Die Leistungssteigerung hält 5 Minuten an. Anschließend kehrt das Kochfeld zu der zuvor eingestellten Leistung zurück. Wenn Sie die Boostfunktion innerhalb dieser 5 Minuten deaktivieren möchten, berühren Sie die Kochfeldanzeige. Neben der Taste leuchtet eine Anzeige auf. Drücken Sie die Taste Boost. Das Kochfeld kehrt zu der zuvor eingestellten Leistung zurück.
- Page 27 Warmhaltefunktion Die Warmhaltefunktion dient dazu, Nahrungsmittel warm zu halten. Berühren Sie die Kochfeldauswahltaste und wählen Sie das Feld aus, welches Sie zum Warmhalten verwenden möchten. Modell 10033021, 10033022, 10035268, 10033027, 10040201, 10040202 Wenn Sie in der Zwischenzeit die Tasten [+] und [-] drücken, zeigt die Kochfeldanzeige [A] an.
- Page 28 Berühren Sie die Heizzone, die Sie mit STOP + GO verwenden möchten, die Anzeige neben der Taste blinkt. Berühren Sie die Taste [STOP+GO], in der Kochzonenanzeige erscheint [ll]. Der Betrieb des Kochfeldes und alle Tasten außer STOP+GO, An/ Aus und der Tastensperre werden deaktiviert. Um den Pausenzustand aufzuheben, berühren Sie die Taste STOP+GO erneut, dann schaltet die Kochzone wieder auf die zuvor eingestellte...
- Page 29 Verwendung als ein großes Kochfeld Um den flexiblen Bereich als ein großes Kochfeld zu nutzen, berühren Sie einfach die entsprechenden Tasten. Die Leistungseinstellung funktioniert wie bei den einzelnen Kochfeldern. Verwendung als zwei unabhängige Kochfelder Um den flexiblen Bereich als zwei voneinander unabhängige Kochfelder mit unterschiedlichen Leistungseinstellungen zu nutzen, drücken Sie erneut die entsprechende Taste und die Einstellung wird...
-
Page 30: Heizleistung Einstellen
Tastensperre • Sie können die Tasten sperren, um eine unbeabsichtigte Verwendung zu vermeiden (beispielsweise Kinder, welche die Kochfelder versehentlich einschalten). • Wenn die Tastensperre aktiv ist, sind alle Tasten außer der Taste An/Aus deaktiviert. Aktivieren/Deaktivieren der Tastensperre für Modell 10033021, 10033022, 10033027, 10035198, 10035266, 10035267, 10035268, 10040201, 10040202: •... -
Page 31: Timereinstellungen
TIMEREINSTELLUNGEN Sie können den Timer auf zwei verschiedene Arten verwenden: 1. Sie können eine bestimmte Zeit einstellen, nach deren Ablauf das Gerät zu piepen beginnt. In diesem Fall wird nach dem Ablauf der Zeit keines der Kochfelder ausgeschaltet. 2. Sie können den Timer so einstellen, dass nach Ablauf der eingestellten Minuten eines oder mehrere Kochfelder automatisch abgeschaltet werden. - Page 32 Mit dem Timer mehr als ein Kochfeld abschalten Berühren Sie die Kochfeldauswahl-Taste des Kochfeldes, welches nach Ablauf des Timers ausgeschaltet werden soll. Berühren Sie die Taste [-] oder [+] der Timersteuerung, die Anzeige beginnt zu blinken und [30] erscheint in der Timer-Anzeige. Um den Timer abzubrechen, berühren Sie das Bedienelement für die Heizzonenauswahl und halten Sie dann die Taste [-] des Timers gedrückt, bis [0] angezeigt wird.
- Page 33 Auswahl mehrerer Kochfelder Wenn Sie diese Funktion für mehr als eine Heizzone verwenden, zeigt die Timeranzeige die kürzeste Zeit an. Beispiel: Der Timer von Zone 2 ist auf 3 Minuten eingestellt, der von Zone 3 auf 6 Minuten. Die Timeranzeige zeigt [03] an. Auf 6 Minuten eingestellt Auf 3 Minuten eingestellt Hinweis: Der blinkende rote Punkt neben der Leistungsanzeige bedeutet, dass die...
-
Page 34: Kochtipps
KOCHTIPPS WARNUNG Brandgefahr! Lassen Sie beim Frittieren besondere Vorsicht walten, da Öl und Fett sich sehr schnell erhitzen, insbesondere dann, wenn Sie die Boostfunktion nutzen. Bei sehr hohen Temperaturen können Öl und Fett sich spontan entzünden und sie stellen deshalb ein enormes Brandrisiko dar. - Page 35 Steak anbraten Zur Zubereitung saftiger, aromatischer Steaks: 1. Lassen Sie das Fleisch für ungefähr 20 Minuten bei Raumtemperatur ruhen. 2. Erhitzen Sie eine Pfanne. Reiben Sie beide Seiten des Steaks mit Öl ein. Träufeln Sie etwas von dem Öl in die heiße Pfanne und legen Sie anschließend das Steak hinein.
-
Page 36: Reinigung Und Pflege
REINIGUNG UND PFLEGE Hinweis: ziehen Sie vor der Reinigung immer den Stecker aus der Steckdose und lassen Sie das Gerät abkühlen. Wichtig! Tägliche Ver- 1 Schalten Sie die Kochplatte • Wenn die Kochplatte unreinigungen aus. ausgeschaltet ist erlischt auf dem Glas 2 Sprühen Sie einen die „Heiße Oberfläche“... - Page 37 Wichtig! Übergekochte, Entfernen Sie den Schmutz • Entfernen Sie die Flecken geschmolzene mit einem Teppichmesser, und Spritzer umgehend, oder heiße, einer Rasierklinge oder einem da sie sich schlechter zuckerhaltige Kratzer für Keramikkochplatten entfernen lassen, wenn Rückstände und aber passen Sie auf, dass Sie erstmal kalt geworden Spritzer auf dem Sie sich nicht an der heißen...
-
Page 38: Fehlersuche Und Fehlerbehebung
FEHLERSUCHE UND FEHLERBEHEBUNG Problem Mögliche Ursachen Mögliche Lösung Die Kochplatte Kein Strom. Versichern Sie sich, dass die lässt sich nicht Kochplatte ans Stromnetz einschalten. angeschlossen und eingeschaltet ist. Überprüfen Sie ob möglicherweise eine Sicherung umgelegt oder kaputt ist. Falls das Problem weiterhin besteht wenden Sie sich an einen qualifizierten Techniker. - Page 39 Problem Mögliche Ursachen Mögliche Lösung Das Gerät Dies wird durch dir Das ist normal. Das Geräusch gibt ein leises Induktionskochtechnologie sollte allerdings leiser erden summendes verursacht. oder vollständig verschwinde, Geräusch von wenn Sie die Wärmeeinstellung sich, wenn es verringern. mit einer hohen Wärmeeinstel- lung verwendet wird.
- Page 40 Fehlercodes und deren Bedeutung Das Gerät ist mit einer Selbstdiagnosefunktion ausgestattet. Diese ermöglicht es dem Techniker die Funktion mehrerer Komponenten zu überprüfen, ohne das Gerät auseinander bauen zu müssen. Fehlercode Mögliche Ursachen Mögliche Lösung F3/ F4 Ausfall des Temperatursensors Kontaktieren Sie den der induktionsspule.
-
Page 41: Spezielle Entsorgungshinweise Für Verbraucher In Deutschland
SPEZIELLE ENTSORGUNGSHINWEISE FÜR VERBRAUCHER IN DEUTSCHLAND Entsorgen Sie Ihre Altgeräte fachgerecht. Dadurch wird gewährleistet, dass die Altgeräte umweltgerecht verwertet und negative Auswirkungen auf die Umwelt und menschliche Gesundheit vermieden werden. Bei der Entsorgung sind folgende Regeln zu beachten: • Jeder Verbraucher ist gesetzlich verpflichtet, Elektro- und Elektro- nikaltgeräte (Altgeräte) sowie Batterien und Akkus getrennt vom Hausmüll zu entsorgen. - Page 42 • Bei einem Vertrieb unter Verwendung von Fernkommunikationsmitteln ist die unentgeltliche Abholung am Ort der Abgabe auf Elektro- und Elektronikgeräte der Kategorien 1, 2 und 4 gemäß § 2 Abs. 1 ElektroG, nämlich „Wärmeüberträger“, „Bildschirmgeräte“ (Oberfläche von mehr als 100 cm²) oder „Großgeräte“ (letztere mit mindestens einer äußeren Abmessung über 50 Zentimeter) beschränkt.
-
Page 43: Hinweise Zur Entsorgung
HINWEISE ZUR ENTSORGUNG Wenn es in Ihrem Land eine gesetzliche Regelung zur Entsorgung von elektrischen und elektronischen Geräten gibt, weist dieses Symbol auf dem Produkt oder auf der Verpackung darauf hin, dass dieses Produkt nicht im Hausmüll entsorgt werden darf. Stattdessen muss es zu einer Sammelstelle für das Recycling von elektrischen und elektronischen Geräten gebracht werden. - Page 45 Dear Customer, Congratulations on purchasing this device. Please read the following instructions carefully and follow them to prevent possible damages. We assume no liability for damage caused by disregard of the instructions and improper use. Scan the QR code to get access to the latest user manual and more product information.
-
Page 46: Product Data Sheet
PRODUCT DATA SHEET Symbol Value Unit 10033021, 10033027, 10035266, 10035267, Model identification 10040201, 10040202 Type of hob Built-In Hob Number of cooking zones and/or areas Heating technology (induction cooking zones and cooking areas, Induction cooking zone radiant cooking zones, solid plates) For circular cooking zones or area: diameter of useful surface area per... - Page 47 Symbol Value Unit Model identification 10033022, 10035268, 10035198 Type of hob Built-In Hob Number of cooking zones and/or areas Heating technology (induction cooking zones and cooking areas, Induction cooking zone radiant cooking zones, solid plates) For circular cooking zones or area: diameter of useful surface area per Right Rear Ø...
- Page 48 Symbol Value Unit Model identification 10034243 Type of hob Built-In Hob Number of cooking zones and/or areas Heating technology (induction cooking zones and cooking areas, Induction cooking zone radiant cooking zones, solid plates) For circular cooking zones or area: diameter Left of useful surface area per Ø...
-
Page 49: Safety Instructions
SAFETY INSTRUCTIONS Electrical shock hazard • Disconnect the appliance from the mains electricity supply before carrying out any work or maintenance on it. • Connection to a good earth wiring system is essential and mandatory. • Alterations to the domestic wiring system must only be made by a qualified electrician. -
Page 50: Instructions On Use And Maintenance
• If the surface is cracked, switch off the appliance to avoid the possibility of electric shock, for hob surfaces of glass-ceramic or similar material which protect live parts • Metallic objects such as knives, forks, spoons and lids should not be placed on the hob surface since they can get hot A steam cleaner is not to be used. - Page 51 CAUTION Risk of burns! During use, accessible parts of this appliance will become hot enough to cause burns. Do not let your body, clothing or any item other than suitable cookware contact the Induction glass until the surface is cool. •...
-
Page 52: Operating Principle
• Children or persons with a disability which limits their ability to use the appliance should have a responsible and competent person to instruct them in its use. The instructor should be satisfied that they can use the appliance without danger to themselves or their surroundings. -
Page 53: Product Overview
PRODUCT OVERVIEW 10033022, 10035198, 10035268 2000 W zone, 2500 W zone, boost to boost to 2600 W 2800 W 1500 W zone, Glass boost to 2000 W 2000 W zone, Control panel boost to 2600 W 1500 W zone, boost to 2000 W... - Page 54 10033021, 10033027, 10035266, 10035267, 10040201, 10040202 2000 W zone, 2500 W zone, boost to boost to 2600 W 2800 W 1500 W zone, 2500 W zone, boost to boost to 2000 W 2800 W 2000 W zone, Glass boost to 2600 W 1500 W zone, Control panel boost to 2000 W...
- Page 55 10034243 2300 W zone, Glass boost to 3000 W 1500 W zone, Control panel boost to 1800 W 2000 W zone, boost to 2600 W...
-
Page 56: Control Panel
CONTROL PANEL 10033021, 10033022, 10033027, 10035198, 10035266, 10035267, 10035268, 10040201, 10040202 Heating zone selecting control ON/OFF control Timer regulating key / Boost function control Key lock control Power level regulating key Flex zone / BBQ control Stop + Go control... - Page 57 10034243 Heating zone selecting control ON/OFF control Timer regulating key Boost function control Power level regulating key Stop + Go control Key lock control Keep warm control...
-
Page 58: Installation
INSTALLATION Selection of installation equipment Cut out the work surface according to the sizes shown in the drawing. For the purpose of installation and use, a minimum of 5 cm space shall be preserved around the hole. Be sure the thickness of the work surface is at least 30 mm. Please select heat-resistant and insulated work surface material (Wood and similar fibrous or hygroscopic material shall not be used as work surface material unless impregnated) to avoid the electrical shock and larger deformation caused by the heat radiation from the hotplate. - Page 59 Note: The safety distance between the hotplate and the cupboard above the hotplate should be at least 760 mm. Note: The dimensions given in the table are “mm“. min. 60 min. 20 Air intake Air exit 5 mm...
- Page 60 Before installing the hob Make sure that: • The work surface is square and level, and no structural members interfere with space requirements. • The work surface is made of a heat-resistant and insulated material. • If the hob is installed above an oven, the oven has a built-in cooling fan. •...
- Page 61 For models 10033021, 10033022, 10035268, 10033027, 10040201, 10040202 Screw Bracket Screw hole Bottom case Glass Retaining bracket Screw ST 3.5*8 Worktop Bottom Screw Bracket Screw hole Bottom case...
- Page 62 Cautions WARNING Risk of injury! The induction hotplate must be installed by qualified personnel or technicians. We have professionals at your service. Please never conduct the operation by yourself. • The hob will not be installed directly above a dishwasher, fridge, freezer, washing machine or clothes dryer, as the humidity may damage the hob electronics.
-
Page 63: Operation
• If the cable is damaged or to be replaced, the operation must be carried out the by after-sale agent with dedicated tools to avoid any accidents. • If the appliance is being connected directly to the mains an omnipolar circuit- breaker must be installed with a minimum opening of 3mm between contacts. - Page 64 Choosing the right cookware Note: Only use cookware with a base suitable for induction cooking. Look for the induction symbol on the packaging or on the bottom of the pan. You can check whether your cookware is suitable by carrying out a magnet test. Move a magnet towards the base of the pan.
- Page 65 Always lift the pot off the induction hob. Do not pull the pot as this could scratch the glass. Pot dimensions The hobs automatically adapt to the diameter of the underside of the pan to a certain extent. However, the bottom of the pan must have a minimum diameter corresponding to the hob.
- Page 66 Touch the control for the heating zone selection and the indicator next to the button will flash. Set a power level by touching the control and sliding your finger in the [-] or [+] direction. • If you do not set the power within 1 minute, the induction hob will switch off automatically.
- Page 67 Stop cooking Touch the cooking zone that you want to switch off. Switch off the cooking zone by sliding your finger along the control in the [-] direction. Make sure the power meter reads [0], then [H]. Switch off the entire cooking surface by pressing the On / Off button.
- Page 68 The increase in performance lasts for 5 minutes. The hob then returns to the previously set power. If you want to deactivate the boost function within these 5 minutes, touch the hob indicator. An indicator lights up next to the button. Press the Boost button.
- Page 69 Keep-warm function The keep-warm function is used to keep food warm. Touch the hob selection button and select the field that you want to use for keeping food warm. Model 10033021, 10033022, 10035268, 10033027, 10040201, 10040202 If you press the [+] and [-] buttons in the meantime, the hob display shows [A].
- Page 70 Touch the heating zone that you want to use with STOP + GO, the display next to the button flashes. Touch the [STOP + GO] key, [ll] appears in the cooking zone display. The operation of the hob and all buttons except STOP + GO, On / Off and the button lock are deactivated.
- Page 71 Use as a large hob To use the flexible area as a large hob, simply touch the appropriate buttons. The power setting works in the same way as for the individual hobs. Use as two independent hobs To use the flexible area as two independent hobs with different power settings, press the corresponding button again and the setting will be changed.
-
Page 72: Set The Heating Power
Key lock • You can lock the buttons to prevent unintentional use (e.g. children who accidentally switch on the hob). • When the key lock is activated, all keys except for the On / Off key are deactivated. Activate / deactivate the key lock for items 10033021, 10033022, 10033027, 10035198, 10035266, 10035267, 10035268, 10040201, 10040202: •... -
Page 73: Timer Setting
TIMER SETTING You can use the timer in two different ways: 1. You can set a specific time after which the device will start to beep. In this case, none of the hobs will switch off after the time has elapsed. 2. - Page 74 Switch off more than one hob with the timer Touch the hob selection button for the hob that you want to switch off after the timer has expired. Touch the [-] or [+] key on the timer control, the display will start to flash and [30] will appear in the timer display.
- Page 75 Choice of several hobs If you use this function for more than one heating zone, the timer display shows the shortest time. Example: The timer of zone 2 is set to 3 minutes and that of zone 3 to 6 minutes. The timer display shows [03].
-
Page 76: Cooking Guidelines
COOKING GUIDELINES WARNING Take care when frying as the oil and fat heat up very quickly, particularly if you are using PowerBoost. At extremely high temperatures oil and fat will ignite spontaneously and this presents a serious fire risk. Cooking tips •... - Page 77 Searing steak To cook juicy flavorsome steaks: 1. Stand the meat at room temperature for about 20 minutes before cooking. 2. Heat up a heavy-based frying pan. 3. Brush both sides of the steak with oil. Drizzle a small amount of oil into the hot pan and then lower the meat onto the hot pan.
-
Page 78: Care And Cleaning
CARE AND CLEANING Note: Before any maintenance or cleaning work is carried out, DISCONNECT the appliance from ELECTRICITY supply and ensure the appliances is completely cool. What? How? Important! Everyday 1 Switch the power to the • When the power to the soiling on glass cooktop off. - Page 79 What? How? Important! Boilovers, melts, Remove these immediately with • Remove stains left by and hot sugary a fish slice, palette knife or melts and sugary food spills on the razor blade scraper suitable for or spillovers as soon as glass ceramic glass cooktops, but possible.
-
Page 80: Troubleshooting
TROUBLESHOOTING Problem Possible causes What to do The cooktop No power. Make sure the cooktop is cannot Be connected to the power supply turned on. and that it is switched on. Check whether there is a power outage in your home or area. If you’ve checked everything and the problem persists, call a qualified technician. - Page 81 Problem Possible causes What to do The induction This is caused by the This is normal, but the noise hob makes a technology of induction should quieten down or low humming cooking. disappear completely when noise when used you decrease the heat setting. on a high heat setting.
- Page 82 Failure display and inspection The induction hob is equipped with a self diagnostic function. With this test the technician is able to check the function of several components without disassembling or dismounting the hob from the working surface. Error Code Possible causes What to do F3/F4...
-
Page 83: Disposal Considerations
DISPOSAL CONSIDERATIONS If there is a legal regulation for the disposal of electrical and electronic devices in your country, this symbol on the product or on the packaging indicates that this product must not be disposed of with household waste. Instead, it must be taken to a collection point for the recycling of electrical and electronic equipment. - Page 85 Chère cliente, cher client, Toutes nos félicitations pour l’acquisition de ce nouvel appareil. Veuillez lire attentivement et respecter les instructions de ce mode d’emploi afin d’éviter d’éventuels dommages. Nous ne saurions être tenus pour responsables des dommages dus au non-respect des consignes et à...
-
Page 86: Fiche De Données Produit
FICHE DE DONNÉES PRODUIT Symbole Valeur Unité 10033021, 10033027, 10035266, 10035267, Référence (s) du modèle 10040201, 10040202 Type de table de cuisson Table de cuisson encastrée Nombre de zones de cuisson ou/et de foyers de cuisson Technique de chauffage (zones de cuisson à induction et -foyers de Zones de cuisson à... - Page 87 Symbole Valeur Unité Référence (s) du modèle 10033022, 10035268, 10035198 Type de table de cuisson Table de cuisson encastrée Nombre de zones de cuisson ou/et de foyers de cuisson Technique de chauffage (zones de cuisson à induction et -foyers de Zones de cuisson à...
- Page 88 Symbole Valeur Unité Référence (s) du modèle 10034243 Type de table de cuisson Table de cuisson encastrée Nombre de zones de cuisson ou/et de foyers de cuisson Technique de chauffage (zones de cuisson à induction et -foyers de Zones de cuisson à induction cuisson, Zones de cuisson par rayonnement, Plaques de cuisson)
-
Page 89: Consignes De Sécurité
CONSIGNES DE SÉCURITÉ Risque de choc électrique • Débranchez la fiche du secteur avant d‘effectuer la maintenance ou des réparations sur l‘appareil. • La connexion à un circuit électrique avec mise à la terre est nécessaire et obligatoire. • Toute modification du système de câblage électrique doit être effectuée uniquement par un électricien qualifié. -
Page 90: Conseils D'utilisation Et De Maintenance
• Mise en garde : pour réduire le risque de choc électrique, éteignez immédiatement l‘appareil si la surface (foyers de cuisson en vitrocéramique ou équivalent, protégeant des composants électriques) présente des fissures. • Ne placez pas d‘objets métalliques tels que des couteaux, des fourchettes, des cuillères et des couvercles casserole sur la surface de cuisson, car ils peuvent chauffer très fortement. - Page 91 ATTENTION Risque de blessure ! La lame tranchante d’un racloir est exposée dès que vous retirez le cache de sécurité. Faites preuve d‘une extrême prudence lors de son utilisation et rangez toujours le racloir avec son cache de sécurité en place, hors de portée des enfants. Le non-respect des instructions peut entraîner des blessures et des coupures.
-
Page 92: Principe De Fonctionnement
• Les enfants et les personnes ayant des capacités mentales limitées doivent être accompagnés par une personne responsable de leur sécurité lors de l‘utilisation de l‘appareil afin qu‘ils puissent utiliser l‘appareil sans se mettre en danger eux-mêmes ou d‘autres personnes. •... -
Page 93: Aperçu De L'appareil
APERÇU DE L‘APPAREIL 10033022, 10035198, 10035268 Zone 2000 W, chauffe jusqu‘à Zone 2500 W, chauffe jusqu‘à 2600 W 2800 W Zone 1500 W, chauffe jusqu‘à Plaque de verre 2000 W Zone 2000 W, chauffe jusqu‘à Panneau de commande 2600 W Zone 1500 W, chauffe jusqu‘à 2000 W... - Page 94 10033021, 10033027, 10035266, 10035267, 10040201, 10040202 Zone 2000 W, chauffe jusqu‘à Zone 2500 W, chauffe jusqu‘à 2600 W 2800 W Zone 1500 W, chauffe jusqu‘à Zone 2500 W, chauffe jusqu‘à 2000 W 2800 W Zone 2000 W, chauffe jusqu‘à Plaque de verre 2600 W Zone 1500 W, chauffe jusqu‘à...
- Page 95 10034243 Zone 2300 W, chauffe jusqu‘à Plaque de verre 3000 W Zone 1500 W, chauffe jusqu‘à Panneau de commande 1800 W Zone 2000 W, chauffe jusqu‘à 2600 W...
-
Page 96: Panneau De Commande
PANNEAU DE COMMANDE 10033021, 10033022, 10033027, 10035198, 10035266, 10035267, 10035268, 10040201, 10040202 Touche de sélection du foyer de Marche/Arrêt cuisson Réglage de la minuterie / Fonction Boost Touche de verrouillage Réglage de la puissance Contrôle zone flexible / BBQ Stop + Go... - Page 97 10034243 Touche de sélection du foyer de Marche/Arrêt cuisson Réglage de la minuterie Fonction Boost Réglage de la puissance Stop + Go Touche de verrouillage Fonction de maintien au chaud...
-
Page 98: Installation
INSTALLATION Préparation du plan de travail Découpez le plan de travail en suivant les dimensions du schéma. Pour l‘installation, conservez au moins 5 cm de plan de travail autour du trou. Assurez-vous que l‘épaisseur du plan de travail est d‘au moins 30 mm. Choisissez un matériau de plan de travail résistant à... - Page 99 Remarque : La distance de sécurité entre la table de cuisson et l‘élément suspendu au-dessus de la table de cuisson doit être d‘au moins 760 mm. Remarque : Les dimensions indiquées dans le tableau sont exprimées en mm. min. 60 min.
- Page 100 Avant l‘installation Assurez-vous que: • le plan de travail est de niveau et qu‘aucun composant n‘empiète sur l‘espace requis pour l‘appareil. • le plan de travail est en matériau résistant à la chaleur et isolant. • le four doit être équipé d’un ventilateur intégré si l‘appareil est installé au-dessus. •...
- Page 101 Pour les modèles 10033021, 10033022, 10035268, 10033027, 10040201, 10040202 Support Perçage Fond du boîtier Vitre Pince de retenue Vis ST 3.5*8 Plan de travail Face inférieure Bride de maintien Trou Face inférieure...
- Page 102 Précautions de sécurité MISE EN GARDE Risque de blessure ! La table de cuisson à induction doit être installée par du personnel qualifié ou des techniciens. N‘essayez jamais d‘installer l‘appareil vous-même. • L‘appareil ne doit pas être installé directement au-dessus d‘un lave-vaisselle, d‘un réfrigérateur, d‘un congélateur, d‘une machine à...
-
Page 103: Mise En Marche Et Utilisation
• Si le câble d‘alimentation est endommagé et doit être remplacé, contactez le fabricant ou le service client pour éviter les dommages aux biens et / ou aux personnes. • Si l‘appareil est raccordé directement à la prise murale, installez un disjoncteur omnipolaire avec une ouverture de contact d‘au moins 3 mm entre tous les contacts. - Page 104 Choix des ustensiles de cuisson Remarque : Utilisez uniquement des ustensiles compatibles avec l‘induction. Recherchez le symbole d‘induction sur l‘emballage ou sur le fond de la casserole. Pour vérifier la compatibilité d‘utilisation Vous pouvez effectuer un test magnétique. Déplacez un aimant vers le fond de la casserole.
- Page 105 Soulevez toujours la casserole de la plaque à induction. Ne faites pas glisser la casserole pour ne pas rayer la vitre. Dimensions des casseroles Les plaques de cuisson s'adaptent automatiquement dans une certaine mesure au diamètre du fond de la casserole. Cependant, le dessous de la casserole doit avoir un diamètre minimum correspondant à...
- Page 106 Appuyez sur la commande pour choisir la zone de cuisson et l'indicateur à côté du bouton clignotera. Réglez un niveau de puissance en touchant la commande et en faisant glisser votre doigt dans le sens [-] ou [+]. • Si vous ne réglez pas la puissance dans la minute qui suit, la plaque à...
- Page 107 Pour terminer la cuisson Touchez la zone de cuisson que vous souhaitez éteindre. Éteignez la zone de cuisson en faisant glisser votre doigt le long de la commande dans le sens [-]. Assurez-vous que l'indicateur de puissance indique [0], puis [H]. Éteignez toute la table de cuisson en appuyant sur le bouton Marche / Arrêt.
- Page 108 L'augmentation des performances dure 5 minutes. La table de cuisson revient ensuite à la puissance précédemment réglée. Pour désactiver la fonction boost avant la fin des 5 minutes, appuyez sur l'indicateur de la table de cuisson. Un voyant s'allume à côté de la touche. Appuyez sur la touche Boost.
- Page 109 Fonction maintien au chaud La fonction de maintien au chaud sert à garder les aliments au chaud. Appuyez sur la touche de sélection de la table de cuisson et sélectionnez le champ que vous souhaitez utiliser pour maintenir les aliments au chaud. Modèle 10033021, 10033022, 10035268, 10033027, 10040201, 10040202 Si vous appuyez entre-temps sur les touches [+] et [-], l'écran de la table...
- Page 110 Touchez la zone de chauffe que vous souhaitez utiliser avec STOP + GO, le voyant à côté de la touche clignote. Appuyez sur la touche [STOP + GO], [ll] apparaît sur l'affichage de la zone de cuisson. Le fonctionnement de la table de cuisson et tous les boutons sauf STOP + GO, On / Off et le verrouillage des boutons sont désactivés.
- Page 111 Utilisation comme une grande zone de cuisson Pour utiliser la zone flexible comme une grande zone de cuisson, appuyez simplement sur les touches correspondantes. Le réglage de la puissance fonctionne de la même manière que pour les zones de cuisson individuelles. Utilisation comme deux plaques de cuisson indépendantes Pour utiliser la zone flexible comme deux plaques indépendantes avec des réglages de puissance...
-
Page 112: Réglage De La Puissance De Chauffe 1
Verrouillage des touches • Vous pouvez verrouiller les touches pour éviter toute utilisation involontaire (par exemple, les enfants qui allument accidentellement la table de cuisson). • Lorsque le verrouillage des touches est activé, toutes les touches à l'exception de la touche On/Off sont désactivées. -
Page 113: Réglage De La Minuterie 1
RÉGLAGE DE LA MINUTERIE Vous pouvez utiliser la minuterie de deux façons : 1. Vous pouvez définir une heure spécifique après laquelle l'appareil commence à émettre un bip. Dans ce cas, aucune des plaques ne s'éteindra une fois le temps écoulé. - Page 114 Éteignez plus d'une zone de cuisson avec la minuterie Appuyez sur la touche de sélection de la zone de cuisson que vous souhaitez éteindre une fois la minuterie écoulée. Touchez [-] ou [+] sur la commande de la minuterie, le voyant se met à clignoter et [30] apparaît dans l'affichage de la minuterie.
- Page 115 Sélection de plusieurs zones de cuisson Si vous utilisez cette fonction pour plusieurs zones de cuisson, l'affichage de la minuterie indique la durée la plus courte. Exemple : La minuterie de la zone 2 est réglée sur 3 minutes et la zone 3 sur 6 minutes. L'affichage de la minuterie indique [03].
-
Page 116: Conseils De Cuisson 1
CONSEILS DE CUISSON MISE EN GARDE Risque d‘incendie ! Faites particulièrement attention lorsque vous faites des fritures, car l‘huile et la graisse chauffent très rapidement, surtout si vous utilisez la fonction boost. À très haute température, l‘huile et la graisse peuvent s‘enflammer spontanément et présenter un fort risque d‘incendie. - Page 117 Saisir les steaks Pour la préparation de steaks tendres et délicieux : Laissez reposer la viande environ 20 minutes à température ambiante. Chauffez une casserole. Frottez les deux côtés du steak avec de l‘huile. Mettez de l‘huile dans la poêle chaude et mettez-y le steak.
-
Page 118: Nettoyage Et Entretien 1
NETTOYAGE ET ENTRETIEN Remarque : avant le nettoyage, retirez toujours la fiche de la prise et laissez l‘appareil refroidir. Quoi Comment Important ! Saletés du 1 Éteignez la plaque de • Lorsque la plaque quotidien cuisson. chauffante est éteinte, sur le verre 2 Vaporisez un nettoyant de l’indicateur «... - Page 119 Quoi Comment Important ! Résidus brûlés Enlevez la saleté avec un • Enlevez immédiatement et fondus ou couteau de tapissier, une lame les taches et les sucrés et chauds de rasoir ou un grattoir en éclaboussures, car elles sur le verre, et céramique, mais faites attention seront moins faciles à...
-
Page 120: Identification Et Résolution Des Problèmes
IDENTIFICATION ET RÉSOLUTION DES PROBLÈMES Problème Causes possibles Solution possible Impossible Pas de courant. Assurez-vous que la table d'allumer la de cuisson est bien branchée plaque de et allumée. Vérifiez si un cuisson. fusible s'est endommagé ou déclenché. Si le problème persiste, contactez un technicien qualifié. - Page 121 Problème Causes possibles Solution possible L'appareil Ceci est causé par la C'est normal. Cependant, le émet un léger technologie de cuisson par bruit doit réduire ou disparaître bourdonne- induction. complètement si vous réduisez ment lorsqu'il le réglage de la température. est utilisé...
- Page 122 Codes erreurs et signification L‘appareil est équipé d‘une fonction d‘autodiagnostic. Cela permet au technicien de vérifier le fonctionnement de plusieurs composants sans démonter l‘appareil. Code erreur Causes possibles Solution possible F3 / F4 Le capteur de température Contactez le service client. de la bobine d'induction est cassé.
-
Page 123: Informations Sur Le Recyclage
INFORMATIONS SUR LE RECYCLAGE S‘il existe une réglementation pour l‘élimination ou le recyclage des appareils électriques et électroniques dans votre pays, ce symbole sur le produit ou sur l‘emballage indique que cet appareil ne doit pas être jeté avec les ordures ménagères. - Page 125 Estimado cliente: Le felicitamos por la adquisición de este producto. Lea atentamente las siguientes instrucciones y sígalas para evitar posibles daños. No asumimos ninguna responsabilidad por los daños causados por el incumplimiento de las instrucciones y el uso inadecuado. Escanee el siguiente código QR para obtener acceso a la última guía del usuario y más información sobre el producto.
-
Page 126: Hoja De Datos Del Producto
HOJA DE DATOS DEL PRODUCTO Símbolo Valor Unidad Identificación del 10033021, 10033027, 10035266, 10035267, producto 10040201, 10040202 Tipo de módulo de cocina Módulo empotrable Número de zonas de cocción y/o superficies de cocción Tecnología de calentamiento (Zonas y superficies de cocción Zonas de cocción por inducción por inducción, zonas de cocción por irradiación,... - Page 127 Símbolo Valor Unidad Identificación del 10033022, 10035268, 10035198 producto Tipo de módulo de cocina Módulo empotrable Número de zonas de cocción y/o superficies de cocción Tecnología de calentamiento (Zonas y superficies de cocción Zonas de cocción por inducción por inducción, zonas de cocción por irradiación, hornillos) En zonas o superficies...
- Page 128 Símbolo Valor Unidad Identificación del 10034243 producto Tipo de módulo de cocina Módulo empotrable Número de zonas de cocción y/o superficies de cocción Tecnología de calentamiento (Zonas y superficies de cocción Zonas de cocción por inducción por inducción, zonas de cocción por irradiación, hornillos) En zonas o superficies...
-
Page 129: Indicaciones De Seguridad
INDICACIONES DE SEGURIDAD Riesgo de descarga eléctrica • Cuando realice reparaciones o mantenimiento en el aparato, desconecte el enchufe de la toma de corriente. • Es necesaria una conexión a una conexión eléctrica con toma de tierra. • Las modificaciones en el sistema eléctrico deberán ser realizadas por un electricista autorizado. -
Page 130: Indicaciones De Limpieza Y Mantenimiento
• ADVERTENCIA: Apague enseguida el aparato para reducir el riesgo de descarga eléctrica si la superficie presenta roturas (superficie de cocción vitrocerámica o material similar que proteja las piezas conductoras). • No coloque ningún objeto metálico, como cuchillos, tenedores, cucharas y tapas de ollas sobre la superficie de cocción, pues esta puede alcanzar temperaturas muy elevadas. - Page 131 ATENCIÓN Existe riesgo de quemaduras. Durante el uso, las piezas accesibles al aparato alcanzan temperaturas muy elevadas que pueden provocar quemaduras. Asegúrese de que su cuerpo, ropa y otros materiales (como utensilios de cocina) tocan la placa de cocción solo cuando esta se haya enfriado por completo.
-
Page 132: Funcionamiento
• Los niños y las personas con discapacidades mentales deberán ser instruidos por una persona responsable acerca del uso del aparato para garantizar que pueden manejarlo sin ponerse en peligro a ellos mismos ni a otras personas. • No repare ni sustituya ninguna pieza a manos que se indique expresamente lo contrario en el manual de instrucciones. -
Page 133: Visión General Del Aparato
VISIÓN GENERAL DEL APARATO 10033022, 10035198, 10035268 Zona de 2000 W, aumento Zona de 2500 W, aumento hasta 2600 W hasta 2800 W Zona de 1500 W, aumento Placa de cristal hasta 2000 W Zona de 2000 W, aumento Panel de control hasta 2600 W Zona 1500 W, aumento hasta 2000 W... - Page 134 10033021, 10033027, 10035266, 10035267, 10040201, 10040202 Zona de 2000 W, aumento Zona de 2500 W, aumento hasta 2600 W hasta 2800 W Zona de 1500 W, aumento Zona de 2500 W, aumento hasta 2000 W hasta 2800 W Zona de 2000 W, aumento Placa de cristal hasta 2600 W Zona de 1500 W, aumento...
- Page 135 10034243 Zona de 2300 W, aumento Placa de cristal hasta 3000 W Zona de 1500 W, aumento Panel de control hasta 1800 W Zona de 2000 W, aumento hasta 2600 W...
-
Page 136: Panel De Control
PANEL DE CONTROL 10033021, 10033022, 10033027, 10035198, 10035266, 10035267, 10035268, 10040201, 10040202 Botón de selección de zonas de ON/OFF cocción Regulación del temporizador / Función boost Bloqueo de las teclas Ajuste de potencia Control zona flexible / BBQ Stop + Go... - Page 137 10034243 Botón de selección de zonas de ON/OFF cocción Regulación del temporizador Función boost Ajuste de potencia Stop + Go Función de mantenimiento de Bloqueo de las teclas calor...
-
Page 138: Instalación
INSTALACIÓN Preparación de la superficie de trabajo Corte la superficie de trabajo según las medidas indicas en el esquema. Con motivo de la instalación, deben dejarse al menos 5 cm de espacio libre alrededor del orificio. Asegúrese de que el grosor de la superficie de trabajo sea de al menos 30 mm. Seleccione un material de trabajo aislante y resistente al calor. - Page 139 Nota: La distancia de seguridad entre la superficie de cocción y los muebles de cocina situados encima de esta debe ser de al menos 760 mm. Nota: Las medidas indicadas en la tabla se expresan en «mm». min. 60 min. 20 Orificio de entrada Orificio de entrada de aire...
- Page 140 Antes de la instalación Asegúrese de que: • la superficie de trabajo sea plana y que ningún componente afecte a los requisitos de espacio del aparato. • la superficie de trabajo esté compuesta por material aislante y resistente al calor. •...
- Page 141 Para los modelos 10033021, 10033022, 10035268, 10033027, 10040201, 10040202 Tornillo Soporte Orificio Base de la carcasa Cristal Sujeción Tornillo ST 3.5*8 Placa de trabajo Parte inferior Tornillo Abrazadera de sujeción Agujero Parte inferior de la carcasa...
- Page 142 Medidas de seguridad ADVERTENCIA Riesgo de lesiones. La placa de inducción debe ser instalada por técnicos cualificados. No intente reparar el aparato usted mismo. • El aparato no debe instalarse justo encima de lavavajillas, frigoríficos, congeladores, lavadoras o secadoras, pues la humedad podría dañar los componentes electrónicos del aparato.
-
Page 143: Puesta En Marcha Y Uso
• Si el cable de alimentación está dañado y debe repararse, contacte con el fabricante o el servicio de atención al cliente o una persona igualmente cualificada para evitar daños personales o materiales. • Si el aparato está conectado directamente a una toma de corriente, debe contar con un conmutador de aislamiento con un orificio de contacto de al menos 3 mm entre todos los contactos. - Page 144 Selección de la batería de cocina Nota: Utilice solamente batería de cocina apta para inducción. Busque el símbolo de inducción situado en el embalaje o en la parte inferior de la olla. Puede realizar la comprobación de la idoneidad mediante una prueba magnética. Mueva un imán en dirección a la parte inferior de la olla.
- Page 145 Levante siempre la olla de la placa de inducción. No tire de la olla, ya que podría rayar el cristal. Medidas de las ollas Las zonas de cocción se ajustan automáticamente hasta un grado determinado al diámetro del fondo de la olla. El fondo de la olla debe tener un diámetro mínimo en función de la zona de cocción.
- Page 146 Toque el control de selección de la zona de cocción y el indicador junto al botón parpadeará. Ajuste un nivel de potencia tocando el control y moviendo el dedo hacia [-] o [+]. • Si no ajusta la potencia en el intervalo de 1 minuto, la placa de inducción se apagará...
- Page 147 Finalizar el proceso de cocción Toque la zona de cocción que desea apagar. Apague la zona de cocción moviendo el dedo a lo largo del control hacia [-]. Asegúrese de que el panel de control muestre el indicador [0] y luego [H]. Apague toda la superficie de cocción pulsando la tecla de encendido/apagado.
- Page 148 El aumento de rendimiento dura 5 minutos. A continuación, la zona vuelve a la potencia ajustada anteriormente. Si desea desactivar la función «Boost» en estos 5 minutos, toque el indicador de la zona. Un indicador se ilumina junto a la tecla. Pulse la tecla «Boost».
- Page 149 Función «Mantenimiento de temperatura» La función «Mantenimiento de temperatura» se utiliza para mantener los alimentos calientes. Toque el botón de selección de la zona y elija la zona de cocción en la que desea utilizar la función «Mantenimiento de temperatura». Modelo 10033021, 10033022, 10035268, 10033027, 10040201, 10040202 Si mientras tanto pulsa los botones [+] y [-], el indicador de la zona de...
- Page 150 Toque la zona de cocción que desea utilizar con STOP + GO; el indicador junto al botón parpadea. Toque la tecla STOP+GO y el indicador de la zona de cocción mostrará [II]. El funcionamiento de la zona de cocción y todas las teclas, excepto STOP+GO, Encendido/apagado y el bloqueo de teclas, están desactivados.
- Page 151 Uso como zona de cocción grande Para utilizar la zona flexible como una zona de cocción grande, simplemente toque las teclas correspondientes. El ajuste de potencia es el mismo que para las zonas de cocción individuales. Uso como dos zonas de cocción independientes Para usar la zona flexible como dos zonas de cocción independientes con diferentes ajustes de potencia, vuelva a pulsar la tecla correspondiente y...
-
Page 152: Ajustar El Nivel De Potencia
Bloqueo de las teclas • Puede bloquear las teclas para evitar un uso no deseado (por ejemplo, que niños enciendan una zona de cocción accidentalmente). • Si el bloqueo de las teclas está activado, todas las teclas estarán bloqueadas excepto la de encendido/apagado. Activar el bloqueo de las teclas para productos 10033021, 10033022, 10033027, 10035198, 10035266, 10035267, 10035268, 10040201, 10040202:... -
Page 153: Ajustar El Temporizador
AJUSTAR EL TEMPORIZADOR Puede utilizar el temporizador de dos maneras diferentes: 1. Puede establecer un tiempo específico después del cual el aparato comenzará a emitir pitidos. En este caso, ninguna de las zonas de cocción se apagará una vez transcurrido el tiempo. 2. - Page 154 Uso del temporizador para desconectar más de una zona de cocción Toque la tecla de selección de la zona de cocción que debe apagarse una vez transcurra el tiempo del temporizador. Pulse las teclas [-] o [+] en el modo «Temporizador», el indicador de los minutos empezará...
- Page 155 Selección de varias placas de cocción Si utiliza esta función para más de una zona de cocción, el indicador del temporizador mostrará el tiempo más breve. Ejemplo: El temporizador de la zona 2 está configurado a 3 minutos y el de la zona 3, a 6 minutos.
-
Page 156: Consejos De Cocción
CONSEJOS DE COCCIÓN ADVERTENCIA Riesgo de incendio. Tras la cocción, tome precauciones, pues el aceite y la grasa se calienten muy rápidamente, especialmente si utiliza la función Boost. A temperaturas muy elevadas, el aceite y la grasa pueden inflamarse repentinamente y representar un gran riesgo de incendio. - Page 157 Freír filetes Para preparar filetes tiernos y aromáticos. Ponga la carne a temperatura ambiente durante 20 minutos. Caliente una sartén. Unte ambos lados del filete con aceite. Vierta un poco de aceite en la sartén caliente y a continuación coloque el filete. Voltee el filete una sola vez durante el proceso.
-
Page 158: Limpieza Y Cuidado
LIMPIEZA Y CUIDADO Nota: Desconecte el enchufe antes de limpiar el aparato y deje que este se enfríe por completo. ¿Qué? ¿Cómo? Importante Suciedad Apague la placa de • Cuando la placa de habitual del cocción. cocción esté apagada, cristal (manchas Pulverice un limpiador se apaga el indicador de huellas,... - Page 159 ¿Qué? ¿Cómo? Importante Restos Retire la suciedad con un • Retire las manchas derramados cuchillo de mesa, una cuchilla y salpicaduras durante la de afeitar o un rascador para inmediatamente, pues ebullición, placas vitrocerámicas pero serán más difíciles de derretidos o asegúrese de que no se queme quitar cuando se hayan calientes que...
-
Page 160: Detección Y Resolución De Problemas
DETECCIÓN Y RESOLUCIÓN DE PROBLEMAS Problema Posible causa Posible solución La placa de No hay electricidad. Asegúrese de que la placa cocción no se de cocción esté conectada a enciende. la red eléctrica y encendida. Compruebe que el fusible no esté... - Page 161 Problema Posible causa Posible solución El aparato emite Está causado por la tecnología Se trata de un fenómeno un ligero sonido de inducción. normal. No obstante, el ruido de vibración cu- debería desaparecer parcial ando se utiliza o totalmente si reduce el ajuste con un ajuste de potencia.
- Page 162 Codes erreurs et signification Este aparato está equipado con una función de autodiagnóstico. Esto permite al técnico comprobar el funcionamiento de varios componentes sin necesidad de desmontar el aparato. Código de error Posible causa Posible solución F3 / F4 Fallo del sensor de Contacte con el servicio de temperatura de la bobina de atención al cliente.
-
Page 163: Indicaciones Sobre La Retirada Del Aparato
INDICACIONES SOBRE LA RETIRADA DEL APARATO Si en su país existe una disposición legal relativa a la eliminación de aparatos eléctricos y electrónicos, este símbolo estampado en el producto o en el embalaje advierte que no debe eliminarse como residuo doméstico. En lugar de ello, debe depositarse en un punto de recogida de reciclaje de aparatos eléctricos y electrónicos. - Page 165 Gentile cliente, La ringraziamo per aver acquistato il dispositivo. La preghiamo di leggere attentamente le seguenti istruzioni per l’uso e di seguirle per evitare possibili danni. Non ci assumiamo alcuna responsabilità per danni scaturiti da una mancata osservazione delle avvertenze di sicurezza e da un uso improprio del dispositivo.
-
Page 166: Scheda Informativa Del Prodotto
SCHEDA INFORMATIVA DEL PRODOTTO Simbolo Valore Unità Numero di 10033021, 10033027, 10035266, 10035267, riconoscimento del 10040201, 10040202 modello Tipo di piano cottura Piano cottura a incasso Numero di zone e/o aree di cottura Tecnologia di riscaldamento (zone di cottura a induzione e Piano di cottura a induzione aree di cottura, zona di cottura radiante, piastre... - Page 167 Simbolo Valore Unità Numero di riconoscimento del 10033022, 10035268, 10035198 modello Tipo di piano cottura Piano cottura a incasso Numero di zone e/o aree di cottura Tecnologia di riscaldamento (zone di cottura a induzione e Piano di cottura a induzione aree di cottura, zona di cottura radiante, piastre solide)
- Page 168 Simbolo Valore Unità Numero di riconoscimento del 10034243 modello Tipo di piano cottura Piano cottura a incasso Numero di zone e/o aree di cottura Tecnologia di riscaldamento (zone di cottura a induzione e Piano di cottura a induzione aree di cottura, zona di cottura radiante, piastre solide) Per zone o aree di...
-
Page 169: Avvertenze Di Sicurezza
AVVERTENZE DI SICUREZZA Rischio di scosse elettriche • Staccare la spina dalla presa di corrente prima di realizzare manutenzione o riparazioni sul dispositivo. • Il collegamento a una canalizzazione con messa a terra è necessario e obbligatorio. • Modifiche alla canalizzazione elettrica devono essere realizzate da un elettricista qualificato. -
Page 170: Avvertenze Sull'utilizzo E La Manutenzione
• Attenzione: se la superficie presenta delle crepe (superficie di cottura in vetroceramica o materiale simile che protegge componenti che trasportano corrente), spegnere immediatamente il dispositivo per ridurre il rischio di folgorazioni. • Non poggiare oggetti metallici, come coltelli, forchette, cucchiai o coperchi delle pentole sul piano cottura, in quanto potrebbero diventare estremamente caldi. - Page 171 ATTENZIONE Pericolo di ustione! Durante l’utilizzo, alcuni componenti accessibili all’utente diventano così caldi da poter causare ustioni. Assicurarsi che parti del corpo, abiti o altri materiali che non sono utensili da cucina entrino in contatto con il piano cottura solo dopo il completo raffreddamento.
-
Page 172: Funzionamento
• Bambini e persone con limitate capacità fisiche e psichiche che utilizzano il dispositivo devono essere stati precedentemente istruiti in modo esaustivo sull’utilizzo, per assicurarsi che non rappresentino un pericolo per loro stessi o altri. • Non riparare o sostituire componenti del dispositivo, a meno che non sia esplicitamente suggerito nel manuale d’uso. -
Page 173: Descrizione Del Dispositivo
DESCRIZIONE DEL DISPOSITIVO 10033022, 10035198, 10035268 Zona 2000 W, aumento fino a Zona 2500 W, aumento fino a 2600 W 2800 W Zona 1500 W, aumento fino a Piastra in vetro 2000 W Zona 2000 W, aumento fino a Pannello di controllo 2600 W Zona 1500 W, aumento fino a 2000 W... - Page 174 10033021, 10033027, 10035266, 10035267, 10040201, 10040202 Zona 2000 W, aumento fino a Zona 2500 W, aumento fino a 2600 W 2800 W Zona 1500 W, aumento fino a Zona 2500 W, aumento fino a 2000 W 2800 W Zona 2000 W, aumento fino a Piastra in vetro 2600 W Zona 1500 W, aumento fino a...
- Page 175 10034243 Zona 2300 W , aumento fino a Piastra in vetro 3000 W Zona 1500 W , aumento fino a Pannello di controllo 1800 W Zona 2000 W, aumento fino a 2600 W...
-
Page 176: Pannello Di Controllo
PANNELLO DI CONTROLLO 10033021, 10033022, 10033027, 10035198, 10035266, 10035267, 10035268, 10040201, 10040202 Selezione zona riscaldante On/Off Regolazione del timer / Funzione boost Blocco tasti Regolazione della potenza Gestione area flessibile / BBQ Stop + Go... - Page 177 10034243 Selezione zona riscaldante On/Off Regolazione del timer Funzione boost Regolazione della potenza Stop + Go Blocco tasti Tasto mantenimento in caldo...
-
Page 178: Installazione
INSTALLAZIONE Preparare il piano di lavoro Tagliare il piano di lavoro seguendo le dimensioni in immagine. Per motivi legati all’installazione, vanno tenuti 5 cm di piano di lavoro intorno al foro. Assicurarsi che il piano di lavoro sia spesso almeno 30 mm. Scegliere un materiale termoresistente e isolante per il piano di lavoro. - Page 179 Nota: la distanza di sicurezza tra piano cottura e mobile pensile sovrastante deve essere di almeno 760 mm. Nota: le misure nella tabella sono in “mm”. min. 60 min. 20 Apertura ingresso Apertura uscita aria aria 5 mm...
- Page 180 Prima dell’installazione Assicurarsi di quanto segue: • La superficie di lavoro è in piano e nessuno dei componenti strutturali occupa lo spazio necessario per il dispositivo. • Il piano di lavoro è in materiale termoresistente e isolante. • Se un forno si trova sotto al dispositivo, deve essere dotato di ventola di raffreddamento.
- Page 181 Per i modelli 10033021, 10033022, 10035268, 10033027, 10040201, 10040202 Vite Supporto Foro Fondo alloggiamento Vetro Molla di supporto Vite ST 3.5*8 Piano di lavoro Lato inferiore Vite Morsetto Foro Parte inferiore alloggiamento...
- Page 182 Misure di sicurezza ATTENZIONE Pericolo di lesione! Il piano cottura a induzione deve essere installato da tecnici specializzati. Non cercare di installarlo autonomamente. • Non installare il dispositivo direttamente sopra a lavastoviglie, congelatori, lavatrici o asciugatrici, in quanto l’umidità potrebbe danneggiare i componenti elettronici del dispositivo.
-
Page 183: Messa In Funzione E Utilizzo
• Se il cavo di alimentazione è danneggiato e deve essere sostituito, contattare il produttore o il servizio di assistenza ai clienti, in modo da evitare danni a cose e/o persone. • Se il dispositivo è collegato direttamente con la presa elettrica, deve essere installato un disgiuntore di sicurezza con un’apertura di contatto di almeno 3 mm tra tutti i contatti. - Page 184 Scegliere le stoviglie adatte Nota: utilizzare solo stoviglie adatta all’induzione. Cercare il simbolo dell’induzione sull’imballaggio o sul fondo delle pentole. Per controllare se le stoviglie sono adatte, è possibile realizzare un test magnetico. Se il magnete viene attratto, la pentola è adatta all’induzione.
- Page 185 Per togliere le pentole dal piano cottura, sollevarle sempre. Non trascinarle, altrimenti si potrebbe graffiare il vetro. Dimensioni delle pentole Le zone si adeguano fino a un certo punto al diametro del fondo delle pentole. In base alla zona, il diametro del fondo della pentola deve presentare però una dimensione minima.
- Page 186 Toccare il controllo per selezionare la zona e lampeggia l'indicazione vicino al tasto. Impostare un livello di potenza toccando il controllo e facendo scorrere il dito in direzione [-] o [+]. • Se non si imposta la potenza entro un minuto, il piano cottura si spegne automaticamente.
- Page 187 Finire di cucinare Toccare la zona che si desidera spegnere. Spegnere il fornello facendo scorrere il dito sul cursore della temperatura in direzione [-]. Assicurarsi l'indicazione della potenza mostri [0] e poi [H]. Spegnere tutto il piano cottura con on/off. [H] indica che il fornello è...
- Page 188 L’aumento di potenza dura per 5 minuti. Il fornello torna poi alla potenza impostata in precedenza. Se si desidera disattivare la funzione boost durante i 5 minuti, toccare l’indicazione del fornello. Si accende un'indicazione accanto al tasto. Premere il tasto Boost. Il fornello torna alla potenza impostata in precedenza.
- Page 189 Funzione di mantenimento calore Questa funzione serve a mantenere caldi gli alimenti. Toccare il tasto di selezione del fornello su cui si desidera utilizzare la funzione di mantenimento calore. Modelli 10033021, 10033022, 10035268, 10033027, 10040201, 10040202 Se nel frattempo si premono i tasti [+] e [-], lo schermo del fornello mostra [A].
- Page 190 Toccare la zona riscaldante che si desidera utilizzare con STOP + GO e l'indicazione accanto al tasto lampeggia. Toccare [STOP+GO] e nell'indicazione del fornello compare [ll]. Il funzionamento viene interrotto e tutti i tasti sono disattivati, tranne STOP+GO, On/Off e Blocco tasti.
- Page 191 Utilizzo come fornello unico Per utilizzare la zona flessibile come fornello unico, basta toccare l’apposito tasto. La gestione della potenza funziona come per i singoli fornelli. Utilizzo come due fornelli separati Per utilizzare la zona flessibile come due fornelli separati con diverse potenze, basta premere nuovamente l’apposito tasto e l’impostazione viene cambiata.
-
Page 192: Impostare La Potenza Riscaldante
Blocco dei tasti • I tasti possono essere bloccati per impedire un utilizzo involontario (ad esempio bambini che accendono inavvertitamente i fornelli). • Quando il blocco è attivo, tutti i tasti sono disattivati tranne On/Off. Attivare/disattivare il blocco dei tasti per gli articoli 10033021, 10033022, 10033027, 10035198, 10035266, 10035267, 10035268, 10040201, 10040202: •... -
Page 193: Impostazioni Timer
IMPOSTAZIONI TIMER Il timer può essere utilizzato in due modi: 1. Può essere impostato un determinato tempo, allo scadere del quale il dispositivo emette segnali acustici. In tal caso non vengono spenti fornelli allo scadere del tempo. 2. Può essere impostato in modo tale da far spegnere automaticamente uno o più fornelli allo scadere del tempo. - Page 194 Spegnere più di un fornello con il timer Toccare il tasto di selezione del fornello che si desidera spegnere automaticamente a timer scaduto. Toccare [-] o [+] della gestione del timer, l'indicazione inizia a lampeggiare e compare l'indicazione del timer [30]. Per interrompere il timer, toccare l'elemento di controllo per la selezione della zona riscaldante e tenere premuto [-] del timer fino a quando compare [0].
- Page 195 Selezionare diversi fornelli Se si utilizza questa funzione per più di una zona, l’indicazione del timer mostra il tempo più breve. Esempio: il timer della zona 2 è impostato su 3 minuti e quello della zona 3 su 6 minuti. L'indicazione del timer mostra [03].
-
Page 196: Suggerimenti Per Cucinare
SUGGERIMENTI PER CUCINARE AVVERTENZA Pericolo d’incendio! Prestare particolare attenzione quando si frigge, dato che olio e grassi si scaldano molto rapidamente, soprattutto se si utilizza la funzione boost. A temperature molto elevate, olio e grassi possono prendere fuoco spontaneamente e rappresentano un serio rischio d’incendio Suggerimenti per cucinare •... - Page 197 Cucinare una bistecca Per preparare bistecche succose e ricche di aroma: 1. Lasciar riposare la bistecca a temperatura ambiente per 20 minuti. 2. Scaldare una padella. 3. Spalmare dell’olio su entrambi i lati della bistecca. Versare un po’ d’olio nella padella e metterci la bistecca.
-
Page 198: Pulizia E Manutenzione
PULIZIA E MANUTENZIONE Nota: staccare sempre la spina e far raffreddare il dispositivo prima di procedere alla pulizia. Cosa Come Importante! Sporco 1 Spegnere il fornello. • Quando il fornello quotidiano sul 2 Spruzzare un detergente viene spento, scompare vetro (impronte per piani cottura a fornello l’indicazione “Superficie delle dita,... - Page 199 Cosa Come Importante! Residui bruciati, Rimuovere i resti con un • Rimuovere macchie e sciolti, bollenti taglierino, un rasoio o un spruzzi immediatamente, contenenti raschietto per piani cottura dato che una volta zucchero o in vetroceramica, facendo raffreddati sono molto spruzzi sul vetro.
-
Page 200: Ricerca E Risoluzione Dei Problemi
RICERCA E RISOLUZIONE DEI PROBLEMI Problema Possibile causa Possibile soluzione Il piano cottura Non c’è corrente. Assicurarsi che il piano cottura non si accende. sia collegato alla rete elettrica e sia acceso. Controllare se è scattato un fusibile o se è guasto. Se il problema persiste, contattare un tecnico qualificato. - Page 201 Problema Possibile causa Possibile soluzione Il dispositivo Questo è dovuto alla Questo è del tutto normale. emette un lieve tecnologia a induzione. Il rumore dovrebbe però rumore se viene scomparire o diventare meno utilizzato con intenso quando si abbassa il un’impostazione livello di potenza.
- Page 202 Codici di errore e il loro significato Il dispositivo è dotato di una funzione di autodiagnosi. Questo permette al tecnico di controllare la funzione di diversi componenti, senza dover smontare il dispositivo. Codice di errore Possibile causa Possibile soluzione F3/F4 Guasto del sensore di Contattare il servizio di temperatura della bobina di...
-
Page 203: Avviso Di Smaltimento
AVVISO DI SMALTIMENTO Se nel proprio paese si applicano le regolamentazioni inerenti lo smaltimento di dispositivi elettrici ed elettronici, questo simbolo sul prodotto o sulla confezione segnala che questi prodotti non possono essere smaltiti con i rifiuti normali e devono essere portati a un punto di raccolta di dispositivi elettrici ed elettronici. - Page 205 Geachte klant, gefeliciteerd met de aanschaf van dit apparaat. Lees de hierna volgende handleiding aandachtig door en volg de instructies op om schade te voorkomen. Voor schade veroorzaakt door het niet in acht nemen van de instructies of door onjuist gebruik nemen wij geen verantwoordelijkheid.
-
Page 206: Productinformatieblad
PRODUCTINFORMATIEBLAD Symbool Waarde Eenheid 10033021, 10033027, 10035266, 10035267, Identificatie model 10040201, 10040202 Type kookplaat Inbouw kookplaat Aantal kookzones en/of vlaktes Verwarmingstechniek (inductiekookzones en -kookvlaktes, Inductiekookzones stralingsverwarming, kookplaten) Bij cirkelvormige kookzones- of vlaktes: doorsnede van het k.A. bruikbare oppervlak Ø k.A. voor elke elektrisch verwarmde kookzone, tot op 5 mm nauwkeurig. - Page 207 Symbool Waarde Eenheid Identificatie model 10033022, 10035268, 10035198 Type kookplaat Inbouw kookplaat Aantal kookzones en/of vlaktes Verwarmingstechniek (inductiekookzones en -kookvlaktes, Inductiekookzones stralingsverwarming, kookplaten) Bij cirkelvormige kookzones- of vlaktes: doorsnede van het Rechtsachter bruikbare oppervlak Ø Rechtsvoor voor elke elektrisch verwarmde kookzone, tot op 5 mm nauwkeurig.
- Page 208 Symbool Waarde Eenheid Identificatie model 10034243 Type kookplaat Inbouw kookplaat Aantal kookzones en/of kookoppervlakken Verwarmingstechniek (inductiekookzones en -kookvlaktes, Inductiekookzones stralingsverwarming, kookplaten) Bij cirkelvormige kookzones- of vlaktes: doorsnede van het Links bruikbare oppervlak Ø Midden voor elke elektrisch Rechts 21,6 verwarmde kookzone, tot op 5 mm nauwkeurig.
-
Page 209: Veiligheidsinstructies
VEILIGHEIDSINSTRUCTIES Gevaar voor elektrische schokken • Neem de stekker van het apparaat uit het stopcontact voordat u onderhoud of reparaties aan het apparaat gaat uitvoeren. • Aansluiting op een geaard bedradingssysteem is vereist en verplicht. • Wijzigingen in het elektrische bedradingssysteem mogen uitsluitend door een hiervoor gekwalificeerde elektricien worden uitgevoerd. -
Page 210: Tips Voor Gebruik En Onderhoud
• Let op! Schakel het apparaat onmiddellijk uit wanneer het oppervlak (kookplaat met glaskeramisch oppervlak of gelijkwaardig materiaal dat onder spanning staande delen beschermt) barsten vertoont om het risico op elektrische schokken te reduceren. • Leg geen metalen objecten, zoals messen, lepels, vorken of deksels, op de kookplaat aangezien die heel heet kunnen worden. - Page 211 LET OP! Verbrandingsgevaar! Tijdens het gebruik worden de voor de gebruiker toegankelijke onderdelen zo heet dat ze brandwonden kunnen veroorzaken. Let erop dat uw lichaam, uw kleding en andere materialen, zoals pannenlappen, de kookplaat pas aanraken wanneer deze volledig is afgekoeld. •...
-
Page 212: Functiewijze
• Kinderen of personen met beperkte geestelijke vermogens dienen door een voor hen verantwoordelijk persoon te worden geïnformeerd over het gebruik van het apparaat om er zeker van te zijn dat ze het kunnen gebruiken zonder zichzelf en/ of anderen in gevaar te brengen. •... -
Page 213: Overzicht Apparaten
OVERZICHT APPARATEN 10033022, 10035198, 10035268 2500 W vermogen, te verhogen 2000 W vermogen, te verhogen tot 2600 W 2800 W 1500 W vermogen, te verhogen Glazen plaat tot 2000 W 2000 W vermogen, te verhogen Controlepaneel tot 2600 W 1500 W vermogen, te verhogen tot 2000 W... - Page 214 10033021, 10033027, 10035266, 10035267, 10040201, 10040202 2500 W vermogen, te verhogen 2000 W vermogen, te verhogen tot 2600 W 2800 W 2500 W vermogen, te verhogen 1500 W vermogen, te verhogen tot 2000 W 2800 W 2000 W bereik, te verhogen tot Glasplaat 2600 W 1500 W vermogen, te verhogen...
- Page 215 10034243 2300 W vermogen, te verhogen Glasplaat tot 3000 W 1500 W vermogen, te verhogen Controlepaneel tot 1800 W 2000 W vermogen, te verhogen tot 2600 W...
-
Page 216: Controlepaneel
CONTROLEPANEEL 10033021, 10033022, 10033027, 10035198, 10035266, 10035267, 10035268, 10040201, 10040202 Selectietoets hittezone Aan / Uit Timerinstelling / Toetsenblok- Boostfunctie kering Vermogensinstelling Bediening flexibel bereik / BBQ Stop + Go... - Page 217 10034243 Selectietoets hittezone Aan / Uit Timerinstellingen Boostfunctie Vermogensinstelling Stop + Go Toetsenblokkering Warmhoudknop...
-
Page 218: Installatie
INSTALLATIE Voorbereiden van het werkvlak Snij het werkvlak comfort de afmetingen in de tekening uit. Voor installatiedoeleinden moet minimaal 5 cm van de werkplaat rondom het gat behouden blijven. Zorg ervoor dat de dikte van de werkplaat minimaal 30 mm is. Kies een hittebestendig en isolerend materiaal voor het werkvlak uit. - Page 219 Let op! De veiligheidsafstand tussen het kookvlak en het hangkastje erboven moet minimaal 760 mm zijn. Let op! Bij de in de tabel aangegeven maten gaat het om de weergave in mm. min. 60 min. 20 Opening Opening luchtaanvoer luchtafvoer 5 mm...
- Page 220 Voor de installatie Zorg ervoor dat: • het werkoppervlak egaal is en dat er geen onderdelen zijn die de voor het toestel benodigde ruimte beïnvloeden. • het werkoppervlak uit hittebestendig en isolerend materiaal bestaat. • een oven moet over een ingebouwde koelventilator beschikken wanneer het apparaat erboven wordt ingebouwd.
- Page 221 Voor modellen 10033021, 10033022, 10035268, 10033027, 10040201, 10040202 Schroef Beugel Boorgat Bodem behuizing Glas Bevestigingsclip Schroef ST 3.5*8 Werkblad Onderkant Schroef Bevestigingsklem Boorgat Onderkant behuizing...
- Page 222 Voorzorgsmaatregelen LET OP! Risico op verwonding! De inductiekookplaat moet door gekwalificeerde personen of een elektricien worden geïnstalleerd. Probeer het apparaat nooit zelf in te bouwen. • Het apparaat mag niet direct boven afwasmachines, koelkasten, vrieskasten, wasmachines of wasdrogers worden geïnstalleerd omdat het vocht de elektronica van het apparaat kan beschadigen.
-
Page 223: Ingebruikname En Bediening
• Wanneer de stroomkabel beschadigd is en vervangen moet worden neemt u contact op met de fabrikant of de klantenservice om schade aan eigendommen en persoonlijk letsel te voorkomen. • Wanneer het apparaat direct met het stopcontact wordt verbonden moet een omnipolaire stroomonderbreker met een contactopening van minimaal 3 mm tussen alle contacten worden geïnstalleerd. - Page 224 Selecteren van het kookgerei Let op! Gebruik uitsluitend kookgerei dat geschikt is voor inductie. Kijk op de verpakking of de onderkant van de pan of het inductiesymbool zichtbaar is. U kunt ter controle van de bruikbaarheid een magnetische test uitvoeren. Beweeg een magneet in de richting van de onderkant van de pan.
- Page 225 Til de pan altijd van de inductiekookplaat. Trek niet aan de pan om beschadiging van het glas te voorkomen. Afmetingen pannen De kookvelden passen zich, tot op zekere hoogte, automatisch aan de doorsnede van de onderkant van de pan aan. De onderkant van de pan moet een minimale doorsnede hebben die overeenkomt met het kookveld.
- Page 226 raak de toets aan voor de keuze van de kookzone en de weergave naast de toets knippert. Stel het vermogensniveau in door de regelaar aan te raken en uw vinger richting [-] of [+] te schuiven. • Als u het vermogen niet binnen een minuut instelt, dan schakelt de inductiekookplaat automatisch uit.
- Page 227 Koken beëindigen Raakt u de kookzone aan als u die wilt uitschakelen. Schakel de kookzone uit door met uw vinger langs de regelaar in de richting [-] te schuiven. Controleer of de vermogensweergave[ 0] en dan [H] weergeeft. Schakel het hele kookoppervlak uit door op de Aan/Uit toets te drukken.
- Page 228 De vermogenstoename duurt 5 minuten. Daarna keert het kookveld terug naar het daarvoor ingestelde vermogen. Wanneer u de boostfunctie binnen deze 5 minuten wilt deactiveren raakt u de het display aan. Naast de toets licht een indicator op. Druk op de boost- toets Het kookveld gaat terug naar het daarvoor ingestelde vermogen.
- Page 229 Warmhoudfunctie De warmhoudfunctie dient om maaltijden warm te houden. Raakt u de knop aan om de kookzone te kiezen en kies de zone die u wilt gebruiken voor het warmhouden. Model 10033021, 10033022, 10035268, 10033027, 10040201, 10040202 Als u in de tussentijd op de knoppen [+] en [-] drukt, geeft de kookplaat display [A] weer.
- Page 230 Raak de verwarmingszone aan die u met STOP + GO wilt gebruiken, de indicator naast de toets knippert. Raak de toets [STOP+GO] aan, op de kookzone display verschijnt [ll]. Het gebruik van het kookveld en alle toetsen behalve STOP+GO, Aan/ Uit en de toetsenblokkering worden gedeactiveerd.
- Page 231 Gebruik als één groot kookveld Om het flexibele bereik als één groot kookveld te gebruiken raakt u gewoon de bijbehorende toets aan. De vermogensinstelling functioneert zoals bij de individuele kookvelden. Gebruik als twee onafhankelijke kookvelden Om het flexibele bereik als twee onafhankelijke kookvelden met verschillende vermogens te gebruiken drukt u opnieuw op de bijbehorende toets en de instelling wordt gewijzigd.
-
Page 232: Warmtevermogen Instellen
Toetsenblokkade • U kunt de toetsen blokkeren om onbedoeld gebruik te voorkomen (bijvoorbeeld kinderen, die de kookplaat per ongeluk aanzetten). • Wanneer de toetsenblokkering actief is, zijn alle toetsen, behalve de toets Aan/Uit gedeactiveerd. Activeren/deactiveren van de toetsenblokkering voor model 10033021, 10033022, 10033027, 10035198, 10035266, 10035267, 10035268, 10040201, 10040202: •... -
Page 233: Timerinstellingen
TIMERINSTELLINGEN U kunt de timer op twee verschillende manieren gebruiken: 1. U kunt een bepaalde tijd instellen waarna het apparaat begint de piepen. In dit geval wordt na afloop geen enkel kookveld uitgeschakeld. 2. U kunt de timer zo instellen dat na afloop van het geprogrammeerde aantal minuten één of meerdere kookvelden automatisch uitgeschakeld worden. - Page 234 Meer dan één kookveld met de timer uitschakelen Raak de selectieknop van het kookveld aan dat moet worden uitgeschakeld wanneer de timer afloopt. Raakt u de toets [-] of [+] van de timer bediening aan, de weergave begint te knipperen en [30] verschijnt in de timerweergave.
- Page 235 Selectie meerdere kookvelden Wanneer u deze functie voor meer dan één hittezone gebruikt, laat het timerdisplay de kortste tijd zien. Voorbeeld: De timer van zone 2 is op 3 minuten ingesteld, die van zone 3 op 6 minuten. Het timer-display geeft [03] weer. Ingesteld op 6 minuten.
-
Page 236: Kooktips
KOOKTIPS LET OP! Brandgevaar! Wees bijzonder voorzichtig bij het frituren aangezien olie en vet heel snel heet worden, zeker wanneer u de boostfunctie gebruikt. Bij heel hoge temperaturen kunnen olie en vet spontaan ontsteken en vormen dan een groot brandgevaar. Tips voor het koken •... - Page 237 Steak aanbraden Voor het bereiden van sappige, aromatische steaks: 1. Laat het vlees gedurende circa 20 minuten op kamertemperatuur rusten. 2. Verhit een pan. Wrijf beide kanten van de steak met olie in. Druppel wat olie in de hete pan en leg aansluitend de steak erin.
-
Page 238: Reiniging En Onderhoud
REINIGING EN ONDERHOUD Let op! Neem voor het schoonmaken altijd de stekker uit het stopcontact en laat het apparaat afkoelen. Belangrijk! Dagelijkse 1 Schakel de kookplaat uit. • Wanneer de kookplaat verontreiniging 2 Sproei een reinigingsmiddel uitgeschakeld is verdwijnt op het glas voor kookplaten op het de weergave 'heet (vingerafdruk-... - Page 239 Belangrijk! Overgelopen, Verwijder vuil met een • Verwijder vlekken en gesmolten tapijtmes, een scheermes of spetters direct aangezien of heet, een schraper voor keramische het lastiger te verwijderen suikerachtig kookplaten, maar let op dat is wanneer het eenmaal residu en u zich niet aan de hete plaat koud geworden is.
-
Page 240: Problemen En Oplossingen
PROBLEMEN EN OPLOSSINGEN Probleem Mogelijke oorzaken Mogelijke oplossingen De kookplaat Geen stroom. Controleer of de kookplaat op gaat niet aan. het stroomnet is aangesloten en ingeschakeld is. Controleer of er misschien een stop omgezet of vervangen moet worden. Wanneer het probleem blijft bestaan wendt u zich tot een gekwalificeerde elektricien. - Page 241 Probleem Mogelijke oorzaken Mogelijke oplossingen Het apparaat Dit wordt veroorzaakt door de Dit is normaal. Het geluid laat een zacht, inductietechnologie. zal echter minder worden of zoemend geluid verdwijnt volledig wanneer u horen wanneer de temperatuur lager zet. het met een hoge tempe- ratuurinstelling wordt gebruikt.
- Page 242 Foutmeldingen en hun betekenis Het apparaat is voorzien van een zelfdiagnosefunctie. Zo kan de technicus meerder componenten controleren zonder dat het apparaat uit elkaar moet worden gehaald. Foutmelding Mogelijke oorzaken Mogelijke oplossing F3/ F4 Temperatuursensor van Neem contact op met de inductiespoel defect.
-
Page 243: Instructies Voor Afvoer
INSTRUCTIES VOOR AFVOER Wanneer in uw land een wettelijke regeling geldt voor het wegdoen van elektrische en elektronische apparaten, wijst dit symbool op het product zelf of op de verpakking erop dat het betreffende product niet met het huisvuil weggegooid mag worden.
Need help?
Do you have a question about the DELICATESSA and is the answer not in the manual?
Questions and answers