Table of Contents
Advertisement
Available languages
Available languages
Quick Links
MANUALE DI ISTRUZIONI -
NOTICE D'UTILISATION - GEBRAUCHSANWEISUNG
KIT CAMBIO IMMAGINE - IMAGE CHANGE KIT
KIT CHANGEUR DE GOBOS
Via Vecchia Provinciale 167 – Archi – 89121 Reggio Calabria (RC)
DIVUM 50K
Goboservice by SunlandOptics SRL
+39 0965 813264
Via 2 Giugno 19/10 – Bonate – 24040 (BG)
+39 035 0176860
www.goboservice.com
info@goboservice.com
INSTRUCTION MANUAL
Advertisement
Chapters
Table of Contents

Related Manuals for SunlandOptics GOBOSERVICE DIVUM 50K

Summary of Contents for SunlandOptics GOBOSERVICE DIVUM 50K
- Page 1 KIT CAMBIO IMMAGINE - IMAGE CHANGE KIT KIT CHANGEUR DE GOBOS DIVUM 50K Goboservice by SunlandOptics SRL Via Vecchia Provinciale 167 – Archi – 89121 Reggio Calabria (RC) +39 0965 813264 Via 2 Giugno 19/10 – Bonate – 24040 (BG) +39 035 0176860 www.goboservice.com...
- Page 2 - 2 - Kit cambio immagine Divum 50K...
- Page 3 Inoltre la Goboservice by SunlandOptics SRL si riserva la facoltà di modificare, in qualunque momento e senza preavviso quanto riportato nel presente manuale di istruzioni.
-
Page 4: Table Of Contents
INDICE CONDIZIONI DI UTILIZZO SICURE........................... 5 CONTENUTO DELLA SPEDIZIONE ........................... 5 INSTALLAZIONE NEL PROIETTORE ......................... 6 3.1. MESSA IN FUNZIONE KIT CAMBIO IMMAGINE ..................6 3.2. CONFIGURAZIONE CAMBIOGOBO TRAMITE APP ..................8 POSSIBILI PROBLEMI - CAUSE E SOLUZIONI ...................... 11 SMALTIMENTO ................................ -
Page 5: Condizioni Di Utilizzo Sicure
1. CONDIZIONI DI UTILIZZO SICURE Leggere attentamente le seguenti condizioni di utilizzo sicuro prima di eseguire qualsiasi operazione. Il prodotto descritto nel presente manuale è l’accessorio di un apparecchio di illuminazione per la proiezione di un fascio luminoso. Viene solitamente impiegato per illuminare, con un alto livello di luminosità... -
Page 6: Installazione Nel Proiettore
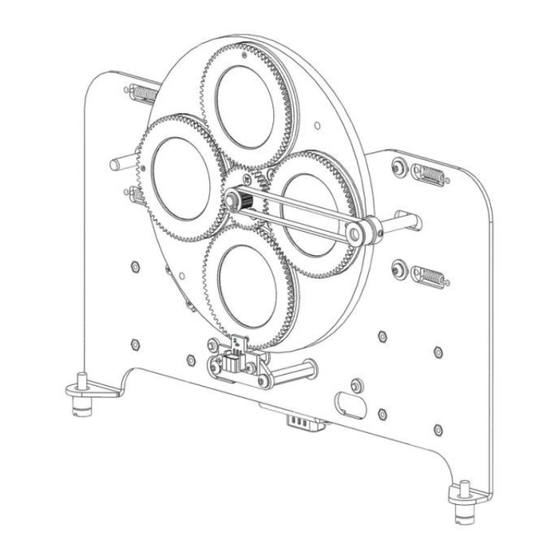
3. INSTALLAZIONE NEL PROIETTORE 3.1. MESSA IN FUNZIONE KIT CAMBIO IMMAGINE L‟accessorio è formato da due parti distinte (Fig. 1): 1. Il componente 1 è la parte meccanica dell’ accessorio, ovvero quella che rende possibile il movimento dell’effetto. 2. Il componente 2 è la ruota cambio gobo, capace di contenere fino a 4 gobo. Fig. - Page 7 Fig. 3 ATTENZIONE: Nel compiere queste operazioni è consigliato usare un guanto e porre particolare attenzione al maneggiare la ruota, in quanto contenente oggetti molto fragili (gobo) L‟installazione/sostituzione del componente 2 va eseguita col proiettore spento e scollegato dalla linea elettrica.
-
Page 8: Configurazione Cambiogobo Tramite App
3.2. CONFIGURAZIONE CAMBIOGOBO TRAMITE APP Una volta installato l’accessorio si può procedere con la configurazione dello stesso tramite APP, seguendo gli steps sotto riportati: 1. Effettuare il collegamento WiFi con il proiettore e inserire la password: Goboservice 2. Accedere all’App tramite il browser Google Chrome ed inserire l’indirizzo IP 192.168.4.1 3. - Page 9 Una volta aperta la scena, per ogni gobo sarà possibile impostare: la posizione del gobo attraverso due livelli di regolazione (Angle e Fine Angle) il Fade In ed il Fade Out per ogni posizione gobo, ovvero definire l’intensità luminosa della proiezione al momento dell’ingresso o dell’uscita della posizione gobo selezionata il tempo di permanenza della posizione corrente in termini di h/m/s (Duration) se la posizione deve o meno ruotare su se stessa (Rotation).
- Page 10 E’ possibile creare più scene ed ordinarle in proiezione secondo una sequenza desiderata; se qualcuna delle scene salvate non deve essere eseguita è sufficiente spegnere la scena attraverso il comando 5. Nel caso in cui invece l’accessorio venga acquistato in un secondo momento, è necessario configurare il proiettore perché...
-
Page 11: Possibili Problemi - Cause E Soluzioni
E’ possibile una volta entrati nella lista delle scene impostare il comando di Auto Homing, ovvero impostare un numero di cambi posizione gobo dopo i quali l’accessorio effettuerà una verifica dei riferimenti su ogni posizione gobo. Il primo homing viene effettuato in automatico nel momento in cui l’accessorio è... -
Page 12: Garanzia
6. GARANZIA Il prodotto è coperto da garanzia secondo i termini di legge. In caso di malfunzionamento durante il periodo di garanzia il prodotto sarà riparato o sostituito a discrezione del produttore. Per maggiori informazioni fare riferimento ai termini di garanzia presenti su Allegato 1. Per l'uso della garanzia sono indispensabili le seguenti informazioni: Data di acquisto (vale la data della fattura). - Page 13 Knowledge and compliance with the contents of this manual are essential to guarantee the correct and safe installation, use and maintenance of the product. Goboservice by SunlandOptics SRL declines all responsibility for damage to the appliance or to other things or persons, deriving from installation, use and maintenance carried out not in accordance with the provisions of this instruction manual, which must always accompany the appliance.
- Page 14 INDEX SAFE CONDITIONS OF USE ............................15 CONTENT OF THE SHIPMENT ..........................15 INSTALLATION IN THE PROJECTOR ........................16 3.1. CONFIGURING THE IMAGE CHANGE KIT ....................16 3.2. GOBO CONFIGURATION VIA APP ........................ 18 POSSIBLE PROBLEMS - CAUSES AND SOLUTIONS ................... 21 DISPOSAL ..................................
- Page 15 1. SAFE CONDITIONS OF USE Please read the following conditions of safe use carefully before performing any operation. The product described in this manual is the accessory of a lighting device for the projection of a light beam. It is usually used to illuminate, with a high level of surface brightness, large areas on which to project decorative effects or to reproduce suggestive and particular projections of logos and images.
- Page 16 3. INSTALLATION IN THE PROJECTOR 3.1. CONFIGURING THE IMAGE CHANGE KIT The accessory consists of two distinct parts (Image 1): 1. Component 1 is the mechanical part of the accessory, i.e. the one that makes the movement of the effect possible. 2.
- Page 17 Image 3 ATTENTION: When carrying out these operations it is advisable to use a glove and pay particular attention to handling the wheel, as it contains very fragile objects (gobos). The installation / replacement of component 2 must be carried out with the projector switched off and disconnected from the power line.
- Page 18 3.2. GOBO CONFIGURATION VIA APP Once the accessory has been installed, it can be configured via the APP, following the steps below: 1. Make WiFi connection with the projector and enter the password: Goboservice 2. Access the App via the Google Chrome browser and enter the IP address 192.168.4.1 3.
- Page 19 Once the scene is open, for each gobo it will be possible to set: the position of the gobo through two levels of adjustment (Angle and Fine Angle) the Fade In and Fade Out for each gobo position, that is to define the luminous intensity of the projection at the time of entry or exit of the selected gobo position the time spent by the current position in terms of h / m / s (Duration) whether or not the position must rotate on itself (Rotation).
- Page 20 It is possible to create more scenes and arrange them in projection according to a desired sequence; if any of the saved scenes do not need to be executed, simply turn off the scene using the command 5. However, if the accessory is purchased at a later time, the projector must be configured to work correctly with the new accessory.
- Page 21 Once you have entered the scene list, you can set the Auto Homing command, that is, set a number of gobo position changes after which the accessory will check the references on each gobo position. The first homing is carried out automatically when the accessory is put into operation and it could also be decided not to repeat it (by default the value set for this parameter is '0');...
- Page 22 6. WARRANTY The product is covered by a warranty according to the terms of the law. In the event of a malfunction during the warranty period, the product will be repaired or replaced at the manufacturer's discretion. For more information, refer to the warranty terms in Attachment 1. For the use of the guarantee, the following information is essential: Purchase date (invoice date applies).
- Page 23 De plus, la société Goboservice by SunlandOptics SRL se réserve le droit de modifier, à tout moment et sans préavis le contenu de la présente notice d’utilisation.
- Page 24 SOMMAIRE CONDITIONS D’UTILISATION EN TOUTE SÉCURITÉ ..................25 CONTENU DE L’EXPÉDITION ..........................25 INSTALLATION DANS LE PROJECTEUR ........................ 26 3.1. MISE EN MARCHE DU KIT CHANGEUR DE GOBOS ................26 3.2. CONFIGURATION VIA L’APPLICATION DU CHANGEUR DE GOBOS ..........28 PROBLÈMES POSSIBLES - CAUSES ET SOLUTIONS ...................
-
Page 25: Conditions D'utilisation En Toute Sécurité
1. CONDITIONS D’UTILISATION EN TOUTE SÉCURITÉ Lisez attentivement les conditions d’utilisation suivantes avant d’exécuter la moindre opération.Le produit décrit dans la présente notice est l’accessoire d’un appareil d’éclairage pour la projection d’un faisceau lumineux. Il est habituellement utilisé pour illuminer, avec un niveau élevé de luminosité superficielle, de larges surfaces sur lesquelles projeter des effets de type décoratif ou pour reproduire des projections de logos ou d’images suggestives et particulières. -
Page 26: Installation Dans Le Projecteur
3. INSTALLATION DANS LE PROJECTEUR 3.1. MISE EN MARCHE DU KIT CHANGEUR DE GOBOS L’accessoire est formé de deux parties distinctes (Figure 1): 1. Le composant 1 est la partie mécanique de l’accessoire, celle qui rend possible le mouvement de la roue. - Page 27 Figure 3 ATTENTION : Pendant ces opérations, il est conseillé d’utiliser un gant et d’apporter une attention particulière lors de la manipulation de la roue, qui contient des objets très fragiles (gobos). L’installation/le remplacement du composant 2 doit être effectué avec le projecteur éteint et débranché du secteur.
-
Page 28: Configuration Via L'application Du Changeur De Gobos
3.2. CONFIGURATION VIA L’APPLICATION DU CHANGEUR DE GOBOS Une fois l'accessoire installé, vous pouvez procéder à sa configuration via l'application en suivant les étapes décrites ci-dessous : 1. Établissez la connexion Wi-Fi avec le projecteur et entrez le mot de passe Goboservice 2. - Page 29 Une fois la scène ouverte, il sera possible de paramétrer pour chaque gobo : la position du gobo grâce à deux niveaux de réglage (Angle et Fine Angle) Le Fade In et le Fade Out pour chaque position de gobo, qui permettent de définir l'intensité lumineuse de la projection au moment de l'entrée ou de la sortie de la position de gobo sélectionnée le temps de permanence de la position courante en terme de h/m/s (Duration [Durée])
- Page 30 Il est possible de créer plusieurs scènes et de les ordonner en projection selon une séquence souhaitée ; si l'une des scènes enregistrées ne doit pas être exécutée, il suffit de désactiver la scène à l'aide du bouton 5. Si l'accessoire est acheté ultérieurement, il est nécessaire de configurer le projecteur pour qu’il fonctionne correctement avec le nouvel accessoire.
-
Page 31: Problèmes Possibles - Causes Et Solutions
Une fois que vous avez entré la liste des scènes, vous pouvez définir la commande Auto Homing qui permet de définir un certain nombre de changements de position de gobo après lesquels l'accessoire vérifiera les références sur chaque position de gobo. Le premier homing est effectué automatiquement lors de la mise en marche de l'accessoire et vous pouvez également décider de ne pas le répéter (par défaut, la valeur définie pour ce paramètre est '0') ;... -
Page 32: Garantie
6. GARANTIE Le produit est couvert par la garantie selon les termes de la loi. En cas de mauvais fonctionnement pendant la période de garantie, le produit sera réparé ou remplacé à la discrétion du fabricant. Pour plus d'informations, reportez-vous aux conditions de garantie présentes en Annexe 1. Pour l’utilisation de la garantie, les informations suivantes sont indispensables: Date d’achat (la date de la facture est valable). - Page 33 - 33 - WWW.GOBOSERVICE.COM IST0011–Rev.0...
- Page 35 - 35 - WWW.GOBOSERVICE.COM IST0011–Rev.0...
- Page 36 IST0011 Rev.0 21/09/2022 Goboservice by Sunland Optics SRL Via Vecchia Provinciale 167 – Archi – 89121 Reggio Calabria (RC) +39 0965 813264 Via 2 Giugno 19/10 – Bonate – 24040 (BG) +39 0350176860 www.goboservice.com info@goboservice.com...
Need help?
Do you have a question about the GOBOSERVICE DIVUM 50K and is the answer not in the manual?
Questions and answers