Advertisement
INTERFACE


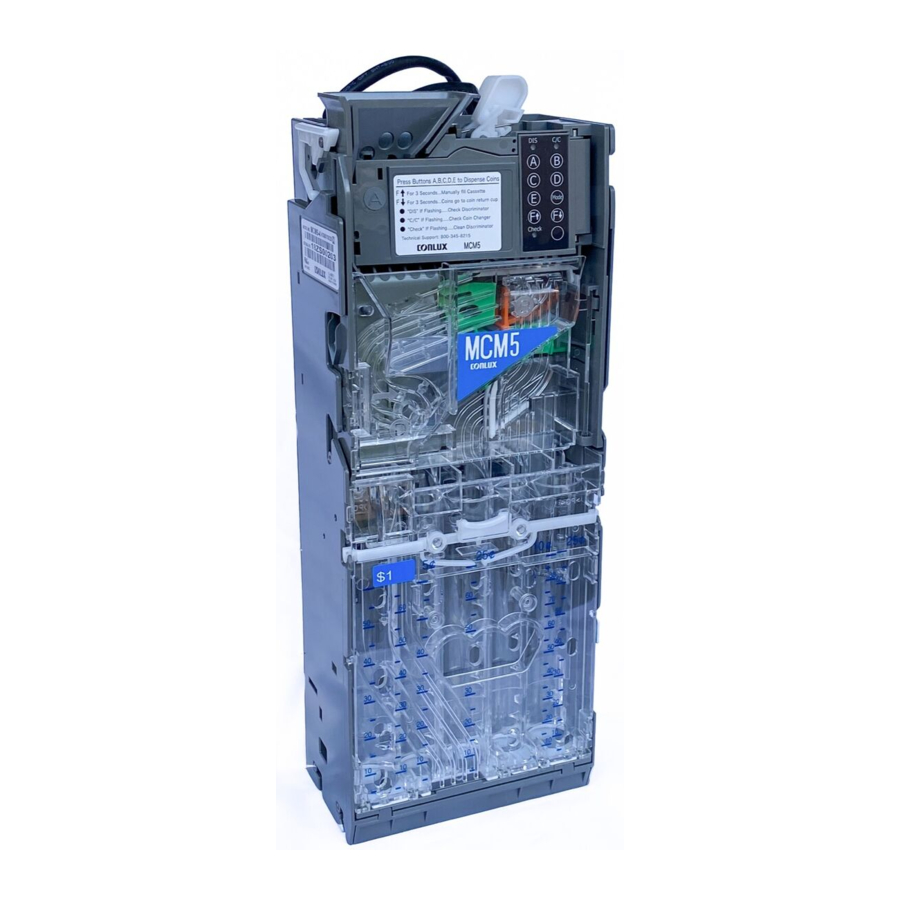
MEI Conlux MCM5 coin changer operates in machines that support the MDB interface*.
The operating voltage of a MEI Conlux coin mechanism is stated on the label of each product. The label is located on the left side of the coin mechanism.
Weight: 3.5 lbs.
Rated Operating Voltage: 34v d.c.12W
0.92A at DC34V peak
Compliance: UL standart, FCC standart

X = October
Y = November
Z = December
Ignore the rest of the numbers

This is the QR code for www.meigroup.com.
BEFORE YOU BEGIN
- Remove the coin mechanism from the packaging material. Inspect unit for physical damage.
You need these tools:
Phillips screw driver
Wire Tie wraps
Wire cutters
Wire Tie wrap adhesive anchors
- Turn OFF the power supply to the vending machine.
- Lift up on the White lever on the top left side of the coin mechanism and tilt the Discriminator assembly forward.

- Once open, the mounting holes are accessible. Hang the coin mechanism on the mounting studs/screws, ensuring that the coin mechanism is mounted vertically with no tilt, on all three studs/screws.
- Tighten the screws (if required),
Check / Set the DIP Switches.
Close and latch the Discriminator assembly.
![]()


CURRENCY SWITCH
(Located on the back of the Discriminator Unit.)
| Switch Number | Function |
| #1 USA On/Off | On - Accept United States Coins |
| #2 Canada On/Off | On - Accept Canadian Coins |
| #3 Token On/Off | On - Accept Tokens |
| #4 Float High/Low | Set Float either High ($52.00) or Low ($34.00) |
ALIGNMENT
Once the coin mechanism is installed, check that there is a small gap (2 mm) between the return lever on the vending machine and the Acceptor Gate lever on the coin mechanism.
Confirm that when you press the coin return lever on the machine door, it fully depresses the acceptor gate lever on the coin mechanism, then lets it return smoothly without holding the gate open.
Check the alignment of the coin input chute and cashbox chute. Insert some coins to check that they enter the coin mechanism properly and exit into the return cup. Ensure that the coin chute does not rest on or open the acceptor gate.
Most machines allow you to adjust the return lever, coin chute, and the return cup to align with the coin mechanism. Align, adjust, and test as necessary to ensure coins are properly routed before continuing with these instructions.
CONNECTION
If the vending machine has a bill validator, connect the MDB harness coming from the coin mechanism to the bill validator's "Y" connector. If there is no bill validator, connect the coin mechanism harness to the harness coming from the vending machine control board.
Tuck any excess length of harnessing inside the machine. Make sure no harness is pinched or trapped when the coin return lever is pressed or when the vending machine door in closed.
Now you may switch ON the power to the vending machine.
COIN CASSETTE
The coin mechanism can be ordered with one of two cassette configurations for both the USA and Canada. The USA and CANADA use the same cassettes.
- Remove cassette by using your thumb to depress the white latch and tilt the cassette forwards and lift upwards as shown.
![]()

The cassette type will be recognized automatically by the coin mechanism.


LOADING THE COIN CASSETTE
You can load the coin cassette using either of these two techniques:
Loading by Removing Cassette
- Remove the cassette. Place it front down on a firm surface. Open the back by pinching the two tabs together and levering it open on the hinge. Fig 1.

- It is recommended that you fill each tube (nickel, dime, quarter, and dollar) if available with at least 15 coins. Each tube will hold 2 rolls of coins.
Note: Insure that coins are inserted into the proper tubes. Do not fill above the MAX FILL line. Fig. 2


DIAGNOSTIC LED's
Error status will be reported to the main controller, and LEDs will flash as below:
- "DIS": Error of discriminator (Upper part of body)
- "C/C": Error of coin changer (Lower part of body)


| DIS | C/C | Check Light | Status |
 | |  | Ready |
 | | | Check Discriminator for ERROR |
| | | Check Coin Changer for ERROR |
| | | Check and CLEAN the Discriminator |
| OFF | ON | FLASHING | Press the unmarked button to |
| | | clear the Check Light |
TOKEN TEACH
The Conlux MCM5 will accept tokens when the Token DIP Switch is placed in the ON position. The Token teach mode is entered by pressing the Mode and B button simultaneously for longer than 2 seconds. When this mode is entered, the C/C LED will flash rapidly. The user should then drop 10 tokens with at least 1 second intervals between tokens.
The mode will automatically end after the 10 th token is dropped. If successful, the C/C LED will illuminate continuously.
| Types of cassettes and the coin configuration | |||||||
| Type | Feature | Tube A | Tube B | Tube C | Tube D | Tube E | |
| 1 | US-1 | Denomination | 25 ¢ | 5 ¢ | 25 ¢ | 10 ¢ | 25 ¢ |
| Auto Storing | No | Yes | Yes | Yes | No | ||
| Empty Quantity (Note 1) | 6 | 8 | 8 | 10 | 5 | ||
| Full Quantity (Note 2) | 71 | 64 | 71 | 97 | N/A | ||
| 2 | US-4 | Denomination | 1 $ | 5 ¢ | 25 ¢ | 10 ¢ | 25 ¢ |
| Auto Storing | Yes | Yes | Yes | Yes | No | ||
| Empty Quantity (Note 1) | 5 | 8 | 8 | 10 | 5 | ||
| Full Quantity (Note 2) | 63 | 64 | 71 | 97 | N/A | ||
Note 1: If lower sensor detects coins, then there are coins to at least the empty quantity.
Note 2: If the coins reach the upper sensor, the tube is considered to be full.
Factory FLOAT/PAR Settings
| Float 1 $34 – Switch Position Low (OFF) | |
| Cassette US-1 | |
| Tube A – 25¢ | 40 coins = $10 |
| Tube B - 5¢ | 40 coins = $ 2 |
| Tube C – 25¢ | 40 coins = $10 |
| Tube D – 10¢ | 40 coins = $ 4 |
| Tube E – 25¢ | 32 coins = $ 8 |
| Cassette US-4 | |
| Tube A - $1 | 10 coins = $10 |
| Tube B – 5¢ | 40 coins = $ 2 |
| Tube C – 25¢ | 40 coins = $10 |
| Tube D – 10¢ | 40 coins = $ 4 |
| Tube E – 25¢ | 32 coins = $ 8 |
| Float 2 $52 – Switch Position High (ON) | |
| Cassette US-1 | |
| Tube A – 25¢ | 60 coins = $15 |
| Tube B - 5¢ | 60 coins = $ 3 |
| Tube C – 25¢ | 60 coins = $15 |
| Tube D – 10¢ | 60 coins = $ 6 |
| Tube E – 25¢ | 52 coins = $13 |
| Cassette US-4 | |
| Tube A - $ 1 | 30 coins = $30 |
| Tube B – 5¢ | 40 coins = $ 2 |
| Tube C – 25¢ | 40 coins = $10 |
| Tube D – 10¢ | 40 coins = $ 4 |
| Tube E – 25¢ | 24 coins = $ 6 |
How to Manually set User Float/Par Programming
The user must empty the current cassette.
- The DIP switch should be set to either Float High (ON) or Float Low (OFF) depending on which value will be re-programmed.
- Press the Mode and C buttons simultaneously. If one of the low level sensors is covered, the C/C LED will flash slowly for 5 seconds and the changer reverts to its normal operating mode. If all the low level sensors are uncovered, the C/C LED will blink rapidly and the next step can be performed.
- The user will insert coins through the coin funnel until the required float level is reached. The following conditions will apply:
- Unrecognized coins will be rejected.
- If the cassette contains coin tubes of equal value, the coins will alternately be routed to each tube in turn.
- The mode will automatically exit if no coins are dropped for a period of 2 minutes.
- Coins will be reported on the MDB protocol as Manual Fill.
- The mode can be exited at any time without saving any data by pressing the Mode button for 2 seconds or longer.
- The cassette can be removed and replaced at anytime without affecting the current tube counts.
- When the cassette has been filled to the appropriate level, the user should press the Mode and C buttons simultaneously to save the tube levels.
- To return the float levels to the default factory programmed values, the Float / Par Programming mode should be entered as described above by pressing the Mode and C buttons simultaneously. When the C/C LED is blinking rapidly, the user should press the F↓ button and the F↑ button simultaneously.
MEI
1301 Wilson Drive
West Chester, PA 19380
Technical Support 1(800)345-8172
Customer Support 1(800)345-8215
http://www.meigroup.com

Documents / Resources
References
Download manual
Here you can download full pdf version of manual, it may contain additional safety instructions, warranty information, FCC rules, etc.
Advertisement

Need help?
Do you have a question about the MCM5 and is the answer not in the manual?
Questions and answers