Table of Contents
Advertisement
Available languages
Available languages
Advertisement
Chapters
Table of Contents

Related Manuals for Shangzhadyuan BTC-B250C

Summary of Contents for Shangzhadyuan BTC-B250C
- Page 1 BTC-B250C User Manual...
-
Page 2: Table Of Contents
Any problem, please feel free to contact us. Contents Specifications ......................1 Overview of Components ...................2 Install CPU & Fan ....................3 Install Memory ....................... 4 Back Panel Connectors ...................5 USB 2.0 Port ..................... 5 USB 3.0 Port ..................... 5 VGA Port ......................5 HDMI Port ...................... -
Page 3: Specifications
Any problem, please feel free to contact us. Specifications BTC B250C Support Intel 6th/7th Gen Core i3/i5/i7 (Intel Skylake full series), Xeon E3 Processor 1230 V5, Celeron and Pentium series processors. Southbridge B250 Chipset Technology Dual channel DDR4 Maximum 32GB (16GB*2) Capacity Memory Slot 2 * DDR4... -
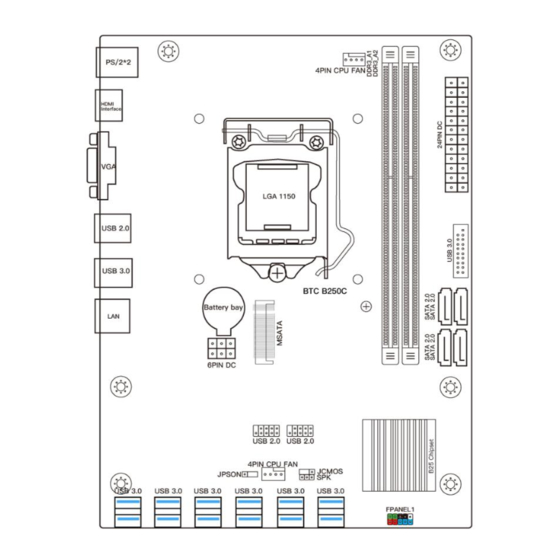
Page 4: Overview Of Components
Any problem, please feel free to contact us. Overview of Components Package List: BTC B250C Motherboard * 1 SATA Cable * 1... -
Page 5: Install Cpu & Fan
Any problem, please feel free to contact us. Install CPU & Fan Please install the CPU into the CPU socket (LGA 1151) as shown below. Wichtig • Make sure that the motherboard supports the CPU. • Always unplug the power cord from the power outlet before installing or removing the CPU to prevent hardware damage. -
Page 6: Install Memory
Any problem, please feel free to contact us. Install Memory The motherboard provides 2 DDR4 DIMM slots with a maximum capacity of 32GB. 1. Wrench the latches on both sides of the memory slot outwards. 2. Insert the memory into the slot by aligning it with the notch in the slot. 3. -
Page 7: Back Panel Connectors
Any problem, please feel free to contact us. Back Panel Connectors USB 2.0 Port The USB port supports the USB 2.0 specification. Use this port for USB devices. USB 3.0 Port The USB 3.0 supports the USB 3.0 specification and is compatible to the USB 2.0 specification. -
Page 8: Internal Connectors
Any problem, please feel free to contact us. Internal Connectors F_PANEL1 Connector SPEAK1 Connector Wichtig • An incorrect connection between the module connector and the motherboard header will make the device unable to work or even damage it. 4*SATA 2.0 Connectors The theoretical speed of the SATA 2.0 port can reach 3Gb/s, which can meet all daily work activities. -
Page 9: Msata Slot
Any problem, please feel free to contact us. MSATA Slot Stable SATA 6GB/s transfer rate. Compared with traditional 3.5/2.5 hard drives, it is more portable and more efficient. There is no need for SATA data cables and power cables, farewell to the trouble of cable management, and the motherboard components are clear and tidy. -
Page 10: Jcom1: Serial Port Connector
Any problem, please feel free to contact us. JCOM1: Serial Port Connector The COM connector can provide one serial port via an optional COM port cable. ATXPWR1, JATXPWR1: Power Connectors With the use of the power connector, the power supply can provide enough stable power to all the components on the motherboard. -
Page 11: Cpu_Fan1, Sys_Fan1: Fan Connectors
Any problem, please feel free to contact us. CPU_FAN1, SYS_FAN1: Fan Connectors CPU_FAN is a interface for CPU radiator. The 4pin fan has PWM intelligent speed regulation function, which can intelligently control the fan speed based on load and temperature changes. -
Page 12: Bios Setup
Any problem, please feel free to contact us. BIOS Setup BIOS (Basic Input and Output System) records hardware parameters of the system in the CMOS on the motherboard. BIOS identifies, configures, tests and connects computer hardware to the OS immediately after a computer is turned on. Its major functions include conducting the Power-On Self-Test (POST) during system startup, saving system parameters and loading the operating system, etc. -
Page 13: Reset Bios
Any problem, please feel free to contact us. Current Version Wichtig • Functions may vary depending on the product you have. Reset BIOS When you need to restore the default BIOS settings to resolve certain issues, there are several ways to reset the BIOS: ∙... - Page 14 Any problem, please feel free to contact us. BTC-B250C Benutzerhandbuch...
- Page 15 Any problem, please feel free to contact us. Inhalt Spezifikationen ....................... 1 Übersicht der Komponenten ................2 Installieren CPU & Fan ................... 3 Arbeitsspeicher installieren ...................4 Anschlüsse auf der Rückseite ................4 USB 2.0-Anschluss ....................5 USB 3.0-Anschluss ....................5 VGA-Anschluss ....................5 HDMI-Anschluss ....................5 RJ45 LAN-Anschluss ..................
-
Page 16: Spezifikationen
Any problem, please feel free to contact us. Spezifikationen BTC B250C Unterstützt Intel 6th/7th Gen Core i3/i5/i7 (Intel Skylake full series), Xeon E3 Prozessor 1230 V5, Celeron und Pentium Series Prozessoren. Südbrücke B250-Chipsatz Technologie Dual-Channel-DDR4 Maximale Kapazität 32 GB (16 GB*2) Speichersteckplatz 2 * DDR4 PS/2... -
Page 17: Übersicht Der Komponenten
Any problem, please feel free to contact us. Übersicht der Komponenten Übersicht der KomponentenPaketliste: BTC B250C Mainboard* 1 SATA-Kabel * 1... -
Page 18: Installieren Cpu & Fan
Any problem, please feel free to contact us. Installieren CPU & Fan Bitte installieren Sie die CPU wie unten gezeigt im CPU-Sockel (LGA 1151). Wichtig • Stellen Sie sicher, dass das Motherboard die CPU unterstützt. • Ziehen Sie immer das Netzkabel aus der Steckdose, bevor Sie die CPU installieren oder entfernen, um Hardwareschäden zu vermeiden. -
Page 19: Arbeitsspeicher Installieren
Any problem, please feel free to contact us. Arbeitsspeicher installieren Das Motherboard bietet 2 DDR4-DIMM-Steckplätze mit einer maximalen Kapazität von 32 1. Drehen Sie die Riegel auf beiden Seiten des Speichersteckplatzes nach außen. 2. Setzen Sie den Speicher in den Steckplatz ein, indem Sie ihn an der Kerbe im Steckplatz ausrichten. -
Page 20: Usb 2.0-Anschluss
Any problem, please feel free to contact us. USB 2.0-Anschluss Der USB-Anschluss unterstützt die USB 2.0-Spezifikation. Verwenden Sie diesen Anschluss für USB-Geräte. USB 3.0-Anschluss USB 3.0 unterstützt die USB 3.0-Spezifikation und ist mit der USB 2.0-Spezifikation kompatibel. Verwenden Sie diesen Anschluss für USB-Geräte. VGA-Anschluss VGA (Video Graphics Array) unterstützt analoge Videosignalübertragung, hohe Auflösung, schnelle Anzeigerate und satte Farben. -
Page 21: Interne Anschlüsse
Any problem, please feel free to contact us. Interne Anschlüsse F_PANEL1-Anschluss SPEAK1-Anschluss Wichtig • Eine falsche Verbindung zwischen dem Modulanschluss und dem Motherboard-Header führt dazu, dass das Gerät nicht funktioniert oder sogar beschädigt wird. 4 * SATA 2.0-Anschlüsse Die theoretische Geschwindigkeit des SATA 2.0-Ports kann 3 Gb/s erreichen, was allen täglichen Arbeitsaktivitäten gerecht wird. -
Page 22: Msata-Steckplätze
Any problem, please feel free to contact us. MSATA-Steckplätze Stabile SATA-Übertragungsrate von 6 GB/s. Im Vergleich zu herkömmlichen 3,5/2,5-Festplatten ist es tragbarer und effizienter. SATA-Datenkabel und Stromkabel entfallen, Kabelmanagement ade und die Mainboard-Komponenten sind übersichtlich und aufgeräumt. JCMOS1: CMOS-Entladung Wichtig •... -
Page 23: Atxpwr1, Jatxpwr1: Stromanschlüsse
Any problem, please feel free to contact us. ATXPWR1, JATXPWR1: Stromanschlüsse Mit der Verwendung des Stromanschlusses kann das Netzteil alle Komponenten auf dem Motherboard ausreichend stabil mit Strom versorgen. Stellen Sie vor dem Anschließen des Netzsteckers sicher, dass die Stromversorgung ausgeschaltet und alle Geräte ordnungsgemäß... -
Page 24: Cpu_Fan1, Sys_Fan1: Lüfteranschlüsse
Any problem, please feel free to contact us. CPU_FAN1, SYS_FAN1: Lüfteranschlüsse CPU_FAN ist eine Schnittstelle für CPU-Kühler. Der 4-Pin-Lüfter verfügt über eine intelligente PWM-Geschwindigkeitsregulierungsfunktion, die die Lüftergeschwindigkeit basierend auf Last- und Temperaturänderungen intelligent steuern kann. SYS_FAN ist die Systemlüfterschnittstelle, die im Allgemeinen mit dem Gehäuselüfter verbunden ist. -
Page 25: Bios-Setup
Any problem, please feel free to contact us. BIOS-Setup Das BIOS (Basic Input and Output System) zeichnet Hardwareparameter des Systems im CMOS auf der Hauptplatine auf. Das BIOS identifiziert, konfiguriert, testet und verbindet die Computerhardware unmittelbar nach dem Einschalten eines Computers mit dem Betriebssystem. -
Page 26: Bios Zurücksetzen
Any problem, please feel free to contact us. drücken, um Ihren Computer neu zu starten. Es wird empfohlen, unmittelbar nach dem Start des Computers wiederholt die Taste "Entf" zu drücken, um sicherzustellen, dass der Computer in den BIOS-Modus wechseln kann. Current Version Wichtig •...
Need help?
Do you have a question about the BTC-B250C and is the answer not in the manual?
Questions and answers