Roland GR-20 Owner's Manual
Guitar synthesizer
Hide thumbs
Also See for GR-20:
- Mode d'emploi (70 pages) ,
- Owner's manual (52 pages) ,
- Workshop manual (8 pages)
Table of Contents
Advertisement
Owner's Manual
Before using this unit, carefully read the sections entitled: "USING THE UNIT SAFELY"
and "IMPORTANT NOTES" (p. 2–3, p. 4). These sections provide important information
concerning the proper operation of the unit. Additionally, in order to feel assured that you
have gained a good grasp of every feature provided by your new unit, Owner's manual
should be read in its entirety. The manual should be saved and kept on hand as a conve-
nient reference.
Copyright © 2004 ROLAND CORPORATION
All rights reserved. No part of this publication may be reproduced in any form without the written
permission of ROLAND CORPORATION.
Advertisement
Table of Contents

Related Manuals for Roland GR-20


Summary of Contents for Roland GR-20
- Page 1 The manual should be saved and kept on hand as a conve- nient reference. Copyright © 2004 ROLAND CORPORATION All rights reserved. No part of this publication may be reproduced in any form without the written...
-
Page 2: Using The Unit Safely
• Do not attempt to repair the unit, or replace parts within it (except when this manual provides specific instructions directing you to do so). Refer all servicing to your retailer, the nearest Roland Service Center, or an authorized Roland distributor, as listed on the “Information” page. - Page 3 • Before using the unit in a foreign country, consult with your retailer, the nearest Roland Service Center, or an authorized Roland distributor, as listed on the “Information” page.
-
Page 4: Important Notes
(including padding) that it came in, if possible. Otherwise, you will need to use equivalent packaging materials. • Use a cable from Roland to make the connection. If using some other make of connection cable, please note the following precautions. -
Page 5: Introduction
• The GR-20 can be used with any steel-string guitar on which a GK-3 or GK-2A (divided pickup; sold separately) can be correctly installed. • The GR-20 can also be used with a bass guitar on which a GK-3B or GK-2B (divided pickup for bass guitar; sold separately) is installed. -
Page 6: Table Of Contents
Chapter 2 Using the GR-20 with Guitar Effects...17 Connections ... 17 Switching between the Synth Sound and Guitar Sound ... 18 Using the GR-20 with a Multi-effects Unit ... 18 Channel (CH)... 18 Patch Link Setup (PATCH LINK SETUP) ... 19 Chapter 3 Editing The Sounds...20... - Page 7 Restoring the Factory Settings (Factory Reset)... 31 Calibrating the Expression Pedal ... 31 Regarding GR-20 bass guitar support ... 32 Switching the GR-20 between bass guitar and guitar operation... 32 How the Bass Guitar and Guitar settings differ ... 32 Troubleshooting... 33 During Normal Performance Using the GR-20 Alone...
-
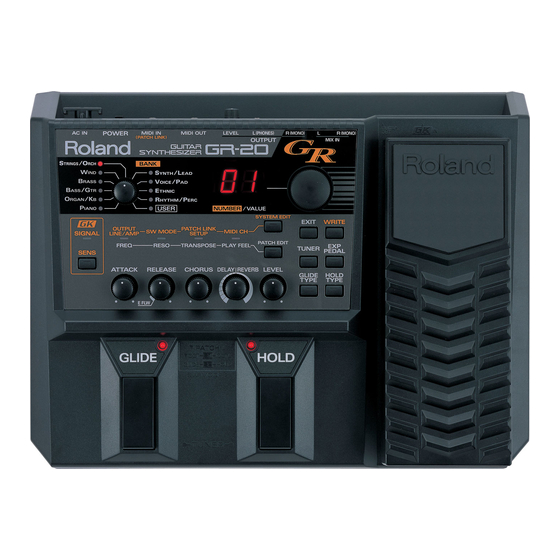
Page 8: Names Of Things And What They Do
Names of Things and What They Do Front Panel fig.0-01 (Panel Descriptions1) 1. BANK indicators These indicators light to indicate the currently selected sound bank. If the bank has been switched from an external device (such as via MIDI or by the switches of your GK pickup), the indicator for the selected bank will light regardless of the position of the BANK knob. -
Page 9: Expression Pedal
9. PATCH LINK SETUP/TRANSPOSE indicator This indicator lights when you edit the System parameter PATCH LINK SETUP or the Patch parameter TRANSPOSE (p. 19, p. 21). 10. MIDI CH/PLAY FEEL indicator This indicator lights when you edit the System parameter MIDI CH or the Patch parameter PLAY FEEL (p. -
Page 10: Rear Panel
31. MIX IN R (MONO)/L jacks The sound that is input to these jacks is mixed with the synth sound of the GR-20 and sent from the OUTPUT jacks (32). If you have connected the GUITAR OUT jack (30) to an external effects unit, connect the output of your effects unit to this jack;... -
Page 11: Chapter 1 Play The Sounds
Chapter 1 Play the Sounds! Preparing Your Guitar • In order to use the GR-20 you will need a guitar that has a divided pickup (GK pickup) such as the Roland GK-3 or GK-2A, or a bass guitar that has a bass guitar divided pickup such as the Roland GK-3B/GK-2B, which can independently output a separate signal for each string. -
Page 12: Turning The Power On
This state is called “Play mode.” Before the GR-20 enters Play mode, it will indicate whether it is currently in guitar mode or bass guitar mode. -
Page 13: Tuning Your Guitar (Tuner Function)
Tuning Your Guitar (Tuner Function) Since the GR-20 analyzes the pitch of each string in order to determine the sound it should produce, you must tune your guitar accurately. * If your guitar is mistuned, the sound produced will be out of tune, and the system will not operate correctly. -
Page 14: Specifying The Output Device (Output Select)
Selecting a Sound (Patch) What is a Patch A “patch” is a sound you play on the GR-20; in addition to the type of sound, a patch also contains settings for effects such as reverb and chorus. -
Page 15: Using The Switches Of The Gk Pickup To Select Patches
Let’s get started playing the GR-20. Check the following points. 1. Make sure that the GR-20 is in Play mode (the state it’s normally in immediately following power up). In some cases, you won’t hear any sound if the GR-20 is not in Play mode. -
Page 16: Using The Foot Pedal To Sustain The Sound (Hold)
When you’re ready to turn off the power, be sure to do so in the following order. 1. Turn off the power of your amp. 2. Turn off the power of the GR-20. 3. Turn off the power of the device connected to MIX IN. -
Page 17: Chapter 2 Using The Gr-20 With Guitar Effects
The sound of the guitar’s normal pickups will pass through the GK cable and be output from the GR-20’s GUITAR OUT jack. The sound that is processed by your effects unit can be connected to the GR-20’s MIX IN, and internally mixed with the GR-20’s synth sound. -
Page 18: Switching Between The Synth Sound And Guitar Sound
Chapter 2 Using the GR-20 with Guitar Effects Switching between the Synth Sound and Guitar Sound To switch between the synth sound and guitar sound, use the selector switch provided on your GK pickup. If the selector of your GK pickup (e.g., GK-3, GK-2A) is set to the GK position (labeled SYNTH on the GK-2A), the synth sound will be output. -
Page 19: Patch Link Setup (Patch Link Setup)
GR-20's MIDI IN. 2. Make sure that the MIDI transmit channel of your multi- effects unit is the same as the MIDI channel of the GR-20 (p. 18). 3. Press the [SYSTEM EDIT] button a number of times until the PATCH LINK SETUP/TRANSPOSE indicator lights. -
Page 20: Chapter 3 Editing The Sounds
Chapter 3 Editing The Sounds The GR-20 lets you modify the sound to your taste. This process is called “editing.” When you edit the settings, the decimal point in the display will light, indicating that the sound has been modified from the original settings. -
Page 21: Editing Other Parameters
Adjusting the Pitch —TRANSPOSE The pitch of the synth sound produced by the GR-20 can be raised or lowered in one-octave steps relative to the pitch you play on your guitar. -
Page 22: Selecting The Type Of Glide Effect-Glide Type
Chapter 3 Editing The Sounds Selecting the Type of Glide Effect—GLIDE TYPE You can select how the pitch changes when you press the GLIDE pedal. 1. Press the [GLIDE TYPE] button. fig.3-03(GLIDE TYPE) 2. Use the [NUMBER/VALUE] knob to change the setting. u1: GLIDE UP 1 d1: GLIDE DOWN 1 The pitch will change one semitone (up/... -
Page 23: Selecting The Type Of Hold Effect-Hold Type
Selecting the Type of Hold Effect—HOLD TYPE You can select the type of hold effect you’ll get when you press the HOLD pedal. 1. Press the [HOLD TYPE] button. fig.3-04(HOLD TYPE) 2. Use the [NUMBER/VALUE] knob to change the setting. H1: HOLD 1 The notes that were sounding when you pressed the pedal will be held, and any... -
Page 24: Storing The Sounds You Create (Write)
Chapter 3 Editing The Sounds b4: PITCH BEND 4 When the pedal is pressed, the pitch changes down to a semi tone (max.). b5: PITCH BEND 5 When the pedal is pressed, the pitch changes down to a whole tone (max.). b6: PITCH BEND 6 When the pedal is pressed, the pitch changes down to one octave (max.). -
Page 25: Chapter 4 Other Functions
Chapter 4 Other Functions Copying Patches Here’s how you can copy patch settings. You can copy only to the USER bank. 1. Select the copy-source patch (the patch you want to copy from). 2. Press the [WRITE] button. The BANK indicator will change to USER, and the display will blink. -
Page 26: Changing The Function Of The Foot Pedals (Sw Mode)
Hold function. Your GK pickup's UP/S2 switch and DOWN/S1 switch will move up/down through the patches. * This mode is selected when the GR-20 is shipped from the factory. Switch Mode 2 The HOLD pedal and GLIDE pedal will move up/down through the patches. -
Page 27: Loading Patches And System Parameter Settings From An External Device (Bulk Load)
5. Press the [WRITE] button. * If the power of the GR-20 was turned off while the data was being received, the transmitted data will not be written into the GR-20. If necessary, perform the Bulk Load operation once again. -
Page 28: Chapter 5 Connecting An External Sound Module Or Sequencer
Chapter 5 Connecting an External Sound Module or Sequencer You can use the GR-20 to play an external sound module via MIDI, or use it as an input tool for your sequencer. Connecting an External Sound Module or Sequencer Connect the GR-20 to your external sound module or computer (sequencer) as shown in the diagram. -
Page 29: Setting The Midi Channel (Basic Channel)
* You can select only channels 1–11. Channels 12–16 are not available. * If the output mode is set to “Mono Mode,” the GR-20 will use six channels starting with the channel you specify here. 1. Press the [SYSTEM EDIT] button a number of times until the MIDI CH/PLAY FEEL indicator lights. -
Page 30: Local Control Off
Local Control Off setting. If you make connections with this setting On, switches will not function, and the system will not operate correctly. * To turn Local Control on, turn the power of the GR-20 off, then on again. GR-20... -
Page 31: Chapter 6 Appendices
Settings (Factory Reset) If you want, you can get back all the settings and patches that the GR-20 had when you first took it out of the box; this process is called “Factory Reset.” You can restore the entire GR-20 to the factory-set state, or restore an individual user patch to its factory-set state. -
Page 32: Regarding Gr-20 Bass Guitar Support
The setting will be stored, and you will be in Play mode. * The decimal point of the display will blink while the setting is being stored. Do not switch off the GR-20’s power while this takes place. * Please note that the setting will not be stored if you neglect to return to Play mode before you switch off the unit. -
Page 33: Troubleshooting
Chapter 6 Appendices ● Internal effects not applied to the guitar sound ◆ The GR-20’s internal effects can only be applied to the synth sound. They cannot be applied to the normal guitar sound. → By using the guitar out jack you can apply an external guitar effects processor only to the guitar sound. -
Page 34: When Using The Gr-20 With Other Midi Devices
● Pitch does not change smoothly ◆ On the GR-20, could you have selected a patch such as piano or organ for which the pitch changes in semitone steps? → Select a patch on the GR-20 whose pitch will change smoothly. -
Page 35: Patch List
Patch List BANK NAME PIANO Grand E.P Rock Piano Piano / Bass 4-Hand Piano Honky Tonk Piano & Strings Piano & Orchestra Piano & Choir Oohs Piano & Choir Aahs West Coast Ac.Piano Hard Rhodes Rhodes Phaser Rhodes Touch Sense E.P Soft Rhodes Smooth Rhodes Love E.P... - Page 36 Chapter 6 Appendices BANK NAME BASS/ In Sync Throw up Basstortion Nylon Guitar Nylon Duet Nylon & Strings Nylon & Choir Ac.Guitar Ac.Guitar Oct Ac.Guitar + Low 12 Str Guitar 12 Str & Synth Strings 12 Str Heaven Guitar & Pad Feedback Whammy OD-Paradise...
- Page 37 BANK NAME STRINGS Playback Strings 2 /ORCH Moving Strings Clustered Farewell Wind & Strings Orchestra & Choir Ending Scene Strings & Warm Brass Strings & Bright Brass Strings & Horns 2 Synth Brass & Strings SYNTH/ Guitar Attack Soft Lead LEAD Digi Lead Attack Digi Lead...
- Page 38 Chapter 6 Appendices BANK NAME VOICE/ Choir Aahs Soft Choir Aahs Female Aahs Choir Oohs Pop Chorus Pop Voice Arpeggio Choir Melancholia Spaced Voxx Voice Pad 909 Choir & Sweep Wide Vox Choir & Pad 1 Choir & Pad 2 Chorus Vox Pad Heavenly Pad S&H Layer...
- Page 39 BANK NAME RHYTHM Agogo Bell /PERC Jublag Gamelan Set Kajar Asian Gong Finger Bell Balaphone Angklung Dragon Vox Set Vox & Perc. Kit Drum & Perc. Kit Drum Kit Machine & Perc. Kit Machine Kit Guiro & Cowbell Pattern Latin Perc. Set Conga Pattern Tabla &...
-
Page 40: User Patch List
Chapter 6 Appendices User Patch List BANK BANK BRASS Tp Section BASS/GTR Wood Bass PIANO Rhodes WIND Fat Tenor Sax STRINGS/ORCH Strings ORGAN/KB Rock Organ 1 ETHNIC Sitar & Morocco Phrase VOICE/PAD Choir Oohs RHYTHM/PERC Steel Drum PIANO Grand E.P BASS/GTR Fretless Bass 2 SYNTH/LEAD... -
Page 41: Midi Implementation
MIDI Implementation Model: GR-20 Date: Dec. 18 2003 Version: 1.00 1. Recognized Receive Data ■Channel Voice Message ●Note Off STATUS SECOND THIRD n=MIDI Channel Number: 0H - FH (ch.1 - ch.16) kk=Note Number: 00H - 7FH (0 - 127) vv=Velocity: 00H - 7FH (0 - 127) * Velocity is ignored. -
Page 42: System Exclusive Message
...ee = Data: 00H - 7FH (0 - 127) F7H: EOX (End Of Exclusive) * For more details, refer to the page of “Roland Exclusive message” and Section 3 or after. 2. Transmitted Data ■Channel voice messages ●Note Off... -
Page 43: Program Change
3. Exclusive Communications The GR-20 can transmit or receive system and patches parameters using system exclusive messages. Model ID of exclusive message available on the GR-20 is 00H 72H.Device ID is fixed at 10H. When the GR-20 receives an Identify Request inquiry message, it will transmit an Identity... - Page 44 ●Data Set 1: DT1 (12H) The GR-20 transmits this message in the following conditions. If the address matches with one of the parameter base addresses of the GR-20, the received data is stored at the specified address of the memory.
- Page 45 00H 00H 00H 00H Software Revision Level EOX (End of Exclusive) * When an Identity Request is received, the GR-20 will transmit the above Identity Reply. 4. Parameter Address Map Addresses and sizes are expressed in 7-bit hexadecimal values. Address...
- Page 46 GR-20 Patch Number /Example using RQ1/ To extract the all system parameters, send the following message to the GR-20. F0 41 10 00 72 11 00 00 00 00 00 00 00 10 70 F7 /Example using DT1/ To change OUTPUT LINE/AMP to GA and SW MODE to “2”, send the following message to the GR-20.
- Page 47 Reserve /Example using RQ1/ To extract all the data of patch USER BANK 50, send the following message to the GR-20. F0 41 10 00 72 11 01 00 31 00 00 00 00 10 3D F7 /Example using DT1/ If you want to set as the following the EXP PEDAL parameter of patch USER BANK 10 is “FL”, create data as the following and send it to your GR-20.
-
Page 48: Midi Implementation Chart
Chapter 6 Appendices MIDI Implementation Chart GUITAR SYNTHESIZER Model GR-20 Function... Default Basic Channel Changed Default Mode Messages Altered Note True Voice Number : Note ON Velocity Note OFF After Key's Touch Ch's Pitch Bend 0, 32 6, 38 Control... -
Page 49: Main Specifications
Main Specifications GR-20: GUITAR SYNTHESIZER • Sound Generator 1 part • Maximum Polyphony 48 voices • Patches User: 99 Preset: 469 • Display 7 segments, 2 characters (LED) • Effects MULTI-FX (included in the patches) Chorus Delay/Reverb • Connectors/Jacks GK IN... -
Page 50: Index
INDEX ATTACK ... 9, 20 BANK ... 8 Bank Select ... 29 BASIC CHANNEL ... 29 Bend Range ... 29 BULK DUMP ... 26 BULK LOAD ... 27 Channel ... 18 CHORUS ... 9, 20 Control change ... 29 CUTOFF FREQEUCY ... 21 DELAY ... - Page 51 For EU Countries IMPORTANT: THE WIRES IN THIS MAINS LEAD ARE COLOURED IN ACCORDANCE WITH THE FOLLOWING CODE. BLUE: NEUTRAL BROWN: LIVE As the colours of the wires in the mains lead of this apparatus may not correspond with the coloured markings identifying the terminals in your plug, proceed as follows: The wire which is coloured BLUE must be connected to the terminal which is marked with the letter N or coloured BLACK.
- Page 52 Information When you need repair service, call your nearest Roland Service Center or authorized Roland distributor in your country as shown below. AFRICA PHILIPPINES G.A. Yupangco & Co. Inc. 339 Gil J. Puyat Avenue EGYPT Makati, Metro Manila 1200, Al Fanny Trading Office...
Need help?
Do you have a question about the GR-20 and is the answer not in the manual?
Questions and answers