Power Plus AIR-102W - Ait Conditioner Remote Controller Manual
- User instruction (2 pages)
Advertisement
Product Introduction
Model AIR-102W All-purpose Air Conditioner Remote Controller has been designed to remotely control various brands and models of the air conditioners. This product is characteristic of point-to-point fast brand searching and automatic digital code searching with low power consumption, complete functions, long transmission distance, easy setting, simple operation and fresh visual appearance and comfortable hand feel which can facilitate you with unlimited convenience. The product has a large LCD screen which provides easy setting and operation. It has built-in clock, on/off timer and night illumination function which have facilitated more convenience for you.
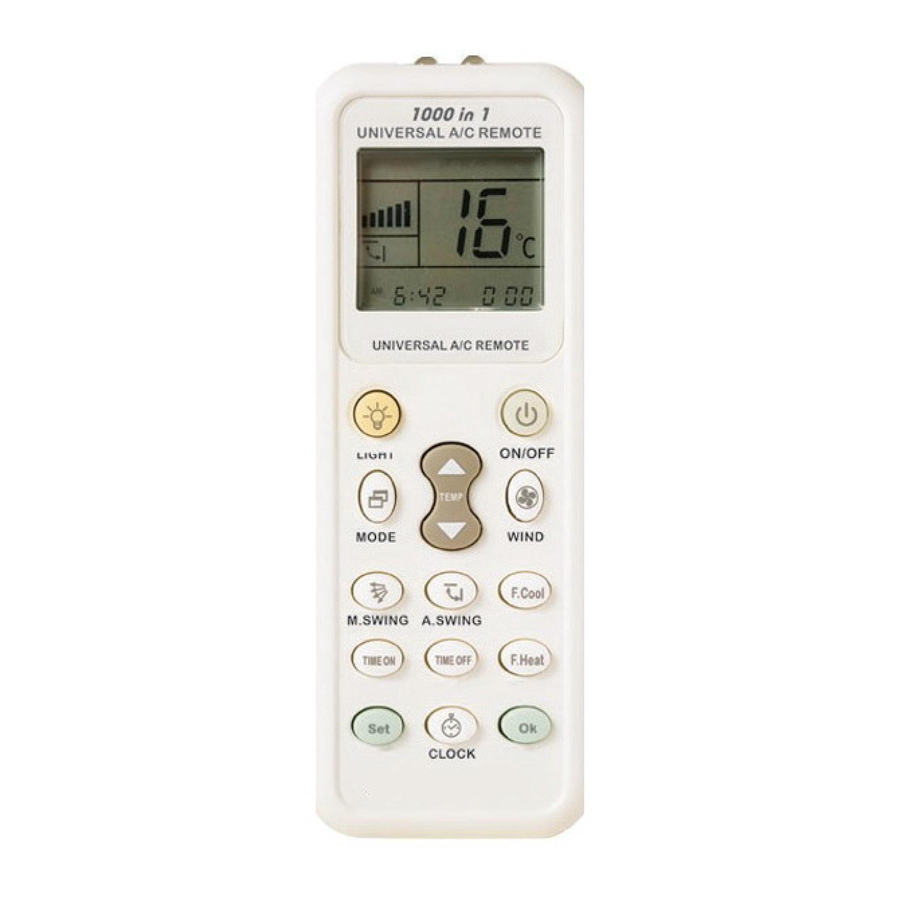
Panel Description

- Signal Sending Display
- Fan Display
- Blowing Direction Display
- Backlight
- Temperature "+" key
- Mode Key
- Automatic Blowing Direction Control Key
- Blowing Direction Control Key
- Timing OFF Key
- Timing ON Key
- SET
- Clock Function Key
- Run Mode Display
- Temperature Display
- Model Code
- Power Key
- Fan Key
- Temperature "- key
- Fast Cool Key
- Fast Heat Key
- Confirmation Button

Remarks:
Fast Cool/Heat Key
- Press Fast Cool key to automatically set the machine as refrigerating mode, 21℃, middle wind, automatic blowing direction;
- Press Fast Heat key to automatically set the machine as heating mode, 27℃, middle wind, automatic blowing direction.
No need to set:
Once the battery is loaded, the remote control can control the mainstream brands on the market: Gree (YB0F2), Midea, Toshiba, Chunlan, Haier, Mitsubishi Heavy Industries 388, Hualing and other brands.
Restore factory settings: press the buttons set and FAN simultaneously for three seconds to restore the factory settings.
Note: when the battery is loaded, the combination code does not have timing function. To use the timing function, please control according to the setting method described in the instruction book, which is corresponding to the model.
Battery Installation

- Remove the battery cover of the remote control, install two new 7# batteries;
- Install the battery cover. The time will appear in the left corner of LCD display.
Setting of Remote Control
This remote controller has four setting modes that are marked as A, B, C. Please select one mode for operation.
- The brand corresponding point-to-point fast searching
- Manually plug-in the air conditioner, aim the remote control at the receiving window of the air conditioner.
![]()
- Press the code key that corresponds to your brand and hold until the air conditioner is started by giving out a sound signal. Release the key and the setting is completed.
![]()
- Manually plug-in the air conditioner, aim the remote control at the receiving window of the air conditioner.


Table of brand corresponding keys
 |  |  |  |  |  |
| GREE/Haier | MD\TOSHIBA /CHANGHONG | SHARP\ KELONG | MITSUBISHI /OTHER | LG\ SAMSUNG | HITACHI\ Panasonic |
 |  |  |  |  | |
| SANYO\ HISENSE | CHIGO\ DAIKIN | FUJITSU\ CARRIER | CHUNLAN /AUX | SHINCO\ AUCMA |
- Manually input code
- Manually plug-in the air conditioner, find the type of the air conditioner in the Code Table, and find the first code, for example: Haier
![]()
- Hold SET button (for about three seconds) until the conditioner type code flickers in the window, press Temperature
![]() or
or ![]() buttons until the desired code flickers in the window. When the code is right, the air conditioner will start.
buttons until the desired code flickers in the window. When the code is right, the air conditioner will start.
![]()
- Press OK button and the selected conditioner type code will stop flickering.
![]()
- Test whether the remote control button has been effectively set. If yes, setting completes. And if no, repeat steps 2-3.
![]()
- Manually plug-in the air conditioner, find the type of the air conditioner in the Code Table, and find the first code, for example: Haier


- Digital automatic search type
- Manually plug-in the air conditioner, aim the remote control at the receiving window of the air conditioner.
![]()
- Hold SET button (for about six seconds) until the conditioner type code changes in the window, indicating you have entered the high-speed conditioner type search status. press OK button to stop searching until the air conditioner automatically starts.
![]()
- Test whether the functions of remote control buttons (excluding Temperature "
![]() " and "
" and "![]() " buttons, timed ON/OFF buttons, and SET button) are correct. If yes, the code is effectively set. If not, press SET button to continue once the search.
" buttons, timed ON/OFF buttons, and SET button) are correct. If yes, the code is effectively set. If not, press SET button to continue once the search.
![]()
- Manually plug-in the air conditioner, aim the remote control at the receiving window of the air conditioner.


Set Time Function
Press CLOCK button (for three seconds) to enter the clock setting status, and the clock will flicker. Use the Temperature " " or "
 " buttons to adjust the current time, and press CLOCK button again to exit setting.

Timing ON/OFF Function
To configure the timer function of the original remote control, press TIME ON or TIME OFF buttons, and the air conditioner timer lights will go on, indicating the air conditioner has entered the timed status.
※The timed ON function of some of the air conditioner types is only valid only in the Power Off status.
Warm Tips:

- This remote control is effective if the air conditioner receiver works normally.
- If this remote control is intended to be not in use for a long time, please remove the batteries.
- It may possibly caused internal program disorder if this remote control is not operated correctly, in case of that, please take out the battery, and install the batteries 35 minutes later, then the remote control may recover normal.
Applicable brand and code list
 ※ This company reserves the right to interpretation of the User's Manual. Design and technical parameters may vary without notice.

Documents / ResourcesDownload manual
Here you can download full pdf version of manual, it may contain additional safety instructions, warranty information, FCC rules, etc.
Download Power Plus AIR-102W - Ait Conditioner Remote Controller Manual
Advertisement

Need help?
Do you have a question about the AIR-102W and is the answer not in the manual?
Questions and answers