Table of Contents
Advertisement
Quick Links
Advertisement
Table of Contents

Related Manuals for Electrolux Zanussi FC 1200W


Summary of Contents for Electrolux Zanussi FC 1200W
- Page 1 WASHING MACHINE FC 1 200W I NSTR U C T I O N B O O K L E T 822 90 14-85...
-
Page 2: Table Of Contents
Contents For the user For the installer Important safety information Technical specifications Description of the appliance Unpacking the machine - Machine front - If the machine is damaged - Machine rear - When lifting the machine - The control panel - Transit locking devices - Identification of materials Using your appliance... -
Page 3: Important Safety Information
Important safety information Before installing and first using the washing machine, read the instruction booklet carefully, including its hints and warnings. Doing so will ensure that your machine will perform properly and to best advantage. Anyone using the machine should be thoroughly familiar with its instructions for use and safety features. -
Page 4: Description Of The Appliance
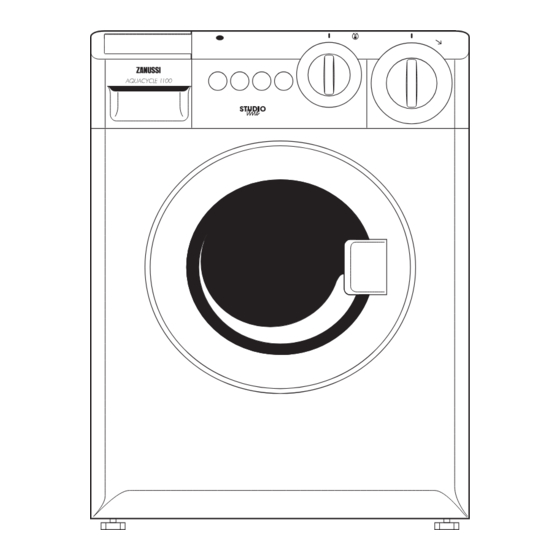
Description of the appliance Machine front Control panel Door Door latch All feet adjustable Machine rear Transit locking Electrical lead devices Discharge hose Inlet hose, cold fill - 4 -... -
Page 5: The Control Panel
Description of the appliance The control panel Push-button switches Knob controls and detergent dispenser – After selecting the wash programme and Temperature control – For setting temperatures temperature, push this button in to start the machine. between and 90°. Follow care label recommen- (See 8, Indicator light). -
Page 6: Using Your Appliance
Using your appliance The very first time that the machine is used you should run a wash programme with no load in the drum, to clear any residues which may have been left by the manufac- turing process. Pour approx. 100 ml of detergent straight into the drum and run programme G, 40°... -
Page 7: Hints & Tips
Hints & Tips For Best Washing Results Always: • Load the laundry loosely alternating large items with • Empty pockets. small ones. • Ensure buttons and zips are fastened. • Sort the laundry according to the type of fabric, colour •... -
Page 8: Programme Chart
Programme chart Cotton (dry load weight: 3.0 kg) Load Degree of Progr. Temp. Progr. time Programme type soiling selection setting (min.) content 90° programme with White Heavily ~147 pre-wash. 3 rinses and articles soiled spin at 1 100 rpm. 90° programme without White Normally pre-wash. - Page 9 Synthetics and Delicate (dry load weight: 1.5 kg) Wool (dry load weight: 1.0 kg) Load Degree of Progr. Temp. Progr. time Programme type soiling selection setting (min.) content 60° programme without Normally pre-wash. Synthetics soiled 3 rinses and spin at 600 rpm.
-
Page 10: Wash Symbols
Wash symbols Wash care labels inside garments recommend how to launder your clothes with the best results. The care labelling code is in line with care labelling used in the rest of Europe. The symbols used make it easy to select the correct programme on your washing machine. -
Page 11: Which Detergent
Which detergent? To ensure you obtain the best wash results from your Coloureds appliance, it is important to use the right detergent in For coloured items you should use a your everyday wash, and only detergents recommended detergent which is designed to clean for use in automatic machines. -
Page 12: Maintenance And Cleaning
Maintenance and cleaning The cabinet Use a container such as a bowl to catch water running out of it. Clean the outside surfaces of the machine using a mild (non-abrasive) household cleaning product. Finish by Turn the programme control knob to an Drain pro- removing remaining traces of the product with a damp cloth. -
Page 13: Something Not Working
Something Not Working Certain problems are due to lack of simple maintenance or oversights, which can be solved easily without calling out an engineer. Before contacting your local Service Force Centre, please carry out the checks listed below. Symptom Check Have you pressed the ON/OFF button? The machine will not start. -
Page 14: Service
Customer Care Department For general enquiries concerning your Zanussi Electrolux appliance or for further information on Zanussi Electrolux products, please contact our Customer Care Department by letter or telephone at the address below or visit our website at www.zanussi.co.uk... -
Page 15: Guarantee Conditions
Standard guarantee conditions We, Zanussi Electrolux, undertake that if within 12 months of the date of the purchase this ZANUSSI ELECTROLUX appliance or any part thereof is proved to be defective by reason only of faulty workmanship or materials, we will, at our option repair or replace the same FREE OF CHARGE for labour, materials or carriage on condition that: •... -
Page 16: Technical Specifications
Installation instructions Any electrical work required to install this appliance should be carried out by a qualified electrician or competent person. Any plumbing work required to install this appliance should be carried out by a qualified plumber or competent person. Technical specifications DIMENSIONS Height... -
Page 17: Unpacking The Machine
Unpacking the machine If the machine is damaged If the machine has been damaged during transportation, you should immediately notify the company responsible for delivering it. Check that the washing machine is undamaged. If you discover any damage, faults or that anything is missing, you should notify the seller immediately. -
Page 18: Installation
Installation The machine must be installed on a sound and firm surface and must not be touching walls or furniture. Levelling the machine Adjust the feet to level the machine. Make sure the machine is standing on all four feet. Accurate levelling prevents vibration, noise and displacement of the machine during operation. - Page 19 Water drainage If you intend the drain hose from the machine to empty into a sink, make sure that the sink is empty and that the plug hole is not blocked. If the machine is permanently plumbed in, hook the end of the hose into a standpipe installed for the purpose.
- Page 20 © Electrolux plc 2003...
- Page 21 This file has been downloaded from: www.UsersManualGuide.com User Manual and User Guide for many equipments like mobile phones, photo cameras, monther board, monitors, software, tv, dvd, and othes.. Manual users, user manuals, user guide manual, owners manual, instruction manual, manual owner, manual owner's, manual guide, manual operation, operating manual, user's manual, operating instructions, manual operators, manual operator, manual product, documentation manual, user maintenance, brochure, user reference, pdf manual...
Need help?
Do you have a question about the Zanussi FC 1200W and is the answer not in the manual?
Questions and answers