Table of Contents
Advertisement
Quick Links
Advertisement
Table of Contents

Related Manuals for Sight mark SM18050


Summary of Contents for Sight mark SM18050
- Page 1 USER MANUAL USER MANUAL WRAITH MONOCULAR SM18050...
- Page 2 ® ABOUT SIGHTMARK While Sightmark’s MAKE YOUR MARK tagline perfectly illustrates our mission to provide uncompromising accuracy in virtually any environment, to us, those three words mean quite a bit more. MAKE YOUR MARK represents our commitment; first, to those who serve; second, to our Constitutional right to bear arms, the right ensuring all others remain intact;...
- Page 3 WRAITH 4K MONOCULAR Sightmark’s Wraith Monocular combines high quality imaging with durability and ease of use that make this digital night vision monocular an essential part of any night hunter’s arsenal. Its 8x digital magnification, 4k sensor resolution (3840x2160) with object detection of up to 300 yards and a 1280x720 FLCOS screen, while its HD video capabilities at 720/1080/4K resolutions and IR illumination capabilities are a testament to the quality and reliability of its imaging.
- Page 4 TECHNICAL SPECIFICATIONS SM13140 Sensor Resolution 4K (3840x2160) Sensor Type CMOS Display Resolution 1280x720 Display Type FLCOS Magnification (x) 1-8x Objective Lens 17mm Mount Type Picatinny (not included) NV Detection Range 300/274 IR Illuminator IR Wavelength 850 nm Video/Audio Recording Diopter Adjustment (+/-) -6 to +3 Field of View, ft@100yd Minimum Focusing Distance, ft/m...
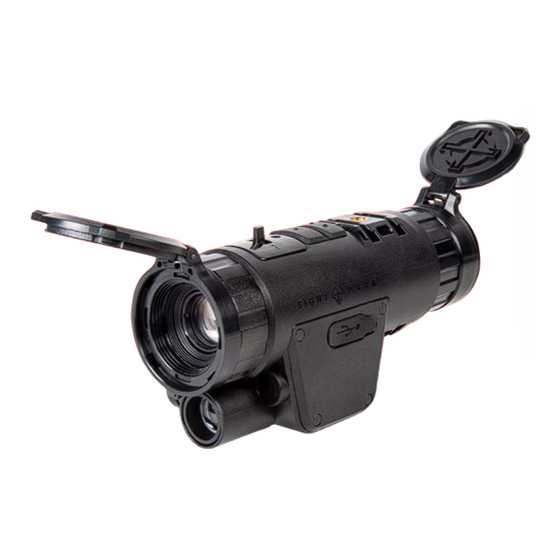
- Page 5 DIAGRAM 1. Eyepiece (diopter adjustment) 2. Area for Bridge Mount 3. Controls 4. Focus Adjustment 5. Objective Lens 6. IR Illuminator 7. IR Focus Adjustment 8. Battery Cover and Latch 9. Card Slot 10. USB Port...
-
Page 6: Installing The Battery
INSTALLING THE BATTERY The Sightmark Wraith 4K Monocular uses two CR123A batteries. It is recommended to use batteries of the same type and same charge for best performance. To install new batteries: 1. Open battery compartment by pressing the spring-loaded latch. 2. -
Page 7: Diopter Adjustment
MOUNTING The unit attaches to a head mount. (not included) To attach: 1. Slide the optic onto the bridge mount. 2. Adjust the position to be correct for your eye. 3. Insert the screw into the top of the unit and tighten it. DIOPTER ADJUSTMENT Look through the unit at the screen while the unit is on. - Page 8 VIEWFINDER 1. Profile 2. Magnification 3. Date 4. Time 5. Memory card status 6. Day/night mode 7. Battery status 5 6 7...
- Page 9 CONTROLS Digital Zoom - Use the toggle on the top of the unit to adjust the magnification. This unit has a digital magnification range up to 8x. Day/Night/Green Mode - Press and hold the button with 2 dots for 2-3 seconds to toggle between day, night, and Night Custom.
-
Page 10: Resolution Settings
RESOLUTION SETTINGS To change resolution setting: 1. Open the menu and go to Settings and then Resolution. Settings Resolution 2. Use the toggle switch to select the desired resolution. 3. Use the center button to save and exit the setting. VIDEO RECORDING AND PHOTO MODE To switch between video recording and photo mode: 1. -
Page 11: Brightness Settings
VIDEO RECORDING AND PHOTO MODE ( cont To watch playback of videos: 1. Open the menu and go to Playback. Playback 2. Use the toggel switch to look through the existing photos and videos. 3. Press the center button to watch the video. BRIGHTNESS SETTINGS To Adjust Brightness: 1. -
Page 12: Time And Date
TIME AND DATE To set the time/date: 1. Open the menu. 2. Go to settings and then Time/Date. Settings Time/Date 3. Select Time Set or Date. 4. Adjust Time/Date using toggle switch. 5. Press the center button to save and exit. FIRMWARE To update the firmware: 1. - Page 13 To perform a factory data reset: 1. Open the menu using the center button. 2. Go to Settings and then Factory Data Reset. Settings Factory Data Reset 3. Use the arrow buttons to navigate to Yes and select it with the center button. Warning: This will completely reset the unit to factory settings including all reticle zero settings.
- Page 14 MENUS Use the up and down buttons to scroll through c. Format Card and the center button to select. The left button i. Are you sure? (Format Card) can be used to exit menus. ii. Cancel d. Factory Data Reset 1.
-
Page 15: Maintenance
MAINTENANCE Proper maintenance of the Sightmark Wraith is recommended to ensure longevity. Attempts to disassemble or repair the unit will void the warranty. It is recommended that when the unit becomes dirty that it is wiped down with a dry or slightly damp cloth. -
Page 16: Troubleshooting Continued
TROUBLESHOOTING ( continued There are light or black dots on the display: 1. The presence of dots on the display is caused by sensor production technology and is not a defect. No action is required. The image is not in focus: 1. - Page 17 This device complies with Part 15 of the FCC Rules. Operation is subject to the following two criteria: (1) This device may not cause harmful interference, and (2) This device must accept any interference received, including interference that may cause undesired operation. Warning: Changes of modifications to this unit is not expressly approved by the party responsible for compliance could void the user’s authority to operate the equipment.
- Page 18 www.sightmark.com...
Need help?
Do you have a question about the SM18050 and is the answer not in the manual?
Questions and answers