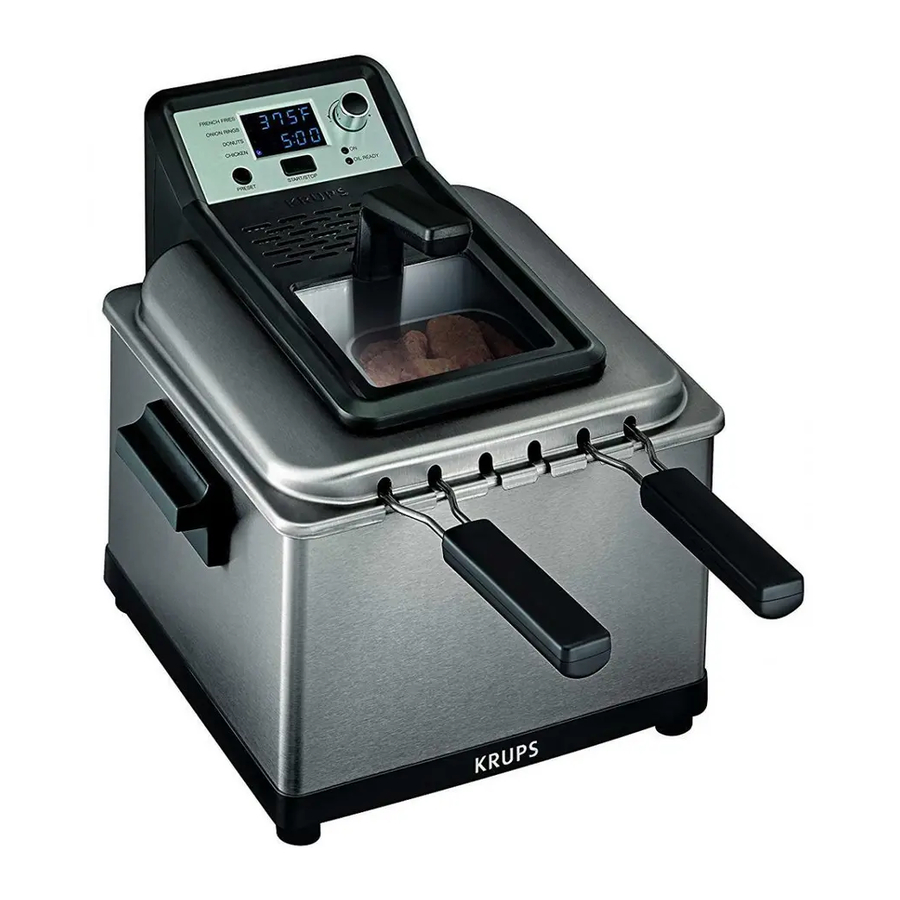
KRUPS KJ502D51 - 4.5L Deep Fryer with 3 Baskets Manual
- User manual (33 pages)
Advertisement
IMPORTANT SAFEGUARDS
When using electrical appliances, basic safety precautions should always be followed, including the following:
- Read all instructions before using.
- Do not touch hot surfaces. Use handles or knobs.
![shock hazard]() To protect against electric shock, do not immerse cord, plugs or fryer in water or other liquid.
To protect against electric shock, do not immerse cord, plugs or fryer in water or other liquid.- Close supervision is necessary when any appliance is used by or near children.
- Unplug from outlet when not in use and before cleaning. Allow to cool before putting on or taking off parts, and before cleaning the appliance.
- Do not operate any appliance with a damaged cord or plug or after the appliance malfunctions, or has been damaged in any manner. Return appliance to the nearest authorized service facility for examination, repair or adjustment.
- The use of accessory attachments not recommended by the appliance manufacturer may cause injuries.
- Do not use outdoors.
- Do not let cord hang over edge of table or counter, or touch hot surfaces.
- Do not place on or near a hot gas or electric burner, or in a heated oven.
- Extreme caution must be used when moving fryer containing hot oil.
- Always attach plug to appliance first (depending on model), then plug cord in the wall outlet. To disconnect, turn any control to "off", then remove plug from wall outlet.
- Do not use appliance for other than intended use.
- Be sure handles are properly assembled to basket and locked in place. See detailed assembly instructions.
- SAVE THESE INSTRUCTIONS
- FOR HOUSEHOLD USE ONLY.
![]()
POSSIBLE ERUPTION. WATER'S REACTION TO HOT OIL IS EXTREMELY VOLATILE. PLEASE ENSURE NO MATTER WHAT THE RECIPE STATES, FOOD MUST BE DRIED THOROUGHLY BEFORE IMMERSING IN HOT OIL.- Before use, check that your local voltage corresponds with the specifications shown on the appliance nameplate located on the back of the control panel.
- Only connect the appliance to electrical sockets which have a minimum load of 15A. If the sockets and the plug on the appliance should prove incompatible, get a professionally qualified technician to replace the socket with a more suitable one.
![]()
This electrical equipment operates at high temperatures which may cause burns. Do not touch the hot surfaces of the appliance (housing, plastic parts...).- To ensure safe operation, oversized foods must not be inserted into the appliance.
- Do not overload the frying baskets. For safety reasons never exceed the maximum quantity.
- The cooking times are given as guidelines only.
- Do not leave the cord hanging.
- Do not unplug the appliance by pulling on the cord.
- Always unplug the appliance immediately after use, when moving it and prior to any cleaning or maintenance.
- In the event of fire, never try to extinguish the flames with water. Unplug the appliance. Close the lid, if it is not dangerous to do so. Smother the flames with a damp cloth.
- Do not move the appliance when it is full of hot food.
- Never immerse the appliance in water!
- This appliance is not suitable for recipes with a high-liquid content (eg. soups, cooking sauces...).
- Never turn on the appliance if the frying basket is empty.
- Do not overfill the frying basket, never exceed the indicated quantities.
- Ensure that the bowl is completely dry after washing and before use.
- The oil level must always be between the Min. and Max. markings.
- Never operate your fryer without any oil.
- This appliance is not intended to be operated by means of an external timer or separate remote control system.
- This appliance is not intended for use by persons (including children) with reduced physical, sensory or mental capabilities, or lack of experience and knowledge, unless they have been given supervision or instruction concerning use of the appliance by a person responsible for their safety. Children should be supervised to ensure that they do not play with the appliance.
- This appliance is intended to be used in households only.
It is not intended to be used in the following applications, and the guarantee will not apply for:- staff kitchen areas in shops, offices and other working environments;
- Farms houses;
- by clients In hotels, motels and other residential type environments;
- bed and breakfast type environments.
- If the supply cord is damaged, it must be replaced by the manufacturer, its service agent or similarly qualified persons in order to avoid a hazard.
- Keep the appliance and its cord out of reach of children less than 8 years.
- If you have any problems, contact the authorized after-sales service or the Internet address www.krups.com
- To turn off the power press the START/STOP button and unplug the breakaway power cord from the wall outlet.
![]()
Over tightening can result in stripping of screws or nuts or cracking of handle or feet.

POLARIZATION INSTRUCTIONS
 This appliance has a polarized plug (one blade is wider than the other). To reduce the risk of electric shock this plug Is intended to fit Into a polarized outlet only one way. If the plug does not fit fully into the outlet, reverse the plug. If It still does not fit, contact a qualified electrician. Do not attempt to modify the plug in any way.
SHORT CORD INSTRUCTIONS
Do not use with an extension cord.
A short power-supply cord is to be provided to reduce the risk resulting from becoming entangled in or tripping over a longer cord.
Magnetic connector
The cord is equipped with a detachable magnetic connector. The magnetic connector should be attached directly to the fryer. THIS SHOULD BE DONE PRIOR TO PLUGGING THE CORD INTO THE WALL OUTLET.

Environment protection first!
 Your appliance contains valuable materials which can be recovered.
 Leave it at a local civic waste collection point.
PARTS & ACCESSORIES

- Lid Assembly
- Odor Filter
- Filter Cover
- Cool Touch handle
- Viewing Window
- Housing
- Stainless Steel oil container
- Cool Touch Handles
- Electronic Assembly
- Control Panel (refer below for more detail)
- Breakaway cord
- Heating element
- Large Fry Basket with cool touch handle
- Small Fry Baskets with cool touch handles (two)
- Reset
CONTROL PANEL

- Presets – our recommended settings for your favorite fried foods
- French Fries – for use with frozen French fries
- Onion Rings
- Donuts
- Chicken
- PRESET Button – Scroll and select preset options
- DUAL LEVEL DISPLAY – Displays currently selected time and temperature
- TEMP/TIME Knob – Adjust time and temperature by turning the knob; press down on the knob to switch from one to the other
- ON indicator – Red light indicates when the heating element is on
- OIL READY indicator – Green light indicates when the oil has reached your desired temperature
- START/STOP Button – Press to begin heating and countdown time. Press and hold to stop heating at any time
BEFORE FIRST USE
- Remove all packaging and stickers from your deep fryer
- Thoroughly clean the oil container, lid and baskets to remove any dust or residue remaining from manufacturing.
- Attach the cool touch basket handles to the baskets
- Squeeze the handle rods together placing the ends into the loop of the basket.
Ensure the handle stem is placed beneath the locking bracket on the basket as shown in the image.
![]()
- Squeeze the handle rods together placing the ends into the loop of the basket.

Note: Serious injury can occur if your handle is not properly locked in place.
SET UP
- Place the unit on a stable horizontal flat surface.
- Attach the magnetic end of the power cord to the unit.
![]()
- Ensure the Electronic Assembly (controls and heating element) is firmly in place.
![]()
- Line up the control panel with the grooves on the rear of the unit and slide down.


Note: Your Deep Fryer is equipped with a safety microswitch which will not allow the control panel to work unless it is properly seated into both grooves in the housing.
- Add desired amount of oil, making sure not to fill below the Min or above the Max line.
- Plug the pronged end of cord into a standard 120V outlet. The display will automatically switch on and will show default temperature.
Note: always attach the cord to the Fryer before plugging into the outlet.
FRYING
- Select your cooking temperature
- The current temperature will flash indicating that the unit is in SET TEMP mode.
- Turn the knob to your desired temperature.
- If desired, select your cooking time
- Press and release the knob to switch to SET TIME mode. The current time will flash.
- Turn the knob to your desired cooking time.
Note: Switch between TEMP & TIME mode at any time by pressing the knob.
- Press Start to begin heating. Once the oil has reached the set temperature the OIL READY light will illuminate.
- Place food into the basket and gently submerge the basket into the hot oil.
- Close lid to avoid splatter.
- Start the countdown timer by pressing the START button again.
Note: When the fryer is on, change your settings with the TIME/TEMP Knob. The unit will automatically adjust.
- Your fryer will beep to alert you when the countdown timer has reached 00:00. When your food is done, remove the lid and lift the basket from the oil.
- Hook your basket onto the oil container rim in order to drain.
- Once oil has drained, remove the basket and place food onto a paper-towel lined dish.
- To put your machine on stand by, press and hold the START/STOP button for 3 seconds. The unit will beep and the display and heater will turn off. to turn on again, you can press any button.
USING PRESETS
We've made it easy to cook your favorite fried foods with our presets.
- Select your desired preset by pressing the PRESET button – our recommended cooking temperature and time for your selection will automatically show on the display.
- Begin frying by following the above Frying directions.
TIPS & HINTS
USE
- Make sure the green ready light is on before lowering food into oil.
- Too much food will prevent the food from moving around and browning evenly. In addition, it may slow down the cooking time. Fry in smaller batches for faster, crispier fried food.
OIL
![burn hazard]() When selecting oil to use in your Deep Fryer, choose a high quality brand of peanut oil, canola oil, sunflower oil or vegetable oil. These fats can withstand high temperatures well. Do not use butter, margarine, animal fats or olive oil because these smoke at lower temperatures. Do not mix different oils. Do not use shortening or lumps of fat as your Deep Fryer thermostat will overheat and could cause a flash fire.
When selecting oil to use in your Deep Fryer, choose a high quality brand of peanut oil, canola oil, sunflower oil or vegetable oil. These fats can withstand high temperatures well. Do not use butter, margarine, animal fats or olive oil because these smoke at lower temperatures. Do not mix different oils. Do not use shortening or lumps of fat as your Deep Fryer thermostat will overheat and could cause a flash fire.- Cover and refrigerate the oil between uses to maintain freshness.
- Change oil often and dispose of responsibly. Do not pour down the sink drain. Check with local regulations for proper disposal.
- Keep oil for frying seafood and fish separate from oil used for potatoes and other milder items.
 When selecting oil to use in your Deep Fryer, choose a high quality brand of peanut oil, canola oil, sunflower oil or vegetable oil. These fats can withstand high temperatures well. Do not use butter, margarine, animal fats or olive oil because these smoke at lower temperatures. Do not mix different oils. Do not use shortening or lumps of fat as your Deep Fryer thermostat will overheat and could cause a flash fire.
MOISTURE
- Before deep frying any foods, remove excess moisture by blotting well with a paper towel.
- Do not add water, wet foods, or icy frozen foods to hot oil, because this will cause the oil to spatter, which may result in injury.
COOKING
- When frying battered foods, shake off any excess batter or coating before putting in the oil.
- Never pour salt into the oil. Instead, salt the food while it is hot and draining on a paper towel.
- Frozen foods can be cooked in the basket. Follow directions on food package. Use caution when lowering the basket in the oil, as the ice crystals can cause splattering. Always lower slowly into the oil.
- After cutting potatoes for French fries or potato chips, wash in cold water to remove starch. This will keep them from sticking together. Dry completely before frying.
- Never place any plastic utensils into hot oil. Do not pour hot oil into plastic containers.
RECIPE
Chicken Wings with Dill Ranch Sauce
Makes 24 pieces
Ingredients:
- 1 gallon vegetable oil
- 2 ½ pounds chicken wings
Coating:
- 3 tablespoons corn starch
- 1 teaspoon smoked paprika
- ½ teaspoon kosher salt
- ¼ teaspoon freshly cracked pepper
Dressing:
- ½ cup Ranch style dressing
- ¾ teaspoon dried dill weed
- ¼ teaspoon garlic powder
Directions:
- Place vegetable oil in fryer container. Cover; set temperature to 375ºF. Let oil heat until ready light goes on.
- Meanwhile, cut tips off chicken wings and discard; then cut each wing in half at the joint. There should be 24 pieces. Pat each chicken wing piece dry with paper towel; set aside.
- In large bowl stir together coating ingredients. Place chicken wing pieces in coating mixture and toss until well coated.
- Place fryer basket in hot oil. Carefully place about 8 chicken wing pieces in fryer, one at a time. Cover fryer and cook for 10 to 12 minutes or until chicken pieces are golden brown and chicken reaches 165ºF on inside. Remove chicken wing pieces from fryer and drain on several layers of paper towels. Repeat with remaining chicken wing pieces.
- In small bowl stir together all dressing ingredients. Serve chicken wings with dill dressing. Refrigerate leftovers.
Buttermilk Onion Rings
Makes 6 servings
Ingredients:
- 1 gallon vegetable oil
- 1 to 2 large sweet yellow onions (about 1 pound), peeled, cut into 3/8-inch slices (rings) – 2 cups buttermilk
- 3 tablespoon Dijon mustard
- 2 eggs, beaten
- ¼ cup corn starch
Breading:
- 2 cups Panko bread crumbs
- 1 teaspoon kosher salt
- ½ teaspoon freshly cracked pepper
Directions:
- In large bowl stir together onion rings, buttermilk, and Dijon mustard. Set in refrigerator at least 1 hour.
- Meanwhile, place vegetable oil in fryer; cover and preset for onion rings at 375ºF.
- Place corn starch in pie plate. Place beaten eggs in second pie plate.
- In large bowl stir together all breading ingredients.
- To coat onion rings: One at a time, remove an onion ring from buttermilk mixture. Coat with corn starch, then coat well with beaten egg. Next, coat with breading mixture; set breaded rings on cooling rack. Repeat with remaining onion rings.
- Carefully place large frying basket into hot oil. Place about 6 onion rings in fryer. Cover; cook for preset time of 4 minutes or until batter is golden brown. Remove cooked onion rings from basket and let cool slightly on paper towel lined plate to absorb excess oil. Repeat with remaining coated onion rings. Refrigerate leftovers.
- Enjoy.
Homemade Doughnuts with Ginger Beer Glaze
Makes 6 servings
Ingredients:
- 1 gallon vegetable oil
Donuts:
- ¼ cup butter, softened
- 1/3 cup sugar
- 1/3 cup firmly packed light brown sugar
- 3 ½ cups all-purpose flour
- 2 teaspoons baking powder
- 1 teaspoon salt
- ½ teaspoon baking soda
- ½ teaspoon ground cardamom
- 2 eggs, room temperature
- ½ cup buttermilk
- ½ teaspoon real vanilla extract
Glaze:
- 1 cup confectioners' sugar
- 2 tablespoons ginger beer
OR
- 1 cup sugar
- ½ teaspoon ground cardamom
Directions:
- Place vegetable oil in fryer; cover and set temperature for 375ºF.
- In large mixer bowl place butter and both sugars. Beat, scraping bowl often, until mixture resembles small pebbles (about 1 to 2 minutes). Add eggs, one at a time, beating well after each addition; add buttermilk and vanilla, mix well. In medium mixing bowl stir together flour, baking powder, salt, baking soda, and cardamom. Add dry ingredients to buttermilk mixture and mix until dough comes together. Dough is slightly sticky.
- On well floured surface and using a well-floured rolling pin, roll out dough to ½ inch thick. Using a 3-inch biscuit cutter, cut out round rings of dough. Using a 1-inch cutter, cut center out of larger round. Reroll remaining dough and repeat cutting. Let donut rings and donut holes set on a cooling rack for 15 minutes.
- Add about 6 donut rings to fryer at a time. Cover and fry for 1 minute; turn donuts over, continue frying 1 additional minute, or until golden brown. Remove from fryer and let drain on paper towel lined tray. Repeat with remaining dough rings and donut holes.
- Meanwhile, in small bowl stir together confectioners' sugar and ginger beer. Drizzle over donuts and donut holes. Let cool.
TIP: If desired, stir together sugar and cardamom and sprinkle or roll donuts in mixture. Let cool.
Homemade French Fries
Makes 4 servings
Ingredients:
- 1 gallon vegetable oil
- 1 pound Russet Potatoes (about 2 large), rinsed, cut into 3/8-inch strips
- Kosher salt
Directions:
- Place vegetable oil in fryer and turn on preset French fry setting (350ºF). Heat until indicator light goes on.
- Rinse cut potato strips in cold water to remove starch. Let French fry strips sit in a bowl of cold water for 30 minutes. Remove fries from water and pat dry with a clean towel or paper towels.
- Place about ½ French fry strips in each of the two small baskets then place baskets in hot oil. Set timer for 6 minutes. When timer goes off or French Fries are golden color, lift baskets from oil and let drain on side of fryer. Turn out onto paper towel lined plate and sprinkle with salt. Enjoy.
COOKING TABLES
Cooking times are suggestions. Adjust them according to your own preference and the amount of food being cooked. Do not overfill the frying basket or exceed 3/4 lbs in the small baskets, or 1 ½ lbs in the large basket.
| FOOD | TEMPERATURE | TIME |
| French Fries | 350ºF | 6 minutes |
| Onion Rings | 375ºF | 3 minutes |
| Chicken Fingers | 375ºF | 4 minutes |
| Doughnuts | 375ºF | 3 minutes |
| Chicken Tenders/Nuggets | 375ºF | 3 minutes |
| Fresh Eggplant Slices | 375ºF | 3 minutes |
| Fish Sticks | 375ºF | 3 minutes |
| Fish Filet (breaded) | 375ºF | 6 minutes |
| Pork Chops (breaded) | 375ºF | 4 minutes |
| Pork Chops (batter) | 375ºF | 6 minutes |
| Veal Cutlets (breaded) | 375ºF | 4 minutes |
| Veal Cutlets (batter) | 375ºF | 6 minutes |
| Corn Dogs | 350ºF | 6 minutes |
| Potato Chips | 350ºF | 3 minutes |
| Chicken Breast (batter) | 375ºF | 3-4 minutes |

Do not add water, wet foods or icy frozen foods to cooking oil, because this will cause the oil to splatter and may result in injury. Do not move the Deep Fryer while cooking, or at any time when the oil is hot.
Do not attempt to empty the oil while the oil is hot. Do not touch any metal surfaces of your Deep Fryer as they are hot and can cause burns.
Do not store the product outdoor.
Store your appliance in a dry and ventilated place.
CLEANING & MAINTENANCE

Do not attempt to clean your Deep Fryer or drain the oil while either the Deep Fryer or the oil is hot. Allow unit to completely cool.
- Before cleaning, unplug the breakaway cord from the wall outlet first, and then from your Deep Fryer and wait for the Deep Fryer to cool completely.
- Remove the control panel with heating element from the housing by lifting vertically.
- Never immerse the control panel in any liquid. Clean the heating element with hot, soapy water, being careful not to wet the control panel.
- Clean the exterior of the control panel with a slightly damp cloth.
- Wash frying baskets, and oil container in warm, soapy water and dry thoroughly or in the dishwasher.
- Wipe the deep fryer housing with a damp cloth. Always ensure that all components are dried thoroughly, as any residual water will cause splattering of oil.

Do not immerse the Deep Fryer control panel or breakaway power cord in water or other liquid. Always hand wash as described above and dry thoroughly. Any other servicing should be performed by an authorized service representative.
RESET FUNCTION
- Your appliance is equipped with an overheating security feature located below the control panel.
- If you use your fryer without oil the safety cut-off is activated and the appliance will shut off automatically.
- In this case, unplug the appliance and let it cool (about 10 minutes).
- After the bowl has been filled with oil, plug the appliance in. Then press the safety cut-off RESET button with a toothpick or similar nonmetallic object.
- If the problem with the safety cut-off persists, please contact our Helpline.

Documents / Resources
References
Download manual
Here you can download full pdf version of manual, it may contain additional safety instructions, warranty information, FCC rules, etc.
Download KRUPS KJ502D51 - 4.5L Deep Fryer with 3 Baskets Manual
Advertisement


Need help?
Do you have a question about the KJ502D51 and is the answer not in the manual?
Questions and answers