KRUPS OK505D51 - Convection Toaster Oven with Digital Controls Manual
- Manual (29 pages)
Advertisement
IMPORTANT SAFEGUARDS
When using electrical appliances, basic safety precautions should always be followed, including the following:
- Read all instructions before using.
- Do not touch hot surfaces. Use handles or knobs.
![shock hazard]() To protect against electric shock, do not immerse or partially immerse cord, plugs or appliance in water or other liquid.
To protect against electric shock, do not immerse or partially immerse cord, plugs or appliance in water or other liquid.- Close supervision is necessary when any appliance is used by or near children.
- Unplug from outlet when not in use and before cleaning. Allow to cool before putting on or taking off parts, and before cleaning the appliance.
- Do not operate any appliance with a damaged cord or plug, or after the appliance malfunctions or has been damaged in any manner. Return appliance to the nearest authorized service facility for examination, repair or adjustment.
- The use of accessory attachments not recommended by the appliance manufacturer may cause injuries.
- Do not use outdoors.
- Do not let cord hang over the edge of table or counter, or touch hot surfaces.
- Do not place on or near a hot gas or electric burner, or in a heated oven.
- Extreme caution must be used when moving an appliance containing hot oil or other hot liquids.
- To disconnect, turn the product to OFF, then remove plug from wall outlet.
- Do not use appliance for other than intended use.
- Use extreme caution when removing tray or disposing of hot grease.
![burn hazard]()
![shock hazard]()
Oversized foods or metal utensils must not be inserted in a toaster oven, as they may create a fire or risk of electric shock.![shock hazard]() Do not clean with metal scouring pads. Pieces can break off the pad and touch electrical parts involving a risk of electric shock.
Do not clean with metal scouring pads. Pieces can break off the pad and touch electrical parts involving a risk of electric shock.![burn hazard]() A fire may occur if the toaster oven is covered or touching flammable material including curtains, draperies, walls and the like, when in operation. Do not store any item on top of the appliance when in operation.
A fire may occur if the toaster oven is covered or touching flammable material including curtains, draperies, walls and the like, when in operation. Do not store any item on top of the appliance when in operation.- Extreme caution should be exercised when using containers constructed of materials other than metal or glass.
- Do not store any material, other than manufacturer's recommended accessories, in this oven when not in use.
- Do not place any of the following materials in the oven: paper, cardboard, plastic, and the like.
- Do not cover crumb tray or any part of this oven with metal foil. This will cause overheating of the oven.
- To turn off the oven, press the START/STOP button on the control panel.
 To protect against electric shock, do not immerse or partially immerse cord, plugs or appliance in water or other liquid.
SAVE THESE INSTRUCTIONS.
THIS APPLIANCE IS FOR HOUSEHOLD USE ONLY.
POLARIZATION INSTRUCTIONS
![shock hazard]() This appliance has a polarized plug (one blade is wider than the other). To reduce the risk of electric shock, this plug is intended to fi t into a polarized outlet only one way. If the plug does not fi t fully into the outlet, reverse the plug. If it still does not fi t, contact a qualifi ed electrician. Do not attempt to modify the plug in any way.
This appliance has a polarized plug (one blade is wider than the other). To reduce the risk of electric shock, this plug is intended to fi t into a polarized outlet only one way. If the plug does not fi t fully into the outlet, reverse the plug. If it still does not fi t, contact a qualifi ed electrician. Do not attempt to modify the plug in any way.
SPECIAL CORD INSTRUCTIONS
- A short power-supply cord (or detachable power-supply cord) should be used to reduce the risk of becoming entangled in or tripping over a longer cord.
- Longer detachable power-supply cords or extension cords are available and may be used if care is exercised in their use.
- If a longer detachable power-supply cord or extension cord is used:
- The marked electrical rating of the cord set or extension cord should be at least as great as the electrical rating of the appliance; and
- The cord should be arranged so that it will not drape over the countertop or tabletop where it can be pulled on by children or tripped over unintentionally. If the appliance is of the grounded type, the extension cord should be a grounding-type 3-wire cord.


To reduce the risk of fire or electric shock, do not attempt to remove the outer cover. There are no user-serviceable parts inside. Repair should be done only by authorized service personnel.
Note: If the power supply cord is damaged, it should be replaced by qualified personnel.
DO NOT USE APPLIANCE FOR OTHER THAN INTENDED USE.
If you have any problems, contact the authorized after-sales service center.
Thank you for buying this appliance. Read the instructions in this leaflet carefully and keep them within reach. Any commercial use, inappropriate use or failure to comply with the instructions, the manufacturer accepts no responsibility and the warranty will not apply.
For your safety, this product conforms to all applicable standards and regulations (Electric Safety, Food Compliant Materials, Environment, ...).
Our company has an ongoing policy of research and development and may modify these products without prior notice.
- Only use parts or accessories provided with the appliance or bought from an Approved Service Center. Do not use them for other appliances or intentions.
- To avoid damaging your appliance, do not use fl ambé recipes with it at any time.
Prevention of accidents at home
- This appliance is not intended for use by persons (including children) with reduced physical, sensory or mental capabilities, or lack of experience and knowledge, unless they have been given supervision or instruction concerning use of the appliance by an adult responsible for their safety. Children should be supervised to ensure that they do not play with the appliance.
- Accessible surface temperatures can be high when the appliance is operating.
- Never touch the hot surfaces of the appliance, always use the handles.
- As this appliance is for household use only, it is not intended for use in the following applications and the warranty will not apply for:
- staff kitchen areas in shops, offi ces and other working environments
- farm houses
- by clients in hotels, motels and other non-residential type environments
- bed and breakfast type environments
- This appliance is not intended to function using an external time-switch or a separate remote control system.
- Do not use the appliance if:
- it has faulty or damaged power cord,
- the appliance has been dropped and shows visible signs of damage or malfunction.

Environment protection first!
 Your appliance contains valuable materials which can be recovered or recycled.
 Leave it at a local civic waste collection point.
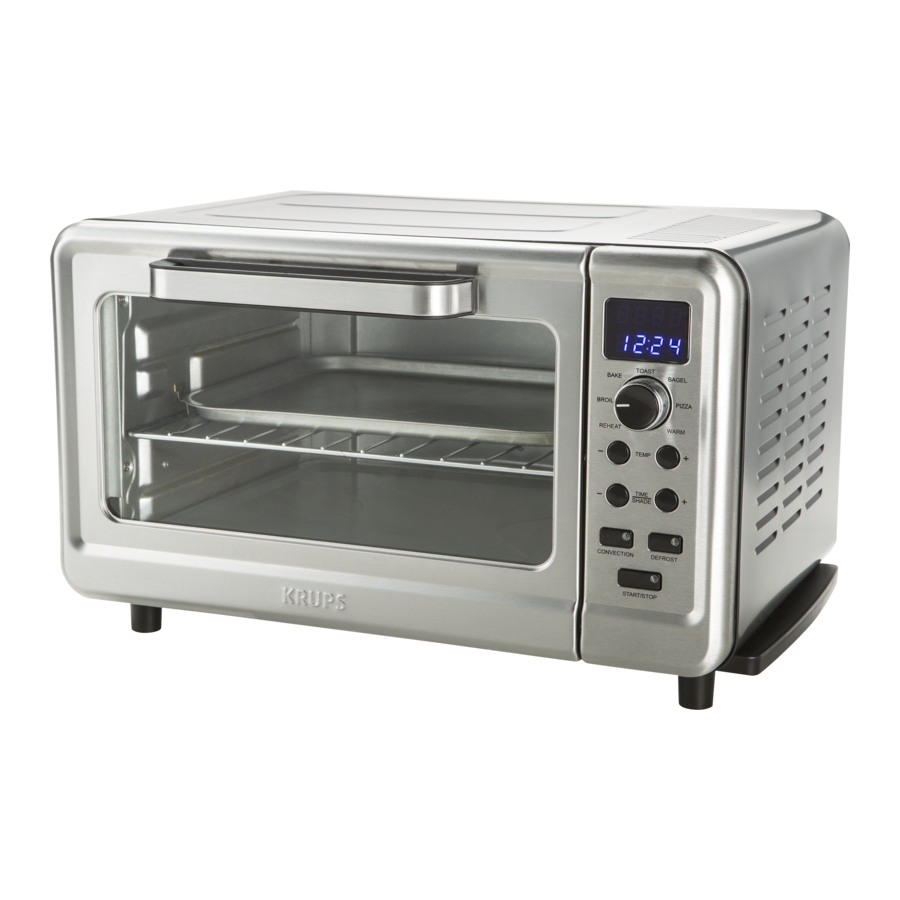
PARTS & ACCESSORIES

- Side Handles
- Door with viewing window
- Cool Touch Handle
- Controls
- Dual Display
- Temperature
- Time
- Function Knob – used to select desired cooking function
- Temp Buttons – used to set desired cooking temperature. Press and hold to scroll quickly; press and release to advance one digit at a time
- Time/Shade Buttons – used to set desired cooking time or toast shade. Press and hold to scroll quickly; press and release to advance one digit at a time
- Convection with indicator – used to select convection mode with the BAKE, BROIL OR PIZZA functions
- Defrost with indicator – used for toasting frozen bread with the TOAST or BAGEL functions
- Start/Stop with indicator – used to start and stop the cooking process
- Dual Display
- Baking Pan
- Oven Rack
- Crumb Tray
SET UP & FIRST USE
- Remove all packaging and stickers from your toaster oven.
![]()
- Remove all accessories and wash them in warm, soapy water. Dry thoroughly.
![]()
![]()
- Insert Crumb tray.
![]()
- Insert Crumb tray.
- Plug the cord into a standard 120V outlet.
![]()
- 12:00 default time will start to flash.
![]()
- Select the time of day
- Press the "-" Time button to select your desired hour
- Press the "+" Time button to select your desired minute
- To set the time, do nothing for 5 seconds or press any button (except "+" / "-")
- 12:00 default time will start to flash.


Note: to re-set the clock, press and hold the Time + and - buttons at the same time until the clock begins to flash.
- To remove any dust or residue remaining from manufacturing, run the Toaster Oven empty on BAKE for 15 minutes at max temperature.
![]()
![]()
![]()
![]()
![]()


Note: You may observe some smoke escaping from the oven during this time. This is normal and will disappear with use.
COOKING RACK POSITION
To ensure optimal performances make sure the rack is place at the right position We recommend you follow the table above according to the function selected. You might want to adjust the position of the rack depending on recipe, the amount and size of the food and your personal taste.
| Mode | Convection Option | Temp adjustment | Time /shade Adjustment | Cooking rack position | Defrost Option |
| BROIL | Y | Fixed at 450F | Adjustable | 3 | N |
| BAKE | Y | Default is 350F; Adjustable | Adjustable | 2 | N |
| TOAST | N | N/A | Adjustable 1-7 | 2 | Y |
| BAGEL | N | N/A | Adjustable 1-7 | 2 | Y |
| PIZZA | Y | Default is 400F; Adjustable | Adjustable | 2 | N |
| REHEAT | N | Default is 325F; Adjustable | Adjustable | 1 | N |
| WARM | N | Default is 175F; adjustable. | Adjustable | 1 | N |
Note: This table is for reference only.
BAKING, BROILING, PIZZA, REHEAT & WARM
- Select your cooking function with the Function knob. The default temperature & time will display.
- Select the Convection option by pressing the Convection button if desired. When the indicator of the button is lit the Convection option is selected.
Note: Convection cannot be turn off once cooking has started unless you reset your program.
- Adjust Time & Temperature if desired by using the button + and - accordingly.
- If no cooking time has been selected, the toaster oven will cook at the selected temperature for a maximum of 2 hours.
- Press the Start/Stop button to begin cooking.
- The oven will preheat.
- ":" will fl ash during preheating. You will be notifi ed that your oven has reached cooking temperature with a beep.
Note: Cooking time will countdown once preheat is complete.
Note: If you would like to change the Temperature & Time during operation, press the + or - button accordingly. Setting will be revised based on new selection.
- Once the cooking time has elapsed the Oven will beep.
- Press the Start/Stop button to stop cooking.
Note: The heater will remain on after the timer has reached 00:00, similar to a conventional oven. As a safety precaution, it automatically turn off after 2 hours.
TOASTING & BAGEL
- Select your desired function with the Function knob. The default toast shade will display.
- Select the Defrost option by pressing the defrost button if desired. When the indicator is lit the defrost option is selected and toasting time will be adjusted.
- Adjust Shade if desired.
- Press the Start/Stop button to begin toasting; the display will start to countdown.
- Once toasting is complete the Toaster Oven will beep and the heater will turn off.
RECIPE
Cheesy Garlic Bread
Prep Time: 5 minutes
Total Time: 20 minutes
Serves 6
- 10-inch section of soft French bread
- 2 tablespoons butter, softened
- 1 small garlic clove, grated
- 1/8 teaspoon freshly ground black pepper
- 3/4 cup finely shredded Italian cheese blend (3 oz)
Place oven rack in middle position. Set Function knob to Bake, set Temp to 375°F and Time to 10 minutes. Press Start/Stop button. Cut bread in half horizontally; place on work surface cut sides up. In small bowl, mix butter, garlic and pepper. Spread evenly over cut surfaces of bread. Place cut sides together and wrap loaf in foil. When beep sounds, place on oven rack in oven. When beep sounds, remove from oven. Press Start/Stop button. Unwrap bread and place on baking pan, cut sides up. Top evenly with cheese. Set Function knob to Toast and Time/Shade to #5. Place pan in oven. Press Start/Stop button. Toast until beep sounds or until cheese is melted and starting to brown. Cut in sections.
Mediterranean Pita Pizzas
Prep Time: 12 minutes
Total Time: 20 minutes Serves 3
- 3 soft pita breads (6-inch)
- 6 tablespoons hummus
- 1 tablespoon chopped fresh oregano
- 1 tablespoon chopped fresh mint
- 3 tablespoons thin slivers of red onion
- 3 tablespoons sliced pitted Kalamata olives
- 6 tablespoons crumbled feta cheese
- 1 to 2 teaspoons extra virgin olive oil
Place oven rack in middle position. Spread pitas evenly with hummus. Top with remaining ingredients except olive oil. Set Function knob to Pizza. Set Time to 7 minutes. Press Start/Stop button. When beep sounds, place pitas directly on rack. Bake until crisp and thoroughly heated. (Start checking doneness after 5 minutes.) Press Start/Stop button. If desired, drizzle with olive oil and garnish with additional fresh herbs. Cut in wedges to serve.
Blueberry Cream Scones
Prep Time: 15 minutes
Total Time: 30 minutes
Serves 6
- 1/4 cups all-purpose flour
- tablespoons plus 1/2 teaspoon sugar
- 1 1/2 teaspoons baking powder
- 1/2 teaspoon kosher salt
- tablespoons cold butter, cut in small pieces
- 1/2 teaspoon grated lemon peel
- 3/4 cup fresh blueberries
- 1/3 cup whipping cream
- egg
In medium bowl, mix flour, 2 tablespoons sugar, baking powder and salt until well blended. With pastry blender or 2 table knives, cut in butter until mixture is crumbly. Gently stir in lemon peel and blueberries. In medium bowl, whisk cream and egg until well blended. Pour all but 2 teaspoons of the mixture into dry ingredients; mix gently with fork just until ingredients are moistened. Bring together into a ball and let rest for 2 minutes.
Meanwhile, place oven rack in lower position. Set Function knob to Bake, select Convection option and set Temp to 375°F. Set Time to 15 minutes. Press Start/Stop button. Line baking tray with parchment paper. On floured work surface, gently knead dough 5 or 6 times. Pat into 7-inch circle. Cut in 6 wedges. Brush tops with reserved cream mixture and sprinkle with 1/2 teaspoon sugar. Place 1 inch apart on pan. When beep sounds, place in oven. Bake until golden brown and no longer doughy. (Start checking doneness after 13 minutes.) Press Start/Stop button. Cool slightly.
Broiled Salmon
Prep Time: 5 minutes
Total Time: 20 minutes
Serves 2
- 3/4 lb salmon fi llets, about 1 inch thick
- 2 tablespoons mayonnaise
- 1/2 teaspoon Dijon mustard
- 1/4 teaspoon dried dill weed
Lightly brush baking pan with vegetable oil. Place salmon skin side up on pan. Adjust oven rack to upper position. Place pan in oven. Set Function knob to Broil. Set Time to 6 minutes. Press Start/Stop button. When beep sounds, remove pan. Turn salmon over. Spread about 1/2 of mayonnaise mixture over top of salmon. Return to oven. Set Time to 8 minutes. Broil until top starts to bubble and brown, and fish flakes easily with a fork. (Start checking doneness after 6 minutes.) Serve with remaining sauce.
Note: Exact time will vary depending on thickness of fish.
CLEANING & MAINTENANCE

Do not clean your Toaster Oven while hot. Allow the unit to completely cool.
- Before cleaning, unplug the cord and wait for the Toaster Oven to cool completely.
![]()
![]()
- Clean the exterior of the toaster oven and door with a damp cloth and dry thoroughly. Do not use abrasive cleaners.
![]()
- To clean the inside of the oven, use a damp cloth and mild soap solution. Never use abrasive or corrosive products.
![]()
![]()
![]()
- Remove the crumb tray by sliding it out of the unit and discarding crumbs. (Fig.18)
![]()
- Wash the crumb tray, cooking rack and baking pan with warm soapy water. Dry thoroughly.
![]()
![]()


Any other servicing should be performed by an authorized service representative.

Documents / ResourcesDownload manual
Here you can download full pdf version of manual, it may contain additional safety instructions, warranty information, FCC rules, etc.
Download KRUPS OK505D51 - Convection Toaster Oven with Digital Controls Manual
Advertisement


Need help?
Do you have a question about the OK505D51 and is the answer not in the manual?
Questions and answers