Advertisement
Quick Links
Advertisement

Subscribe to Our Youtube Channel
Related Manuals for LIVING AND HOME MANICURE TABLE


Summary of Contents for LIVING AND HOME MANICURE TABLE
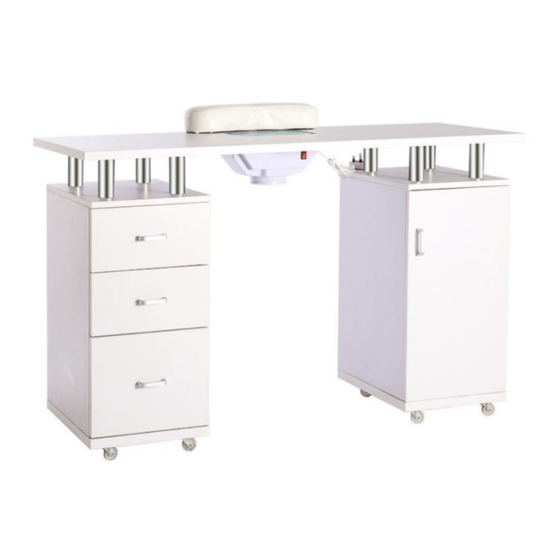
- Page 1 MANICURE TABLE...
- Page 2 ASSEMBLY INSTRUCTIONS Carefully unpack & identify each component before attempting to assemble, refer to the parts list. Please take care when assembling the unit and always set the parts on a clean, soft surface. Check screws, nuts and bolts periodically (or every 6 months). Tighten if ...
-
Page 3: Part List
PART LIST... - Page 4 COMPONENTS A-2: Side-board (x4) A-1: Table Top (x1) A-3: Bottom Drawing (x3) 549*385*15mm 1200*450*21mm 325*224*3mm B-1: Door-board (x1) B-2: Bottom-board (x2) B-3: Top-board (x2) 546*300*15mm 300*400*25mm 300*400*15mm B-6: Pad (x1) B-4: Layer-board (x2) B-5: Drawing Face (x2) 368*269*15mm 300*150*15mm B-8: Drawing Back-board (x2) B-9: Drawing Face (x1) B-7: Fan (x1) 215*90*15mm...
- Page 5 B-11: Drawing B-12: Drawing B-10: Drawing Side-board (x2) Back-board (x1) Side-board (x2) 330*90*15mm 215*120*15mm 330*120*15mm (2): Wheel (x8) B-13: Back-board (x2) (1) : Eccentric Fittings 549*270*15mm (x36+2) (3): Handle (x4) (4): Screw (x8) (5): Shim (x8) Φ4*20 (7) : Screw (x60) (8): Screw (x8) (6) : Screw (x12) Φ3.5*12...
-
Page 6: Installation
INSTALLATION Step 1 Attach the guides (9) to the side-boards (A-2) with screws (7) as shown. Step 2 Insert the eccentric fittings (1) to the shown positions of the side-boards (A-2). - Page 7 Step 3 Assemble the bottom-board (B-2), top-board (B-3), back-board (B-13) and two side-boards (A-2) together as shown in the picture. Step 4 Assemble the left bottom-board (B-2), top-board (B-3), back-board (B-13) and two side-boards (A-2) together as shown in the picture.
- Page 8 Step 5 Attach the wheels (2) to the bottom of the cabinet with screws (7). Step 6 Attach the table top (A-1) to two cabinets with cylinders (11), shims (5) and screws (8) as shown.
- Page 9 Step 7 Set the shelves height with layers (12). Slide two layer-boards (B-4) into the cabinet. Step 8 Attach two drawing side-boards (B-11) to the drawing face (B-5) with eccentric fittings (1), then slide the bottom drawing (A-3) along the slots as shown. Repeat this step for another time.
- Page 10 Step 9 Attach two drawing side-boards (B-10) to the drawing face (B-9) with eccentric fittings (1), then slide the bottom drawing (A-3) along the slots as shown. Step 10 Attach the handles (3) to the corresponding positions of the assembled part of step 9 with screws (4).
- Page 11 Step 11 Slide three drawers to the nail table as shown. Attach the handle (3) to the door- board (B-1) with screws (4). Attach door-board (B-1) to the cabinet with hinges (10) and screws (7) as shown. Step 12 Attach the fan (B-7) to the tabletop as shown.
-
Page 12: Cleaning And Care
CLEANING & CARE Wipe regularly with clean water and a damp, clean, soft white cloth. General cleaning can be done as needed with a mild detergent and water solution. Always rinse with clean water and dry. For heavy soiling, dampen a soft ... - Page 13 Living and Home A Home is for Living in For comfort and style update your living space. Browse contemporary and classic designs and find the perfect home to your look and the perfect spot to lounge. Put your feet up and sink into our stylish home decor.
Need help?
Do you have a question about the MANICURE TABLE and is the answer not in the manual?
Questions and answers