
Subscribe to Our Youtube Channel
Related Manuals for MD 900503


Summary of Contents for MD 900503
- Page 1 XHAUST NALYZER 900503 ODEL ANUAL 2300 P INNACLE 44087 WINSBURG 330.963.5400 330.425.3310 SALES MUSTANGDYNE MUSTANGDYNE October 19, 2020 Page 1 of 18...
-
Page 2: Document Revision Control
Document Revision Control EVEL ESCRIPTION NITIALS Release October 19, 2020 Mustang’s product(s) specifications and descriptions may be changed at any time based on engineering improvements or other reasons. It is Mustang’s practice to change part numbers when published specifications or features are changed, or when significant engineering changes are made. -
Page 3: Analyzer Features
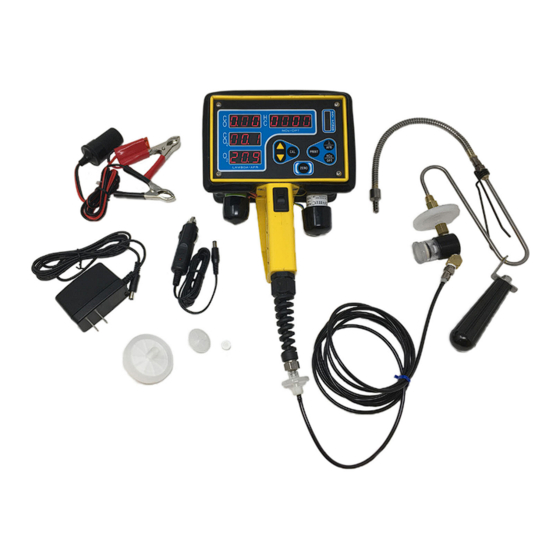
NTRODUCTION The 5 Gas Analyzer is a complete, ready-to-use gas analyzer. Just turn on the power switch, connect the hose and probe and push the ZERO button. When the Zero is done, the analyzer is ready to measure exhaust gas. There are three power options, a stainless-steel probe assembly, easy storing sample line, a built-in water trap and particulate filters to protect the analyzer. - Page 4 1.2 Unpacking Your 5 Gas Analyzer Contents: 5 Gas Analyzer Tailpipe Probe assembly including detachable flexible probe tip, S-Bend, primary particulate 50mm filter; handle and attached water trap assembly. Sample line assembly. Vehicle battery clip adapter with power socket. External power cord with vehicle power plug External power cord with wall mounted 12V supply.
-
Page 5: Principle Of Operation
RINCIPLE OF PERATION The analyzer draws a slip sample of exhaust gas using an internal pump. The sample gas is passed through infrared optics and also across chemical sensors. This combination of detection methods is used to determine the gas concentration of various exhaust gases. There are two distinct detection methods for exhaust gas analysis: non-dispersive infrared (NDIR) for CO, CO , and hydrocarbons, and chemical sensors for O... - Page 6 3.2 5 Gas Analyzer Front Panel The analyzer front panel tells you just what you want, and gives you just the controls that you need. It never gets in your way. CO Concentration Display The CO gas concentration is reported in hundredths of a volume percent within the range 0.00% to 9.99%.
- Page 7 3.3 Using Your 5 Gas Analyzer First choose the power source you wish to use. You can use the on board battery pack, cigarette lighter plug, the optional vehicle battery clip-on cable, or the wall-mounted supply. Turn on your analyzer by using the power on switch on the analyzer handle. ...
- Page 8 3.4 Lambda, AFR, and Combustion Efficiency To display Lambda, AFR, and Combustion Efficiency, enter the diagnostics screen by momentarily pressing the “ / AFR” button. The CO display changes to display ‘-L-‘, and the HC display now shows Lambda to 3 decimal places as X.XXX.
- Page 9 3.5 Displaying Combustion Efficiency Pressing the UP arrow changes the CO display to read ‘EFF’, and the HC display now shows Combustion Efficiency % to 2 decimal places as YY.YY. NOTE: Combustion Efficiency is a measure of the efficiency of the engine to burn fuel, and is calculated from the exhaust gas readings using fuel –...
- Page 10 3.6 Displaying NOx (Model 9005 Only) To display Oxides of Nitrogen (NO ), momentarily press the “NO / OPT” button when the analyzer is reading normal gas concentrations. The HC display will display decimal points in all locations, indicating that it is now displaying in ppm concentration.
-
Page 11: Zero Calibration
ALIBRATION 4.1 Zero Calibration Zero calibration is a fully automatic function that corrects measurement inaccuracies caused primarily by changes in temperature and empties condensed water from the water trap. To maintain the best accuracy, you should zero calibrate your analyzer each time it requests it by displaying dashes in the gas concentration displays or before each test. - Page 12 Press both the CAL and ZERO buttons (CAL button first). Hold them pressed for about one second. The CO display will read normally while the other displays read “CAL” as shown. (Use the CAL button to select CO as the active gas if the CO display is not reading values.) Then, simply use the UP and DOWN arrow buttons to adjust the gas concentration reading on the analyzer to match the calibration gas tank ‘tag’...
- Page 13 Save, Abort or Restore CAL Values: Save CAL values: When you have set and confirmed all gases, press both the CAL and ZERO buttons (CAL button first). Hold them pressed for about one second. (This is the same combination you used to enter the span calibration mode.) The new span calibration values are stored in power safe memory and you are ready for normal gas measurement.
-
Page 14: User Maintenance
AINTENANCE 5.1 Battery Power and Charging Display The battery power display serves two functions – display of remaining battery power, and status of the battery charge function. Whenever the analyzer is running, the top 9 segments of the display indicate charge level. A fully charged battery will light all 9 segments (7 green and 2 Red) –... - Page 15 5.3 User Maintenance Note: There are no user replaceable parts inside the Gas Analyzer housing. Additionally, opening the analyzer case will void your warranty – so it is not recommended to do so. “Lo’ on O This is an indication that the analyzer has detected that the O sensor display after a is low output.
- Page 16 ONSUMABLES PARE ARTS AND CCESSORIES The following parts and assemblies can be purchased from Mustang Dynamometer. UMBER ESCRIPTION 000815 Annual Use Filter Set, (typical 1 yr supply) 101196 50 mm Primary Particle Filter (6 pcs – 1 yr supply) 104156 Water Trap Filter (6 pcs - 2 yr supply) 108126 25 mm Filter, Analyzer (6 pcs –...
- Page 17 NALYZER PECIFICATIONS CO, HC, CO , NO Gases Measured Calculates Lambda, A/F Ratio, and Combustion Efficiency 0-10% 0-9,999 ppm Hexane and Propane 0.000 – 9.999% Methane 0-20% Reporting 0-25% Range: 0-5000 ppm Lambda: 0.500-2.000 7.50 – 30.0 Combustion Efficiency: 0.00 to 99.99% 0.01% 1 ppm (Hexane and Propane) 0.001% (Methane)
- Page 18 ECHNICAL UPPORT ARRANTY AND ERVICE Technical Support: Technical support is available from Mustang Dynamometer at the telephone numbers and email address below. Please feel free to make use of this service in case you have any questions. Warranty Service Policy: Your Gas Analyzer is covered by a one-year parts / workmanship warranty.
Need help?
Do you have a question about the 900503 and is the answer not in the manual?
Questions and answers