Table of Contents
Advertisement
Quick Links
Advertisement
Table of Contents

Related Manuals for Cooke & Lewis PBIWCB60EU


Summary of Contents for Cooke & Lewis PBIWCB60EU
- Page 1 5059340094182 PBIWCB60EU V11220 BX220IM...
-
Page 2: Table Of Contents
Contents Zawartość Contenido Contenu RO Cuprins Conteúdo Installation Installation Instalacja Instalare Instalación Instalação Utilisation Użytkowanie Utilizare Utilização Care and Maintenance Entretien et Maintenance Czyszczenie i konserwacja Îngrijire şi întreţinere Cuidados y Mantenimiento Cuidados e Manutenção... - Page 3 EN IMPORTANT - Please FR IMPORTANT - Lire PL WAŻNE - Przed read carefully the attentivement le użyciem proszę separate safety dokładnie zapoznać guide de sécurité guide before use. séparé avant się z instrukcją utilisation. bezpieczeństwa. RO IMPORTANT - Vă ES IMPORTANTE - Lea PT IMPORTANTE - rugăm să...
-
Page 4: Pl Es
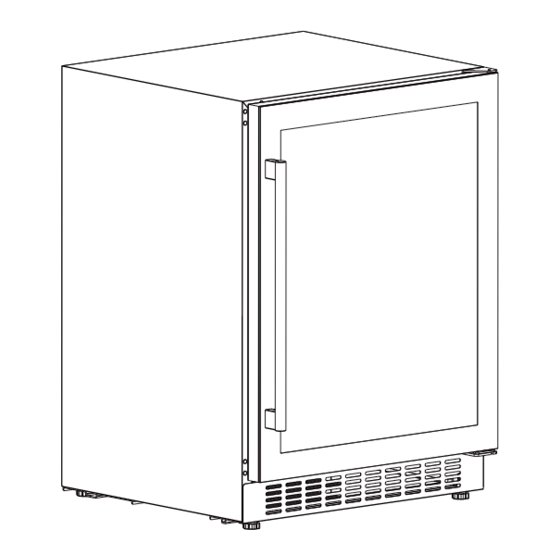
Product description Opis produktu Descripción del producto Description du produit RO Descrierea produsului Descrição do produto 1. Shelf / 2. Display panel / 3. Carbon filter / 4. Grill / 5. Adjustable legs (x4) / 6. Upper Hinge / 7. Door seal / 8. Handle / 9. Door / 10. Lower Hinge / 11. Door switch 1. - Page 5 Installation Instalacja Instalación Installation RO Instalare Instalação Positioning the appliance This appliance should be installed underneath the worktop between two base cabinets or at the end of a row. • Ensure the appliance is installed directly onto a flat even floor. •...
-
Page 6: Installation
Installation Instalacja Instalación Installation RO Instalare Instalação Ustawianie urządzenia Urządzenie należy zainstalować pod blatem roboczym między dwiema szafkami dolnymi lub na końcu rzędu. • Upewnić się, że urządzenie montowane bezpośrednio na płaskim, równym podłożu. • Nie montować urządzenia w szafce dolnej ani na innych meblach. •... - Page 7 Installation Instalacja Instalación Installation RO Instalare Instalação Posicionar o aparelho Este aparelho deve ser instalado por baixo da bancada, entre dois módulos baixos ou no fim de uma fila. • Certifique-se de que o aparelho está instalado diretamente num piso plano e uniforme.
- Page 8 Installation Instalacja Instalación Installation RO Instalare Instalação [01] [01] x 1 Height adjustment and adjusting the feet • Rotate the feet in an anti-clockwise direction to raise the height, and a clockwise direction to lower the height. • Carefully adjust each of the four feet in sequence to ensure the appliance is not tilted and unstable.
- Page 9 Installation Instalacja Instalación Installation RO Instalare Instalação Reglarea înălțimii și a picioarelor • Rotește picioarele în sens antiorar pentru a ridica aparatul și în sens orar pentru a-l coborî. • Reglează cu grijă fiecare dintre cele patru picioare, pentru a te asigura că aparatul nu este înclinat și instabil.
- Page 10 Installation Instalacja Instalación Installation RO Instalare Instalação [06] [02] [02] x 1 [06] x 2 Installation Of The Door Handle • Locate the two holes on the front of the door and carefully peel back the door seal from the frame directly behind. •...
-
Page 11: Instalación
Installation Instalacja Instalación Installation RO Instalare Instalação Montaż uchwytu drzwi • Zlokalizować dwa otwory z przodu drzwi i ostrożnie odkleić uszczelkę drzwi od ramy w miejscach dokładnie po drugiej stronie otworów. • Włożyć dwa wkręty [06] przez drzwi od tyłu i wyrównać uchwyt [02] z przodu. - Page 12 Installation Instalacja Instalación Installation RO Instalare Instalação Changing The Door This appliance has the door factory fitted on the right side of the carcass. To change the fitting to the left side, proceed as follows. • Tilt the appliance back slightly to gain access to the bottom hinge bracket. Do not exceed 45°...
- Page 13 Installation Instalacja Instalación Installation RO Instalare Instalação Zmiana kierunku otwierania drzwi Urządzenie jest fabrycznie wyposażone w drzwi zamontowane po prawej stronie korpusu. Aby zamocować po lewej stronie, należy wykonać następujące czynności. • Delikatnie odchylić urządzenie do tyłu, aby uzyskać dostęp do dolnego wspornika zawiasu.
- Page 14 Installation Instalacja Instalación Installation RO Instalare Instalação Remove the six screws securing the top and bottom brackets and keep to one side. Retirer les six vis de fixation des supports supérieur et inférieur et les mettre de côté. Wykręcić sześć wkrętów mocujących górny i dolny wspornik i odłożyć na bok.
- Page 15 Installation Instalacja Instalación Installation RO Instalare Instalação Carefully remove the six pins on the left side of the frame and swap them over to the right side where the hinges were mounted. Retirer avec précaution les six cache-trous situées sur le côté gauche de l’encadrement et les mettre du côté...
- Page 16 Installation Instalacja Instalación Installation RO Instalare Instalação [03] [03] x 1 [04] x 1 [04] Install the left hand top hinge [03] and left hand bottom hinge [04] using the saved screws. Installer la charnière supérieure gauche [03] et la charnière inférieure gauche [04] à...
- Page 17 Installation Instalacja Instalación Installation RO Instalare Instalação Remove the two small screws and door switch plate from the base of the door. Reattach them to the top of the door. Retirer les deux petites vis et la plaque pour l’interrupteur de porte de la base de la porte.
- Page 18 Installation Instalacja Instalación Installation RO Instalare Instalação Reattach the door by aligning the top hinge first and then push the bottom pin carefully into the bottom hinge before loosely fixing with the two screws. Ensure the door frame aligns with the carcass before finally tightening the two screws securely.
-
Page 19: Instalação
Installation Instalacja Instalación Installation RO Instalare Instalação Vuelva a colocar la puerta alineando primero la bisagra superior y, a continuación, presione el pasador inferior con cuidado en la bisagra inferior antes de fijarla sin apretar con los dos tornillos. Asegúrese de que el marco de la puerta está alineado con la carcasa antes de apretar los dos tornillos de forma segura. -
Page 20: Use
First use Cleaning the appliance • Before using the appliance for the first time, clean the inside with warm soapy water and a well wrung damp cloth. • Refer to the Care and Maintenance section at the end of this manual for further information. Locating the appliance •... - Page 21 IMPORTANT: If the door is left open for one minute, a warning alarm will sound; please close the door promptly. Capacity • Each shelf has a capacity of eight bottles when configured as shown. • The bottom compartment has a capacity of six bottles when configured as shown. (Based on a standard Bordeaux bottle size of 750 ml.) IMPORTANT: This configuration will alter significantly dependent upon the size and shape of the bottles in use.
-
Page 22: Utilisation
Utilisation Première utilisation Nettoyage de l’appareil • Avant d’utiliser l’appareil pour la première fois, nettoyer l’intérieur avec de l’eau chaude savonneuse et un chiffon humide bien essoré. • Pour plus d’informations, se reporter à la section Entretien et maintenance à la fin de cette notice. Emplacement de l’appareil •... - Page 23 Utilisation • Appuyer simultanément sur ces deux touches pendant trois secondes pour verrouiller le panneau de commande. Sécurité enfant • Répéter l’opération pour déverrouiller le panneau de commande. • Appuyer simultanément sur les deux touches pendant trois secondes pour modifier l’échelle de température de Celsius à Échelle de Fahrenheit.
- Page 24 Utilisation Użytkowanie Températures recommandées Il s’agit d’un guide général pour les types de vin courants. Régler la température selon les goûts personnels. Type de vin Température de stockage Température de service Rouge corsé 17-19 °C / 63-66 °F 18 °C / 64 °F Rouge léger 12-16 °C / 54-61 °F 15 °C / 59 °F...
-
Page 25: Użytkowanie
Użytkowanie • Nacisnąć przycisk, aby zwiększyć temperaturę. Wyświetlacz będzie migać przez kilka sekund przed wyświetleniem bieżącej Zwiększanie temperatury. temperatury • Ponownie nacisnąć przycisk, aby wyświetlić zaprogramowaną temperaturę. • Nacisnąć przycisk, aby zmniejszyć temperaturę. Wyświetlacz będzie migać przez kilka sekund przed wyświetleniem bieżącej Zmniejszanie temperatury. -
Page 26: Utilizare
Użytkowanie RO Utilizare Montaż cokołu szafkowego W przypadku montażu cokołu w podstawie szafek kuchennych nie wolno blokować kratki wentylacyjnej w dole urządzenia. Zakończyć cokół po obu stronach kratki lub zamontować w cokole nową kratkę o powierzchni takiej samej, jak kratka w urządzeniu. OSTRZEŻENIE: Nie blokować... - Page 27 RO Utilizare • Apasă această tastă pentru a selecta între compartimentul superior și inferior. Temperatura pentru fiecare compartiment va clipi pe afișaj. • IMPORTANT: Se recomandă setarea temperaturii mai întâi în compartimentul superior, nu în cel inferior, deoarece aceasta va Selector limita intervalul compartimentului inferior.
- Page 28 RO Utilizare Montarea unei plinte pentru dulapuri Dacă montezi o plintă la baza dulapurilor de bucătărie, nu bloca grilajul de ventilație din partea inferioară a aparatului. Pune plinta doar de fiecare parte a grilajului sau montează un nou grilaj în plintă, cu aceeași suprafață ca aparatul.
-
Page 29: Uso
Panel de control • Mantenga pulsado el botón durante tres segundos para Encendido/ apagado encender o apagar el aparato. • La luz se enciende automáticamente cuando se abre la puerta y se apaga cuando se cierra. Esto se puede cambiar para que permanezca encendida cuando la puerta está... - Page 30 Utilização IMPORTANTE: Esta configuración variará considerablemente en función del tamaño y la forma de las botellas que se utilicen. Asegúrese de que todos los estantes se desplazan libremente y de que la puerta se cierra por completo para garantizar el correcto funcionamiento del aparato. IMPORTANTE: No utilice botellas que sobresalgan de la abertura para evitar dañar el cristal de la puerta al cerrarla.
-
Page 31: Utilização
Utilização • Este aparelho destina-se apenas a ser utilizado em instalação livre e deve ser colocado entre, ou após, uma sequência de módulos de cozinha. Não o encastre num módulo de cozinha. • Quando o aparelho estiver instalado e nivelado na sua localização final, aguarde pelo menos trinta minutos antes de ligar a corrente elétrica. - Page 32 Utilização Capacidade • Cada prateleira tem capacidade para oito garrafas quando configurada conforme apresentado. • O compartimento inferior tem capacidade para seis garrafas quando configurado conforme apresentado. (Com base no tamanho padrão de uma garrafa Bordeaux de 750 ml.) IMPORTANTE: Esta configuração irá alterar-se significativamente em função do tamanho e da forma das garrafas em utilização.
-
Page 33: Care And Maintenance
Care and Maintenance Cleaning • Disconnect the appliance from the power supply before cleaning. • Remove the shelves as shown. • Clean the cavity with a well wrung cloth and warm soapy water. • Do not use abrasives, solvents, acid or alkaline cleaners. - Page 34 Care and Maintenance Carbon filter • To remove the carbon filter, twist it slightly anti-clockwise and pull. • To replace it, align the lugs on the rear of the filter and twist it slightly to lock in place. • The filter should be replaced every 6-12 months and contact the Customer Helpline for order details. Moving the appliance •...
-
Page 35: Entretien Et Maintenance
Entretien et Maintenance Nettoyage • Débrancher l’appareil de la prise secteur avant de le nettoyer. • Retirer les clayettes comme illustré. • Nettoyer l’intérieur avec un chiffon bien essoré et de l’eau chaude savonneuse. • Ne pas utiliser d’abrasifs, de solvants, de nettoyants acides ou alcalins. - Page 36 Entretien et Maintenance Filtre à charbon • Pour retirer le filtre à charbon, le tourner légèrement dans le sens inverse des aiguilles d’une montre et tirer. • Pour le remplacer, aligner les languettes à l’arrière du filtre et le tourner légèrement pour le verrouiller. •...
-
Page 37: Czyszczenie I Konserwacja
Czyszczenie i konserwacja Czyszczenie • Przed przystąpieniem do czyszczenia należy odłączyć urządzenie od zasilania. • Wyjąć półki w sposób pokazany na rysunku. • Wyczyścić wnękę za pomocą dobrze wykręconej szmatki i ciepłej wody z mydłem. • Nie używać środków ściernych, rozpuszczalników ani kwasowych bądź alkalicznych środków czyszczących. - Page 38 Czyszczenie i konserwacja Filtr węglowy • Aby wyjąć filtr węglowy, należy go lekko obrócić w lewo i pociągnąć. • Aby zamontować, należy wyrównać występy w tylnej części filtra i lekko obrócić, aby zablokować. • Filtr należy wymieniać co 6-12 miesięcy. W celu uzyskania szczegółowych informacji na temat zamówienia należy skontaktować...
-
Page 39: Îngrijire Şi Întreţinere
RO Îngrijire şi întreţinere Curățare • Deconectează aparatul de la sursa de alimentare înainte de a-l curăța. • Scoate rafturile după cum arată imaginea. • Curăță interiorul cu o cârpă bine stoarsă și apă caldă cu săpun. • Nu utiliza abrazivi, solvenți, soluții de curățare pe bază de acid sau alcaline. - Page 40 RO Îngrijire şi întreţinere Filtru din carbon • Pentru a demonta filtrul din carbon, răsucește-l ușor în sens antiorar și trage. • Pentru a-l înlocui, aliniază urechile de pe partea din spate a filtrului și răsucește-l ușor pentru a-l bloca la loc.
-
Page 41: Cuidados Y Mantenimiento
Cuidados y Mantenimiento Limpieza • Desconecte el aparato de la fuente de alimentación antes de limpiarlo. • Retire los estantes como se muestra. • Limpie la cavidad con un paño bien escurrido y agua jabonosa templada. • No utilice limpiadores abrasivos, disolventes, ácidos ni alcalinos. - Page 42 Cuidados y Mantenimiento Filtro de carbono • Para extraer el filtro de carbón, gírelo ligeramente en sentido contrario a las agujas del reloj y tire de él. • Para reemplazarlo, alinee las lengüetas de la parte posterior del filtro y gírelo ligeramente para fijarlo en su lugar.
-
Page 43: Cuidados E Manutenção
Cuidados e Manutenção Limpeza • Desligue o aparelho da fonte de alimentação antes de limpar. • Retire as prateleiras, conforme ilustrado. • Limpe o compartimento com um pano bem espremido e água quente com sabão. • Não utilize detergentes abrasivos, solventes, ácidos ou alcalinos. - Page 44 Cuidados e Manutenção Filtro de carbono • Para retirar o filtro de carbono, rode-o ligeiramente para a esquerda e puxe-o. • Para o colocar novamente no lugar, alinhe as patilhas na parte traseira do filtro e rode-o ligeiramente para que fique bloqueado no devido lugar. •...
- Page 45 Addresses Fabricant • Producent • Producător • RO www.bricodepot.ro Fabricante: Asistență clienți (apel gratuit): EU Manufacturer: 0800 895 099 romania@kingfisherservice.com Kingfisher International Products B. V . Pentru a consulta manualele de instrucţiuni Rapenburgerstraat 175E online, vizitaţi www.kingfisher.com/products 1011 VM Amsterdam ES www.bricodepot.es The Netherlands Línea de atención al cliente (número gratuito):...
Need help?
Do you have a question about the PBIWCB60EU and is the answer not in the manual?
Questions and answers