Advertisement
Quick Links
Advertisement

Subscribe to Our Youtube Channel
Related Manuals for Sim-Lab GRID DDU5


Summary of Contents for Sim-Lab GRID DDU5
- Page 1 INSTRUCTION MANUAL GRID DDU5 VERSION 1.2 Last updated: 19-06-2023...
-
Page 2: Before You Start
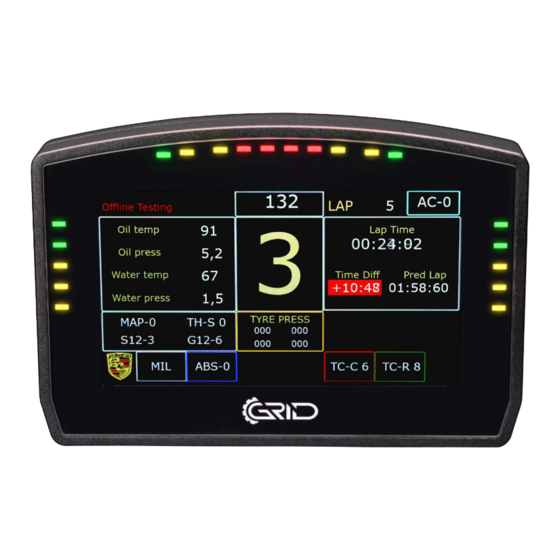
BEFORE YOU START: Thank you for your purchase. In this manual we will provide you with the means to get started using your new dash! GRID DDU5 Features: 5” 854x480 VOCORE LCD 20 full RGB leds Up to 30 FPS... - Page 3 Mounting the dash To be able to mount the dash on the hardware of your choice, we provide several mounting brackets. Which ones you have received may depend on your purchase and may be different from the following ones we show. However, mounting is all more of the same.
- Page 4 OSW/SC1/VRS Remove the existing upper bolts which hold the motor in place. Re-use these bolts and washers to fix the mounting bracket to the front mount. 4 17...
- Page 5 Fanatec DD1/DD2 Locate the accessory mounting holes on your Fanatec hardware and use the two bolts (A4) and washers (A6) from our supplied hardware kit. 5 17...
-
Page 6: Installing Drivers
Installing drivers To make the display part of the dash functional, specific drivers are needed. Drivers can be downloaded from the product page. Vocore drivers download: Installation To install the display drivers, run the downloaded package and specify the location where to install the drivers: Press ‘Next’. - Page 7 Specify the name of the start menu folder: Press ‘Next’. Review the settings before installation: Press ‘Install’. 7 17...
- Page 8 The drivers will install now. Sometimes this can take longer than expected. This usually means a system restore point is being made and should not hinder installation. If it does, unplug the USB cable to the Dash in case it is connected and try again. Make sure you have administrator rights on your system.
- Page 9 RaceDirector installation To control the dash, RaceDirector can be used. This is a simple but effective piece of software, purpose built for our own hardware. Download the lastest version of RaceDirector from: http://www.grid-engineering.com/srd-setup Please review the manual found at: http://grid-engineering.com/srd-manual For more advanced users, SimHub can also be used, but this manual will focus on our own software.
- Page 10 Specify the location where to install the software: Press ‘Next’. Make sure all options are checked: Press ‘Install’. 10 17...
- Page 11 RaceDirector will be installed: Press ‘Finish’. 11 17...
- Page 12 RaceDirector configuration The very first time launching RaceDirector, you will probably be greeted with an empty screen and booting might also take a bit longer than you would expect. Don’t worry, this is normal, some additional files might be downloaded/updated. To keep things visually clear and clutter free, we only want to show the options you actually need.
- Page 13 Firmware We recommend to make sure your device has been flashed with the latest firmware. If you do NOT see orange the ‘Flash device’ (1) button, you are good to go. If you do see this button, press it and follow instructions on screen. 13 17...
-
Page 14: Configuration And Settings
Configuration and settings Almost all of the options found here speak for themselves, though for the sake of being complete, we will go over them on by one. For more detailed information about the functioanlity we offer within RaceDirector, please read the RaceDirector manual. - Page 15 - ‘Test LEDs’ (4) This opens up a pop-up window where you use test input to see what the LEDs do using the currently loaded profile. - ‘Select dash’ (5) This allows you to select a standard dash for a given car. We do not support all cars in every sim.
- Page 16 - ‘Next page’ (11) Cycle to the next page of the loaded dash. Select a controller of your choice, press ‘Select button’ and you have about 10 seconds to press the button you want to use. - ‘Previous page’ (12) Cycle to the previous page of the loaded dash, works like described above.
-
Page 17: Bill Of Materials
If you still have some questions regarding assembly of this product or about the manual itself, please refer to our support department. They can be reached at: support@sim-lab.eu Alternatively, we now have Discord servers where you can hang out or ask for help.
Need help?
Do you have a question about the GRID DDU5 and is the answer not in the manual?
Questions and answers