Advertisement
Table of Contents
- 1 Table of Contents
- 2 Introduction
- 3 Camera
- 4 Monitor
- 5 Installation Guide Bench Test
- 6 Installation Guide in Vehicle
- 7 Product Specification
- 8 Whats in the PACKAGE & PART LIST
- 9 Quick Installation Steps
- 10 Pairing
- 11 Positioning
- 12 Troubleshooting
- 13 Faq
- 14 Warranty Card&Customer Support Contacts
- Download this manual
Advertisement
Table of Contents

Subscribe to Our Youtube Channel
Related Manuals for URVOLAX UR61X

Summary of Contents for URVOLAX UR61X
- Page 1 1080P HD Digital Wireless Backup Camera Systems Product Manual / Installation Instructions URVOLAX UR61X Please read this manual thoroughly before operating the device, Keep it for future reference. Please Do Bench Test before Installation in Vehicle...
-
Page 2: Table Of Contents
Contents 1. Introduction..................1 2. Camera....................2 3. Monitor...................3-5 4.Installation Guide Bench Test............6 5.Installation Guide in Vehicle.............7-8 6. Product Specification..............9 7. What’s in the PACKAGE & PART LIST......10-11 8. Quick Installation Steps...............12 9. Pairing....................13 10. Positioning..................14 11. Troubleshooting.................15 12. FAQ....................16-17 13. Warranty Card&Customer Support Contacts....18... -
Page 3: Introduction
1.Introduction Thanks for purchasing our URVOLAX Digital Wireless Backup Camera Systems! With this manual, you will be able to properly install and operate the unit. Digital Wireless Connection - the product adopts latest car point to point wireless connection technology. -
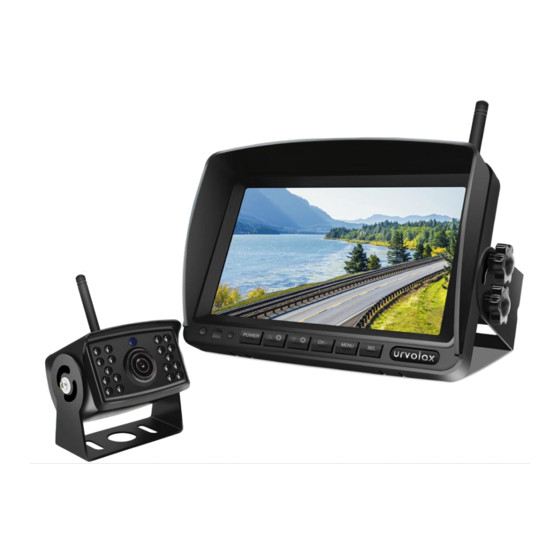
Page 4: Camera
2.Camera Antenna Rain-Cover Daylight Sensor High Definition Lens 18 pcs IR LEDs Mount Bracket Power Port Tips: 1)The camera's infrared light will start automatically in low brightness. 2)You need to connect the power cable to the camera’s power port to power on the camera. -
Page 5: Monitor
3.Monitor Bu�on Func�on POWER Turn the Monitor ON/OFF Adjust se�ngs Camera Switch MENU PAIRING, PICTURE, MIR-FLIP, SYSTEM Confirm Key, Parking Line ON/OFF Long Press for Parking Line Adjustment... - Page 6 ※ MENU ■ PAIRING There will be 25 seconds for pairing, please make sure both the monitor and camera have power. ■ PICTURE Adjust the monitor BRIGHTNESS,CONTRAST,HUE ■ MIR-FLIP Adjust the image for viewing ■ SYSTEM Support different language, default language is English. DELAYTIME System se�ng Only, will not influence the image transmission, please no need to adjust this value.
- Page 7 ※ Gridline Adjustment "SEL" to turn ON/OFF Long Press "SEL" to "Ver�cal" and adjust by "SEL" to "Horizontal" and adjust by "SEL" to "Width" and adjust by...
-
Page 8: Installation Guide Bench Test
4.Installation Guide Bench Test Bench Test is A MUST before Installation . Please use the included connector to do Bench Test √ TEST OK with Display Make sure Positive/ Negative is tighten connected with plug into cigar screw socket to get power !... -
Page 9: Installation Guide In Vehicle
5.Installation Guide in Vehicle Install the antenna in the camera Red to your car’s power + :Like battery or ACC Connect the power Black to GND :Any cable to the black metal from your car port of the camera Supply power by cigarette or wires as you choose This port to your car... - Page 10 Camera Connection: Step 1: Choose the camera locations. Step 2: Drill a 12mm Diameter Cable Hole and Secure the Camera With Two Screws.(Accessory Includes Screws) Step 3: Locate the reversing lights or running lights wiring on your vehicle.You may need to remove the interior panel in order to locate.Connect the red wire of the power cable to the positive and the black wire to the ground.
-
Page 11: Product Specification
6.Product Specification Monitor Specification •Supports both NTSC and PAL video systems •Grid lines (can be switched on/off) •Resolution: 1920(H)×1080(V) •Contrast: 800:1 •Brightness: 500cd/m2 •Power Supply: DC 9-36V •Power consumption: <500mA •Operating temperature: -20°C ~ 70°C •Storage temperature: -30°C ~ 80°C Camera Specification •Image Sensor:1/2.7 inch Starlight HD •Picture Elements:250,000 pixels... -
Page 12: Whats In The Package & Part List
7.Whats in the PACKAGE & PART LIST... - Page 13 PART LIST PICTURE FUNCTION or LOCATION In PACKAGE ①Monitor For Rearview Display ②Backup Camera Rear View Camera at Vehicle Tail ③Power Cable for To connect the ②Backup Camera to car Backup Camera power To connect the ①Monitor to ACC power,no ④Power Cable for need to use this cable if getting power from Monitor...
-
Page 14: Quick Installation Steps
8.Quick Installation Steps ❶ Install Removable Sunshade with Monitor ❷ Op�onⅠfor Monitor si�ng, with U-Bracket (Part⑥) ❸ Op�onⅡfor Monitor si�ng, with Swivel Head Mount(Part⑧) (1)Rotate and loosen① Then slide it into the Monitor, and �ghten① (2)Tighten②to hold the monitor firmly. (3)Rotate②... -
Page 15: Pairing
9.Pairing 1.Press "MENU" to enter "PAIRING" 2.Please make sure the camera is receiving power when pairing. “+” Reversing light ACC/Fuse/radio“+” Ground “-” Ground “-” Included Camera for REAR view SECOND Camera for FRONT/SIDE view (Not included) Note: the system has been paired successfully at the factory, and if you need to rematch, refer to steps 1 and 2 above. -
Page 16: Positioning
10.Positioning In order to get a better horizons and stronger signal, please refer to the above position to install the camera. -
Page 17: Troubleshooting
11.Troubleshooting Problem Solution - Do Bench Test before Installation in Car Start the car engine. Press Screen power button to turn on. Monitor No Power Check if wiring is well connected to power. Start the car engine. Camera No Power Check if wiring is well connected to power. -
Page 18: Faq
12.FAQ 1.Is the camera water resistant? The camera is IP69K Rating waterproof. It can be placed outside and can be cleaned using a pressure washer. 2.Can this be used as a full time camera on the rear of a travel trailer for better vision of surrounding vehicles? Yes, this wireless backup camera can work as a full time camera on the rear of the travel or surrounding , this just based on your install method , camera need to get... - Page 19 4.What is the difference between digital signal and analog signal? Respective characteristics of them: 1)Analog signal: a, Will be interfered from other electronic product signals, flashing image, the receiver even will receive the signal from other transmitter; b, Low price is its biggest advantage; c, Has a long time and high visibility in the filed of car reversing.
-
Page 20: Warranty Card&Customer Support Contacts
Please scan the QR code above to activate the 1-year warranty within 2 WEEKS upon product receipt. Should you have any general or technical questions about this product, please feel free to contact us as following: CUSTOMER SUPPORT service03@urvolax.cn service02@urvolax.cn Email: Company TEL:(0086)769 2198 6525...
Need help?
Do you have a question about the UR61X and is the answer not in the manual?
Questions and answers